background image

23

User Guide


Predia Flex360

4. Setup and Connection

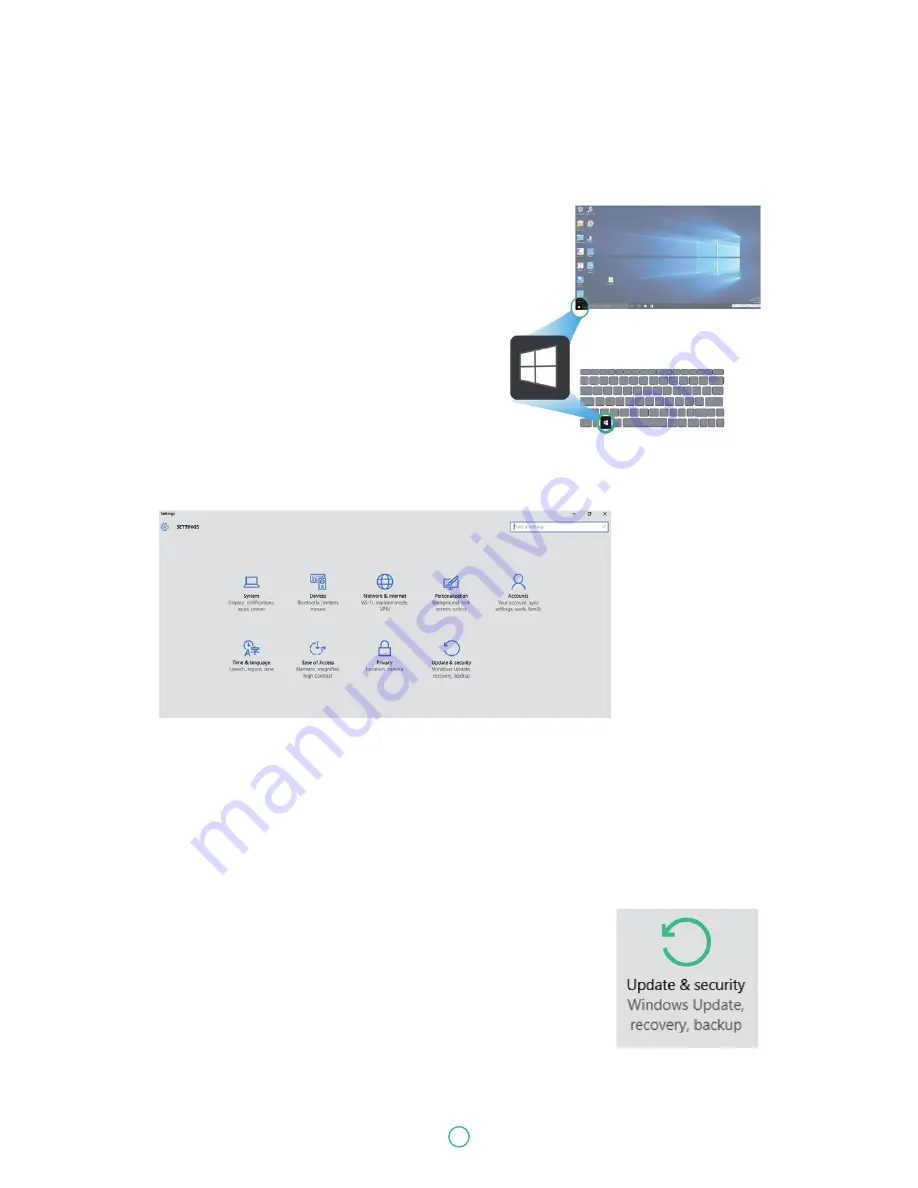
Settings screen

To access to the Settings screen:

1.  Click the Windows icon in the low-left corner of 

the Desktop. Or, press on the Windows key in 
the keyboard.

2. Select <Settings>.

This will open the Settings screen, as shown below

Windows Activation

To use all features of your Windows laptop, you may need to activate your Windows system.
Follow the following steps to register and activate your Windows.

1. Open the Start menu and click <Settings >

2. Click <Update & security>

3. Select <Activate>.

4. Follow the instructions to activate your windows.

Содержание FLEX360

Страница 1: ...www predia nl Predia Flex360 User Guide...

Страница 2: ...ce with the instruc tions may cause harmful interference to radio communications However there is no guarantee that interference will not occur in a particular installation If this equipment does caus...

Страница 3: ...met pas de bruits radio lectriques d passant les limites applicables aux appareils num riques de la classe B prescrites dans le R glement sur le broullage radio lectrique dict par le minist re des Com...

Страница 4: ...s that this product including battery must not be disposed of with household waste It is your responsibility to hand it over to a designated collection point for the recycling of waste electrical and...

Страница 5: ...adapter should not be handled by the children Emphasize to students that this device is an educational tool and not a toy The computer power supply battery pack or power cord should not be dropped cru...

Страница 6: ...ect sunlight Do not expose to rain or moisture Do not place heavy objects to add heavy pressure on the computer Do not drop the computer Caution Risk of explosion if battery is replaced by an incorrec...

Страница 7: ...ations 17 Basic touchscreen operations 18 3 Windows Interface 19 Desktop and virtual desktop experience 19 Taskbar 20 Start menu 20 Search box Cortana 21 App shortcuts area 22 Notification area 22 4 S...

Страница 8: ...card 26 Connecting an External Device 27 Connecting to the USB port 27 Connecting to the HDMI port 27 5 Battery 28 Charging your battery 28 Inspecting your battery status 29 6 Windows Help and Trouble...

Страница 9: ...ackage contents Carefully unpack your box and take out the items listed below If any of the items are missing or damaged please contact your dealer immediately 1 Getting to know your computer One lapt...

Страница 10: ...phone Mainly for sound and speech recording 3 Touchscreen The main display of your laptop and a see touch device You can look at it and also touch it with your fingers to control it 4 Windows key Pres...

Страница 11: ...st the provided stylus 3 USB 2 0 port Plug your USB devices here 4 Power button Press it to power on off your laptop 5 Kensington lock slot You can attach a Kensington lock here to attach a cable from...

Страница 12: ...port Plug your RJ 45 network cable to connect your laptop to a wired network 4 USB 3 0 port Plug your USB devices here 5 HDMI port Plug your HDMI capable monitor here 6 Micro SD card slot Plug your m...

Страница 13: ...vel Switches display output between your display external monitor if connected and both Decreases the display brightness Play or Pause Push here to talk to Cortana if available F1 F6 F2 F7 F3 F4 F5 F8...

Страница 14: ...l different ways Opening the device as a standard laptop gives you access to the keyboard and touchpad while folding the keyboard behind the screen turns it into a tablet You also can prop the noteboo...

Страница 15: ...power button normally 1 to 2 seconds You shall see the power indicator on the button lights up in blue 2 Using your computer Powering on for the first time The laptop will require you to do the initia...

Страница 16: ...rd 2 In the Start menu click Power option as shown on the right 3 Select Shut down from the power option menu as shown on the right Putting your computer into sleep mode When you will be away from you...

Страница 17: ...works like a traditional mouse With it you can move the cursor and perform left click right click double click actions However the actual available actions are application dependent Action name Expla...

Страница 18: ...a left click with a mouse Double tap Slightly press twice with your finger to select an item Press and hold Press and leave your finger on an item This brings up detailed information or opens a menu...

Страница 19: ...experience The Desktop screen is as shown below and natively provides virtual desktop feature To launch the feature you can click the app icon as shown on the left or just press Window key and TAB ke...

Страница 20: ...menu Search box App shortcuts area Notification area Start menu To open the Start menu you can either click on the windows icon which is also known as Start button located at the left end of the task...

Страница 21: ...ow will pop out as shown below After you setup the Cortana settings the search box will look like This is the Cortana icon Cortana is a new virtual assistant built into your Windows 10 Click here to f...

Страница 22: ...right part of the taskbar holds several icons that show you the status of your laptop as shown below This is an area called Notification Area where Click here to show more hidden status icons Shows yo...

Страница 23: ...in the keyboard 2 Select Settings This will open the Settings screen as shown below Windows Activation To use all features of your Windows laptop you may need to activate your Windows system Follow t...

Страница 24: ...a Microsoft account instead 4 Follow the instruction to register your account information Replacing Desktop with Start screen If you are more familiar with the interface similar to the Start screen i...

Страница 25: ...an app 1 Right click the app that you want to remove from your Start menu or taskbar 2 Click Unpin from Start or Unpin from taskbar to remove it from your Start menu or taskbar Wireless LAN Enabling w...

Страница 26: ...ra digital camcorder MP3 etc To insert your micro SD card 1 Insert the micro SD card into the card slot as shown below 2 Follow the message on the screen and choose to open and view files 3 A Windows...

Страница 27: ...a USB storage device make sure you click the Safely Remove Hardware icon as shown on the left in the notification area of the taskbar to remove the device before disconnecting Connecting to the HDMI p...

Страница 28: ...ee the battery indicator lights up in orange 4 When the battery is fully charged the battery indicator will turn into blue While system is off it takes around 5 hours to fully charge the battery After...

Страница 29: ...charged Battery is starting to drain Battery is about to completely drain and you should using your computer and charge it at once Battery is being charged A battery is an expendable supply so when u...

Страница 30: ...t need help from your resel ler or your service provider When you observe a problem stop operation immediately because taking further action might re sult in data loss or damage Take a note of what th...

Страница 31: ...conds to force the power off and power it on again If these items are properly set and the screen remains blank have the computer serviced Your laptop is in its sleep mode Do one of the following to r...

Страница 32: ...set The monitor type is correct Are the operating system or programs installed correctly If they are installed and configured correctly have the computer serviced Make sure that The Mute function is o...

Страница 33: ...5400rpm 320GB 500GB SSD 128GB 307 x 206 5 x 25 9mm 1 56 kg AW NB177NF Wi Fi 802 11 B G N 2 4GHz Bluetooth 4 0 LE AW CM217 Wi Fi 802 11 a b g n ac Bluetooth 4 0 LE Miracast support TFT Color LCD LED B...

Страница 34: ...D Card slot 1 x combo Audio jack Speaker Build in 2 Speakers 1 5 W Microphone one digital microphone Default English Spanish Portuguese Arabic Turkish Russian Simplified Chinese Thai Greek Hungarian T...

Страница 35: ...TTE UL CB CCC CEL WEEE RoHS Restriction of Hazardous Substances EU directive 2011 65 EU HDMI 1 4a UL 696 CPSIA Vibration test MIL STD 810F EN 60068 Drop test MIL STD 810F GB T4857 70 cm Acoustic test...

Отзывы: