background image

Product Features 

17


Selecting a U.S. Standard or Metric Display 

The equipment can display measurements in either Metric or 
U.S. Standard. The default factory setting is U.S. Standard. 

To change the display measurement: 

1.


At the 

S E L E C T   U N I T S

 prompt, press 

OK.


Use the navigational arrow keys to select a unit of 
measure (

U S

 or 

M E T R I C

). 

2.


Press 

OK

 to accept the displayed setting and move to the 

next feature.   


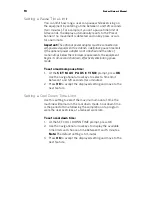
Setting a Workout Session Time Limit 

You can limit how long a user can exercise on the equipment. 
For example, if you set the time limit to 20 minutes, users can 
only enter a session time between 1 and 20 minutes. 

Note: 

The automatic cool down period is appended to the end 

of any time-based program, so adjust the time limit 
accordingly. 

To set a maximum workout time: 

1.


At the 

S E T   M A X   W O R K O U T   T I M E

 prompt, press 

OK

. Use the navigational arrow keys to change the 

displayed time limit. 

Note: 

When you press and hold a navigational arrow key, 

the number increments by five, for example, 1, 5, 10, 15, 
20. When you tap an arrow key, the number increments 
by one. 

2.


When you have selected a maximum workout time, press 

OK

 to accept the displayed setting and move to the next 

feature. 

You can also let a user exercise indefinitely by selecting 

N O  

L I M I T

. If you choose the 

N O   L I M I T  

setting, you will 

need to provide the following instructions to your users. 

To exercise without a time limit: 

1.


Select a program. The workout time appears in the 
display. 

2.


On the number keypad, type 

240

.  

3.


Press the 

UP

 arrow key to display 

N O   L I M I T

, and 

press 

OK

The exercise session times available are between 1 and 
240 minutes. 


Содержание UBK 815

Страница 1: ...Assembling and Maintaining the UBK 815 Upright Exercise Bike ...

Страница 2: ......

Страница 3: ...Assembling and Maintaining the UBK 815 Upright Exercise Bike ...

Страница 4: ...ectual Property Notice Precor is widely recognized for its innovative award winning designs of exercise equipment Precor aggressively seeks U S and foreign patents for both the mechanical construction and the visual aspects of its product design Any party contemplating the use of Precor product designs is hereby forewarned that Precor considers the unauthorized appropriation of its proprietary rig...

Страница 5: ...conseillé de subir un examen médical complet avant d entreprendre tout programme d exercise Si vous avez des étourdissements ou des faiblesses arrêtez les exercices immédiatement y Do not allow children or people unfamiliar with the operation of this equipment on or near it Do not leave children unsupervised around the equipment y Make sure all users wear proper exercise clothing and shoes for the...

Страница 6: ...nt to prevent electric shock or damage to the electronics y Never operate this equipment if it has a damaged cord or plug if it is not working properly or if it has been dropped damaged or exposed to water Call for service immediately if any of these conditions exist y Maintain the equipment to keep it in good working condition as described in the Maintenance section of the assembly and maintenanc...

Страница 7: ...ce the console at all times y Hold on to a stationary handrail or handlebar with one hand whenever you operate the console keys with the other hand Hazardous Materials and Proper Disposal The batteries within self powered equipment contain materials that are considered hazardous to the environment Federal law requires proper disposal of these batteries If you plan to dispose of your equipment cont...

Страница 8: ...is important to minimize any potential effects of EEE on the environment and human health due to the potential presence of hazardous substances in EEE For proper collection and treatment refer to Obtaining Service Regulatory Notices for Cardiovascular Exercise Equipment The regulatory information in this section applies to the exercise equipment and its control console Safety Approvals for Cardiov...

Страница 9: ...ency energy and if not installed and used in accordance with the owner s manual instructions may cause harmful interference to radio communications WARNING Per FCC rules changes or modifications not expressly approved by Precor could void the user s authority to operate the equipment Industry Canada This Class A digital apparatus complies with Canadian ICES 003 Cet appareil numérique de la classe ...

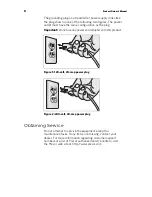
Страница 10: ...ered equipment must be properly grounded In addition Precor treadmills must be connected to a dedicated branch circuit for power A 20 amp dedicated branch circuit is recommended Important A true dedicated branch circuit provides discrete hot neutral and ground lines to each plug These lines must not be looped or daisy chained to any other lines in any way For equipment fitted with P80 consoles or ...

Страница 11: ...power supply looks like the plug shown in one of the following two figures The power outlet must have the same configuration as the plug Important Do not use any power cord adapter with this product Figure 1 120 volt 20 amp power plug Figure 2 240 volt 20 amp power plug ...

Страница 12: ... Service Do not attempt to service the equipment except for maintenance tasks If any items are missing contact your dealer For more information regarding customer support numbers or a list of Precor authorized service centers visit the Precor web site at http www precor com ...

Страница 13: ...Equipment Designated for U S Markets 8 Obtaining Service 10 Assembling the Exercise Bike 13 Unpacking the Equipment 14 Hardware Kit not to scale 15 Required Tools 15 Installing the Upright Support and Cables 16 Installing the Bottle Holder 19 Installing the Handlebars 20 Making Sure the Unit Is Stable 21 Breaking In the Equipment 22 Installing the Console 23 Maintenance 27 Daily Cleaning 27 Daily ...

Страница 14: ...t Exercise Bike Self Powered Features 31 Informational Displays Prior to Shutdown 32 Symptoms of a Low Battery 32 Using the Optional Power Adapter 33 The Optional Power Adapter Kit 33 Replacing the Battery 34 Commercial Equipment Limited Warranty 35 ...

Страница 15: ...e presented in this guide y Assemble and operate your equipment on a hard level surface in the area intended for use Important Do not grasp any plastic parts of the unit while lifting or moving the unit The plastic parts are non structural covers and are not capable of supporting the weight of the unit y Assemble the equipment according to the guidelines in this manual to ensure you do not void th...

Страница 16: ...lly remove any staples holding the cardboard spacers in place at the ends of the container 4 Pull the cardboard spacers away from the equipment and set them aside 5 Cut all plastic ties securing the equipment in place 6 Remove the upright support from the container and set it down near the spot where you plan to install the equipment 7 With the help of at least one other person lift the body assem...

Страница 17: ...following hardware items are packed with the equipment Fasteners Quantity inch x inch sockethead screw 4 inch x inch buttonhead screw 4 8 x inch self tapping screw 2 Upright support mounting screw 2 Required Tools y inch hex wrench y inch hex wrench y inch hex wrench y 2 Phillips screwdriver y Wire cutter ...

Страница 18: ...he following procedure If you are installing Cardio Theater equipment on the bike you will need to perform both procedures You will need the help of another person to complete the procedures To prepare the bike for installation of the upright support 1 Retrieve the cables from the box in which the console was shipped 2 Using a 2 Phillips screwdriver remove the two 10 x 1 inch self tapping screws h...

Страница 19: ...not you are installing Cardio Theater equipment on the console If Then You are not installing Cardio Theater equipment on the console Skip to step 6 You are installing Cardio Theater equipment on the console Continue with step 3 3 Attach the lower ends of the following cables to the inner side of the jack panel y Television cable y Power cable 4 Slide the jack panel back into its bracket in the ri...

Страница 20: ...re 6 Upright support insertion Important In the following step be extremely careful not to trap or pinch any of the cables between the mounting screws and their seats 8 Insert the two upright support mounting screws through the openings on the support and into the screw holes on the body assembly Tighten the mounting screws completely using a inch hex wrench Figure 7 Bolting the upright support in...

Страница 21: ...ottle Holder The bottle holder attaches to a plastic support that has been mounted on the upright support at the factory To install the bottle holder 1 Position the bottle holder on its support so that the three tabs on the bottle holder fit into the three rectangular holes in the support 2 Secure the bottle holder onto its support using the two 8 x inch self tapping screws as shown in the followi...

Страница 22: ...r the top of the upright support as shown in the following illustration The open ends of the assembly should face up and forward Figure 9 Handlebar installation 2 Feed the heart rate cable through the nearest end of the bracket and into the upright support 3 Have your assistant pull the end of the heart rate cable through the console mount at the top of the upright support 4 Place the handlebar as...

Страница 23: ...y movement ask your assistant to tip the unit to one side while you locate the adjustable feet 2 Correct the height of each adjustable foot as follows If you want to Then turn the adjustable feet Raise the unit Counterclockwise Lower the unit Clockwise Important Place the unit on a flat surface Rotating the adjustable feet cannot compensate for extremely uneven surfaces When you are finished adjus...

Страница 24: ...s belts gears and bearings can settle while the equipment is being stored or shipped This can cause the equipment to operate with a small amount of roughness or noise when it starts up for the first time The equipment usually returns to smooth operation after a day or two of normal use If it does not contact your dealer for assistance For more information refer to Obtaining Service ...

Страница 25: ... cable along with any audio video or power cables needed to support a Cardio Theater screen or receiver should be fed through the bracket and should extend through the opening at its upper end To connect the console 1 Using a 2 Phillips screwdriver remove the four 1 inch panhead machine screws securing the back cover of the console Lift off the back cover and set it aside along with the four machi...

Страница 26: ...plastic hooks at the top of the console fit over the two tabs at the upper corners of the bracket Figure 10 Seating the console 3 Insert four inch x inch buttonhead screws through the screw holes in the tabs on the mounting bracket and into the screw anchors on the console Tighten the screws completely using a inch hex wrench ...

Страница 27: ... following illustration Figure 11 Routing the data and heart rate cables 5 Attach the base unit data cable to the eight conductor modular jack labeled LOWER BOARD CONNECTION 6 Attach the heart rate sensor cable to the four pin connector labeled HEART RATE Note The cables on the connector and the circuit board can fit together in only one way There may also be a 10 pin connector labeled HEART RATE ...

Страница 28: ...n before you reattach the console s rear cover 7 Lower the rear cover over the mounting bracket so that the upright support extends through the gap in the cover Figure 12 Rear cover position 8 Position the back cover and attach the four 1 inch panhead machine screws then tighten the screws completely using a 2 Phillips screwdriver Figure 13 Reattaching rear cover screws ...

Страница 29: ...f the equipment is self powered but also uses the optional power adapter disconnect the adapter Daily Cleaning Precor recommends that you clean the equipment before and after each exercise session To remove dust and dirt from the equipment wipe all exposed surfaces with a soft cloth that you have moistened with one of the following cleaners y A solution of 30 parts of water to 1 part of Simple Gre...

Страница 30: ...m the floor underneath the equipment frequently to prevent the accumulation of dust and dirt that can interfere with its operation Use a soft nylon scrub brush to clean the grooves on equipment with foot pedals Daily Inspection At least once every day examine the equipment for the following problems y Slipping belts y Loose fasteners y Unusual noises y Worn or frayed power cords y Any other indica...

Страница 31: ... with a clean towel Keep water away from electronic components to prevent electrical shock or damage 6 Clean the touchscreen using a soft lint free cloth dampened with a 91 isopropyl alcohol solution either full strength or diluted with an equal amount of water Storing the Chest Strap If you purchased the optional heart rate chest strap store it in a place where it remains free of dust and dirt fo...

Страница 32: ...nd remove all external connections television Ethernet and power 2 Lift the rear feet to tip the bike forward onto its roller wheels 3 Push the bike into its new location 4 Lower the rear feet to the floor Long Term Storage If you do not expect anyone to use the equipment for a long time perform the following tasks to prepare it for storage y If it has a power cord disconnect the cord y If it has ...

Страница 33: ...power that is generated allows the equipment to function properly Table 1 Minimum requirements for operation Equipment Rate of Motion AMT 56 strides per minute SPM EFX 40 strides per minute SPM Climber 30 steps per minute Bike 20 revolutions per minute RPM Informational displays appear when the battery is low or when the rate of motion drops below the minimum requirements The display explains what...

Страница 34: ...he point at which it was paused Important If the equipment is connected to a CSAFE master device it follows a slightly different shutdown process Ten seconds before the equipment shuts down it ends the exercise session and displays a reset message while it disconnects from the CSAFE master device It ignores all keypresses during these last ten seconds Symptoms of a Low Battery If no one has used t...

Страница 35: ...trol console for instructions on setting or changing the pause time limit To learn how to install the power adapter refer to The Optional Power Adapter Kit The Optional Power Adapter Kit If you purchase the optional power adapter you must also purchase the internal cable kit The kit supplies the cable bracket and fasteners that connect the power adapter to the lower electronics board CAUTION The i...

Страница 36: ...or a long time However if you feel that the battery may need replacing check with an authorized service technician Refer to Obtaining Servic CAUTION The battery stored inside the equipment contains hazardous materials and must be disposed of according to Hazardous Waste Regulations Refer to Hazardous Materials and Proper Disposal ...

Страница 37: ...resentative Precor s obligations under this warranty are limited as set forth below Warranty Periods and Coverage Commercial Cardiovascular Products excluding StretchTrainer Strength Products Frame and treadmill drive motor 7 years All other parts including mechanical parts electronic parts and items subject to wear 2 years Labor 1 year except for labor coverage on options as defined below Options...

Страница 38: ...s and labels 3 Repairs performed on Precor equipment missing a serial number or with a serial tag that has been altered or defaced 4 Service calls to correct installation of the equipment or instruct owners on how to use the equipment 5 Pickup and delivery involved with repairs 6 Any labor costs incurred beyond the applicable labor warranty period Disclaimer and Release The warranties provided her...

Страница 39: ...EQUIPMENT PROPERTY DAMAGE LOSS OF USE REVENUE OR PROFIT COST OF CAPITAL COST OF SUBSTITUTE EQUIPMENT ADDITIONAL COSTS INCURRED BY BUYER BY WAY OF CORRECTION OR OTHERWISE OR ANY OTHER INCIDENTAL SPECIAL INDIRECT OR CONSEQUENTIAL DAMAGES WHETHER RESULTING FROM NONDELIVERY OR FROM THE USE MISUSE OR INABILITY TO USE THE PRODUCT This exclusion applies even if the above warranty fails of its essential p...

Страница 40: ...38 Assembling and Maintaining the UBK 815 Upright Exercise Bike Notes ...

Страница 41: ...Notes 39 Notes ...

Страница 42: ...40 Assembling and Maintaining the UBK 815 Upright Exercise Bike Notes ...

Страница 43: ......

Страница 44: ...Precor Incorporated 20031 142nd Avenue NE P O Box 7202 Woodinville WA USA 98072 4002 UBK 815 PAG OM 300862 141 rev B Warranty 36286 113 4 August 2010 ...

Страница 45: ...Product Owner s Manual UBK 815 RBK 815 ...

Страница 46: ......

Страница 47: ...Product Owner s Manual RBK 815 UBK 815 ...

Страница 48: ...ty Notice Precor is widely recognized for its innovative award winning designs of exercise equipment Precor aggressively seeks U S and foreign patents for both the mechanical construction and the visual aspects of its product design Any party contemplating the use of Precor product designs is hereby forewarned that Precor considers the unauthorized appropriation of its proprietary rights to be a v...

Страница 49: ...es faiblesses arrêtez les exercices immédiatement y Do not allow children or people unfamiliar with the operation of this equipment on or near it Do not leave children unsupervised around the equipment y Make sure all users wear proper exercise clothing and shoes for their workouts and avoid loose clothing Users should not wear shoes with heels or leather soles and they should check the soles of t...

Страница 50: ...s equipment if it has a damaged cord or plug if it is not working properly or if it has been dropped damaged or exposed to water Call for service immediately if any of these conditions exist y Maintain the equipment to keep it in good working condition as described in the Maintenance section of the assembly and maintenance guide Make sure that all fasteners are secure y If you plan to move the equ...

Страница 51: ...be recycled or discarded according to applicable local and national regulations Product labels in accordance with European Directive 2002 96 EC concerning waste electrical and electronic equipment WEEE determine the framework for the return and recycling of used equipment as applicable throughout the European Union The WEEE label indicates that the product is not to be thrown away but rather recla...

Страница 52: ... interference RFI Federal Communications Commission Part 15 This equipment has been tested and found to comply with the limits for a Class A digital device pursuant to Part 15 of the FCC Rules These limits are designed to provide reasonable protection against harmful interference in a commercial installation The equipment generates uses and can radiate radio frequency energy and if not installed a...

Страница 53: ...s connected to an external power circuit such as treadmills or equipment with optional power supplies for self powered equipment must be properly grounded In addition Precor treadmills must be connected to a dedicated branch circuit for power A 20 amp dedicated branch circuit is recommended Important A true dedicated branch circuit provides discrete hot neutral and ground lines to each plug These ...

Страница 54: ...t Do not use any power cord adapter with this product Figure 1 120 volt 20 amp power plug Figure 2 240 volt 20 amp power plug Obtaining Service Do not attempt to service the equipment except for maintenance tasks If any items are missing contact your dealer For more information regarding customer support numbers or a list of Precor authorized service centers visit the Precor web site at http www p...

Страница 55: ...d Disposal 5 Regulatory Notices for Cardiovascular Exercise Equipment 6 120 V and 240 V Equipment Designated for U S Markets 7 Obtaining Service 8 Product Features 11 Programming Tips 13 Changing the Product Settings 14 Setting a Resistance Range 19 Informational Displays 20 Educating Users 25 Upright Cycle Adjusting the Seat Tilt 25 Using SmartRate 26 Display Console 27 Workout Options 33 Program...

Страница 56: ...10 Product Owner s Manual ...

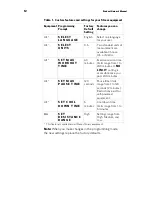
Страница 57: ...age y Change the display to show U S standard or metric measurements y Set the maximum exercise and pause times y Set a cool down time limit y Set the resistance range y View the odometer y Display the number of hours the equipment has been in use y View the software versions and part numbers y Display the serial number y Check the program usage and error logs Note To review the product programmin...

Страница 58: ...ise session time limits range from 1 to 240 minutes A N O L I M I T setting is accessible once you pass 240 minutes All S E T M A X P A U S E T I M E 120 seconds Pause time limits range from 1 to 120 seconds 2 minutes Restrictions exist for self powered equipment All S E T C O O L D O W N T I M E 5 minutes Cool down time limits range from 1 to 5 minutes Bike S E T R E S I S T A N C E R A N G E Hig...

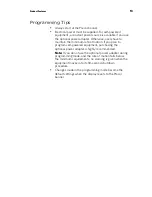
Страница 59: ...mum rate of motion If you plan to program self powered equipment purchasing the optional power adapter is highly recommended Note If you do not use the optional power adapter during programming mode and the rate of motion falls below the minimum requirements no warning is given when the equipment moves into its 30 second shutdown procedure y Changes made in the programming mode become the default ...

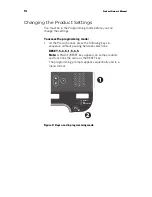
Страница 60: ...cor banner press the following keys in sequence without pausing between selections RESET 5 6 5 1 5 6 5 Note A PAUSE RESET key appears on some products and functions the same as the RESET key The programming prompts appear sequentially and in a menu format ENTER CLEAR 1 2 3 4 5 6 7 8 9 0 DISTANCE PACE AVERAGE SPEED PAUSE RESET OK 2 Figure 3 Keys used in programming mode ...

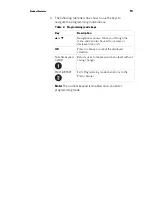
Страница 61: ...ational arrows Move you through the menu and can also be used to increase or decrease time units OK Press to choose or accept the displayed selection Number keypad CLEAR Returns user to the previous menu level without saving changes PAUSE RESET Exits Programming mode and returns to the Precor banner Note The number keypad is disabled once you enter programming mode ...

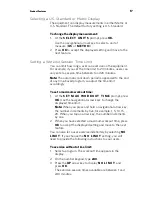
Страница 62: ...ent languages When the equipment is shipped from the factory the default language is English Note Programming prompts are not affected by language selection The prompts in this section continue to appear in English To choose a language 1 At the S E L E C T L A N G U A G E prompt press OK Use the navigational arrow keys to choose a language 2 Press OK again to accept the displayed setting and move ...

Страница 63: ...so adjust the time limit accordingly To set a maximum workout time 1 At the S E T M A X W O R K O U T T I M E prompt press OK Use the navigational arrow keys to change the displayed time limit Note When you press and hold a navigational arrow key the number increments by five for example 1 5 10 15 20 When you tap an arrow key the number increments by one 2 When you have selected a maximum workout ...

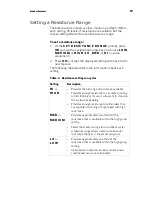
Страница 64: ...down effectively eliminating pause mode To set a maximum pause time 1 At the S E T M A X P A U S E T I M E prompt press OK Use the navigational arrow keys to select a time limit between 1 and 120 seconds two minutes 2 Press OK to accept the displayed setting and move to the next feature Setting a Cool Down Time Limit Use this setting to select the maximum amount of time the machine will remain in ...

Страница 65: ...ings on cycles Setting Description H I or H I G H Provides the full range of resistance available Provides enough resistance to simulate sprinting or hill climbing or for users who want to stand on the cycle while pedaling Provides enough resistance for elite riders that are capable of spinning at high speed with high resistance M E D or M E D I U M Provides approximately two thirds of the resista...

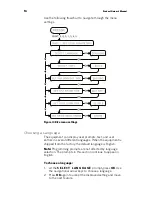
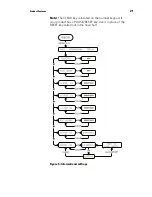
Страница 66: ... meter software versions and part numbers serial number usage log and error log In general you would only access this information if directed to do so by Precor Customer Support To navigate through the informational displays use the following flowchart A table located after the flowchart provides more information about each more display ...

Страница 67: ...Product Features 21 Note The CLEAR key is located on the number keypad If your product has a PAUSE RESET key use it in place of the RESET key called out in the flowchart Figure 5 Informational settings ...

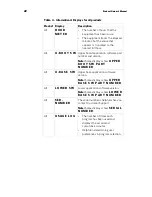
Страница 68: ... P E R B O O T S W P A R T N U M B E R All U B A S E S W Upper base application software version Note Some displays show U P P E R B A S E S W P A R T N U M B E R All L O W E R S W Lower application software version Note Some displays show L O W E R B A S E S W P A R T N U M B E R All S E R N U M B E R The serial number is helpful when you contact Customer Support Note Some displays show S E R I A...

Страница 69: ...e shows the number of total revolutions logged to date Climber indicates the number of floors climbed Error Log Quick access to the informational display is available if error messages appear on the display and have been recorded in the error log This feature is usually reserved for service personnel To view the error log 1 At the Precor banner press and hold RESET for 4 seconds 2 If D I A G S I N...

Страница 70: ... maintain light pressure on the key until the message H O L D T O C L E A R E R R O R S scrolls off the display 3 When you release Quickstart the message N O E R R O R S will appear in the display if the error log has been deleted Important You cannot retrieve the error log once you have deleted it You may want to resolve any issues you are experiencing with the equipment before erasing the error ...

Страница 71: ...d that monitors heart rate and workout intensity at a glance Upright Cycle Adjusting the Seat Tilt The seat on the upright bike can be adjusted for comfort if needed To adjust the seat tilt 1 Use a 14 mm box end wrench or crescent wrench to loosen the nut beneath the seat as shown in the following diagram Note A inch wrench can be used in place of the 14 mm box end wrench however it does not fit a...

Страница 72: ...s In addition some equipment includes a Heart Rate Control HRC workout that automatically adjusts intensity to keep a user s heart rate in its target zone For more information refer to Workouts Caution Before beginning any fitness program see your physician for a thorough physical examination Seek advice from your physician to learn the target heart rate appropriate for your fitness level To test ...

Страница 73: ...raphic and table to learn more about the console displays ENTER CLEAR 1 2 3 4 5 6 7 8 9 0 TIME ELAPSED TIME REMAINING CALORIES DISTANCE PACE AVERAGE SPEED PROGRAMS PROGRAMS MANUAL HEART RATE PERFORMANCE INTERVAL VARIETY WEIGHT LOSS PAUSE RESET OK QUICK START Resistance 2 Figure 8 Console parts ...

Страница 74: ...responses to specific prompts Use the arrows to navigate menus Selection keys Press the key to choose what you want to display Time Elapsed Time Remaining or Calories An indicator light appears next to the item that is displayed RESISTANCE keys Use these keys to adjust the resistance SmartRate display Monitor your heart rate and maintain it in your target zone Number keys During an exercise sessio...

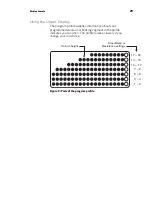
Страница 75: ...formation about your programmed workout A blinking segment in the profile indicates your position The profile raises or lowers if you change your resistance 1 2 3 4 5 6 7 9 10 12 13 16 17 20 Column height CrossRamp or Resistance settings Figure 9 Parts of the program profile ...

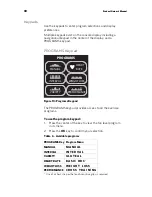
Страница 76: ...ARIETY Figure 10 Programs Keypad The PROGRAMS keypad provides access to all the exercise programs To use the program keypad 1 Press the center of the key to view the top level program in its menu 2 Press the OK key to confirm your selection Table 6 Available programs PROGRAMS Key Program Menu MANUAL M A N U A L INTERVAL I N T E R V A L VARIETY G L U T E A L HEART RATE B A S I C H R C WEIGHT LOSS W...

Страница 77: ...number keypad lets you enter your user ID and answer other setup prompts Entertainment Option If an entertainment option is connected to the display the number keypad acts as a remote control which you use to select the available channels You can also enter number values in answer to exercise session prompts Unconnected Whether or not peripheral devices are attached to the equipment the keypad let...

Страница 78: ...mber being displayed ENTER Use the ENTER key to accept the number being displayed Note The OK and ENTER keys are usually interchangeable and provide the same function when no peripheral devices are attached to the equipment However when answering prompts that originate from a CSAFE device or computer connection use the ENTER key ...

Страница 79: ...lay 2 Hold on to a handlebar and step on the foot pedals 3 When you are comfortably situated begin pedaling 4 Select one of the following options Option Steps To start exercising immediately Press the QUICKSTART key To select a program Press a PROGRAMS key Note The QUICKSTART key is disabled when you press a PROGRAMS key You need to confirm each exercise session selection program time weight and a...

Страница 80: ...ts Prompts Default Value Program Manual Time Fitness Facility setting Weight 150 lb 68 kg Age 35 3 Use the RESISTANCE keys to change the resistance To use the SmartRate feature during your workout you will need to specify your age and wear a chest strap or grasp both touch sensitive grips 1 Press MANUAL and then press OK 2 Follow the prompts to enter your weight and age You can use the navigationa...

Страница 81: ...t time may not be allowed Check with your fitness facility manager To access the NO LIMIT option at the time prompt use the number keypad and type in 240 then press the up arrow key When NO LIMIT appears press OK If you choose this option the automatic cool down period is eliminated You will need to incorporate a cool down period by accessing the Manual Program 3 Enter your weight 1 999 and then y...

Страница 82: ...pears the equipment is not connected to a computer If the equipment is connected to a computer the following appears C H O O S E Q U I C K S T A R T E N T E R O R A P R O G R A M T O B E G I N To save the statistics generated during your exercise session 1 Press ENTER 2 Use the number keypad to specify your 5 digit user ID If you make a mistake press the CLEAR key and reenter the correct number 3 ...

Страница 83: ...he end of a workout session When you complete a program with a time limit or specified goal you automatically enter a cool down period The settings change to help reduce the intensity of your workout Note You cannot switch to a different program during the cool down period Any pressure on the PROGRAMS keys is ignored A workout summary appears at the end of the cool down period A cool down period w...

Страница 84: ...he optional power adapter is attached Refer to Changing Programs in Mid session Ending a Workout At the end of your workout a workout summary appears and shows your cumulative statistics including warm up and cool down periods You can review your statistics as long as you maintain power with the minimum rate of motion If you hold on to the touch sensitive grips or wear a chest strap while exercisi...

Страница 85: ...can increase or decrease the resistance using the resistance key The workout profile reflects changes you make and a blinking light in the column indicates your position in the workout Interval These workouts raise and l your level of exertion repeatedly for a specific time period You can vary your resistance during these workouts ower Variety These workouts are a mix of different levels and can b...

Страница 86: ...the session Weight Loss These workouts are targeted at lowering body fat while improving muscle tone and conditioning The workout time is fixed at 28 minutes and consists of seven 4 minute intervals You are not prompted for a workout time Use the RESISTANCE keys to change the resistance for the rest or work intervals When you make changes the program repeats the settings for the remaining interval...

Страница 87: ...ndicates your position as you progress through a workout y To use the SmartRate feature you need to specify your age and wear a chest strap or hold on to the touch sensitive grips y In some programs an unlimited time setting may be an available option y The fitness facility can set limits on workout pause and cool down times and customize other aspects of your exercise session Check with your mana...

Страница 88: ...42 Product Owner s Manual Notes ...

Страница 89: ...Notes 43 Notes ...

Страница 90: ...44 Product Owner s Manual Notes ...

Страница 91: ......

Страница 92: ...Precor Incorporated 20031 142nd Avenue NE P O Box 7202 Woodinville WA USA 98072 4002 UBK RBK 815 POM 300977 141 rev B 4 August 2010 ...

Отзывы: