background image

Setting Up the Console 

21


Setting Club Parameter Values 

Use this information to customize the equipment for your 

setting.   

Safety Code (Treadmill only) 

Value Range: 

Enabled or Disabled   

(Default: Disabled) 
When the equipment is shipped from the factory, the safety 

code protection feature is disabled. If you enable the safety 

code, your users will need to enter a four digit number to 

begin their exercise session and start the running belt. 

Select Language (All Equipment) 

Value Range:

 English, Deutsch, Espanol, Francais, 

Netherlands, Portugues, Rucckijj, and Italiano 
(Default: English) 
Select your preferred language for the console display. 

Note: 

Programming prompts are not affected by language 

selection. The prompts in this section continue to appear in 

English. 

Set Units (All Equipment) 

Value Range: 

U.S. or Metric   

(Default: U.S.) 
The equipment can display measurements in either Metric or 

U.S. Standard. 

Important:

 If you change the Unit of Measure on a treadmill, be 

sure to check the speed setting to verify that it is correct. 

Содержание AMT 835

Страница 1: ...Assembling and Maintaining Adaptive Motion Trainers AMT 885 AMT 835...

Страница 2: ......

Страница 3: ......

Страница 4: ...ject to change without notice Trademark Note Precor AMT and EFX are registered trademarks and Preva is a trademark of Precor Incorporated Other names in this document may be the trademarks or register...

Страница 5: ...ing designs of exercise equipment Precor aggressively seeks U S and foreign patents for both the mechanical construction and the visual aspects of its product design Any party contemplating the use of...

Страница 6: ......

Страница 7: ...ll de subir un examen m dical complet avant d entreprendre tout programme d exercise Si vous avez des tourdissements ou des faiblesses arr tez les exercices imm diatement Do not allow children or peop...

Страница 8: ...quipment For all equipment other than treadmills Locate at least 40 inches 1 meter away from walls or furniture on either side of the equipment and 40 inches 1 meter away from objects behind the equip...

Страница 9: ...se injuries Do not operate the equipment where aerosol spray products are being used or where oxygen is being administered Do not use outdoors Do not attempt to service the equipment yourself except t...

Страница 10: ...ct Recycling and Disposal This equipment must be recycled or discarded according to applicable local and national regulations Product labels in accordance with European Directive 2002 96 EC concerning...

Страница 11: ...h the limits for a Class A digital device pursuant to Part 15 of the FCC Rules These limits are designed to provide reasonable protection against harmful interference in a commercial installation The...

Страница 12: ...ing interference that may cause undesired operation This Class A digital apparatus complies with Canadian ICES 003 Cet appareil num rique de la classe A est conforme la norme NMB 003 du Canada ATTENTI...

Страница 13: ...0065 Audio video and similar electronic apparatus Safety Radio Frequency Interference RFI This Precor exercise equipment conforms to the following national standards defining acceptable limits for rad...

Страница 14: ...la classe A est conforme la norme NMB 003 du Canada ATTENTION Haute Tension D branchez avant de r parer European Applications CE compliance is claimed to the following directives 2004 108 EC EMC Direc...

Страница 15: ...vices Note The typical splitter power cords that have IEC 320 C13 and C14 plugs have a recommended maximum capacity of five screens Figure 1 IEC 320 C13 and C14 plugs Obtaining Service Do not attempt...

Страница 16: ...3 Obtaining Updated Documentation 13 Assembling the AMT 17 Hardware Kit not to scale 18 Required Tools 19 Performing the Assembly 19 Removing Access Covers 22 Threading the Cables 22 Replacing Access...

Страница 17: ...e 39 Storing the Chest Strap 40 Moving the Equipment 40 Long Term Storage 40 Self Powered Features 41 Informational Displays Prior to Shutdown 42 Symptoms of a Low Battery 42 Using the Optional Power...

Страница 18: ......

Страница 19: ...ssemble and operate your equipment on a hard level surface in the area intended for use Important Do not grasp any plastic parts of the unit while lifting or moving the unit The plastic parts are non...

Страница 20: ...the fasteners and other hardware components shown in the following table Before you begin assembly make sure that your hardware kit is complete If not please contact Precor Customer Support Fasteners...

Страница 21: ...assemble the AMT base unit To begin assembly 1 Remove the two side fasteners that hold the front frame tube to the shipping pallet and cut the tie wraps that secure the rear base CAUTION Do not move t...

Страница 22: ...frame tube If necessary use a rubber mallet to tap them into place Figure 2 Removal of unit from pallet and insertion of end caps To attach the handlebars 1 Slide a plastic boot onto each handlebar F...

Страница 23: ...h the handlebars using four inch x 1 inch hex head screws eight inch washers and four inch locknuts Using a torque wrench tighten the fasteners with 180 to 200 inch pounds of torque Figure 5 Handlebar...

Страница 24: ...loose Figure 6 Where to place pressure when removing top cover 2 Lift the cover then slide it toward the rear of the equipment and out 3 Using a hex wrench disconnect the two 1 inch buttonhead screws...

Страница 25: ...connector on the jack panel Refer to the following illustration and table for the position of each connector Connect To The console power cable The power cable assembly The Ethernet cable The eight co...

Страница 26: ...r hand or a rubber mallet to tap the cover back into place Leveling the AMT It is important that you level and stabilize the AMT properly every time you move it CAUTION To eliminate movement make sure...

Страница 27: ...wer the front end of the AMT Clockwise Figure 7 Location of adjustable feet 3 When you are finished positioning the adjustable feet place the unit on the floor Try rocking it again as described in ste...

Страница 28: ...s belts gears and bearings can settle while the equipment is being stored or shipped This can cause the equipment to operate with a small amount of roughness or noise when it starts up for the first t...

Страница 29: ...the installation tightening the mounting screws and attaching the back cover The following sections describe how to perform these tasks Threading the Cable Assembly P80 Earlier in the installation you...

Страница 30: ...read the cable assembly 1 Make sure that as much of each cable as possible passes through the opening in the middle of the console mount on the base unit 2 Position the console over the console mount...

Страница 31: ...side the console Refer to the following diagram and table to identify the cables and connectors Figure 11 Cable connections P80 console Table 1 P80 internal cable connections Cable Connector Type Circ...

Страница 32: ...de the console s back plate The tuner includes a short cable adapter that allows the television cable to be connected outside the back plate To connect the television cable 1 Pull the cable out throug...

Страница 33: ...jacks in the console Because of this it is important to exercise caution when connecting the cables The black Ethernet cable connects to a jack just underneath the perforated metal bracket at the ver...

Страница 34: ...the cable should look once it is installed Figure 14 Connecting the heart rate cable Connecting the Power Cable Like the tuner the console s upper circuit board is equipped with a cable adapter that...

Страница 35: ...tighten the screws using a inch hex wrench 4 Line up the two small tabs at the top of the console s back cover with the slots at the top of the opening in the console case Insert the tabs into the sl...

Страница 36: ...t 3 Rest the console on the console mount so that the notch on the bottom of the console s back plate rests on the rectangular hook at the bottom of the console mount as shown in the following figure...

Страница 37: ...e Refer to the following diagram and table to identify the cables and connectors Figure 17 Cable connections P30 console Table 2 P30 internal cable connections Cable Connector Type Circuit Connector L...

Страница 38: ...all tabs at the bottom of the console s back cover with the slots at the bottom of the console case Insert the tabs into the slots 5 Insert the two 8 32 x inch Phillips head screws that you removed ea...

Страница 39: ...If the equipment is self powered but also uses the optional power adapter disconnect the adapter Daily Cleaning Precor recommends that you clean the equipment before and after each exercise session To...

Страница 40: ...nd such cleaners weaken the protective finish on the equipment and void the Precor Limited Warranty Never pour water or spray liquids onto any part of the equipment Allow the equipment to dry complete...

Страница 41: ...e console with a damp sponge or soft cloth and dry with a clean towel Keep water away from electronic components to prevent electrical shock or damage 2 Clean the touchscreen using a soft lint free cl...

Страница 42: ...ting techniques If the equipment includes roller wheels on one end use the wheels to reduce the load on yourself and your assistant To move the AMT 1 Disconnect unplug and remove all external connecti...

Страница 43: ...ower that is generated allows the equipment to function properly Table 3 Minimum requirements for operation Equipment Rate of Motion AMT 56 strides per minute SPM EFX 40 strides per minute SPM Climber...

Страница 44: ...exercise session and displays a reset message while it disconnects from the CSAFE master device It ignores all keypresses during these last ten seconds Symptoms of a Low Battery If no one has used the...

Страница 45: ...be installed by authorized service personnel Do not attempt installation on your own as you could void the Precor Limited Warranty For more information refer to Obtaining Service Important If this equ...

Страница 46: ...44 Assembling and Maintaining Adaptive Motion Trainers AMT 885 835...

Страница 47: ...emainder of the original warranty period only To claim under this warranty the buyer must notify Precor or your authorized Precor dealer within 30 days after the date of discovery of any nonconformity...

Страница 48: ...cal wiring not in compliance with electrical codes or Precor owner s manual specifications or failure to provide reasonable and necessary maintenance as outlined in the owner s manual 3 Precor is not...

Страница 49: ...SS WARRANTIES GIVEN ABOVE FOR THOSE SAME PARTS PRECOR HEREBY DISCLAIMS AND EXCLUDES THOSE WARRANTIES THEREAFTER Some States do not allow limitations on how long an implied warranty lasts so the above...

Страница 50: ...USE OR INABILITY TO USE THE PRODUCT This exclusion applies even if the above warranty fails of its essential purposes and regardless of whether such damages are sought for breach of warranty breach of...

Страница 51: ......

Страница 52: ...Precor Incorporated 20031 142nd Avenue NE P O Box 7202 Woodinville WA USA 98072 4002 AMT 885 835 PAG OM 300710 301 rev F Warranty 36286 114 14 February 2011...

Страница 53: ...Operating and Maintaining the P30 Console...

Страница 54: ......

Страница 55: ......

Страница 56: ...of such software and all data collected via the Preva Business Suite are exclusively owned by Precor or its suppliers as the case may be Precor is widely recognized for its innovative award winning d...

Страница 57: ...ase unit The console is intended for use only with a Precor fitness equipment not as a standalone device Safety Precautions Always follow basic safety precautions when using this equipment to reduce t...

Страница 58: ...r outlet as marked on the equipment Care should be taken when mounting or dismounting the equipment Read understand and test the emergency stop procedures before use Keep the power cord or optional po...

Страница 59: ...or tighten prior to use If you plan to move the equipment obtain help and use proper lifting techniques Equipment Weight Restrictions Do not use the treadmill if you weigh more than 500 pounds 225 kg...

Страница 60: ...sal This equipment must be recycled or discarded according to applicable local and national regulations Product labels in accordance with European Directive 2002 96 EC concerning waste electrical and...

Страница 61: ...erence RFI Federal Communications Commission Part 15 This equipment has been tested and found to comply with the limits for a Class A digital device pursuant to Part 15 of the FCC Rules These limits a...

Страница 62: ...ctives 2004 108 EC EMC Directive 2006 95 EC LVD Directive 2002 95 EC RoHS Directive Directive compliance has been verified to the following standards EN 55022 EN 55024 EN 60335 1 120 V and 240 V Equip...

Страница 63: ...ing plug on a treadmill or power supply looks like the plug shown in one of the following two figures The power outlet must have the same configuration as the plug Important Do not use any power cord...

Страница 64: ...10 Operating and Maintaining the P30 Console...

Страница 65: ...the Console 15 Setting Up the Console 19 System Settings 19 Setting Club Parameter Values 21 Viewing the Informational Displays 26 User ID Entry with CSAFE Equipment 29 Introducing Users to the P30 C...

Страница 66: ...12 Operating and Maintaining the P30 Console...

Страница 67: ...ising the battery initializes and displays the Welcome banner A minimum rate of motion must be maintained for the Welcome banner to appear The words PEDAL FASTER or the equivalent message depending on...

Страница 68: ...adapter into the equipment Plug the opposite end into the appropriate power source for your equipment 120 V or 240 V Review the safety instructions found at the beginning of this manual before using t...

Страница 69: ...quipment Figure 3 P30 console keys Table 1 Parts of the console Number Part Name Details Average Speed Pace Distance Use the or arrows to change which item you want to display Calories Displays the nu...

Страница 70: ...e per Minute displays the number of meters feet or steps that a user has gained during a workout Lower Display Displays graphical information about your workout progress Workouts Manual Available on a...

Страница 71: ...age Speed Pace Treadmill only Calories per Minute Calories per Hour WATTS METS Target HR Average HR Elevations Treadmill and climber only Stride Length AMT only Show All Metrics key AMT only Use to vi...

Страница 72: ...ng the P30 Console Number Part Name Details Number pad Use to enter numerical information such as age weight and passwords Press Clear to delete the numbers entered Press Enter after you have entered...

Страница 73: ...display the Welcome banner To access the Welcome banner you must power the equipment For self powered equipment use the optional power adapter otherwise you will have to maintain the minimum rate of...

Страница 74: ...play on the treadmill check the speed setting to verify that it is correct To view the Club Parameters settings 1 At the Welcome banner press Pause 2 Press the following number keys in sequence to ent...

Страница 75: ...ion and start the running belt Select Language All Equipment Value Range English Deutsch Espanol Francais Netherlands Portugues Rucckijj and Italiano Default English Select your preferred language for...

Страница 76: ...have enabled these performance programs Set Max Pause Time All Equipment Value Range 1 to 120 seconds Default 120 seconds This setting limits how long equipment remains in a paused banner during a wor...

Страница 77: ...line EFX 835 only INCLINE Changes the column height and affects the Custom Program ramp incline Bike RESISTANCE Changes the column height and affects the Custom Program pedal resistance Climber RESIST...

Страница 78: ...hour mph or kilometers per hour kph depending upon the units of measure U S Standard or Metric selected earlier The speed ranges values from 0 5 to 16 mph 0 8 to 25 5 kph Set Incline Limit Treadmill o...

Страница 79: ...range The following ranges are available High Provides full resistance range Medium Provides approximately two thirds of the resistance that is available within the high group setting Low Provides ap...

Страница 80: ...es Table 4 Informational Displays values Product Value Information provided All ODOMETER The odometer value correlates to the type of equipment and the standard of units U S or Metric selected in the...

Страница 81: ...on All EVENT LOG Displays any event codes that may have been detected by the software For more information refer to Event Log Event Log The event log holds a maximum of 30 events After the log reaches...

Страница 82: ...d speed is not reducing 26 Motor pulse width incorrect 27 Too much drive motor current 28 Temperature too high 29 Excessive AC input current 30 Communications event lower board to upper board 31 Incor...

Страница 83: ...mode Table 6 CSAFE access keys Keys Function Number Keypad Use the number keys to enter a user ID Once you have entered the user ID number press ENTER or OK to submit the user ID CLEAR Erases individu...

Страница 84: ...30 Operating and Maintaining the P30 Console...

Страница 85: ...ing sections in this guide with your users before allowing them to use the fitness equipment Important Safety Instructions Getting Started Using the Safety Clip for treadmill only Using the Touch Hear...

Страница 86: ...the sensors do not grip tightly Keep a loose cupping hold Holding the grips tightly can affect the reading As you work out your perspiration will help transmit your heart rate signal If you have diffi...

Страница 87: ...ay Note To receive an accurate reading the strap needs to be in direct contact with the skin on the lower sternum just below the bust line for women To use a chest strap transmitter 1 Carefully dampen...

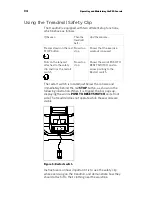
Страница 88: ...Slows to a stop Shows the words PUSH TO RESET SWITCH and an arrow pointing to the Restart switch The restart switch is located just below the console and immediately behind the red STOP button as show...

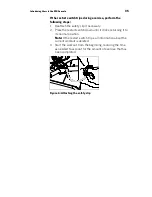
Страница 89: ...ecessary 2 Press the restart switch down until it clicks returning it to its normal position Note If the restart switch trips all information about the current workout is deleted 3 Start the workout f...

Страница 90: ...the equipment begins Auto Stop monitoring If a user is detected then no message appears and the selected workout continues If no user is detected after an additional 30 seconds the console displays th...

Страница 91: ...roll across the upper text display If anything else appears on the screen press Pause to display the Welcome banner From this screen there are two ways to begin a workout Press GO Quick Start method T...

Страница 92: ...ou begin exercising 1 From the Welcome banner press OPTIONS Goal is the first option 2 To choose the Goal option press OK Goal options are Time Distance and Calories 3 Use the Up and Down arrows to in...

Страница 93: ...eart Rate goal The Language and Units settings are also available To enter your Age and Weight during a workout 1 Press OPTIONS 2 Weight Age is the first option To choose this option press OK 3 Use th...

Страница 94: ...pment it displays the summary screen with your workout metrics After displaying the summary it returns to the Welcome screen Pending Shutdown Self Powered Equipment On self powered machines the paused...

Страница 95: ...art rate during the session These messages are only displayed if heart rate data was acquired during the session i e a valid heart rate number was displayed at least once during the session A fourth m...

Страница 96: ...climber Current Performance Metrics describe the intensity of a workout in real time They include Calories Minute Calories Hour Heart Rate Speed treadmill bike Revolutions Minute bike Strides Minute A...

Страница 97: ...target heart rate based on the calculation 60 of 220 minus your age however you can override this value The equipment adjusts resistance and or incline to maintain your target heart rate while you wo...

Страница 98: ...DE PROGRAMS in the Settings menu The Fitness Test available by pressing the PERFORMANCE key provides a means of comparing your fitness level with the official fitness test of the International Associa...

Страница 99: ...n the console before and after each exercise session To remove dust and dirt from the console Wipe all exposed surfaces with a soft cloth that you have moistened with a solution of 30 parts of water t...

Страница 100: ...Precor Incorporated 20031 142nd Avenue NE P O Box 7202 Woodinville WA USA 98072 4002 P30 OM 301096 141 18 January 2011...

Отзывы: