background image

21

Copyright © 2020 Quality Machine Tools, LLC

PM-1440GT v9 2020-10

Section 4  SERVICING THE LATHE

Disconnect 220V power before any maintenance operation!

Remove all machining debris and foreign objects before lubricating ANYTHING! If need 

be, any oil is better than no oil – but use the recommended lubricants when you can.

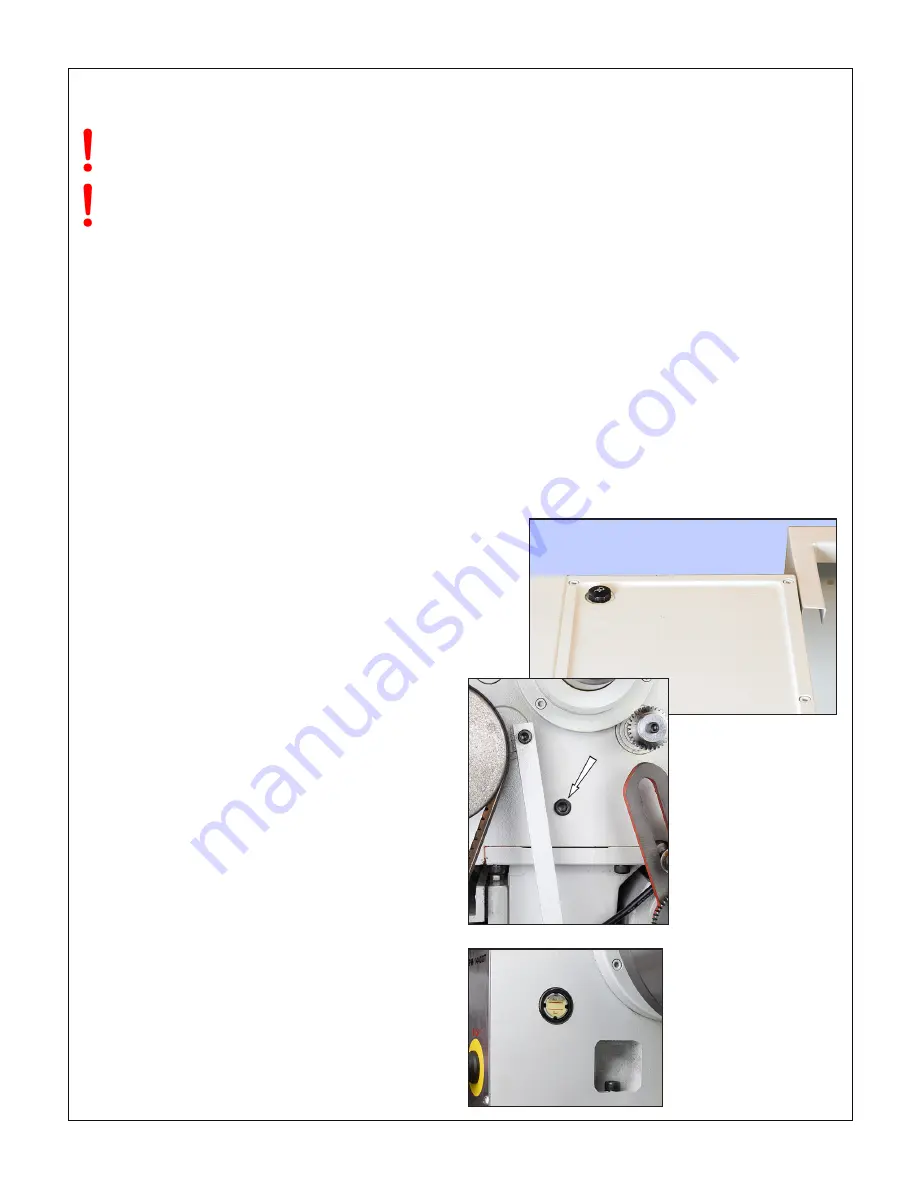
HEADSTOCK GEARBOX DRAIN & REFILL

Take time to prepare. 4 quarts is a lot of oil to clean up! 

1.  Remove the belt cover, left of the headstock.

2. 

Remove the fill plug on the top surface of the headstock, 

Figure 4-1.

GENERAL

Aside from abrasive particles and machining debris, lack of 

proper lubrication is the main cause of premature wear. Rotat-

ing parts are easy to lubricate, sliding parts are not. Gibs are 

tightened for the best compromise between rigidity and slide-

ability, which means practically zero gap between the ways. It 

is not obvious which are the bearing surfaces on the various 

dovetail surfaces — some of the interfaces look like bearing 

surfaces, but are simply narrow gaps.

Every few hours of operation: 1. Apply the recommended way-

oil with a dedicated short-bristle brush such as the type used 

for applying flux; 2. Use a similar brush to apply oil or grease to 

the leadscrews; 3. Apply oil to the ball oilers, see below.

The spindle runs on sealed, pre-lubricated roller bearings re-

quiring no routine attention.

Recommended lubricants

Gearboxes:

 ISO 68, such as Mobil DTE Heavy/Medium circu

-

lating oil. Approximate quantities required:


Headstock

 4 quarts


Saddle feed gearbox

 2 quarts


Apron

 1 quart

Ball oilers

:  ISO  68  way  oil,  such  as  Mobil  Vactra  No.  2,  or 

equivalent.

Machine ways

 (dovetails): ISO 68 way oil, such as Mobil Vac

-

tra No. 2, or equivalent.

External change gears

: light general purpose grease, NLGI 

No. 2, or equivalent.

Leadscrews

: ISO 68 way oil, such as Mobil Vactra No. 2, or 

equivalent.

BALL OILERS

Use a pump-type oil can, pr

eferably with a flexible spout tipped 

with a soft tube. The ID of the tip should be large enough 

to  seat  on  the  oiler's  brass  flange,  more  than  spanning  the 

spring-loaded steel ball. When the oil can tip is firmly pressed 

onto the brass surface oil pressure will displace the ball, allow-

ing oil to flow into the bearing. Before oiling check that the ball 

is not stuck – press it lightly with a probe.

3. 

Place a drain pan (2-gallons minimum) on a stool or other 

support at about the height of the chip tray.

4.  Fold a sheet of card stock to make a Vee-shape drain 

channel. This will be pressed against the headstock below 

the drain plug, angled downward into the drain pan; trim 

the upstream end of the Vee so that it seals against the 

headstock. 

5.  Run the lathe a few minutes to warm the oil if necessary.

6.  With the drain channel in place, remove the drain plug, Fig-

ure 4-2.

7.  Allow the oil to drain completely. Replace the drain plug, 

then add just a few ounces of oil.

8.  When satisfied that the headstock is oil-tight, add oil to the 

halfway mark on the sight glass, Figure 4-3 (about 4 qts).

9. 

Replace the fill plug.

Figure 4-1  

Headstock fill 

plug

Figure 4-2  

Headstock drain 

plug

Figure 4-3 

Headstock sight 

glass

Содержание PM-1440GT

Страница 1: ...5 camlock spindle mount 40 in between centers 14 in swing over bed 20 3 4 in over gap 12 spindle speeds from 50 to 2000 rpm Multi speed gearbox for full range screw cutting TPI MM pitch Bidirectional...

Страница 2: ...e with little or no impact on functionality Please email us if you have questions about any aspect of the manual or your machine see our website www precisionmatthews com for support addresses Your fe...

Страница 3: ...machine can be lifted in one piece by an over head hoist or forklift with slings and or chains all items rated for a total weight of at least 1 1 2 tons A suggested setup for lifting is shown in Figu...

Страница 4: ...ke certain that the motor control lever is set to OFF mid travel Figure 1 7 Figure 1 4 Slide out chip tray LEVELING Make sure the lathe is in its permanent location The following procedure ensures tha...

Страница 5: ...footbrake stops the motor 15 Return the motor control lever to OFF mid travel 16 Shift the motor control lever UP The spindle should Reverse clockwise rotation viewed at the chuck nose end The control...

Страница 6: ...ed by high precision taper roller spindle bearings together with hardened and ground bed ways shafts and headstock gears All gears in the machine are oil bath lubricated A saddle feed gearbox together...

Страница 7: ...slide travel 3 1 2 in Drive system Belt drive with 12 speed gearbox Low range rpm 50 70 95 140 Mid range 180 250 340 510 High range rpm 700 980 1350 2000 Carriage drive thread cutting Leadscrew 8 tpi...

Страница 8: ...an be hazardous Be sure the work area is properly lit Never leave chuck keys wrenches or other loose tools on the machine Be sure the workpiece toolholder s and machine ways are secure before commenci...

Страница 9: ...s Figure 3 2 Motor control lever Mid travel OFF Down FORWARD Up REVERSE Before connecting power to the lathe be sure the Motor Con trol Lever on the apron is set to OFF Figure 3 2 Connect the lathe to...

Страница 10: ...r to the chuck key may be same tool in some cases Recommended procedure 1 Disconnect power from the machine Then select the high est spindle speed 2000 rpm to allow easier hand rotation of the spindle...

Страница 11: ...02 mm per division on the com pound 0 04 mm on the cross slide dition to disengage the gear train 2 Turn the spindle by hand checking that all six cam markers are at 12 o clock Figure 3 7 3 While sup...

Страница 12: ...ero of the tailstock in other words returning it to the normal axis for rou tine operations One way to avoid cut and try is to prepare in advance a bar of say 1 diameter quality ground stock with prec...

Страница 13: ...0T lower following page Figure 3 14 Power feed rates inches per spindle rev FEEDSHAFT CLUTCH The clutch shown in Figure 3 15 disengages the power feed if the saddle or cross slide hits an obstruction...

Страница 14: ...60 60 69 60 A D 3 3 1 4 4 4 1 2 4 3 4 5 5 1 2 5 3 4 7 B D 6 6 1 2 8 9 9 1 2 10 11 11 1 2 14 A C 12 13 16 18 19 20 22 23 28 B C 24 26 32 36 38 40 44 46 56 Figure 3 17 Threads per Inch TPI 1 Remove the...

Страница 15: ...metric threads The split nut on the apron must be left engaged throughout the entire process For metric and UNC UNF threads the tool is ground to 60o in cluded angle It is installed so that its flanks...

Страница 16: ...rk If not the sec ond and subsequent passes will be out of sync In some cas es Figure 3 23 there is a choice of lines for re engagement but in every case the process calls for careful timing NOTE Dise...

Страница 17: ...djustable by thumbwheel If not loosen and re lock the set screws ar rowed Raise the two lower fingers to just touch the workpiece Figure 3 26 Follower rest representative LOCKING THE SLIDES When face...

Страница 18: ...able but a discontinuity that snags the saddle is not If a satisfactory join cannot be achieved it may be necessary to remove and reinstall the insert from scratch COOLANT SYSTEM The coolant system is...

Страница 19: ...an iter ative cut and try process In particular if you will be using for reference a precision ground bar between centers first be sure that the tailstock is zeroed accurately no offset be fore worki...

Страница 20: ...ed Rotate the cam to raise or lower the tie rod socket 4 as necessary 9 Tighten the tie rod and clamp screws then re check the center post draw plate interface 10 Set the draw plate as desired for the...

Страница 21: ...Approximate quantities required Headstock 4 quarts Saddle feed gearbox 2 quarts Apron 1 quart Ball oilers ISO 68 way oil such as Mobil Vactra No 2 or equivalent Machine ways dovetails ISO 68 way oil s...

Страница 22: ...gearbox use a funnel attached to a flexible plastic tube in serted into the fill hole Add oil to the halfway mark on the sight glass about 2 qts APRON GEARBOX DRAIN REFILL Remove the fill plug Figure...

Страница 23: ...on ways and leadscrews Too free means instability of the cutting tool inaccuracies and chatter Both screw heads must be tight against the gib ends If you loosen one tighten the other The saddle gib F...

Страница 24: ...esulting in uneven motion Back off for smooth rotation with no appre ciable end float Re tighten the set screw This tends to back out the handwheel a small amount so check end float again Factor 2 is...

Страница 25: ...g otherwise consider replacing the item The brake pads should be clean evenly worn showing no sign of oil Minimum pad thickness is 4 5 mm about 0 18 If nec essary replace the pads by separating them e...

Страница 26: ...just for minimum TIR then drill the other end 5 Set the drill rod snugly between centers as Figure C Lock the tailstock 6 Set a dial indicator on the cross slide to eliminate vertical error use a flat...

Страница 27: ...t the chuck for minimum runout at position 1 2 Check the runout at 2 Pointer movement when traversing is not a concern at this stage 3 If the drill rod is perfectly aligned with the spindle axis there...

Страница 28: ...tion Figure A3 Misaligned headstock In this illustration the workpiece diameter increases as the cut ting tool moves toward the chuck Correct this by screwing in A a fraction of a turn to rotate the h...

Страница 29: ...29 Copyright 2020 Quality Machine Tools LLC PM 1440GT v9 2020 10 Section 5 PARTS Model PM 1440GT ELECTRICAL SCHEMATIC...

Страница 30: ...ries such as DRO 2 amp max To coolant motor To spindle motor Overload breaker coolant motor Overload breaker spindle motor 5A fuse 2 x 25A fuses not installed in some models 24Vac relay Transformer 2...

Страница 31: ...hat these are same wires 5 and 6 on the termi nal block shown on the previous page If so swap only those two wires on the terminal block leaving the other 5 wire in place for forward jog For reverse j...

Страница 32: ...0 x 40 Z4764 29 Cap screw M8 x 10 Z4765 30 Screw M8 x 10 Z4766 31 Nut Z4767 32 Cap screw M8 x 25 Z4768 33 Screw M8 x 30 Z4769 34 Screw M6 x 16 Z4770 35 Nut Z4771 36 Coolant tank Z4772 37 Coolant pump...

Страница 33: ...x 40 Z4795 24 Cap screw M10 x 35 Z4796 11 Lever Z4747 12 Lever Z4748 Ref Description Part 25 Cap screw M10 x 35 Z4797 26 Taper pin Z4798 27 Nut Z4799 28 Cap screw M6 x 20 Z4800 29 Pin 5 x 28 mm Z4801...

Страница 34: ...rm Z4839 18 Shift fork Z4840 19 Gear M1 5 22T Z4841 20 Flange Z4842 21 Front panel Z4843 22 Cap screw M6 x 25 Z4844 23 Filler plug Z4845 24 Drain plug Z4846 25 Sight glass Z4847 26 O ring Z4848 27 Ret...

Страница 35: ...24T Z4880 16 Gear M2 30T Z4881 17 Plug Z4882 23 Flange Z4883 31 Brake shoe assembly Z4884 Ref Description Part 32 Spring Z4885 33 Bushing Z4886 34 Retaining ring Z4887 35 Cap screw M6 x 12 Z4888 36 C...

Страница 36: ...Z4915 50 O ring Z4916 51 Retaining ring Z4917 52 Key 7 x 25 mm Z4918 53 O ring Z4919 54 Cap screw M6 X 25 Z4920 55 Gasket Z4921 56 Cap screw M6 X 15 Z4922 57 Roller bearing 32013 Z4923 58 Retaining r...

Страница 37: ...Z4939 12 Nut Z4940 Ref Description Part 13 Ball bearing 6202Z Z4941 14 Retaining ring Z4942 15 Nut Z4943 16 Washer Z4944 17 Washer Z4945 18 Cap screw M6 x 16 Z4946 19 Nut Z4947 20 Washer Z4948 21 Key...

Страница 38: ...Z4970 9 A B selector knob Z4971 10 Shifter fork Z4972 11 Screw Z4973 12 Cap screw M6 x 30 Z4974 13 Ball spring set screw Z4975 Ref Description Part 14 Key 5 x 10 mm Z4976 15 O ring Z4977 16 Roll pin 5...

Страница 39: ...pacer Z5005 18 E shaft Z5006 19 Cover plate Z5007 20 Gear assy M2 36T 18T Z5008 21 Gear assy 14DP2 Z5009 22 C shaft Z5010 23 Flange Z5011 24 Pin 5 x 28 mm Z5012 25 Cap screw M8 x 30 Z5013 26 Oil seal...

Страница 40: ...27 Sight glass 29 mm Z5047 28 Cap screw M8 x 10 Z5048 29 Stl ball screw spring set Z5049 30 Set screw M6 x 10 Z5050 31 Plug Z5051 32 Retaining ring Z5052 33 Cap screw M6 x 20 Z5053 39 Cap screw M6 x...

Страница 41: ...haft Z5067 16 Gear M2 22T Z5068 17 Gear M1 5 18T Z5069 18 Shaft Z5070 19 Bushing Z5071 20 Split nut shaft Z5072 21 Split nut actuator Z5073 22 Hub Z5074 34 Cap screw M6 x 16 Z5075 35 Steel ball spring...

Страница 42: ...cription Part 15 Support flange Z5100 16 Graduated collar Z5101 17 Handwheel Z5102 18 Locknut Z5103 19 Handle Z5104 20 Wiper rear Z5105 21 Wiper front Z5106 22 Index tab Z5107 23 Oiler Z5108 24 Cap sc...

Страница 43: ...adscrew Z5131 7 Flange Z5132 Ref Description Part 15 Toolpost stud Z5140 16 T nut Z5141 17 4 way toolpost Z5142 18 Washer Z5143 19 Hub Z5144 20 Lever Z5145 21 Knob Z5146 22 Clamp screw Z5147 23 Index...

Страница 44: ...4 Adjusting screw Z5163 5 Collar Z5164 6 Thumb nut Z5165 7 Cone point Z5166 8 Hinge clamp screw Z5167 9 Thumb nut Z5168 Ref Description Part 10 Hinge pivot Z5169 11 Lock nut Z5170 12 Set screw Z5171 1...

Страница 45: ...clamp lever Z5189 14 Tailstock clmp collar Z5190 15 Tailstock clmp camshaft Z5191 16 Tailstock clmp stud Z5192 Ref Description Part 17 Clamp base Z5193 18 Tailstock clamp lever Z5194 19 Key Z5195 20...

Отзывы: