background image

24

Copyright © 2021 Quality Machine Tools, LLC

PM-1340GT v8 2021-04

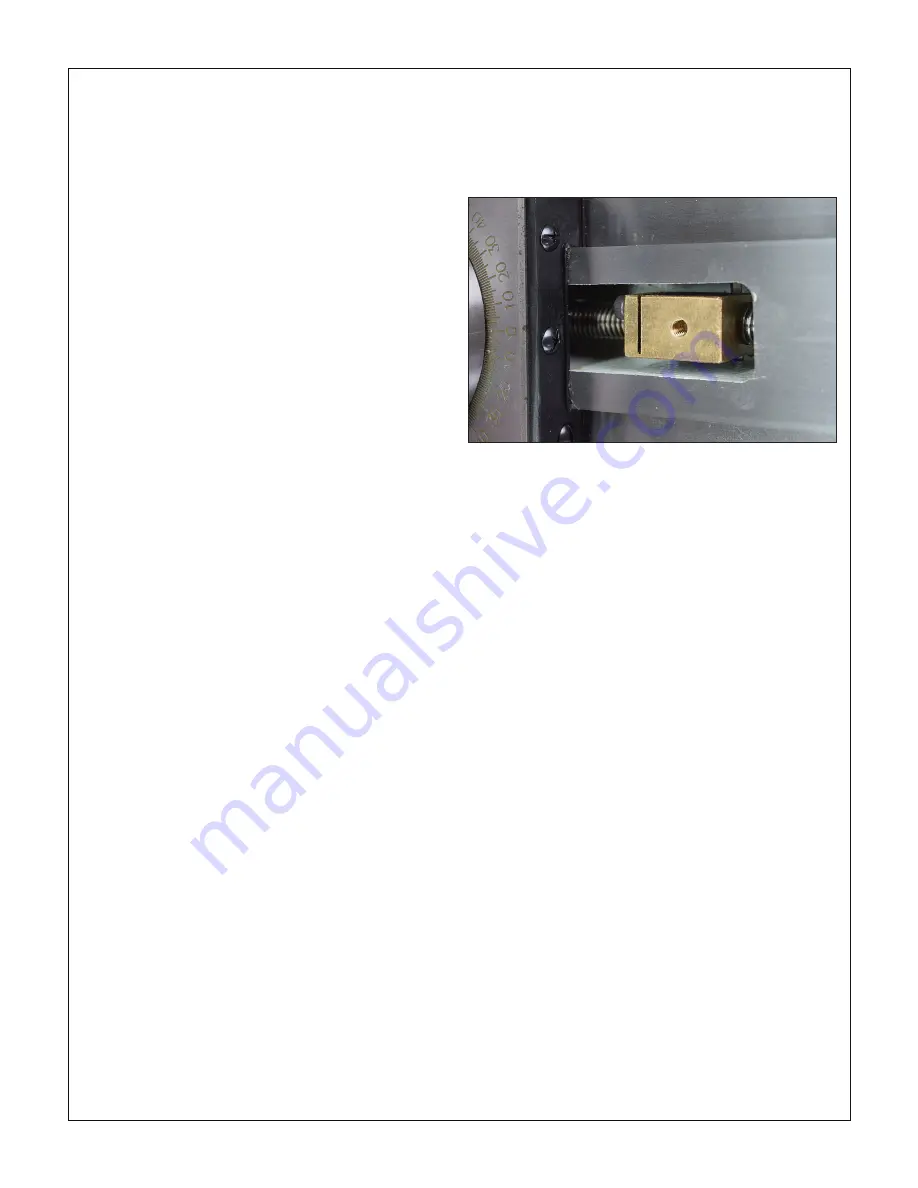
Figure 3-29  

Cross slide leadscrew nut

turning operations — simply remove the draw plate and recon-

nect the cross slide leadscrew. (Alternatively, leave the attach

-

ment intact, with the taper guide bar set for zero degrees; in 

this case use the compound for tool control.)

Referring to Figure 3-28, install the taper turning attach-

ment as follows:        

1. 

Remove  the  socket  head  cap  screw  securing  the  cross 

slide leadscrew nut to the cross slide body, Figure 3-29.

Push/pull the cross slide a few times front to back to be 

sure the no-longer-captive nut allows free movement 

throughout the range called for by the taper attachment.

2. 

Make certain that the cross slide gib is properly adjusted 

for smooth motion without side play.

3.  Because the cross slide leadscrew is inoperative, the 

compound is typically used to infeed the cutting tool. If the 

infeed needs to be precisely controlled, set the compound 

to 90 degrees.

4. 

Install the taper attachment base on the lathe carriage (4 

socket head screws).

5. 

Install  the  draw  plate  on  the  cross  slide,  with  the  two 

round-head socket screws (1) snug but not tight.

6. 

Check the underside of the draw plate where it meets the 

center post. It should touch the post with zero gap. Make 

minor adjustments to the relative height of the attachment 

base (4 screws), or pack with washers as necessary. (mis

-

alignment here can impose a vertical load on the cross 

slide.)

7. 

Loosen the tie rod clamp screws, also the set screw se-

curing cam (5). Screw the tie rod into the slide.

8.  Set the clamp assembly in the desired location on the rear 

track of the lathe bed. Rotate the cam to raise or lower the 

tie rod socket (4) as necessary.

9.  Tighten the tie rod and clamp screws, then re-check the 

center post/draw plate interface.

10.  Set the draw plate as desired for the turning operation. 

Tighten screws (1) and (2). Tighten the cam set screw.

11. 

Loosen screws (3), set the desired taper angle, see be

-

low. Re-tighten the screws.

12.  Use the carriage handwheel to run the lathe carriage 

back and forth a few times, checking for smooth, consis

-

tent functioning of both cross slide and follower carriage. 

There should be no change in load from one end of the 

taper to the other.

13. 

With the workpiece installed engage carriage power feed 

to cut the taper.

Setting the taper angle

No matter what method you use to set the taper angle, bear in 

mind that all dial indicating should be done 

in one direction

only

 to eliminate backlash.

1.  If you are using only the angle scale on the attachment 

to set a taper, the taper guide bar needs first to be ze

-

roed relative to the lathe bed. Do this using a ground bar 

between centers or in a chuck, see above, with a mag

-

netic-based dial indicator positioned on the cross slide so 

that its probe runs on the bar. Adjust the taper angle for 

zero deflection along the length of the bar.

2.  To cut a matching taper, use the same setup to indicate 

the reference item, either between centers or held in the 

chuck. Aim for zero deflection as the probe traverses the 

taper. This calls for patience — expect several iterations 

to achieve this. Be sure the indicator probe is at center 

height. 


Содержание PM-1236T

Страница 1: ...Shown Above Model PM 1236T and PM 1340GT Lathes This manual was written for the PM 1340GT The PM 1236T lathe also manufactured in Taiwan is identical in all respects other than overall weight motor be...

Страница 2: ...fferences between your specific machine and the information given here with little or no impact on functionality Please email us if you have questions about any aspect of the manual or your machine se...

Страница 3: ...y screw jacks or other means to free the dollies 2 Position the LH and RH stand cabinets 40 1 4 inch es apart in the lathe s final location Install the front panel between the two stand cabinets 3 Hig...

Страница 4: ...the lathe bed is in the same state as it was when the lathe was checked for ac curacy in manufacture level from end to end along the bed and from front to back In other words no warping Make sure all...

Страница 5: ...orts Depending on installed options and other factors the entry point shown in Figure 1 4 may not be available Spindle rotation The motor control switches Figure 1 5 are usually wired so that the spin...

Страница 6: ...in the following Do not connect power at this stage 1 Check oil level sight glasses in the headstock and the apron See Section 4 Figure 4 2 2 Inject a small amount of oil into the gearbox oil gallery...

Страница 7: ...en repeat with the Vee belt changed to high speed Note In initial tests the carriage and cross slide should first be exercised manually then under power After the initial test run with 10 additional h...

Страница 8: ...leadscrew ratios for U S TPI screw cutting without external gear swapping together with an independent power feed for both saddle and cross slide The power feed shaft is driven through a friction clut...

Страница 9: ...in 6 in diameter Cross slide travel 6 3 4 in Compound top slide travel 3 1 2 in Center rest steady rest capacity 2 1 2 in diameter Follower rest capacity 1 1 2 in diameter Drive system High Low belt...

Страница 10: ...can be hazardous Be sure the work area is properly lit Never leave chuck keys wrenches or other loose tools on the machine Be sure the workpiece toolholder s and machine ways are secure before commenc...

Страница 11: ...election thread cutting and the carriage cross slide power feed system Because the user is assumed to be familiar with general purpose metal lathes this section contains very little tutorial CONTROL P...

Страница 12: ...d thread cutting or reversed The selected direction ap plies to both the leadscrew and the carriage cross slide power feed Before changing feed direction STOP THE MOTOR Hand turn jiggle the spindle wh...

Страница 13: ...t the power feed rates in the chart inches spindle revolution apply only to the 40T 40T external gear setup The feed rates given are for carriage motion Lon gi Direction Figure 3 11 Cross slide motion...

Страница 14: ...romise start with low spring force then work up in small increments until the carriage stops in the same location say 0 002 assuming a constant depth of cut and feed rate ENGAGING THE POWER FEED Power...

Страница 15: ...for most American and Metric threads and 2 It is pref erable to feed the tool into the workpiece at an angle so it cuts mostly on the left flank of the thread The cor rect angle relative to the cross...

Страница 16: ...ing of the compound Many users save time by disengaging the split nut at the end of each pass reversing the carriage by hand then re engaging usually by reference to the threading dial Figure 3 16 If...

Страница 17: ...y when the datum coincides with a specific line or lines according to the following rules See Figure 3 17 for more options 1 Divide the TPI value by 2 If this gives a whole number example 6 2 3 re eng...

Страница 18: ...ox C1 C4 C6 mm 0 75 0 6 0 5 Gearbox D1 D4 D6 mm 0 3 0 25 Gearbox E4 E6 METRIC PITCH mm mm 7 5 6 5 Gearbox A1 A4 A6 mm 3 75 3 2 5 Gearbox B1 B4 B6 mm 1 5 1 25 Gearbox C4 C6 mm 0 75 Gearbox D4 METRIC PI...

Страница 19: ...ecisely is to cut and try on the workpiece homing in on the correct degree of offset in small increments The same issues arise when re establishing true zero of the tailstock in other words returning...

Страница 20: ...To minimize cosmetic dam age cut through the paint along the joint between insert and bed using a sharp knife or pointed scraper Insert M6 screws into the two locating pins then jack them out using a...

Страница 21: ...stalled Figure 3 24 Camlock stud TO INSTALL A CHUCK Disconnect the 220 240V supply from the lathe Chucks and faceplates are heavy 8 in chucks weigh over 35 lb They will cause serious damage if allowed...

Страница 22: ...ut not locked in this first pass 4 Check that each of the cam markers lies between 3 and 6 o clock between the two Vees stamped on the spindle Figure 3 27 5 If any cam marker is not within the Vees fi...

Страница 23: ...r carriage move freely without side play Adjust the gibs and lubricate if necessary Bear in mind that setting up any taper attachment is an iterative cut and try process In particular if you will be u...

Страница 24: ...also the set screw se curing cam 5 Screw the tie rod into the slide 8 Set the clamp assembly in the desired location on the rear track of the lathe bed Rotate the cam to raise or lower the tie rod soc...

Страница 25: ...ded due to their poten tial for corrosion and other undesirable effects on the lathe and the coolant pump Figure 3 30 PM 1340GT coolant system If you use emulsified cutting fluid bear in mind that the...

Страница 26: ...he cover left of the headstock 2 Remove the fill plug on the top surface of the head stock 3 Place a drain pan 2 gallons minimum on a stool or other support at about the height of the chip tray 4 Fold...

Страница 27: ...og E Stop controls APRON DRAIN REFILL Remove the fill plug Figure 4 4 Remove the drain plug and allow the apron to empty completely Replace the drain plug Add oil to the halfway mark on the sight glas...

Страница 28: ...lity of the cutting tool inaccuracies and chatter Both screw heads must be tight against the gib ends If you loosen one tighten the other Figure 4 9 Cross slide rear gib screw Figure 4 8 Cross slide f...

Страница 29: ...n is due to two factors 1 End float in out move ment of the handwheel caused by insufficiently tight coupling of the leadscrew and thrust bearings 2 Wear in the leadscrew nut Factor 1 is correctable i...

Страница 30: ...30 Copyright 2021 Quality Machine Tools LLC PM 1340GT v8 2021 04 Figure 4 13B Handwheel attachment Figure 4 14 Cross slide leadscrew nut...

Страница 31: ...ffset of several thousandths 4 Advance the tailstock quill to bring the centers togeth er 5 Place a scrap of hard shim stock or an old style dou ble edge razor blade between the centers Figure B 6 Adv...

Страница 32: ...enter turning but it s critical when the workpiece is held in a chuck or a collet often about 90 of the workload in a typical model shop Assuming no appreciable deflection of the workpiece too thin to...

Страница 33: ...e said that the rod is concentric with the spindle 6 Compare dial indications when traversing from 1 to 2 Ideally there will no change Figure E Factors that may affect runout Straightness and roundnes...

Страница 34: ...ck misalignment is a multi step pro cess requiring a number of extremely small adjust ments each one followed by an alignment test either cut and try or one of the other methods described pre viously...

Страница 35: ...35 Copyright 2021 Quality Machine Tools LLC PM 1340GT v8 2021 04 Section 5 PARTS Model PM 1340GT ELECTRICAL SCHEMATIC Fig 1...

Страница 36: ...36 Copyright 2021 Quality Machine Tools LLC PM 1340GT v8 2021 04 HEADSTOCK CASTING CONTROLS Fig 2 There may be detail differences between this representative drawing and the machine as supplied...

Страница 37: ...12 Lever Z2618 13 Collar Z2619 14 Shaft L H speed selector Z2620 15 Selector tongue Z2621 16 Shifter arm Z2622 17 Screw Z2623 18 Screw Z2624 19 Oil sight glass Z2625 20 Pointer disk Z2631 21 Retainin...

Страница 38: ...38 Copyright 2021 Quality Machine Tools LLC PM 1340GT v8 2021 04 HEADSTOCK SPINDLE GEARS Fig 3 There may be detail differences between this representative drawing and the machine as supplied...

Страница 39: ...Washer Z2665 16 Washer Z2666 17 Gear Z2667 18 Shaft E Z2668 19 Oil seal Z2669 20 Bearing flange Z2670 21 Bearing Z2671 22 Bearing Z2672 23 Gear Z2673 24 Gear Z2674 Ref Description Part 25 Key Z2675 2...

Страница 40: ...40 Copyright 2021 Quality Machine Tools LLC PM 1340GT v8 2021 04 HEADSTOCK GEARS Fig 4 There may be detail differences between this representative drawing and the machine as supplied...

Страница 41: ...Description Part 25 Key Z2722 26 Key Z2723 27 Key Z2724 28 Key Z2725 29 Oil seal Z2726 30 Oil seal Z2727 31 Oil seal Z2728 32 Retaining ring Z2729 33 Retaining ring Z2730 34 Retaining ring Z2731 35 Re...

Страница 42: ...e Z2735 4 Knob feed selector Z2736 5 Pointer disk Z2631 6 Retaining ring Z2738 8 Shift fork Z2739 10 Oil port Z2740 Ref Description Part 11 Ball Z2741 12 Spring Z2742 13 Screw Z2743 16 Screw Z2744 17...

Страница 43: ...43 Copyright 2021 Quality Machine Tools LLC PM 1340GT v8 2021 04 INCH GEARBOX GEARS Fig 6 There may be detail differences between this representative drawing and the machine as supplied...

Страница 44: ...Z2763 17 Gear Z2764 18 Gear Z2765 22 Collar Z2766 23 Gear Z2767 24 Gear Z2768 34 Gear Z2769 35 Collar Z2770 36 Gear Z2771 37 Collar Z2772 38 Key Z2773 39 Key Z2774 Ref Description Part 40 Key Z2775 41...

Страница 45: ...807 25 Split nut assembly Z2808 27 Split nut gib Z2809 29 Screw drain plug Z2810 31 Worm Z2811 Ref Description Part 35 Detent ball spring screw Z2812 37 Plug Z2813 38 Screw Z2814 39 Sight glass Z2815...

Страница 46: ...46 Copyright 2021 Quality Machine Tools LLC PM 1340GT v8 2021 04 APRON GEARS Fig 8 There may be detail differences between this representative drawing and the machine as supplied...

Страница 47: ...Z2828 9 Shaft Z2829 10 Lock collar Z2830 11 Retaining ring Z2831 12 Key Z2832 13 Gear Z2833 16 Lever Z2834 17 Knob Z2835 18 Shaft Z2836 19 Gear Z2837 20 Gear Z2838 21 Split nut shaft Z2839 22 Boss spl...

Страница 48: ...48 Copyright 2021 Quality Machine Tools LLC PM 1340GT v8 2021 04 CARRIAGE Fig 9 There may be detail differences between this representative drawing and the machine as supplied...

Страница 49: ...wn Z2863 14 Tee nut Z2864 15 Bushing Z2865 16 Gib screw Z2866 Ref Description Part 29 Screw Z2879 30 Screw Z2880 31 Set screw cross slide lock Z2881 32 Oiler Z2920 33 Roll pin Z2883 34 Key Z2884 35 Sc...

Страница 50: ...t base Z2902 Ref Description Part 24 Gib screw Z2914 25 Screw Z2915 26 Gib screw Z2916 27 Set screw locking Z2917 28 Ball Z2918 29 Spring Z2919 30 Oiler Z2920 31 Screw Z2921 32 Detent Z2922 33 Spring...

Страница 51: ...51 Copyright 2021 Quality Machine Tools LLC PM 1340GT v8 2021 04 TAILSTOCK Fig 11 There may be detail differences between this representative drawing and the machine as supplied...

Страница 52: ...nge screw Z2933 10 Handle Z2934 11 Quill lock shoe Z2935 Ref Description Part 12 Quill lock shaft Z2936 13 Lever Z2937 14 Collar Z2938 15 Cam shaft Z2939 16 Tailstock clamp stud Z2940 17 Clamp base Z2...

Страница 53: ...53 Copyright 2021 Quality Machine Tools LLC PM 1340GT v8 2021 04 LATHE BED SHAFTS Fig 12 There may be detail differences between this representative drawing and the machine as supplied...

Страница 54: ...ight hand Z2972 16 Taper pin Z2973 17 Nut Z2974 Ref Description Part 18 Screw Z2975 19 Screw Z2976 20 Screw Z2977 21 Screw Z2978 22 Screw Z2979 23 Nut Z2980 24 Locking lever Z2981 25 Screw Z2982 26 Pi...

Страница 55: ...limeters Ref Description Part 1 Quadrant Z3008 2 Transposing gear shaft Z3009 3 Bushing Z3010 4 Bearing Z3011 5 Transposing gears Z3012 6 Retaining ring Z3013 7 Washer Z3014 8 Nut 17 mm Z3015 9 Bushin...

Страница 56: ...56 Copyright 2021 Quality Machine Tools LLC PM 1340GT v8 2021 04 THREADING DIAL Fig 14 32T gear 4 inches carriage motion per revolution of threading dial...

Страница 57: ...57 Copyright 2021 Quality Machine Tools LLC PM 1340GT v8 2021 04 ELECTRICAL COMPONENTS Fig 15 1 Front panel switches Motor control switches 3 2 4 5 7 6 8 9 10 11 12 13 Cover interlock switch 14...

Страница 58: ...Z7540 4 Forward Switch Z7544 5 Reverse Switch Z7544 6 Contactor Z7551 7 Contactor Z7551 8 Transformer Z7554 9 Overload Main Motor Z7555 10 Power Relay Omron MY2N D2 24VDC Z7550 11 Fuse Holder Z7546 11...

Отзывы: