background image

Questions? Call Toll Free at 1-800-737-2112


Copyright © 2019 MAT Engine Technologies, LLC

EN - 19

Warranty

• Save all instructions 

Always specify model number when contacting the factory .

We reserve the right to amend these specifications at any time without notice . The only warranty applicable is our standard written 

warranty . We make no other warranty, expressed or implied . MAT Engine Technologies, LLC warrants this Lawn Edger and any parts 

thereof, to be free from defects in material and workmanship for two years (90 days for commercial use) from the date of first purchase 

from an authorized dealer, provided that the product has been properly maintained and operated in accordance with all applicable 

instructions . This warranty is extended only to the original retail purchaser . The bill of sales or proof of purchase must be presented at 

the time a claim is made under this warranty . This warranty does not cover industrial, or rental usage, nor does it apply to parts that are 

not in original condition because of normal wear and tear, or parts that fail or become damaged as a result of misuse, accident, lack of 

proper maintenance, tampering, or alteration . Travel, handling, transportation, and incidental costs associated with warranty repairs are 

not reimbursable under this warranty and are the responsibility of the owner . To the full extent allowed by the law of the jurisdiction that 

governs the sale of the product, this express warranty excludes any and all other expressed warranties and limits the duration of any 

and all implied warranties, including warranties of merchantability and fitness for a particular purpose to two years from the date of first 

purchase, and MAT Engine Technologies, LLC’s liability is hereby limited to the purchase price of the product and MAT Engine Technol-

ogies, LLC shall not be liable for any other damages whatsoever including indirect, incidental, or consequential damages . Some states 

do not allow limitation of how long an implied warranty lasts or an exclusion or limitation of incidental or consequential damages, so the 

above limitation of damages may not apply to you . This warranty provides the original purchaser with specific rights .
For information regarding those rights, please consult the applicable state laws .

METL Corporate Office - CORRESPONDENCE ONLY

ATTN: Technical Service – METL

6700 Wildlife Way

Long Grove, IL 60047

The Engine Emissions Control System Warranty is provided by the engine manufacturer, included with this product and administered 

by MAT Engine Technologies, LLC . 

If you have any questions regarding your warranty coverage, 

you should contact METL customer service:

If you need assistance or have any questions, CALL 

TOLL FREE: 1-800–737-2112

Powermate® LAWN EDGER Limited Warranty

A

Содержание PWLE0799

Страница 1: ...r sales receipt Consumer Toll Free Number 1 800 737 2112 Refer to the website for electronic manual and parts book www powermateoutdoor com IMPORTANT Thank you for purchasing this Powermate Edger This...

Страница 2: ...n Do Not Overfill Gasoline Fill Location Choke Cold Start Run Warm Start Look for this symbol to point out important safety precautions It means Attention Become Alert Your Safety Is Involved Read ope...

Страница 3: ...r emit chemicals known to the State of California to cause cancer and birth defects or other reproductive harm To prevent accidental starting when setting up transporting adjusting or making repairs a...

Страница 4: ...me the engine is running Exercise extreme caution when operating on or crossing gravel drives walks or roads Stay alert for hidden hazards or traffic Exercise caution to avoid slipping or falling Alwa...

Страница 5: ...ny adjustments while the engine is running except when specifically recommended by the manufacturer Keep the edger in safe working condition Check all fasteners at frequent intervals for proper tightn...

Страница 6: ...art the engine 3 Muffler Location of engine exhaust 4 Adjustable Rear Wheel Right rear wheel is adjustable to level the edger when edging along a curb curb hopping 5 Adjustable Front Wheel Front wheel...

Страница 7: ...the Depth Control Lever Secure with hairpin 3 Slide the other end of the control rod through the hole of the quill arm Secure with second hairpin 4 Attach the recoil starter handle through the rope gu...

Страница 8: ...2 and M8 nut 5 Engine Preparation Save all instructions Engine Oil A Engine shipped without oil Failure to add oil will result in serious engine damage A bottle of engine oil is included with your ed...

Страница 9: ...Wheels Engine Preparation Continued Save all instructions Fuel C How to Check Oil Level and Fill to Proper Level B WARNING Gasoline is extremely flammable and vapors can explode if ignited Handle wit...

Страница 10: ...ll as other applicable state and federal law How to Start Engine B DANGER Never Run engine indoors or in a poorly ventilated area Engine exhaust contains Carbon Monoxide an ODORLESS and DEADLY gas WAR...

Страница 11: ...h will cut a trench into the ground 1 Stop the engine 2 Disconnect the spark plug wire from the spark plug 3 Disengage the index lever See Figure 8 Move the index lever to the desired notch 15 0 or 15...

Страница 12: ...ke sure the unit is balanced Make sure of your footing Stay alert for traffic or other hazards Edging Tips WARNING Read the Operator s manual Know location and functions of all controls Keep all safet...

Страница 13: ...very 25 hours if operating under heavy load or in high temperatures 4 Clean air filter every 10 hours if operating under dusty conditions WARNING Use only GENUINE replacement parts Other parts may dam...

Страница 14: ...rain bolt and washer 7 Allow all oil to drain through the frame hole into the pan IMPORTANT Used oil is a hazardous waste Place oil in a sealed container and take to your local recycling center Do NOT...

Страница 15: ...s the blade to the drive shaft See Figure 13 WARNING To remove or tighten the blade locknut always use the method shown in Figure 13 Always position the holding wrench on the nut behind the blade 4 Re...

Страница 16: ...attach spark plug wire to spark plug NOTE Torque of spark plug is 18 22 foot pounds 25 30 Nm How to Clean the Air Filter G A dirty air filter will restrict air intake Regular maintenance of air cleane...

Страница 17: ...ons under How to Change the Engine Oil 3 Remove the spark plug from the cylinder Pour one ounce US of oil into the cylinder Slowly pull the Maintenance Continued Save all instructions You may have fur...

Страница 18: ...plug 4 Clogged air filter 5 Clogged fuel filter 6 Contaminated Fuel 7 Carburetor out of adjustment 8 Choke in Choke Cold Start position 1 Add engine oil 2 Check engine oil Add or drain engine oil if...

Страница 19: ...warranty and are the responsibility of the owner To the full extent allowed by the law of the jurisdiction that governs the sale of the product this express warranty excludes any and all other express...

Страница 20: ...Web pour un manuel sous forme lectronique et un catalogue des pi ces www powermateoutdoor com IMPORTANT Merci pour l achat de votre coupe bordure Powermate Ce manuel fournit des instructions compl tes...

Страница 21: ...mplissage d essence trangleur d marrage froid D marrage en marche chaud Recherchez ce symbole pour d couvrir les pr cautions importantes en mati re de s curit Il signifie Attention Soyez alerte Votre...

Страница 22: ...ts des v hicules contiennent ou mettent des produits chimiques reconnus par l tat de Californie comme causes de cancer de malformations cong nitales ou autres probl mes du syst me de reproduction Pour...

Страница 23: ...de l op rateur AVERTISSEMENT Ne placez pas les mains ni les pieds pr s ou sous Des pi ces rotatives Les lames tournent d s que le moteur est en marche Soyez vigilants pour viter de glisser ou de tomb...

Страница 24: ...anchez le c ble de la bougie d allumage et placez le l cart de la bougie Faites preuve de prudence car tirer la poign e du lanceur rappel fera aussi tourner la lame Ne proc dez jamais des r glages lor...

Страница 25: ...ilencieux Emplacement de l chappement du moteur 4 Roue Arri re R glable La roue arri re droite est r gla ble pour mettre de niveau le coupe bordure le long d une bordure saute bordure 5 Roue Avant R g...

Страница 26: ...s c bles de mise la terre du moteur et du guidon Utilisez l attache m tallique pour fixer le c ble au guidon AVERTISSEMENT Les c bles de mise la terre DOIVENT tre branch s pour assurer un fonctionneme...

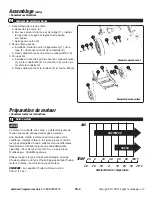
Страница 27: ...et l crou M8 5 Pr paration du moteur Conservez toutes les instructions Huile moteur A AVIS Le moteur et exp di sans huile Le d faut d ajouter de l huile causera de s rieux dommages au moteur Une boute...

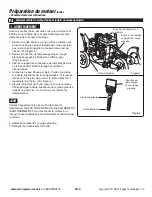
Страница 28: ...te sup rieure de la jauge gradu e Si le niveau d huile est situ pr s de ou sous la limite inf rieure il faut ajouter de l huile Voir Figure 4 5 Ajoutez lentement de l huile jusqu ce que le niveau d hu...

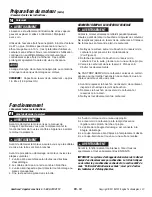
Страница 29: ...de carburant approx 1 6 litres 1 69 pintes US COMMENT REMPLIR LE MOTEUR D ESSENCE AVERTISSEMENT Arr tez le moteur et laissez le refroidir pendant plusieurs minutes avant de retirer le bouchon et d aj...

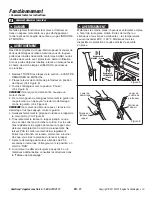
Страница 30: ...e contre le guidon Voir Figure 6 REMARQUE Le moteur ne d marrera pas si le levier de d marrage n est pas appuy contre le guidon 5 Saisissez fermement la poign e du lanceur rappel de la main droite Voi...

Страница 31: ...le de la lame de 15 degr s de la position verticale dans les deux sens pour obtenir une coupe biseaut e permettant de couper la pelouse plus loin du trottoir ou de l entr e et ainsi r duire la fr quen...

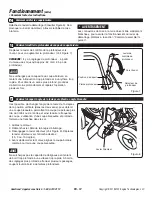
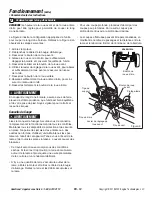
Страница 32: ...br e et de votre prise de pied Soyez vigilants pour le trafic et les autres risques Conseils de Coupe AVERTISSEMENT Lisez le manuel de l usager Assurez vous de conna tre l emplacement et le fonctionne...

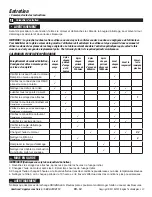
Страница 33: ...oussi reuses ou des temp ratures lev es 4 Nettoyez le filtre air chaque p riode de 10 heures si le travail s effectue dans des conditions plus poussi reuses AVERTISSEMENT N utilisez que des pi ces de...

Страница 34: ...travers l orifice du ch ssis vers le r cipient IMPORTANT L huile souill e est un d chet dangereux Placez l huile dans un r cipient scell et confiez le votre centre local de recyclage Ne le jetez PAS...

Страница 35: ...ir Figure 13 AVERTISSEMENT Pour retirer ou resserrer le contre crou de lame utilisez toujours la m thode en illustration la Figure 13 Placez toujours la cl de support sur l crou situ la partie ar ri r...

Страница 36: ...nstructions Couvercle de filtre air l ment de filtre air Boulon de couvercle Figure 14 Comment changer la bougie d allumage H Mod le de bougie d allumage Torch E7RTC Utilisez uniquement la bougie d al...

Страница 37: ...otre d partement de service technique au 1 800 737 2112 Anglais seulement Vous pouvez galement nous crire METL CORRESPONDANCE SEULEMENT ATT N Service technique METL 6700 Wildlife Way Long Grove IL 600...

Страница 38: ...nt bloqu 6 Carburant contamin 7 Carburateur en besoin de r glage 8 L trangleur est en position choke cold start d marrage l trangleur froid 1 Ajoutez de l huile moteur 2 V rifiez l huile moteur Ajoute...

Страница 39: ...soci s aux r parations sous garantie ne sont pas remboursables sous cette garantie et demeurent la responsabilit du propri taire Dans la mesure autoris e par la loi de la juridiction r gissant la vent...

Страница 40: ...el consumidor 1 800 737 2112 Cons ltese el sitio web para obtener una copia electr nica del manual y el cat logo de piezas www powermateoutdoor com IMPORTANTE Le agracedemos haber comprado la recorta...

Страница 41: ...Busque este s mbolo sobre las precauciones de seguridad importantes respecto a riesgos de lesiones personales Significa Atenci n Est alerta Su seguridad est en juego Leer el Manual del usuario antes...

Страница 42: ...VERTENCIA El gas de escape del motor algunos de sus constituyentes y ciertos componentes de veh culos contienen o emiten substancias qu micas que consta al Estado de California producen c ncer y malfo...

Страница 43: ...ajas ramitas u otros objetos que pudieran pasar desapercibidos por el usuario ADVERTENCIA No colocar ni las manos ni los pies cerca de piezas rotativas o debajo de las mismas Las cuchillas giran siemp...

Страница 44: ...esconectar el cable de la buj a y alejarlo de sta Proceder con precauci n ya que al tirar de la manilla de arranque con retroceso las cuchillas girar n tambi n Jam s intentar ajuste alguno mientras el...

Страница 45: ...scape del motor 4 Rueda Trasera Ajustable La rueda trasera derecha es ajustable para nivelar la bordeadora al efectuar cortes a lo largo de un cord n de acera franqueo de cord n de acera 5 Rueda Front...

Страница 46: ...r torsi n 5 Retirar el inserto temporal del terminal del cable de tierra del motor 6 Conectar los cables de tierra del motor y del asidero Utilizar la atadura para asegurar un cable suelto al asidero...

Страница 47: ...rca M8 5 Preparaci n del motor Conserve todas las instrucciones Aceite de motor A El motor se env a sin aceite El no agregar aceite causar da os severos al motor Se incluye un envase de aceite utomotr...

Страница 48: ...te el aceite alcanzar el l mite superior en la varilla aforadora Si el nivel de aceite est cerca del l mite inferior o por debajo de ste se ha de agregar aceite V ase la figura 4 5 Agregar aceite lent...

Страница 49: ...stible contaminado causar da os severos al motor NOTA La capacidad del tanque de combustible es aproximadamente 1 6 L 1 69 cuartos C MO LLENAR EL MOTOR CON COMBUSTIBLE ADVERTENCIA Apagar el motor y de...

Страница 50: ...o de la bordeadora con la mano izquierda y tirar de la barra de control de arranque paro contra el asidero V ase la figura 6 NOTA El motor no arranca si la barra de control de arranque paro no est hal...

Страница 51: ...ia del and n o acceso vehicular reduciendo as la necesidad de bordear con mayor frecuencia El uso del borde oblicuo a mayor profundidad har una zanja en el terreno 1 Parar el motor 2 Desconectar el ca...

Страница 52: ...acera Asegurarse de que la unidad est equilibrada Asegurar el apoyo de los pies Mantenerse alerta ante el tr fico u otros peligros Consejos para Bordear ADVERTENCIA Leer el Manual del usuario Conocer...

Страница 53: ...en temperaturas altas 4 Limpiar el filtro de aire despu s de cada 10 horas de operaci n bajo condiciones de mucho polvo ADVERTENCIA Utilizar s lo piezas de repuesto GENUINAS Otras piezas podr an averi...

Страница 54: ...del drenaje del aceite 7 Permitir que todo el aceite drene a trav s del agujero del marco hacia la palangana IMPORTANTE El aceite usado es un desecho peligroso Colocar el aceite en un contenedor sell...

Страница 55: ...la buj a 3 Retirar la contratuerca de la cuchilla que sujeta la cuchilla al eje de impulsi n V ase la Figura 13 ADVERTENCIA Para retirar o apretar la contratuerca de la cuchilla siempre utilizar el m...

Страница 56: ...7 Reconectar el cable de la buj a a la buj a NOTA el par de torsi n de la buj a es de 25 a 30 N m 18 a 22 pie libra C mo limpiar al filtro de aire G Un filtro de aire sucio restringir la toma de aire...

Страница 57: ...ornillo 2 Cambiar el aceite Para ello seguir las instrucciones bajo C mo cambiar el aceite Mantenimiento la siguiente Conserve todas las instrucciones Si se tuvieran preguntas adicionales sobre el mon...

Страница 58: ...tro de aire obstruido 5 Filtro de combustible obstruido 6 Combustible contaminado 7 Carburador desajustado 8 Estrangulador en la posici n Estrangulador Arranque en fr o 1 Agregar aceite para motor 2 R...

Страница 59: ...n reparaciones bajo garant a no son reembolsables bajo esta garant a y son responsabilidad del propietario Hasta donde lo permita la ley de la jurisdicci n que gobierne la venta de este producto esta...

Отзывы: