5
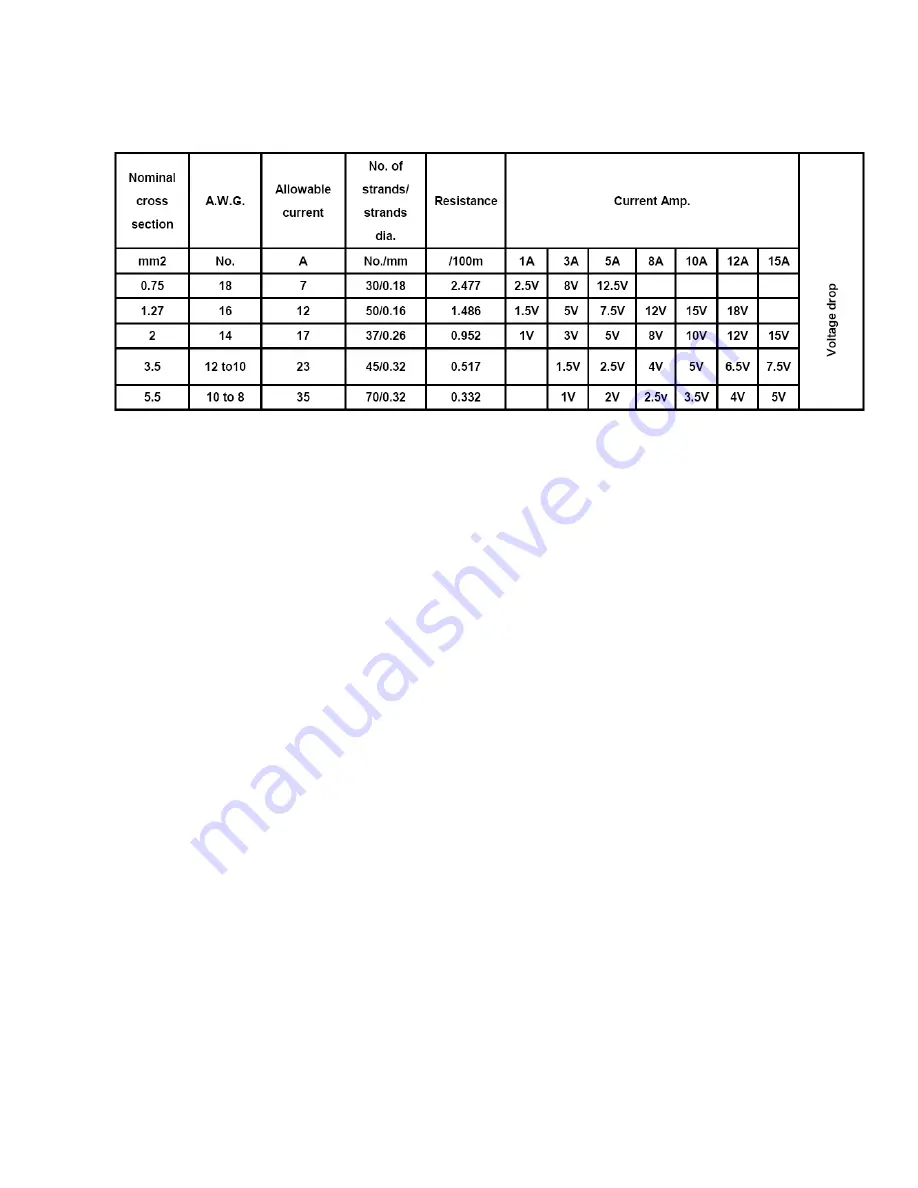
The chart below has been prepared to illustrate the approximate voltage loss when an extension cord of 300
feet (approx.100 meters) is used to connect an appliance or tool to the generator.
Страница 1: ...0...
Страница 2: ...CAL SAFETY PRECAUTIONS 4 5 3 SAFETY INFORMATION 6 7 4 CO NT ROL FUN CTIO N 8 11 5 PRE OPERATION CHECK 11 12 6 OPERATION 13 16 7 PERIODIC MAINTENANCE 17 20 8 TROUBLE SHOOTING 20 21 9 S T O R A G E 2 1...
Страница 3: ...new owner Some important information in this manual will be indicated in the following way please see below The users should pay special attention to these instructions The range of POWER MASTER GENE...
Страница 4: ...m the generator to the connect device If the wire is under the generator or in contact with a vibrating part it may break and possibly cause a fire generator burnout or electric shock hazard Replace d...
Страница 5: ...ue to high mechanical stresses only tough rubber sheathed flexible cable should be used 2 6 If the generator is of CLASS II construction then earthing of the generator is not required 2 7 CordExtensio...
Страница 6: ...5 The chart below has been prepared to illustrate the approximate voltage loss when an extension cord of 300 feet approx 100 meters is used to connect an appliance or tool to the generator...
Страница 7: ...nge your clothes immediately z When operating or transporting the generator please ensure that it is kept upright If it tilts fuel may leak from the carburetor or fuel tank 3 ENGINE AND MUFFLER MAY BE...
Страница 8: ...nt current capacity Diameter 0 12mm 0 005 in ampere EX 10 Ampere 1 2mm 0 055 in 5 CONNECTION NOTES z Do not connect the generator directly to the Utility Power Source z Do not connect the generator in...
Страница 9: ...light 19 Economy control switch 20 Voltmeter 21 DC protector 22 DC receptacle 23 Ground earth terminal 24 AC receptacle 25 AC receptacle L5 30R 26 AC receptacle 5 20R 27 Parallelconnectioncontrolsocke...
Страница 10: ...DC protector 23 DC receptacle 24 Ground earth terminal 25 AC receptacle 26 AC receptacle L5 30R 27 AC receptacle 5 20R 28 Parallel connection control socket 29 Parallel connection socket 30 FrequencyT...
Страница 11: ...ad This may result in better fuel efficiency and less noise 4 DC CIRCUIT PROTECTOR The DC circuit protector turns off automatically when the load exceeds the generator rated output CAUTION z If the DC...
Страница 12: ...time the generator is used 1 CHECK ENGINE FUEL z Make sure there is sufficient fuel in the tank z If the fuel is low refill with clean unleaded gasoline z Be sure to use the fuel filter screen on the...
Страница 13: ...ge 17 z Recommended engine oil API Service SJ 3 GROUND Earth Please ensure that the generator is properly earthed grounded 4 CONNECT BATTERY for electric starting system z Loosen the screw and remove...
Страница 14: ...r handle slowly until resistance is felt This is the Compression point Return the handle to its original position and pull swiftly Do not fully pull out the rope After starting allow the starter handl...
Страница 15: ...is within generator rated output z Make sure that the socket load current is within socket rated current z The economy control switch must be turned to OFF when using electrical appliances that requi...
Страница 16: ...nly a Charging instruction for battery z Disconnect the battery terminals z Loosen the battery fluid filler cap completely z Fill distilled water to the upper limit if the battery fluid level is low z...
Страница 17: ...y turning the switch to the STOP position Click the remote switch to the OFF position 3 Turn the fuel cock lever by turning it to the OFF position 4 Turn the fuel tank cap air vent knob counterclockwi...
Страница 18: ...Oil filter Clean oil filter z Air Filter Clean Replace if necessary z Fuel Filter Clean fuel cock filter Replace if necessary z Choke Check choke operation z Valve Clearance Check and adjust when eng...
Страница 19: ...pletely 5 Once the oil has drained return the generator to the upright position 6 Add engine oil until it reaches the upper level indicator 7 Replace the oil filler cap properly 8 Replace the cover pr...
Страница 20: ...e piston and or cylinder wear 4 CLEANING AND ADJUSTING SPARK PLUG 1 Remove the side cover 2 Check for discoloration and remove the carbon build up 3 Check that the correct spark plug is being used and...
Страница 21: ...el supplied to combustion chamber z Check the fuel in the fuel tank refill if necessary z Check the fuel in the fuel tank if there is sufficient fuel ensure that the fuel tank cap air vent knob is in...
Страница 22: ...the fuel from the fuel tank 2 Remove the side cover and drain fuel from the carburetor by loosening the drain screw 2 ENGINE 1 Remove the spark plug and pour in about one tablespoon of SAE 10W30 or 20...
Страница 23: ...ment 124 6cc 149 5cc Max Output 3 5KW 5500rpm 4 0KW 5500rpm Fuel Regular Automobile Gasoline Fuel tank Capacity 7 5 liters Rated Continuous Operation 4h10min 100 Load 5h30min 50 Load 3h5min 100 Load 4...
Страница 24: ...IL M Oil sensor R R BU BU BU BU BL BL BL BL BL BL W W BL BL BL DC winding Stepping motor Main Control winding winding Economic switch R High pressure wrap Spark plug BL W Spring winding Ignition windi...
Страница 25: ...or R R BU BU BU BU BL BL BL BL BL BL W W BL BL BL DC winding Stepping motor Main Control winding winding Economic switch R High pressure wrap Spark plug BL W Spring winding Ignition winding R BL BR GR...
Страница 26: ...BL BL Stepping motor Main Control winding winding Economic switch R O W BL BU R O BL PI BU BL W Spring winding Ignition winding BL BR GR P Y G W O R BU START MOTOR BATTERY BU BU DC winding Spark plug...
Страница 27: ...BL Stepping motor Main Control winding winding Economic switch R O W BL BU R O BL PI BU BL W Spring winding Ignition winding BL BR GR P Y G W O R BU START MOTOR BATTERY BU BU DC winding Spark plug R H...
Страница 28: ...27...