background image

78

Maintenance and Transportation

7. Gently insert the new lamp along the guide rail. If it doesn’t fit 

easily, make sure it’s facing the correct way. Push the lamp down 
firmly where the label 

PUSH

 appears.

8. Once the lamp is fully inserted, tighten its screws.

9. Lower the lamp cover into place. (The opening should be almost 

covered, and the top of the cover should be flush with the top of 
the projector.) Then slide the cover closed and tighten the screw.

10. Reset the lamp timer as described in the next section.

Resetting the Lamp Timer

You must reset the lamp timer after replacing the lamp to clear the 

Replace the Lamp 

warning message. Follow these steps:

1. Connect the power cable and turn on the projector.

2. Press the 

Menu

 button on the remote control or projector and 

select the 

Reset

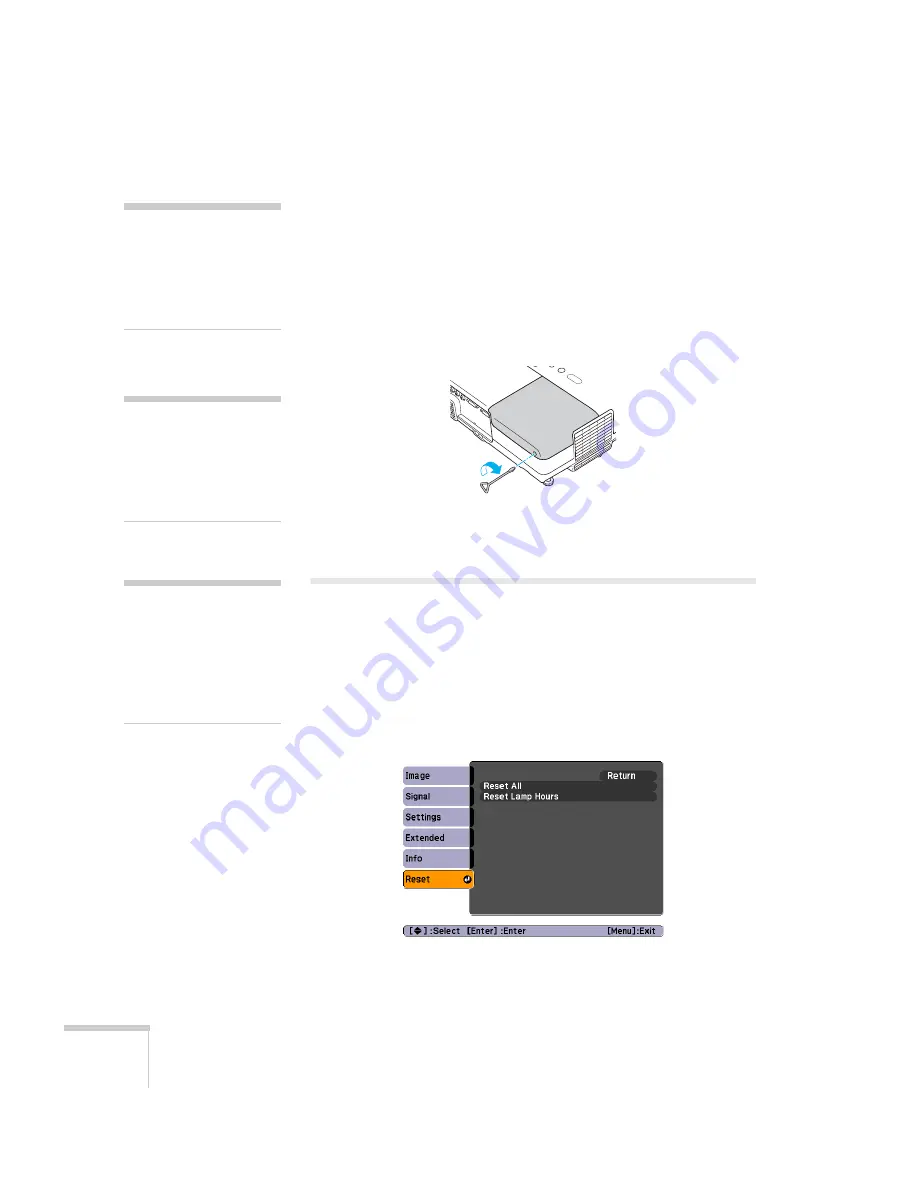
 menu. Then press 

Enter

. You see the following:

caution

Do not touch the glass 
portion of the lamp 
assembly. Touching the glass 
could result in premature 
lamp failure.

note

Be sure to seat the lamp fully 
and secure the lamp cover. If 
the lamp is not properly 
installed or the cover is loose, 
the lamp will not turn on.

note

Do not reset the lamp timer 
if you have not replaced the 
lamp. If you do, the Lamp 
Hours will not accurately 
reflect the number of hours 
that the lamp has been used.

Содержание 77c

Страница 1: ...PowerLite S5 Series 77c Multimedia Projector User sGuide...

Страница 2: ...product Epson is not responsible for any use of this information as applied to other products Neither Seiko Epson Corporation nor its affiliates shall be liable to the purchaser of this product or th...

Страница 3: ...Lite S5 Series Control Panel 12 PowerLite 77c Control Panel 12 Additional Components 13 Optional Accessories 14 1 Setting Up the Projector 15 Positioning the Projector 16 Other Installations 17 Connec...

Страница 4: ...sing and Zooming Your Image PowerLite S5 Series 37 Focusing and Zooming Your Image PowerLite 77c 38 Adjusting the Height of Your Image 39 Adjusting the Image Shape 39 Adjusting the Brightness 40 Corre...

Страница 5: ...69 Starting the Projector with a Password 70 Disabling the Projector s Buttons 71 Installing Security Locks 71 Restoring the Default Settings 72 5 Maintenance and Transportation 73 Cleaning the Lens 7...

Страница 6: ...6 Mouse Compatibility 96 Dimensions 96 Electrical 97 Environmental 97 Safety and Approvals 97 Compatible Video Formats 98 Compatible Computer Display Formats 99 B Notices 101 Important Safety Instruct...

Страница 7: ...e range of computers including IBM compatible PCs and laptops Apple Macintosh Power Macintosh series including G4 and G5 systems PowerBook computers and many iMac and iBook series systems With Epson s...

Страница 8: ...on control you can connect a USB cable to the projector for running slide shows and connect an external monitor to view the presentation on your computer simultaneously Connecting to video sources You...

Страница 9: ...your projector Here s where you can look for help www presentersonline com Includes a library of articles covering presentation tips tricks and technology The site provides templates clip art and sou...

Страница 10: ...ll ship you a replacement unit anywhere in the United States or Canada usually via overnight delivery See the Extra Care Road Service brochure for details To register complete the registration form th...

Страница 11: ...another location Projector Parts Front Control panel Air exhaust vent Front adjustable foot Foot release lever Remote control sensor Monitor Out port Computer Component Video port S Video port Video p...

Страница 12: ...Up button Enter button automatically adjusts computer image Wide and Tele buttons adjust image size and select menu items Up and Down buttons correct keystone distortion and select menu items Down but...

Страница 13: ...sub 15 pin VGA to component video cable which is available from Epson See page 14 Some older PowerBooks and Macintosh desktop models may need a Macintosh video adapter see your computer dealer Older...

Страница 14: ...video cable S Video cable ELPKC19 ELPSV01 Distribution amplifier ELPDA01 Duet portable projector screen 50 inch portable screen 60 inch portable pop up screen 80 inch portable pop up screen 83 6 inch...

Страница 15: ...onnect it to a computer or video source You can connect up to three devices simultaneously three video sources or one computer and two video sources You ll find instructions for the following in this...

Страница 16: ...the audience and remain close enough to the equipment to be able to control it Try to leave as much space as possible between the projector and the screen to get a good size image Place the projector...

Страница 17: ...scribed on page 39 This also causes the image to lose its rectangular shape You can adjust the shape using the buttons on the projector see page 39 or using the projector s menu system see page 61 On...

Страница 18: ...s in this section to Connect the projector to your computer with the VGA cable included with the projector Connect the projector to your computer with a commercially available VGA 5BNC cable After con...

Страница 19: ...computer s video out or monitor port If you re using a PowerBook or iBook and you can t connect the cable you may need to use an optional Macintosh video adapter see your computer dealer 4 If you want...

Страница 20: ...ent Video port 3 Connect the BNC connectors to your computer s BNC ports 4 If you want to view the display simultaneously on your computer monitor and the projector screen see Connecting an External M...

Страница 21: ...rating systems 1 If you are using a desktop computer disconnect the mouse cable from your computer 2 Connect the square end of the USB cable to the projector s USB port 3 Connect the flat end of the c...

Страница 22: ...rojection on the screen Simultaneous display is possible only when the computer is connected to the projector s Computer Component Video port Make sure the projector and computer are off Then connect...

Страница 23: ...wo male RCA plugs from a computer or electronics dealer 1 Connect the RCA plugs on the audio adapter cable to the corresponding L Audio R jacks on the projector 2 Connect the other end of the audio ca...

Страница 24: ...nds on the video source For composite video use a commercially available RCA A V cable See page 25 For S Video use the S Video cable supplied with your video device or order one from Epson See page 26...

Страница 25: ...jack 2 Connect the yellow plug on the other end of the cable to the video out port on your video source 3 To play sound through the projector follow the instructions beginning on page 29 If you don t...

Страница 26: ...her video source are turned off 1 Insert one end of the S Video cable into the projector s S Video port and the other end into the S Video output port of your video source 2 To play sound through the...

Страница 27: ...the VGA computer cable to the Computer Component Video port on the projector 2 Connect the other end to the video port on your player 3 To play sound through the projector follow the instructions beg...

Страница 28: ...large end of the component video cable to the projector s Computer Component Video port 2 Insert the three ends of the component video cable into the R G and B ports on your video source 3 To play sou...

Страница 29: ...tput port In this case use a commercially available RCA style audio cable to connect the projector to your video source 1 Connect the red and white plugs on one end of the audio cable to the L Audio R...

Страница 30: ...stereo miniplug to two male RCA plugs to connect to the projector 1 Connect the red and white plugs on the audio adapter cable to the L Audio R jacks on the projector 2 Connect the other end of the au...

Страница 31: ...sentation Although you can operate the projector without it the remote control lets you use additional features See Chapter 3 for instructions on using the remote This chapter covers the following Tur...

Страница 32: ...deo equipment before starting the projector the projector automatically detects and displays the image source If you turn on the projector first or have multiple pieces of connected equipment you may...

Страница 33: ...ys green If you re using a computer you should see your computer display projected after a moment or two If not you need to select the image source See page 34 Windows only If you see a message saying...

Страница 34: ...rojected image fails to appear see the next section for help Once you see your image turn to page 37 for instructions on focusing and making other image adjustments What To Do If You See a Blank Scree...

Страница 35: ...ts you toggle between the LCD screen and the projector or display on both at the same time If you re projecting from a laptop and you don t see the same image on the projection screen and computer scr...

Страница 36: ...o display on the projector screen as well as the LCD screen Follow these steps 1 From the Apple menu select System Preferences then click Display or Displays 2 Select VGA Display or Color LCD click Ar...

Страница 37: ...see page 39 To adjust image brightness see page 40 If a computer image displays incorrectly see page 41 To change the color mode for your image and surroundings see page 44 You can make many other adj...

Страница 38: ...mote control to zoom in on a portion of the image See page 47 for instructions Focusing and Zooming Your Image PowerLite 77c Rotate the focus ring to sharpen the image and the zoom ring to reduce or e...

Страница 39: ...ting the Image Shape If the projector is tilted up or down the images that are displayed will be distorted To correct the distortion or keystone shape do one or more of the following If your image loo...

Страница 40: ...adjustments using the projector s Settings menu See page 62 Adjusting the Brightness The brightness of an image depends on the source you are projecting and the amount of light in the room If the ima...

Страница 41: ...in the Signal menu is set to OFF the Auto function will not work See page 59 Adjusting the Volume You can use the Vol and Vol buttons on the remote control to increase or decrease the volume for the...

Страница 42: ...gain press the P Power button 4 Press up on the blue foot release lever and lower the projector to retract the front adjustable foot 5 Close the A V Mute slide 6 Unplug the power cord 7 Turn off and d...

Страница 43: ...omputer and you ve connected a USB cable as described in Chapter 1 you can use the remote control to change slides in your presentation When using the remote control stand within 20 feet of the projec...

Страница 44: ...on the projector or remote control to switch between the different sources After you select a source the screen goes dark for a moment before the image appears The name of the selected source such as...

Страница 45: ...watching TV in a bright room component S video or composite video input only Presentation Use when you re projecting a full color presentation in a bright room Text Use when you re projecting a black...

Страница 46: ...te slide on the projector The screen goes dark To turn the image and sound back on press the button again or open the AV Mute slide You can create an image such as a company logo or a picture to displ...

Страница 47: ...r of the zoom in area 2 Use the four arrow buttons on the remote control to position the crosshair in the area you want to enlarge 3 Continue pressing the E Zoom button to enlarge the selected area up...

Страница 48: ...entations such as PowerPoint from up to 20 feet away This gives you more flexibility since you don t need to stand near your computer to change slides To change slides with the remote control make sur...

Страница 49: ...on being pressed more than 30 seconds This conserves battery life It can be helpful for example when the remote is in a carrying case and the Power button is accidentally pushed caution When replacing...

Страница 50: ...50 Using the Remote Control...

Страница 51: ...mage sound and other features This chapter covers the following information Using the menu system Adjusting image colors and clarity Adjusting the input signal Customizing projector features Selecting...

Страница 52: ...enu lets you customize the way you use the projector It allows you to adjust the volume and keystone correction set lamp brightness to high or low and disable buttons on the projector while you are pr...

Страница 53: ...own on the right 2 Use the up and down arrow buttons on the projector or remote control to scroll through the menu list When you ve highlighted the desired menu press the Enter button on the projector...

Страница 54: ...r changing the setting Press the Vol or Vol button on the remote control or the left or right arrow buttons on the projector to adjust a slider bar To select from two or more settings use the Vol or V...

Страница 55: ...d image and fine tune brightness contrast and sharpness The options available depend on which image source is selected Follow these steps to adjust the appearance of your image 1 Press the Menu button...

Страница 56: ...a bright room Theatre For optimizing movie images with natural color in a dark room the default for video or S Video display Game Brightest mode for playing video games in a bright room sRGB For stan...

Страница 57: ...er color temperature produces an image with more red warmer tones while a higher color temperature produces an image with more blue cooler tones Color Adjustment Adjusts the temperature and intensity...

Страница 58: ...al adjustments In addition to changing the position of the projected image you can correct tracking and sync for computer images or change the aspect ratio to widescreen format for video images 1 Pres...

Страница 59: ...nt from the computer See page 90 for more information about adjusting the sync setting Position Use the arrow buttons to move the image on the screen left right up or down Progressive Leave this setti...

Страница 60: ...s the image s aspect ratio ratio of width to height to 4 3 for computer or letterbox video content and to 16 9 for widescreen video content You can also select 16 9 Up for a widescreen display at the...

Страница 61: ...ctor Features The Settings menu lets you customize the way you use the projector from adjusting lamp brightness and speaker volume to applying security controls 1 Press the Menu button 2 Select the Se...

Страница 62: ...on this function disables all projector buttons or all buttons except the P Power button Changes to this setting take effect after you restart the projector After you turn off the projector wait for...

Страница 63: ...n use the up and down arrow buttons and the Enter button to set the following options Display Message Lets you turn screen messages on or off Display Background Sets the screen background to Black Blu...

Страница 64: ...ode is on you can set the period of time before the projector turns off automatically from 1 to 30 minutes Lens Cover Timer This feature is enabled by default to turn the power off automatically when...

Страница 65: ...If the number shown is close to 3000 or the information is displayed in red make sure you have a spare lamp handy Source Displays the input source currently being projected Input Signal computer RGB v...

Страница 66: ...tartup screen and or AV Mute screen Unauthorized users cannot turn it off or change it This feature is intended to discourage theft and provides a way to identify the projector should it be stolen If...

Страница 67: ...Menu button and select the Extended menu 3 Use the down arrow button and press Enter to select User s Logo 4 When you see a message asking if you want to use the present image as a user s logo select...

Страница 68: ...r Then select Logo and press Enter 13 When you re finished press Menu to exit the menus Setting a Password 1 Press the Freeze button on the remote control for about 7 seconds until you see the Passwor...

Страница 69: ...ou see the Password Protect menu 2 To enable the password select Power On Protect and press Enter Select ON then press Esc 3 To enable your screen logo select User s Logo Protect and press Enter Selec...

Страница 70: ...rojector s operation will be locked Request code xxxxx and the projector switches to standby mode for approximately 5 minutes Write down the request code Then disconnect the projector s power cord fro...

Страница 71: ...ns or Operation Lock to disable all except the Power button Then press Enter 5 Select Yes and press Enter to confirm the setting 6 Press the Menu button Installing Security Locks You can install two d...

Страница 72: ...e Enter button to display the confirmation screen Select Yes to reset all the default settings or No to cancel note The Computer Input Zoom PowerLite S5 Series only Lamp Hours and Language settings do...

Страница 73: ...rt needs replacing contact your dealer or a qualified servicer This chapter covers the following Cleaning the lens Cleaning the projector case Cleaning and replacing the air filter Replacing the lamp...

Страница 74: ...ner and gently wipe the lens surface Cleaning the Projector Case Before you clean the case first turn off the projector and unplug the power cord To remove dirt or dust wipe the case with a soft dry l...

Страница 75: ...g is blocking the air vent and clean or replace the air filter To clean the air filter and air intake vent follow these steps 1 Turn off the projector allow it to cool down and unplug the power cord 2...

Страница 76: ...aintain projector brightness and image quality replace the lamp as soon as possible Contact your dealer or call Epson at 800 463 7766 for a replacement lamp Request part number V13H010L41 Follow these...

Страница 77: ...p cover the lamp cover is located on top of the projector 4 Slide the cover out then lift it off 5 Use the screwdriver to loosen the two screws holding the lamp in place You can t remove the screws 6...

Страница 78: ...You must reset the lamp timer after replacing the lamp to clear the Replace the Lamp warning message Follow these steps 1 Connect the power cable and turn on the projector 2 Press the Menu button on t...

Страница 79: ...ines to prevent damage to the projector When shipping the projector for repairs use the original packaging material if possible If you do not have the original packaging use equivalent materials placi...

Страница 80: ...80 Maintenance and Transportation...

Страница 81: ...l support for problems you can t solve yourself This chapter explains the following Using the projector s on screen help system What to do when the projector s status lights flash Solving problems wit...

Страница 82: ...tton on the projector or remote control Follow these steps to get help 1 Press the Help button on the remote control or projector You see the help menu 2 Use the up and down arrow buttons on the proje...

Страница 83: ...f the suggestions solves your problem see additional solutions to problems in the following sections What To Do When the Lights Flash The lights on top of the projector indicate the projector s status...

Страница 84: ...0 m turn on High Altitude mode as the Operation setting in the Extended menu see page 64 If these suggestions don t work contact Epson Red Off Red The projector has overheated and turned itself off Le...

Страница 85: ...rn the projector on Press the A V Mute button to make sure the picture has not been turned off temporarily If the power was switched off and then on again wait until the power light stops flashing and...

Страница 86: ...Allow a few seconds for the projector to sync up after pressing the button If you ve connected a laptop computer make sure it s set to display on an external monitor See page 35 If you re using a PC l...

Страница 87: ...l menu See page 60 It should normally be set to Auto The buttons on the projector don t work The Operation Lock may be enabled Press and hold the Enter button on the projector for 7 seconds to release...

Страница 88: ...rectangular but trapezoid shaped Make sure the projector isn t placed off to one side of the screen at an angle or the image won t be rectangular Place it directly in front of the center of the screen...

Страница 89: ...Adjust the focus using the focus ring There may be dirt or smears on the lens Clean the lens as described on page 74 Make sure the lens is not fogged by condensation You may need to wait before using...

Страница 90: ...Image menu See page 56 Try adjusting the Color Adjustment setting on the Image menu See page 57 Make sure the input signal setting on the Signal menu matches the signal from the connected device If th...

Страница 91: ...is not turned all the way down or muted Make sure the audio cable is securely connected to both the projector and your computer s headphone jack or audio out jack See page 23 The wrong source may be s...

Страница 92: ...e 49 Dim the room lights and turn off any fluorescent lights Make sure the projector is not in direct sunlight Strong lighting especially fluorescent lights may affect the projector s infrared receive...

Страница 93: ...ons Visit http www presentersonline com to access tips templates and training for developing successful presentations Speak to a Support Representative To use the Epson PrivateLine Support service cal...

Страница 94: ...ter or video configuration Description of the problem Purchase Supplies and Accessories You can purchase screens carrying cases or other accessories from an Epson authorized reseller To find the neare...

Страница 95: ...olor 16 77 million colors Brightness ANSI PowerLite S5 Series 2000 lumens High brightness mode 1600 lumens Low brightness mode Brightness ANSI PowerLite 77c 2200 lumens High brightness mode 1760 lumen...

Страница 96: ...gle 30 vertical maximum Projection Lamp Power consumption 170 W UHE Lamp life About 3000 hours High brightness 4000 hours Low brightness Remote Control Range 20 feet 6 meters Batteries 2 Alkaline AA M...

Страница 97: ...to 140 F 10 to 60 C Humidity Operating 20 to 80 RH non condensing Storage 10 to 90 RH non condensing Altitude Up to 4 900 feet 1 500 m Up to 7 500 feet 2 286 m with high altitude mode enabled Safety a...

Страница 98: ...deo component video and RGB video and it automatically senses the video format HDTV SDTV NTSC PAL or SECAM The projector supports these international video standards Mode Refresh Rate Hz NTSC NTSC 4 3...

Страница 99: ...cal frequency that s compatible with the projector see the following table for compatible formats For best results the computer s resolution should be set to match the projector s native resolution 10...

Страница 100: ...A 70 XGA 75 XGA 85 XGA 120 PL 77c only 60 70 75 85 120 1024 768 1024 768 1024 768 1024 768 1024 768 SXGA1 70 SXGA1 75 SXGA1 85 SXGA1 100 PL 77c only 70 75 85 100 1152 864 1152 864 1152 864 1152 864 SX...

Страница 101: ...use with this projector Do not stand on the projector or place heavy objects on it Do not use the projector where it may be exposed to rain water or excessive humidity Unplug the projector from the wa...

Страница 102: ...inct change in performance If smoke strange odors or strange noises come from the projector If the power cord or plug is damaged or frayed If liquid or foreign objects get inside the projector or if i...

Страница 103: ...te control via a line of sight infrared IR receiver at the front and rear of the projector The projector may not respond to remote control commands under the following conditions There is an object be...

Страница 104: ...nna Increase the separation between the equipment and receiver Connect the equipment into an outlet on a circuit different from that to which the receiver is connected Consult the dealer or an experie...

Страница 105: ...Control setting 40 85 Brightness setting 90 Buttons control panel 12 disabling projector 62 C Cables 10 14 94 Camcorder connecting to 24 Carrying case 10 79 Ceiling mount 14 18 projection 18 64 Clean...

Страница 106: ...37 38 Foot release lever 39 Freeze button 46 Front projection 16 to 17 64 Front Ceiling setting 18 64 G Game color mode 45 56 H Height of image adjusting 39 Help 9 93 to 94 Help system using 82 to 83...

Страница 107: ...54 Extended 52 63 to 65 Image 52 55 to 57 Info 52 65 to 66 Reset 52 72 Settings 52 61 to 62 Signal 52 58 to 60 using 52 to 54 Message setting 63 Mouse compatibility 96 Moving projector 79 N Noise leve...

Страница 108: ...96 using 43 to 48 Replacing air filter 75 to 76 lamp 76 to 79 remote control 14 94 remote control batteries 49 Request code password 70 Reset menu 52 72 Resolution 7 65 95 99 to 100 S Safety approval...

Страница 109: ...o image 85 to 87 no sound 91 password 91 remote control problems 92 to 93 103 Turning off audio 46 Turning off picture 46 Turning off projector 42 Turning on password 69 Turning on projector 32 to 34...

Страница 110: ......

Отзывы: