background image


EN 


Online UPS


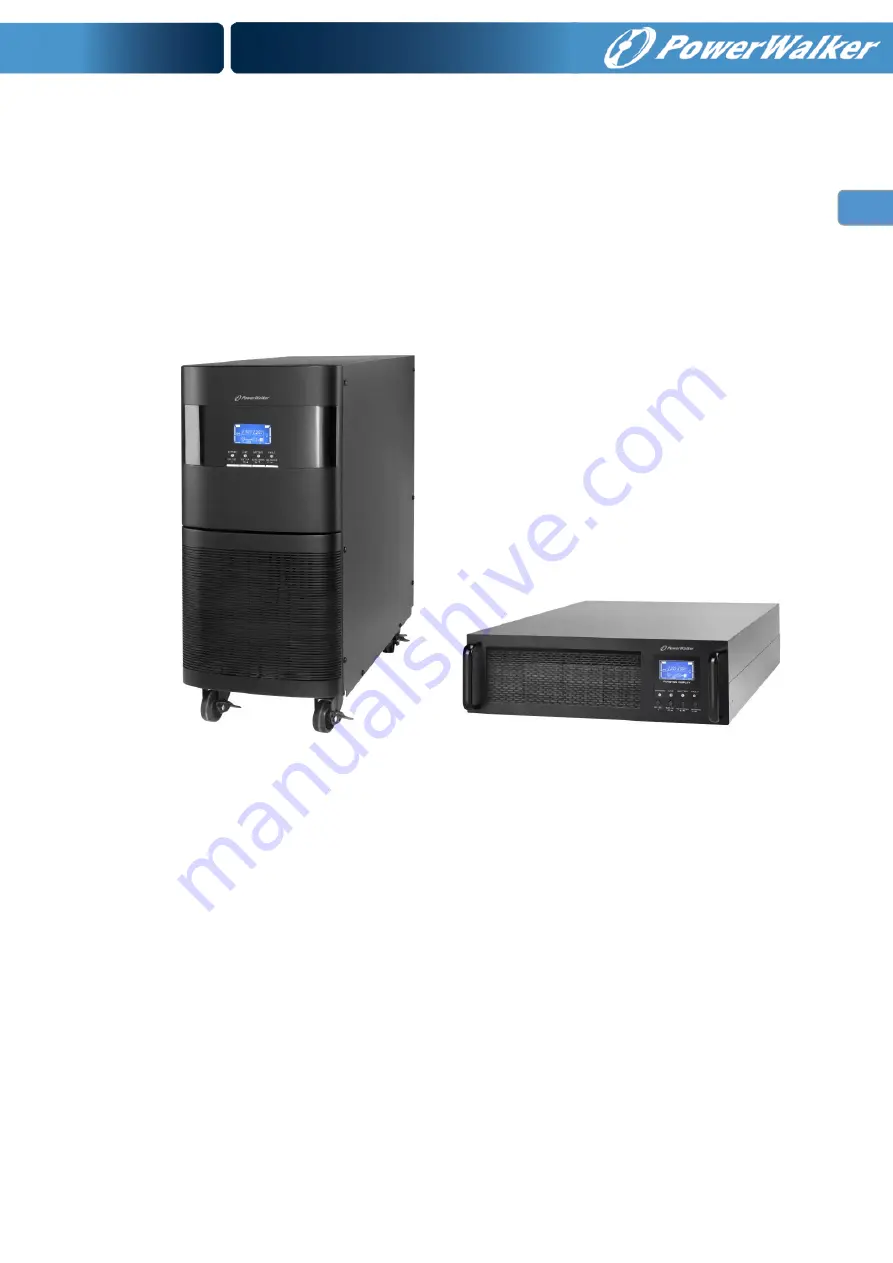
PowerWalker VFI 6000 LCD (Tower) 

PowerWalker VFI 6000R LCD (Rack) 

PowerWalker VFI 10000 LCD (Tower) 

PowerWalker VFI 10000R LCD (Rack) 


Manual   


EN/ES/IT/TR/PT 


Содержание VFI 10000 LCD

Страница 1: ...EN Online UPS PowerWalker VFI 6000 LCD Tower PowerWalker VFI 6000R LCD Rack PowerWalker VFI 10000 LCD Tower PowerWalker VFI 10000R LCD Rack Manual EN ES IT TR PT...

Страница 2: ...ing instructions in this manual strictly Save this manual properly and read carefully the following instructions before installing the unit Do not operate this unit before reading through all safety i...

Страница 3: ...2 5 SOFTWARE INSTALLATION 10 3 OPERATIONS 11 3 1 BUTTON OPERATION 11 3 2 LED INDICATORS AND LCD PANEL 11 3 3 AUDIBLE ALARM 13 3 4 SINGLE UPS OPERATION 14 3 5 PARALLEL OPERATION 16 3 6 ABBREVIATION MEA...

Страница 4: ...ctric shock or fire therefore no water containers such as a water glass shall be placed on the top of the UPS so as to avoid such dangers as electric shock Do not dispose of battery or batteries in a...

Страница 5: ...us vibrations o Outdoor In the event that there is fire occurring in the vicinity please use dry power extinguishers The use of liquid extinguishers may give rise to the danger of electric shock This...

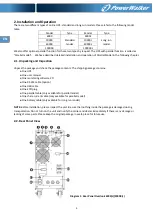
Страница 6: ...pack the package and check the package contents The shipping package contains One UPS One user manual One monitoring software CD One RS 232 cable option One USB cable One EPO plug One parallel cable o...

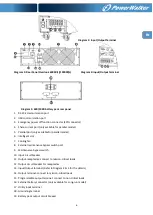
Страница 7: ...el model 6 Intelligent slot 7 Cooling fan 8 External maintenance bypass switch port 9 Maintenance bypass switch 10 Input circuit breaker 11 Output receptacles connect to mission critical loads 12 Outp...

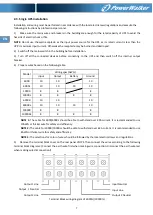
Страница 8: ...l Wiring spec AWG Input Output Battery Ground 6000 10 10 10 6000L 10 10 10 10 10000 8 8 8 10000L 8 8 8 8 6000R 10 10 10 6000RL 10 10 10 10 10000R 8 8 8 10000RL 8 8 8 8 NOTE 1 The cable for 6000 6000L...

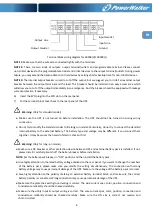
Страница 9: ...l battery to the external battery The battery type and voltage may be different If you connect them together it maybe causes the hazard of electric shock or fire Warning Only for long run model Make s...

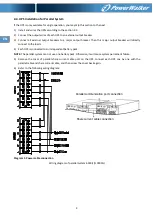
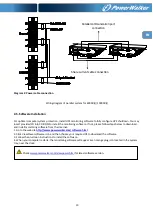
Страница 10: ...l directly connect to the loads 4 Each UPS is connected to an independent battery pack NOTE The parallel system can not use one battery pack Otherwise it will cause system permanent failure 5 Remove t...

Страница 11: ...d and install monitoring software from the internet 1 Go to the website http www powerwalker com software html 2 Click ViewPower software icon and then choose your required OS to download the software...

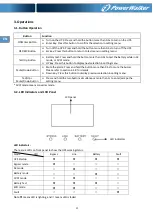
Страница 12: ...is button to display next selection in setting menu Mute Down Button Mute the alarm Press and hold the button more than 0 5s to mute the buzzer Please refer to section 3 4 9 for details Down key Press...

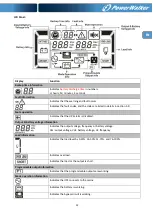
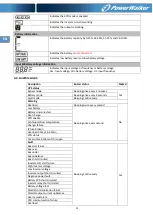
Страница 13: ...s disabled Output Battery voltage information Indicates the output voltage frequency or battery voltage Vac output voltage Vdc battery voltage Hz frequency Load information Indicates the load level by...

Страница 14: ...ry mode Beeping once every 4 seconds Fault mode Beeping continuously Warning Overload Beeping twice every second No Low battery Beeping once every second Battery unconnected Over charge EPO enable Fan...

Страница 15: ...nnect devices to UPS After the UPS is turned on you can connect devices to the UPS 1 Turn on the UPS first and then switch on the devices one by one the LCD panel will display total load level 2 If it...

Страница 16: ...in AC mode CVCF mode ECO mode you could press the Test button to let the UPS do battery self test 2 To keep the system reliable the UPS will perform the battery self test automatically periodically T...

Страница 17: ...be cut off you should remove the cover of maintenance bypass switch on the rear panel and turn the maintenance switch to BPS position first 3 Switch off the input breaker and switch off the battery b...

Страница 18: ...allel system First method 1 Press the OFF key twice and each time should last for more than 0 5s Then the UPS will enter into bypass mode without output 2 Turn off the output breaker of this unit and...

Страница 19: ...ram alternatives There are 15 programs to set up Refer to below table Parameter 2 and parameter 3 are the setting options or values for each program 15 programs available list for parameter 1 Code Des...

Страница 20: ...equency If it is from 46Hz to 54Hz the output frequency will be 50 0Hz If it is from 56Hz to 64Hz the output frequency will be 60 0Hz ATO is default setting Parameter 3 Frequency mode Setting output f...

Страница 21: ...ace Setting Parameter 3 Enable or disable ECO function You may choose following two option DIS disable ECO function ENA enable ECO function If ECO function is disabled voltage range and frequency rang...

Страница 22: ...s function is not supported by 6000R L 10000R L model Interface Setting Parameter 3 Set programmable output You may choose the following three options ON Programmable output is manually switched on ti...

Страница 23: ...ning at normal mode and can t restart without battery 13 Battery voltage adjustment Interface Setting Parameter 2 Select Add or Sub function to adjust battery voltage to real figure Parameter 3 the vo...

Страница 24: ...operation Operating mode status AC mode Description When the input voltage is within acceptable range UPS will provide pure and stable AC power to output The UPS will also charge the battery at AC mod...

Страница 25: ...s is enabled turn off the UPS and it will enter Bypass mode Alarm beeps every two minutes LCD display Battery Test Description When UPS is in AC mode or CVCF mode press Test key for more than 0 5s The...

Страница 26: ...alance 36 None High Inversor voltage 12 None Over temperature 41 None Low Inversor voltage 13 None CPU communication failure 42 None Inversor output short circuited 14 Overload 43 3 10 Warning Indicat...

Страница 27: ...in the Bypass mode Connected devices are fed directly by the mains Remove excess loads from UPS output first Then shut down the UPS and restart it Fault code is shown as 43 The icon lights on LCD disp...

Страница 28: ...A ID number is right after turning on input breakers one by one If all the number displays are correct it s ok to turn on UPSs after disabling the warning message by pressing UP and DOWN button togeth...

Страница 29: ...e required precautionary measures may replace batteries and supervise operations Unauthorized persons must be kept well away from the batteries Verify that no voltage between the battery terminals and...

Страница 30: ...over to 90 capacity Charging Current 1 A 10 max 2 A 10 max 1 A 10 max 2 A 10 max Charging Voltage 14 4 V 1 Long run Model Type Depending on applications Numbers 18 20 Charging Current 4 A 10 max 2 A 1...

Страница 31: ...ES Online UPS PowerWalker VFI 6000 LCD Tower PowerWalker VFI 6000R LCD Rack PowerWalker VFI 10000 LCD Tower PowerWalker VFI 10000R LCD Rack Manual EN ES IT TR PT...

Страница 32: ...tencias e instrucciones de este manual Guarde este manual antes de instalar la unidad UPS para leer todas las instrucciones atentamente No utilice el SAI antes de leer atentamente toda la informaci n...

Страница 33: ...LOS BOTONES 11 3 2 INDICADORES LED Y PANEL LCD 11 3 3 ALARMA AC STICA 13 3 4 OPERACIONES DEL SAI 14 3 5 OPERACI N EN PARALELO 16 3 6 SIGNIFICADO DE LAS ABREVIATURAS EN EL DISPLAY LCD 18 3 7 CONFIGURA...

Страница 34: ...ara cualquier mantenimiento o reparaci n dir jase a su revendedor Un cortocircuito interno del SAI puede causar sacudidas el ctricas o incendio Por lo tanto no coloque recipientes con l quidos p ej un...

Страница 35: ...uertes vibraciones o Exteriores En caso de producirse un incendio al lado del equipo utilice extintores de polvo seco Los extintores a base de l quidos aumentan el riesgo de sacudida el ctrica Este pr...

Страница 36: ...ja y compruebe el contenido que debe ser Un SAI Un manual Un CD de software para el control Un cable RS 232 opcional Un cable USB Un enchufe EPO Un cable paralelo s lo para el modelo paralelo Parte de...

Страница 37: ...s lo para funcionamiento en modo paralelo 6 Slot Inteligente 7 Ventilador de refrigeraci n 8 Puerto externo para conmutador bypass de mantenimiento 9 Conmutador Bypass 10 Interruptor de entrada 11 Co...

Страница 38: ...8 8 8 10000L 8 8 8 8 6000R 10 10 10 6000RL 10 10 10 10 10000R 8 8 8 10000RL 8 8 8 8 NOTA 1 El cable debe soportar m s de 40A para los modelos 6000 6000L Se recomienda utilizar el tipo de cable 10AWG o...

Страница 39: ...r as puede causar riesgo de descarga el ctrica o fuego Advertencia solo para SAI de larga autonom a Instalar un interruptor de CC u otro dispositivo de protecci n entre el SAI y la bater a externa Des...

Страница 40: ...de salida a las cargas 4 Cada SAI est conectado a una bater a de forma independiente NOTA Una sola bateria no se puede utilizar por todos los SAI en paralelo Esto ocasionar a el fallo permanente del...

Страница 41: ...n 1 Vaya a la p gina web http www powerwalker com software html 2 Haga click en el icono de ViewPower y elija su sistema operativo para descargar el software 3 Siga las instrucciones de la pantalla p...

Страница 42: ...ecci n en el men de configuraci n Bot n Mute Down Apaga la alarma presione el bot n m s de 0 5s para apagar el zumbador Por favor consulte la secci n 3 4 9 para m s detalles Al pulsar este bot n muest...

Страница 43: ...a est desactivada Informaci n Tensi n de salida y Tensi n de bateria Indica la tensi n de salida frecuencia o tensi n de bateria Vac tensi n salida Vdc tensi n bateria Hz frecuencia Informaci n de car...

Страница 44: ...do Bateria Pitido una vez cada 2 minutos Modo guasto Pitido continuo Advertencia Sobrecarga Doble Pitido cada segundo No Bateria baja Pitido cada segundo Bateria no conectada Sobrecarga EPO Activado F...

Страница 45: ...operar en modo bater a 3 Conectar dispositivos al SAI Despu s de que el SAI est arrancado se pueden conectar dispositivos al SAI 1 Encienda el SAI y controle el nivel de carga total en la pantalla LC...

Страница 46: ...I autom ticamente realiza auto test peri dicamente El per odo predefinido es una vez por semana 3 Los usuarios pueden configurar auto test de bateria a trav s del software 4 Si el SAI se encuentra eje...

Страница 47: ...n mero de las bater as consulte la siguiente nota A continuaci n desconecte el cable de la bater a para el modelo est ndar y cambie el pack de bater as con mucho cuidado Despu s de completar los camb...

Страница 48: ...nte Verifique el cableado y consulte la secci n 2 3 3 Instale el nuevo SAI en paralelo refiri ndose a la secci n anterior 3 Quitar un SAI del sistema en paralelo 1 Mientras el modo bypass no est habil...

Страница 49: ...en configurar en el SAI Par metro 1 Es para las distintatas opciones del programa Hay 15 programas para configurar Refierase a la tabla m s abajo Par metro 2 y 3 son los par metros de configuraci n o...

Страница 50: ...ir tres opciones en el par metro 2 50 0Hz La frecuencia de salida es 50 0Hz 60 0Hz La frecuencia de salida es 60 0Hz ATO la frecuencia de salida es la de la ltima frecuencia en la entrada Si es de 46H...

Страница 51: ...Modo ECO activar desactivar Interface Configuraci n Par metro 3 Activar o desactivar la funci n ECO Se puede elegir entre las dos siguientes opciones DIS desactivar la funci n ECO ENA activar la func...

Страница 52: ...por los modelos 6000R L 10000R L Interface Configuraci n Par metro 3 Establece la salida programable Puede elegir entre tres opciones ON la salida se programa manualmente sin tiempo de desconexi n OFF...

Страница 53: ...rse sin bater as 13 Ajuste de tensi n de bater a Interface Configuraci n Par metro 2 Seleccion la funci n Add o Sub para ajustar la tensi n de la bateria a la realidad Par metro 3 el rango de tensi n...

Страница 54: ...ove a su salida alimentaci n AC pura y estable El SAI al mismo tiempo carga la bateria en modo AC LCD display Modo ECO Descripci n Cuando la tensi n de entrada est en el rango adecuado y el modo ECO e...

Страница 55: ...eria Descripci n Cuando el SAI est en modo AC o CVCF pulsando Test por m s de 0 5s el SAI emite una se al ac stica e inicia la prueba de la bateria La l nea entre los iconos I P e Inversor parpadean p...

Страница 56: ...alelo 36 No Tensi n alta en Inversor 12 No Alta temperatura 41 No Tensi n baja en Inversor 13 No Fallo comunicaci n CPU 42 No Corto circuito en Inversor 14 Sobrecarga 43 Bus Placa DC Voltaje 3 10 Indi...

Страница 57: ...imentan directamente desde la red Primero eliminar la excesiva carga en la salida del SAI Despu s apague y reinicie el SAI El c digode fallo es 43 y el icono parpadea en el panel LCD con aviso ac stic...

Страница 58: ...e la ERP es inmediatamente despu s de encender la entrada cambia uno por uno Si todos los indicadores num ricos son correctas puede activar el SAI despu s de desactivar el mensaje de advertencia pulsa...

Страница 59: ...as de precauci n necesarias pueden sustituir las bater as y supervisar las operaciones Personas no autorizadas no deben tener contacto con las bater as Verificar que ninguna tensi n entre los terminal...

Страница 60: ...capacidad 4 horas recarga 90 capacidad Corriente de carga 1 A 10 max 2 A 10 max 1 A 10 max 2 A 10 max Voltaje de carga 14 4 V 1 Modelo larga autonom a Tipo Depende de las aplicaciones Numero 18 20 Co...

Страница 61: ...IT Online UPS PowerWalker VFI 6000 LCD Tower PowerWalker VFI 6000R LCD Rack PowerWalker VFI 10000 LCD Tower PowerWalker VFI 10000R LCD Rack Manual EN ES IT TR PT...

Страница 62: ...i d uso in questo manuale Conservare con cura questo manuale perch prima d istallare le unit UPS necessario leggere attentamente tutte le istruzioni Prima di utilizzare l UPS necessario leggere con mo...

Страница 63: ...D INDICATORS AND LCD PANEL 11 3 3 ALLARME ACUSTICO 13 3 4 OPERAZIONI DEL SINGOLO UPS 14 3 5 OPERAZIONI DI PARALLELO 16 3 6 SIGNIFICATO DELLE ABBREVIAZIONI IN DISPLAY LCD 18 3 7 IMPOSTAZIONE LCD 18 15...

Страница 64: ...orta a pericoli come ad esempio scossa elettrica o incendio per questo motivo contenitori con acqua come un bicchier d acqua non devono essere posti sopra all apparecchiatura per evitare il verificars...

Страница 65: ...iasi zona soggetta a forti vibrazioni o Esterni Nel caso in cui si verifichino incendi nelle vicinanze usare estintori a polvere L uso di estintori liquidi pu provocare il rischio di scossa elettrica...

Страница 66: ...il contenuto che deve esserci Un UPS Un manuale Un disco CD del software di monitoraggio Un cavo RS 232 opzionale Un cavo USB Una spina EPO Un cavo di parallelo solo per il modello parallelo Una part...

Страница 67: ...olo per modello parallelo 6 Slot intelligente 7 Ventole di raffreddamento 8 Bypass di manutenzione porta Switch 9 Interruttore del bypass 10 Disgiuntore d ingresso 11 Connettori dei carichi critici EP...

Страница 68: ...following table Modello Specifica cavi del cablaggio AWG Entrata Uscita Batteria Massa terra 6000 10 10 10 6000L 10 10 10 10 10000 8 8 8 10000L 8 8 8 8 6000R 10 10 10 6000RL 10 10 10 10 10000R 8 8 8...

Страница 69: ...di scosse elettriche o incendi Avvertenza solamente per UPS a lunga autonomia Installare con molta attenzione un interruttore DC o di altri dispositivi di protezione tra UPS e pacco di batteria estern...

Страница 70: ...ttore si collega direttamente ai carichi 4 Ogni UPS collegato a una batteria indipendente 5 Rimuovere il coperchio del cavo parallelo per collegare ogni UPS con il cavo parallelo oltre collegare il ca...

Страница 71: ...1 Go to the website http www powerwalker com software html 2 Click ViewPower software icon and then choose your required OS to download the software 3 Follow the on screen instructions to install the...

Страница 72: ...this button to display next selection in setting menu Mute Down Button Mute the alarm Press and hold the button more than 0 5s to mute the buzzer Please refer to section 3 4 9 for details Down key Pr...

Страница 73: ...to Informazione uscita e batteria Indica la tensione d uscita frequenza o tensione batteria Vac tensione uscita Vdc Volt batteria Hz frequenza Informazioni del carico Indica il livello del carico da 0...

Страница 74: ...4 secondi Modo guasto Suono continuo Avvertimento Sovraccarico Doppio suono ogni secondo No Batteria bassa Suono ogni secondo Batteria non connessa Sovraccarico Consenso EPO Ventilatori guasti temper...

Страница 75: ...tteria 3 Collegare i dispositivi all UPS Dopo che l UPS acceso possibile collegare i dispositivi all UPS 1 Accendere l UPS e sul display LCD visualizzare il livello di carico totale 2 Se necessario to...

Страница 76: ...ntenere il sistema affidabile eseguir auto test periodicamente L impostazione predefinita periodo una volta a settimana 3 Gli utenti possono impostare il proprio auto test batteria attraverso il softw...

Страница 77: ...ella batteria fare riferimento alla nota che segue Quindi scollegare il cavo della batteria per il modello standard e modificare il pacco batteria con cura Dopo aver completato le modifiche collegare...

Страница 78: ...ssibile disattivare l interruttore della batteria per UPS a lunga autonomia e rimuovere i cavi del parallelo Dopo rimuovere l unit dal sistema parallelo Secondo metodo 1 Fino quando il by pass non att...

Страница 79: ...ione LCD Ci sono tre parametri d impostazione dell UPS Parametro 1 per programma alternativo Ci sono 15 programmi da istituire Fare riferimento alla tabella riportata in seguito Parametri 2 e 3 sono i...

Страница 80: ...ndica tensione d uscita 240Vac 02 Frequenza uscita Interfaccia Impostazione 60 Hz CVCF mode 50 Hz Normal mode ATO Parametro 2 frequenza uscita Impostazione della frequenza di uscita Si possono sceglie...

Страница 81: ...Interfaccia Impostazione Parametro 2 Impostazione a bassa frequenza accettabile per il by pass 50 Hz sistema Campo di regolazione da 46 0Hz a 49 0Hz 60 Hz sistema Campo di regolazione da 56 0Hz a 59...

Страница 82: ...FF AC si esegue il trasferimento in modo Bypass 09 Impostazione del tempo autonomia Interfaccia Impostazione Parametro 3 000 999 Impostare il tempo massimo d autonomia da 0 a 999 minuti L UPS si spegn...

Страница 83: ...SI Hot funzione standby attivata Ci significa che l attuale gruppo di continuit impostato per ospitare la funzione hot standby e si riavvia subito dopo il recupero di CA anche senza batteria collegat...

Страница 84: ...uniti dopo saranno assegnati come 002 o 003 I numeri assegnati possono essere modificati dinamicamente nel funzionamento Operare in mode status Modo AC Descrizione Quando la tensione d ingresso nella...

Страница 85: ...to il modo bypass l UPS funziona in Bypass emettendo un segnale acustico ogni due minuti LCD display Test Batteria Descrizione Quando UPS in modo AC o CVCF premendo Test per pi di 0 5s l UPS emette un...

Страница 86: ...ione alta dell inverter 12 None Alta temperatura 41 None Tensione bassa dell inverter 13 None Guasto comunicazione CPU 42 None Corto circuito dell inverter 14 Sovraccarico 43 3 10 Indicatori d avverti...

Страница 87: ...Poi spegnere e riavviare l UPS Il guasto mostra il codice 43 e l icona con lampeggiante in LCD display e avviso acustico continuo L UPS si spento automaticamente per causa di sovraccarico in uscita de...

Страница 88: ...subito dopo aver acceso gli interruttori d ingresso uno per uno Se tutti i display numerici sono corretti consentito attivare UPS dopo aver disabilitato il messaggio di avvertimento premendo il tasto...

Страница 89: ...i cautelari possono sostituire le batterie e controllare le operazioni Persone non autorizzate non devono avere contatti con le batterie Verificare che nessuna tensione tra i morsetti della batteria e...

Страница 90: ...ricarica 90 capacit 4 ore ricarica 90 capacit Corrente di carica 1 0 A 10 max 2 0 A 10 max 1 0 A 10 max 2 0 A 10 max Volt di carica 14 4 V 1 Modello lunga autonomia Tipo Dipende dalle applicazioni Nu...

Страница 91: ...0 TR ONLINE KES NT S Z G KAYNA I PowerWalker VFI 6000 LCD Tower PowerWalker VFI 6000R LCD Rack PowerWalker VFI 10000 LCD Tower PowerWalker VFI 10000R LCD Rack KULLANICI KILAVUZU EN ES IT TR PT...

Страница 92: ...1 TR L tfen bu k lavuzda belirtilen uyar lara ve al t rma talimatlar na kesinlikle uyunuz Cihaz al t rmadan nce b t n g venlik ve al t rma talimatlar n dikkatlice okuyunuz...

Страница 93: ...8 2 5 YAZILIMIN KURULUMU 9 3 ALI TIRMA 10 3 1 BUTON LEVLER 10 3 2 LED G STERGELER VE LCD PANEL 10 3 3 SESL ALARM 12 3 4 TEK KGK ALI TIRMASI 13 3 5 PARALEL ALI TIRMA 15 3 6 LCD DEK KISALTMALARIN A IKL...

Страница 94: ...li k sa devresi elektrik arpmas veya yang n gibi tehlikelere yol a abilir bu nedenle elektrik arpmas gibi tehlikelerden ka nmak i in hi bir su kab bir su barda gibi UPS in st ne konulmamal d r Pil vey...

Страница 95: ...nda herhangi bir alanda o Ciddi titre imleri olan herhangi bir alanda o A k alanda Yak n evrede meydana gelen bir yang n durumunda kuru g l s nd r c ler kullan n S v s nd r c lerin kullan m elektrik a...

Страница 96: ...rma talimatlar ileriki b l mde verilmi tir 2 1 Paketin A lmas ve Kontrol Paketi a n ve i indekileri kontrol edin Pakette unlar vard r KGK Kullan c k lavuzu zleme yaz l m CD si RS 232 kablo opsiyonel U...

Страница 97: ...l portu sadece paralel modellerde vard r 25 Ak ll yuva 26 So utma fan 27 Harici bak m bypass portu 28 Bak m baypas anahtar 29 Giri devre kesicisi 30 k prizleri Kritik y kleri ba lay n 31 Prizler i in...

Страница 98: ...ygun olmal d r Model Kablo kesiti mm Giri k Ak Toprak 6000 10 10 10 6000L 10 10 10 10 10000 8 8 8 10000L 8 8 8 8 6000R 10 10 10 6000RL 10 10 10 10 10000R 8 8 8 10000RL 8 8 8 8 NOT 1 6000 6000L modelle...

Страница 99: ...sicisini OFF konumuna al n ve sonra ak bataryas n monte edin Arka panelde yaz l ak voltaj na dikkat edin E er ak say s n de i tirmek isterseniz ak ayarlar n da de i tirmeniz gerekir Yanl ak voltaj uyg...

Страница 100: ...nt s Tower tipi paralel ba lant emas ekil 3 G kablo ba lant s Rack tipi paralel ba lant emas 2 5 Yaz l m n Kurulumu En iyi bilgisayar sistem korumas i in KGK izleme ve denetim yaz l m n bilgisayar n z...

Страница 101: ...lar men s nde bir sonraki se ene i g rmek i in bu butona bas n Mute Down Butonu Alarm susturur Sesli alarm susturmak i in bu butona 0 5 saniyeden fazla bas n Detaylar i in b l m 3 4 9 a bak n Down but...

Страница 102: ...izle tirildi ini g sterir k ve Ak voltaj bilgisi k voltaj n frekans n ve ak voltaj n g sterir Vac k voltaj Vdc ak voltaj Hz frekans Y k bilgisi Y k seviyesini 0 25 26 50 51 75 ve 76 100 aral klar nda...

Страница 103: ...Her 4 saniyede bir alar Ar za modu S rekli alar Uyar A r y k Saniyede 2 kez alar Hay r Ak seviyesi d k Saniyede bir alar Ak ba l de il A r arj EPO aktif Fan ar zas A r s cakl k arj r ar zas Giri sigor...

Страница 104: ...Birka saniye sonra KGK ak modunda al maya ba lar 3 Cihazlar n KGK na ba lanmas KGK al t ktan sonra cihazlar KGK na ba lanabilir 1 nce KGK n al t r n ve sonra cihazlar teker teker a n LCD panel toplam...

Страница 105: ...ak lerini belli arl klarla test eder Bu s re normal olarak haftada birdir 3 Kullan c lar izleme yaz l m n kullanarak ak testini ger ekle tirebilirler 4 KGK ak testini yaparken LCD ve sesli alarm ak m...

Страница 106: ...anik baypas anahtar n UPS konumuna al n ve sonra KGK n al t r n 3 5 Paralel al t rma 1 Paralel sistem ba lant s 1 B t n KGK lar paralel model olmal d r Kablo ba lant lar i in b l m 2 4 e bak n 2 B t n...

Страница 107: ...devreden kartamazs n z Y k kapat p sistemi tamamen kapatman z gerekir 2 Sistemdeki b t n KGK lar nda baypas aktif oldu undan emin olun Sistemi kapat n KGK lar n n hepsi Baypas moduna transfer olur B...

Страница 108: ...7 LCD Ayarlar KGK ayarlar i in parametre vard r A a daki diyagrama bak n z Parametre 1 Program se imi i indir ve 15 program vard r A a daki tabloya bak n z Parametre 2 ve parametre 3 her bir program i...

Страница 109: ...e ildi inde k frekans son normal ebeke frekans na g re ayarlan r Alg lanan frekans 46Hz 54Hz ise k 50HZ olur E er frekans 56Hz 64Hz k frekans 60 0Hz e ayarlan r ATO fabrika ayar d r Parametre 3 Frekan...

Страница 110: ...etkin etkisiz G sterge Ayar Parametre 3 ECO fonksiyonunu etkin etkisiz hale getirir u se enekler vard r DIS ECO fonksiyonu etkindir ENA ECO fonksiyonu etkisizdir ECO modu etkisizken bile ECO modu i i...

Страница 111: ...k ayar Not Bu ayar Rack modelde yap lmaz G sterge Ayar Parametre 3 Programl k ayar d r A a daki se enek vard r ON Programl k zamana ba l olmaks z n man el olarak s resizce al t r labilir OFF Programl...

Страница 112: ...kisizdir KGK normal modda al r ve ak ler olmadan yeniden al maz 13 Ak voltaj ayar G sterge Ayar Parametre 2 Ak voltaj n ger ek de ere ayarlamak i in Add Ekle veya Sub kart fonksiyonlar se ilebilir Par...

Страница 113: ...se KGK k a kararl AC g temin edecektir KGK ayn zamanda ak leri de arj eder LCD g sterge ECO modu Tan m Giri voltaj voltaj reg lasyon aral nda ve ECO mod etkin ise KGK enerji tasarrufu sa lamak i in gi...

Страница 114: ...k fonksiyonun testi i in kullan l r LCD g sterge Ar za durumu Tan m KGK nda ar za olu tu unda LCD panelde hata mesaj g r lebilir LCD g sterge 3 9 Ar za Kodlar Ar za olay Ar za kodu Ikon Ar za olay Ar...

Страница 115: ...siyonu kald rmak i in devresini kapal duruma getirin LCD panelde ikon ve yan p s n yor ve alarm saniyede bir al yor Dahili veya harici ak do ru ba lanmam Ak lerin do ru ba lan p ba lanmad n kontrol ed...

Страница 116: ...ksek Fanlar kontrol edip yetkili servisi aray n Problem Muhtemel neden z m Ikon uyar kodu LCD ekranda yan p s n yor ve alarm saniyede bir al yor Paralel haberle me kablosu gev ek veya yanl parallel a...

Страница 117: ...labilir Ak lerin de i imi ak ve de i im s ras nda al nacak tedbirler konusunda gerekli bilgiye sahip ki iler taraf ndan yap lmal d r Yetkisiz ki ileri ak lerden uzak tutunuz Dikkat elektrik arpma tehl...

Страница 118: ...ye Tower 9 saat 90 kapasiteye Rack 4 saat 90 kapasiteye arj Ak m Tower 1 0 A 10 maks Rack 2 A 10 maks arj Voltaj 14 4 V 1 Uzun Destek S reli Model Tip Uygulamaya ba l Adet 18 20 arj Ak m Tower 4 0 A 1...

Страница 119: ...0 PT SAI Online PowerWalker VFI 6000 LCD Tower PowerWalker VFI 6000R LCD Rack PowerWalker VFI 10000 LCD Tower PowerWalker VFI 10000R LCD Rack Manual do Usu rio EN ES IT TR PT...

Страница 120: ...ncias e instru es de opera o neste manual Guarde este manual adequadamente e leia atentamente as seguintes instru es antes de instalar a unidade N o opere esta unidade antes de ler atentamente todas a...

Страница 121: ...PERA ES 11 3 1 FUNCIONAMENTO DOS BOT ES 11 3 2 INDICADORES LED E PAINEL LCD 11 3 3 ALARME SONORO 13 3 4 OPERA O NICA DA UPS 14 3 5 OPERA O EM PARALELO 16 3 6 SIGNIFICADO DAS ABREVIATURAS NO ECR LCD 18...

Страница 122: ...ode incorrer nos perigos de choque el ctrico ou inc ndio por isso para evitar tais perigos n o devem ser colocados em cima da UPS recipientes que contenham gua como um copo de gua N o destrua a s bate...

Страница 123: ...de aquecimento o Qualquer rea com intensas vibra es o Exteriores No caso de ocorrer um inc ndio na vizinhan a utilize extintores de p qu mico seco A utiliza o de extintores base de l quido pode provoc...

Страница 124: ...gem e verifique o conte do da embalagem O conte do da embalagem cont m Uma UPS Um manual do utilizador Um software de monitoriza o Um cabo RS 232 opcional Um cabo USB opcional Um cabo paralelo dispon...

Страница 125: ...de paragem de emerg ncia conector EPO 42 Porta de corrente partilhada dispon vel apenas para o modelo paralelo 43 Porta paralela dispon vel apenas para o modelo paralelo 44 Ranhura inteligente 45 Vent...

Страница 126: ...e os ligar UPS 17 Prepare a fia o de acordo com a seguinte tabela Modelo Esp da fia o AWG Entrada Sa da Bateria Terra 6000 10 10 10 6000L 10 10 10 10 10000 8 8 8 10000L 8 8 8 8 6000R 10 10 10 6000RL 1...

Страница 127: ...instale o cuidadosamente Desligue o disjuntor da bateria antes da instala o Aviso Para a bateria padr o existe um disjuntor DC para desligar a bateria e a UPS Mas para outras baterias externas certif...

Страница 128: ...diretamente s cargas 16 Cada UPS est ligado a uma bateria independente 17 Retire a tampa da porta do cabo de corrente paralelo partilhado na UPS ligue cada UPS uma a uma com o cabo paralelo e o cabo...

Страница 129: ...lo para modelos de rack 2 5 Instala o do software Para uma prote o tima do sistema do computador instale o software de monitoriza o da UPS para configurar integralmente o encerramento da UPS Diagrama...

Страница 130: ...xima sele o no menu de defini es Bot o de Mute Down Desativar o som do alarme Mantenha o bot o pressionado durante mais de 0 5s para desativar o som do alarme Consulte o cap tulo 3 4 9 para mais detal...

Страница 131: ...e a tens o da sa da e da bateria Indica a tens o de sa da frequ ncia ou tens o da bateria Vac tens o de sa da Vdc tens o da bateria Hz frequ ncia Informa o da carga Indica o n vel de carga por 0 25 26...

Страница 132: ...falha Emite sinal sonoro cont nuo Aviso Sobrecarga Emite sinal sonoro a cada 4 segundos N o Bateria fraca Emite sinal sonoro a cada segundo Bateria desligada Sobrecarga EPO ativa Falha do ventilador...

Страница 133: ...poder ligar dispositivos UPS Ligue a UPS primeiro e depois ligue os dispositivos um a um o painel LCD exibir o n vel de carga total 2 Se for necess rio ligar as cargas indutivas como por exemplo uma i...

Страница 134: ...de defini es do LCD 6 Testar a bateria 1 Caso necessite verificar o estado da bateria quando a UPS estiver funcionar em modo AC modo CVCF modo ECO poder pressionar o bot o Teste para permitir que a UP...

Страница 135: ...nas est dispon vel para t cnicos profissionais ou qualificados 2 Desligue a UPS Se n o foi poss vel cortar a carga dever remover a tampa do interruptor de deriva o de manuten o no painel traseiro e co...

Страница 136: ...a remover uma unidade do sistema paralelo Primeiro m todo 7 Pressione a tecla OFF por duas vezes sendo que cada uma dessas vezes deve ser por mais de 0 5s Ent o a UPS entrar em modo de deriva o sem sa...

Страница 137: ...A Ativar DIS Desativar ATO Auto BAT Bateria NCF Modo normal n o o modo CVCF CF Modo CVCF SUB Subtrair ADD Adicionar ON Ligar OFF Desligar FBD N o permitido OPN Permitir RES Reservado PAR Paralelo 3 7...

Страница 138: ...o modo de deriva o Y Y 09 Configura o do tempo de reserva da bateria Y Y Y Y Y Y 10 Configura o da sa da program vel Y Y Y Y Y Y 11 Ponto de encerramento para a sa da program vel Y Y Y Y Y Y 12 Ativar...

Страница 139: ...o a frequ ncia de sa da ser definida a 50Hz ou 60Hz de acordo com a defini o no par metro 2 A frequ ncia de entrada poder ser entre 46Hz e 64Hz NCF Configurar a UPS para modo normal n o o modo CVCF Em...

Страница 140: ...metro 3 Ative ou desative a fun o ECO Poder escolher as seguintes duas op es DIS Desativar a fun o ECO ENA ativar a fun o ECO Se a fun o ECO estiver desativada o intervalo de tens o e de frequ ncia pa...

Страница 141: ...er a bateria ap s atingir o tempo de reserva O valor predefinido 990min DIS A desativa o da prote o da descarga da bateria e o tempo de reserva depender da capacidade da bateria 10 Configura o da sa d...

Страница 142: ...rtada O valor predefinido 11 2V 12 Ativar desativar fun o de espera aguardando entrada em opera o Interface Configura o Par metro 2 HS H Ative ou desative a fun o de espera aguardando entrada em opera...

Страница 143: ...ar ajustes de tens o certifique se que primeiro desliga todas as baterias para conseguir obter a tens o de carga exata Sugerimos fortemente que use o valor predefinido 0 Qualquer altera o deve ser ade...

Страница 144: ...dentro do intervalo aceit vel a UPS fornecer corrente AC pura e est vel sa da A UPS tamb m carregar a bateria em modo AC Ecr LCD Modo ECO Descri o Quando a tens o de entrada se encontrar dentro do in...

Страница 145: ...rmitente para avisar os utilizadores Esta opera o utilizada para verificar o estado da bateria Ecr LCD Estado de falha Descri o Quando ocorrer uma falha da UPS ser o exibidas mensagens de erro no pain...

Страница 146: ...oro a cada segundo Sobrecarga Emite dois sinais sonoros a cada segundo Bateria desligada Emite sinal sonoro a cada segundo Sobrecarga Emite sinal sonoro a cada segundo EPO ativa Emite sinal sonoro a c...

Страница 147: ...da sa da da UPS De seguida encerre a UPS e volte a reinici la O c digo da falha exibido o 43 O cone acende se no ecr LCD e o alarme emite sons continuamente A UPS encontra se em sobrecarga h tanto tem...

Страница 148: ...t correto ap s ligar os disjuntores um a um Se todos os n meros exibidos estiverem corretos n o h qualquer problema em ligar as UPS ap s desativar a mensagem de aviso pressionando os bot es UP e DOWN...

Страница 149: ...nte com baterias e com as medidas de preven o exigidas podem substituir as baterias e supervisionar as opera es Os indiv duos n o autorizados devem manter se longe da bateria Verifique que n o existe...

Страница 150: ...a o a 90 de capacidade 4 horas de recupera o a 90 de capacidade Corrente de carga 1 A 10 m x 2 A 10 m x 1 A 10 m x 2 A 10 m x Tens o de carga 273 V 1 Modelo de longa dura o Tipo Dependente de aplica e...

Отзывы: