background image


POWERKING                                                    1-800-344-3371                              [email protected] 

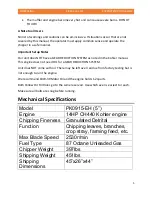
Before performing any maintenance procedure or inspection, stop the motor, unplug 
the spark plug and wait 5 minutes to allow all parts to cool. Disconnect the spark plug 
wire to prevent accidental startup.  

Important Setup Notes 

Our unit does NOT have a GEAR REDUCTION SYSTEM as noted in the Kohler manual. 
This engine does not need OIL for a GEAR REDUCTION SYSTEM. 

Unit does NOT come with oil. There may be left over residue from factory testing but is 
not enough to run the engine. 

We recommend 10W-30 Motor Oil and the engine holds 1.2quarts. 

Both Yellow Oil Fill Holes go to the same reservoir. Use whichever is easiest to reach.  

Make sure all bolts are snug before running.  

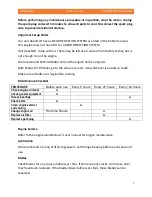
Maintenance Checklist 

PROCEDURE


Before each use 

Every 5 hours 

Every 25 hours 

Every 100 hours 

Check engine oil level 

Δ 


Check general equipment 

Δ 


Grease bearings 


Δ 

Check belts 

Δ 


Clean engine exterior 
and cooling 


Δ 


Change engine oil 

First time 5hours 


Δ 


Replace air filter 


Δ 


Replace spark plug 


Δ 


Engine Service 

Refer to the engine manufacturer’s user manual for engine maintenance.


Lubrication 

We recommend 1 pump of lithium grease in each flange bearing before each season of 
use.  

Blades 

Check blades for any cracks, dullness or chips. If there are any cracks, do not use until 
they have been replaced. If the blade shows dullness or chips, these blades can be 
reversed. 


Содержание PK0915-EH

Страница 1: ...MODEL PK0915 EH OWNER S MANUAL AND OPERATIONS GUIDE WARNING This product can expose you to chemicals including benzene carbon monoxide and lead which is known to the State of California to cause canc...

Страница 2: ...roved spare parts there is an increased risk and this is therefore not permissible All liability is renounced in the event of an accident or other damage caused by the use of non approved parts Before...

Страница 3: ...recommend wearing gloves Be sure your gloves fit properly and do not have loose cuffs or drawstrings Wear steel toed boots with non slip treads Do not use machine while barefoot or with open toed san...

Страница 4: ...eating any source of ignition until the gas vapors have dissipated Wipe up any spilled fuel to prevent a fire hazard and properly dispose of the waste Allow the engine to cool completely before storin...

Страница 5: ...eed OIL for a GEAR REDUCTION SYSTEM Unit does NOT come with oil There may be left over residue from factory testing but is not enough to run the engine We recommend 10W 30 Motor Oil and the engine hol...

Страница 6: ...ace 2 Adjust exit chute to location for processed material 3 Refer to Kohler manual on how to start the engine 4 Adjust throttle to maximum RPM 5 Do not stand directly behind entry chute Stand to the...

Страница 7: ...arts Both Yellow Oil Fill Holes go to the same reservoir Use whichever is easiest to reach Make sure all bolts are snug before running Maintenance Checklist PROCEDURE Before each use Every 5 hours Eve...

Страница 8: ...adjusting the bar blade to about 1 5mm to the chipping blades make sure it is parallel to the chipping blades and retighten Jams Stop the machine remove both entry chute and exit chute Remove the cap...

Страница 9: ...wipe off the plug and reinsert it Are you using fresh clean unleaded gas If it s old change it Use a fuel stabilizer if you keep gas longer than 30 days Does your engine have the right amount of clea...

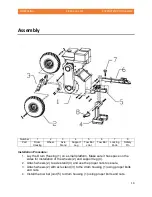
Страница 10: ...lation Procedure 1 Lay the Drum Housing 1 on a small platform Make sure it has space on the sides for installation of the wheels 2 and support leg 4 2 Attach wheels 2 to axle stand 3 and use the prope...

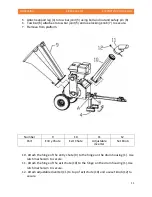
Страница 11: ...7 Remove from platform Number 9 10 11 12 Part Entry Chute Exit Chute Adjustable diverter Set Knob 10 Attach the hinge of the entry chute 9 to the hinge on the drum housing 1 Use latch mechanism to se...

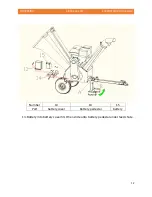
Страница 12: ...12 POWERKING 1 800 344 3371 SUPPORT QVTOOLS COM Number 13 14 15 Part battery cover Battery pedestal battery 13 Battery into battery cover first then slide onto battery pedestal under feed chute...

Страница 13: ...13 POWERKING 1 800 344 3371 SUPPORT QVTOOLS COM Parts Diagram...

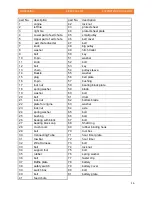
Страница 14: ...e 16 D pin 57 bushing 17 lock nut 58 bearing block plate 18 spring washer 59 blade 19 washer 60 bolt 20 bolt 61 drum 21 lock nut 62 bottom blade 22 plate for engine 63 washer 23 lock nut 64 axle 24 sp...

Страница 15: ...lades bar blades etc are not covered under warranty Power King has all replacement parts at value pricing Damaged Products You must take the time to inspect the goods before you sign the delivery rece...

Отзывы: