background image


- 26 - 

TV OPERATIONS 


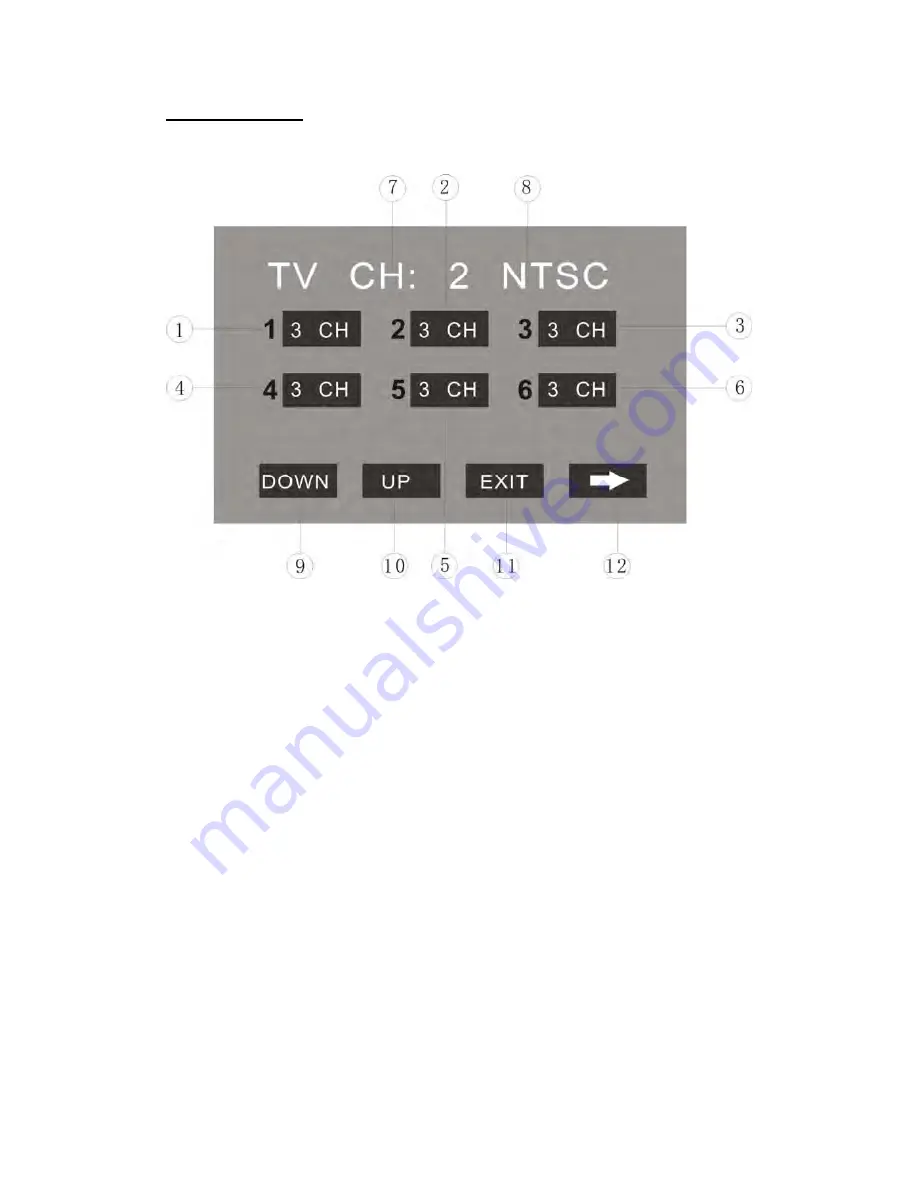
Touch the icon “TV” to enter the TV Mode: 


1~6. 

STORED CHANNEL   

Manual Store TV Station 

Hold on touching the icon, you can store current station to the stored channel. For 
example, the current station is 3 CH, by hold on touching the icon 1, you can store 
the radio station of 3 CH, to the channel 1. 
After manual store TV station, the former stored stations will be instead. 
The number icons 1 to 6 represent the stored stations. 
To hold on pressing the number buttons 1~6 on the panel performs same operation. 
 

Recall a Preset Station 

Touch the icon 1~6 to recall the corresponding stored station in M1~M6 channels. 
To press the number buttons 1~6 on the panel performs same operation. 

 
7. 

TV CHANNEL 


8. 

AUDIO FORMAT   


9.

 DOWN / 

10. 

UP 

After [ASM] seeking, touch the icon to select the stations downward / upward. 
To press the 

[

]

 / [

]

 buttons of remote control performs same operation. 

 
11.

 EXIT 

Touch the icon to exit the TOUCH ICONS display. 
 

12. 

NEXT PAGE


Touch the icon to enter the 2

nd

 page of TV Mode. 


Содержание PTID-5850NRT

Страница 1: ...5 8 Wide Touch Screen 1 Din Oversized Fully Motorized TFT Monitor DVD AM FM Built In TV Tuner Operating Manual...

Страница 2: ...ear Panel 12 Remote Control 14 Touch Screen Operations 18 Touch Screen Calibrate 18 Main Menu 19 Radio Operations 20 DVD Operations 23 USB Operations 25 SD CARD Operations 25 TV Operations 26 iPod Ope...

Страница 3: ...ing with the sound at a level preventing you from hearing sounds outside and around the car may cause an accident When cleaning Do not expose the product to water or excessive moisture This could caus...

Страница 4: ...Wire Brake Screen Safety Trigger AM FM With 30 Pre sets 18 FM 12 AM Auto Store Pre set Scan 4 Channel High Power 50 x 4 Channels Mosfet Power Dual RCA Outputs Front Rear Sub Woofer Selectable Frequenc...

Страница 5: ...l Bar x 1 M5X5 Screws x 4 Connecter Wire x 1 Remote Control x 1 Operational Manual x 1 Mounting Sleeve x 1 Keys x 2 Trim Bezel x 1 USB Cable x 1 Nut M5 x 1 iPod Cable x 1 option Faceplate case x 1 1 2...

Страница 6: ...5 UNIT INSTALLATION Installation Method 1 Din Front Mount Install the Mounting sleeve into the dashboard Bend as many claws outward for tight fit to lock the sleeve into place...

Страница 7: ...6 Install the trim bezel to the unit Arched surface toward the bottom Use the Rear Mounting Bolt to support the unit...

Страница 8: ...sides 2 Select a position where the screw holes of the mounting bracket supplied with the car and the screw holes of the main unit become aligned tighten the screws on each side and re mount the brac...

Страница 9: ...T REMOVAL when installed using the sleeve 1 Detach the front panel 2 Insert the keys supplied with the unit on both sides as illustrated as this will release the internal locks so you can slide the un...

Страница 10: ...9 WIRE CONNECTION...

Страница 11: ...FT monitor will display the alarm picture see as follows in order to ensure the safety Under the Rear View Mode the Brake Control function is no effective Auto Antenna Control Connect the auto antenna...

Страница 12: ...Mode if Mini USB connected The unit could be switched to SD Mode if SD card connected The unit could be switched to IPOD Mode if iPod connected 2 MUTE LOUD Press the MUTE LOUD button to switch off the...

Страница 13: ...and gear drives are now back to their factory positions 8 BAND In RADIO mode press the button to switch the wave band as following FM1 FM2 FM3 AM1 AM2 FM1 9 DISPLAY Press to display current playback i...

Страница 14: ...13 BASE PANEL 17 RESET...

Страница 15: ...BER BUTTONS 15 RANDOM 27 RIGHT 4 MENU 16 ZOOM 28 NEXT 5 AUDIO 17 SYSTEM NAVI 29 D ANGLE 6 DISPLAY 18 P ANGLE EJECT 30 PLAY PAUSE 7 UP 19 SETUP 31 STOP 8 LEFT 20 VOLUME 32 A B 9 ENTER BAND 21 VOLUME 33...

Страница 16: ...d to select item Press the buttons to move the cursor leftward rightward to select item Under RADIO Mode Press the buttons to switch the stored stations Hold on pressing the buttons to fast seeking th...

Страница 17: ...volume 22 LOUD EQ Press to adjust the EQ setting as following USER POP CLASSIC ROCK JAZZ USER Hold on pressing to turn the LOUD function on off 23 PBC AST Press to turn the PBC function on off when p...

Страница 18: ...dio Mode REPLACING THE BATTERIES If the remote control has no function or if the operating range reduced replace the old battery with new one 1 Pull out the battery holder Follow the arrow 1 slide it...

Страница 19: ...remote control to enter the CALIBRATE page To touch the points from 1 to 5 until the points change to brighter by using a ballpoint pen or pencil After all 5 points change to brighter the unit would...

Страница 20: ...19 MAIN MENU Touch the icon MORE to enter the 2nd page of main menu...

Страница 21: ...erforms same operation Recall a Preset Station Touch the icon 1 6 to recall the corresponding stored station in M1 M6 channels To press the number buttons 1 6 of remote control performs same operation...

Страница 22: ...ng increasing Hold on touching the icons has same function with SEEK SEEK To press the buttons of remote control performs same operation 3 LOCAL ON OFF When you are using the local searching function...

Страница 23: ...p playing 4 It is independent for FM AM frequency There are 3 wave bands of FM1 FM2 FM3 2 wave bands of AM1 AM2 each can store 6 radio stations totally 30 radio stations 5 The unit will stop on the be...

Страница 24: ...remote control performs the same operation 4 EXIT Touch the icon to exit the TOUCH ICONS display 5 F REV 6 F FWD Touch the icon to select fast reverse forward search Touch the PLAY icon to resume to...

Страница 25: ...o press the direction buttons UP DOWN LEFT RIGHT arrow of remote control performs same operation 5 ENTER Touch the icon to confirm the selection To press the ENTER button of remote control performs sa...

Страница 26: ...ly if there is a disc inside Under USB Mode all operations are same as DVD operations SD CARD OPERATIONS Touch the icon SD CARD to enter the SD CARD Mode if SD card connected The unit will switch to S...

Страница 27: ...icons 1 to 6 represent the stored stations To hold on pressing the number buttons 1 6 on the panel performs same operation Recall a Preset Station Touch the icon 1 6 to recall the corresponding store...

Страница 28: ...stop automatically when seek an available channel then play this station The unit will stop on the beginning frequency if no available station after seeking one cycle To hold on pressing buttons of pa...

Страница 29: ...3 The unit will stop on the beginning frequency if no available station after seeking one cycle 4 To press the PBC AST button of remote control performs same operation 2 MENU Touch the icon to return...

Страница 30: ...List 3 The Playing Time 4 The Name of Playing Song 5 The Name of Artist 6 The Name of Album 7 PREV 8 NEXT Touch the icon to go to the pervious next chapter track or song To press the PREVIOUS NEXT but...

Страница 31: ...ouch the icon to exit the TOUCH ICONS display Video Operation 1 MUTE Touch the icon to switch off the sound touch it again to resume to the previous volume level 2 MUSIC Touch the icon to switch to th...

Страница 32: ...ouch it again to resume to the previous volume level 2 EQ The user can set to adjust the audio output to your preference USER POP CLASSIC ROCK JAZZ USER 3 MENU Touch the icon to return the main menu 4...

Страница 33: ...hen 1st time to enter NAVI mode you will see the CALIBRATE screen Please touch the points from 1 to 5 by using a ballpoint pen or pencil To verify the calibration please touch the points from 1 to 5 a...

Страница 34: ...and touch I agree button at the bottom of the screen then enter the NAVI mode NOTE If change the NAVIbox to connect another unit please take out the SD card from the NAVIbox and connect with computer...

Страница 35: ...ll be displayed Read information and touch I agree button at the bottom of the screen Enter the NAVI mode by main menu the NAVI operations are effective only all other processes are disable such as Ra...

Страница 36: ...ode and return back the Radio mode Enter the NAVI mode by Quick Access Key the previous working mode is still working on background For example under Radio mode press the NAVI button to switch to NAVI...

Страница 37: ...ly 6 SAVE SETTINGS Touch the icon 5 to save all settings and exit SETUP SETUP MENU OPERATION Press the ENTER BAND button of remote control to switch the main menus as following SYSTEM VIDEO AUDIO MORE...

Страница 38: ...IT AUS NZ US DEFAULT the unit will restore all default settings of Sound Parameter Picture Parameter Tuner Parameter VIDEO SETUP BRIGHTNESS 0 64 CONTRAST 0 64 COLOR 0 64 HUE 0 64 VIDEO TYPE NTSC PAL...

Страница 39: ...38 AUDIO SETUP BASS 15 15 TREBLE 15 15 BALANCE L 15 R 15 FADER F 15 R 15 MORE AUDIO SETUP SUB WF FRQ 80HZ 120HZ 160HZ OFF 80HZ SUB WF VOL 0 15 BEEP SOUND ON OFF...

Страница 40: ...39 CLOCK SETUP CLOCK 12H 24H DISPLAY ON OFF HOUR 00 23 MINUTE 00 59...

Страница 41: ...ss the buttons to select the submenus as your need Press the or ENTER buttons to enter the items of submenus Press the button to exit the items of submenus Press the buttons to select the item you wan...

Страница 42: ...G 13 5 PG R 6 R 7 NC 17 8 ADULT The Parental Ratings could be changed after the correct password input DEFAULT The unit will restore all default settings by selecting this option LANGUAGE SETUP OSD LA...

Страница 43: ...options are available for the MENU LANGUAGE ENGLISH GERMAN SPANISH FRENCH PORTUGUESE ITALIAN RUSSIAN DUTCH SWEDISH KOREAN DANISH NORWEGIAN POLISH HUNGARIAN DIVX LANGUAGE Following options are availab...

Страница 44: ...r the BRIGHTNESS 0 2 4 6 8 10 12 CONTRAST Following options are available for the CONTRAST 0 2 4 6 8 10 12 HUE Following options are available for the HUE 6 4 2 0 2 4 6 SATURATION Following options ar...

Страница 45: ...for the BASS MODE ALL LG SPK ALL SM SPK MIXED SPK DIGITAL SETUP OP MODE Following options are available for the OP MODE LINE OUT RF REMOD DYNAMIC RANGE Following options are available for the DYNAMIC...

Страница 46: ...late all speaker wiring connections Poor sound quality or distortion Pirate disc is in use Speaker power rating not compatible with unit Speaker is shorted Use original copy Connect proper speakers Ch...

Страница 47: ...VCD playback PBC is not available on the disc No repeat or searching while playing VCD PBC is on Turn PBC off MP3 Interruption occurred during playback Disc is dirty or scratched Clean disc or replac...

Страница 48: ...vity 15 dB V Stereo Separation 27 dB 1KHz Frequency Response 20 10000 Hz AM TUNER Frequency Range 530 1710 KHz USA 522 1620 KHz Europe 531 1602 KHz China IF 450 KHz Usable Sensitivity 34 dB V TV TUNER...

Страница 49: ...t such as benzene thinner or conventional record cleaners which may mar the surface of the disc NOTE A disc may became somewhat scratched although not enough to made it unusable depending on your hand...

Отзывы: