

RoboKaddy
RoboKaddy hints and tips
To get the best from your RoboKaddy the following hints and tips should
be followed –
l
Practice using your RoboKaddy away from obstructions. It is worth
practicing with your golf bag fitted and on grass. The machine will react
very differently on a car park surface without a bag.
l
Do not overload the base pockets of your golf bag. The more weight on
the front wheel of the machine the less maneuverable it will be and it will
use more power from the battery.
l
The RoboKaddy is a sophisticated machine and will
carry your clubs across most normal
golf course terrain. However, it will
not operate properly if
asked to emulate a
mountain goat!
Wherever the terrain is
difficult, move to manual mode.
l
Should the machine get caught against
an obstruction, please stop and either reverse
or use manual mode. This is particularly
important when using the left/right keys
whilst stationary. If you keep trying you will
overload the motors.
l
Do not keep your finger pressed on any
key for more than 5 seconds as this could
cause damage to your RoboKaddy.
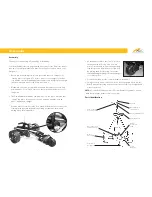
Special Features
Your RoboKaddy is fitted with some special features to give you maximum control
and adaptability. You will not need them often. However it is worth reading the
instructions now to familiarise yourself with the range of features available to you.
LED Signal Indicators
Your RoboKaddy is fitted with three sophisticated LED signal indicators one on
the handset, one on the handle and one on the base controller under the battery
tray. These will help you to diagnose any problems.
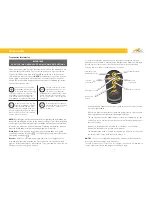
Handle:
l
RED
Manual control mode (potentiometer).
l
GREEN
Remote Control Mode.
l
FLASHING RED/GREEN
Manual mode entered with rotary control knob
not set to zero. Return potentiometer to zero to enable Manual control.
Base Power Unit:
l
FLASHING GREEN
Unit ready with no errors.
l
SOLID ORANGE
The battery is at a very low voltage, the system will re-set
as soon as a fully charged battery is connected.
l
FLASHING ORANGE
Receiving valid command data.
l
SOLID RED
The units over-temperature cut-out has been activated (unit will
re-enable automatically when it cools to a safe operating temperature).
l
FLASHING RED
The units over-current cut-out activated, the total
current drawn by the motors has exceeded the maximum capability
of the system. The unit will automatically re-enable itself in the idle
condition after a short delay.
Handset:
The red LED on the handset will illuminate when a button is
pressed showing that the signal has been sent.
Please see the trouble shooting guide for further details.
5
6


