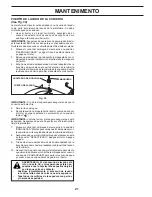
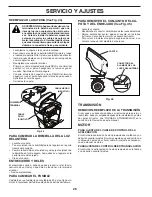
background image

17

MANTENIMENTO

IMPORTANTE

: NO ACEITE O ENGRASE LOS PUNTOS PIVOTES, 

LOS QUE TIENEN RODAMIENTOS DE NILÓN ESPECIALES. LOS 

LUBRICANTES VISCOSOS ATRAERÁN POLVO Y MUGRE, LO QUE 

ACORTARA LA DURACIÓN DE LOS RODAMIENTS. SI CREE QUE 

LUBRICARSE, USE SOLAMENTE UN LUBRICANTE TIPO GRAFITO 

DE POLVO SECO EN FORMA MODERADA.

RECOMENDACIONES GENERALES

La garantía de este tractor no cubre los artículos que han estado 

sujetos al abuso o a la negligencia del operador. Para recibir todo 

el valor de la garantía, el operador tiene que mantener la se ga do ra 

según las instrucciones descritas en este manual.
Hay algunos ajustes que se tienen que hacer en forma periódica 

para poder mantener su trac tor adecuadamente.
Al menos una vez cada estación comprobar si es necesario 

efectuar los adjustes descritos en las secciones de Servicio y 

Ajustes de este manual.
• 

Una vez al año, cambie la bujía, limpie o cambie el filtro de 

aire y revise si las cuchillas y las correas están desgastadas. 

Una bujía nueva y un filtro de aire limpio aseguran una mezcla 

de aire-combustible adecuada y le ayudan a que su motor 

funcione mejor y que dure más.

ANTES DE CADA USO

• 

Revise el nivel del aceite del motor.

• 

Revise la operación de los frenos.

• 

Revise la presión de las llantas.

• 

Verifique que el sistema de presencia del operado y ROS 

funcionen adecuatamente.

• 

Revise si hay sujetadores sueltos.

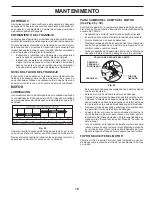
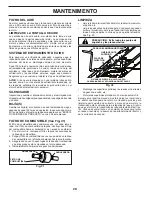
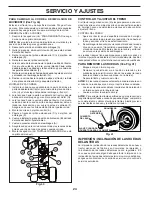
TABLA DE LUBRICACIÓN

3

2

2

1,2

2

2

1

,

2

4

5

1,2

ANTES 

DE CADA 

USO

CADA

25

HORAS

CADA

HORAS

CADA

100

HORAS

CADA

TEMP-

ORADA

ALMACEN-

AMIENTO

CADA

50

HORAS

Limpiar el filtro de aire

Cambiar el aceite del motor (Modelos con filtro de aceite)

Limpiar las aletas de enfriamiento

Limpiar la rejilla de aire

Cambiar el filtro de aceite (si equipado)

Cambiar el filtro de combustible

Cambiar el aceite del motor (Modelos sin filtro de aceite)

PROGRAMA DE MANTENIMIENTO

Revisar el nivel de bateria
Limpiar la batería y los tereminales

Tabla de lubricación

Afilar/cambiar las cuchillas de la segadora

Revisar si hay sujetadores sueltos

Verificar la sistemas presencia del operador y sistemas "ROS"

Revisar la presión de las llantas

Revisar la operación del freno

Cambiar el cartucho de papel del filtro de aire

Cambiar la bujia

Inspeccionar el silenciador/amortiguador de chispas

Revisar el nivel del aceite del motor

Inspeccione las correas trapezoidales

Compruebe la nivelación del cortacéspedes

Revisar el enfriamiento del transeje

Limpie los residuos de la placa de dirección.

1- Cambiar más a menudo cuando se opere bajo carga pesada o en ambientes con altas temperaturas
2- Dar servicio más a menudo cuando se opere en condiciones sucias o polvorosas.

3- Cambiar las cuchillas más a menudo cuando se siegue en suelo arenoso. 
4- No requerido si equipado con una batería libre de mantenimiento.

5- Vea “LIMPIEZA” en la sección de 
    Mantenimento de este manual.

M

O

T

O

R

T

R

A

C

T

O

R


Grasa de proposito general

  Refiérase a la sección del “MOTOR” en Mantenimiento

02500


ACCESORIO 

DE GRASA 

DEL MAN-

DRIL

➁ 

MOTOR


ACCESORIO 

DE GRASA DEL 

RODAMIENTO 

DE LA RUEDA 

DELANTERA


ACCESORIO 

DE GRASA DEL 

RODAMIENTO 

DE LA RUEDA 

DELANTERA


ACCESORIO 

DE GRASA 

DEL ARBOL


ACCESORIO 

DE GRASA 

DEL ARBOL

Содержание PBLGT2654

Страница 1: ...is Manual and follow all Warnings and Safety Instructions Failure to do so can result in serious injury IMPORTANT MANUAL DO NOT THROW AWAY Gasoline containing up to 10 ethanol E10 is acceptable for us...

Страница 2: ...operate the machine while under the influence of alcohol or drugs Watchfortrafficwhenoperatingnearorcrossingroadways Use extreme caution when loading or unloading the ma chine into a trailer or truck...

Страница 3: ...OF GASOLINE To avoid personal injury or property damage use extreme care in handling gasoline Gasoline is extremely flammable and the vapors are explosive Extinguish all cigarettes cigars pipes and o...

Страница 4: ...PPE while operating this machine including at a minimum sturdyfootwear eyeprotection andhearingprotection Do not mow in shorts and or open toed footwear Always let someone know you are outside mowing...

Страница 5: ...eration of your tractor all parts and hardware you assemble must be tightened securely Use the correct tools as necessary to ensure proper tightness TOOLS REQUIRED FOR ASSEMBLY A socket wrench set wil...

Страница 6: ...2 LABEL ADJUST SEAT See Fig 2 Raiseseatandloosenadjustmentbolts Donotremove adjustment bolts Lower seat into operating position and sit on seat Slide seat until a comfortable position is reached which...

Страница 7: ...R BRACKET W FRONT GAUGE WHEEL X SHOULDER BOLT Y 1 1 4 O D WASHER Z 3 8 16 LOCKNUT Fig 5 Y Z W H X Fig 7 3 TURN STEERING WHEEL LEFT AND POSITION MOWER See Fig 6 Turn steering wheel to the left as far a...

Страница 8: ...on bracket F Insert other end of link E into hole in front mower bracket H and secure with washer and small retainer spring J NOTE Requires deck lifting Fig 14 FRONT LINK LOCATION E G F M E FRONT LIFT...

Страница 9: ...arnhowtooperateyourtractor checktoseethat the brake is operating properly See TO CHECK BRAKE in the Service and Adjustments section of this manual CHECKLIST BEFORE YOU OPERATE YOUR NEW TRACTOR WE WISH...

Страница 10: ...rty damage DANGER indicates a hazard which if not avoided will result in death or serious injury WARNING indicates a hazard which if not avoided could result in death or serious injury CAUTION indicat...

Страница 11: ...he engine C PARKING BRAKE Locks clutch brake pedal into the brake position D THROTTLECONTROL Usedtocontrolenginespeed E ATTACHMENTCLUTCHSWITCH Usedtoengagethe mowerbladesorotherattachmentsmountedtoyou...

Страница 12: ...erating efficiency Full speed fast offers the best mower performance B C ATTACHMENT CLUTCH SWITCH ENGAGED ATTACHMENT CLUTCH SWITCH DISENGAGED D F GROUND DRIVE To stop ground drive depress brake pedal...

Страница 13: ...e average lawn should be cut to approximately 2 1 2 63 5 mm during the cool season and to over 3 76 2 mm during hot months For healthier and better looking lawns mow often and after moderate growth Fo...

Страница 14: ...ross any slope Choose the slowest speed before starting up or down hills Avoid stopping or changing speed on hills If stopping is absolutely necessary push brake pedal quickly to brake position and en...

Страница 15: ...easier starting See OIL VISCOSITY CHART in the Maintenance section of this manual To change engine oil see the Maintenance section in this manual TO START ENGINE See Fig 16 When starting the engine fo...

Страница 16: ...ed that the transmission be purged before operating tractor for the first time This procedure will remove any trapped air inside the transmission which may have devel oped during shipping of your trac...

Страница 17: ...CATED USE ONLY A DRY POWDERED GRAPHITE TYPE LUBRICANT SPARINGLY 1 Change more often when operating under a heavy load or in high ambient temperatures 2 Service more often when operating in dirty or du...

Страница 18: ...s running with the ignition switch in the ROS ON position and the attachment clutch engaged any attempt by the operator to shift into reverse should NOT shut off the engine BLADE CARE Forbestresultsmo...

Страница 19: ...not to allow dirt to enter the engine when changing oil Remove yellow cap from end of drain valve and install the drain tube onto the fitting 02463 CLOSED AND LOCKED POSITION DRAIN TUBE OIL DRAIN VALV...

Страница 20: ...tor replacement is required Withenginecool removefilterandplugfuellinesections Place new fuel filter in position in fuel line with arrow pointing towards carburetor Be sure there are no fuel line leak...

Страница 21: ...n the water on 6 While sitting in the operator s position on the tractor re start the engine and place the throttle lever in the Fast position IMPORTANT Recheck the area to ensure the area is clear En...

Страница 22: ...ht rear mower bracket D remove retainer spring and washer and pull mower toward you until the bar falls from the hole in bracket Turn tractor steering wheel to the left as far as it will go Slide mowe...

Страница 23: ...y checking the appearance Readjust if neces sary until you are satisfied with the results A TURN NUT LEFT TO LOWER MOWER TURN NUT RIGHT TO RAISE MOWER Fig 36 Fig 37 PRECISION SIDE TO SIDE ADJUSTMENT S...

Страница 24: ...e tractor forward If the rear wheels rotate then the brake needs to be serviced Contact a qualified service center TO REPLACE MOTION DRIVE BELT See Fig 40 Park the tractor on level surface Engage park...

Страница 25: ...RED cable last from both batteries WEAK OR DEAD BATTERY FULLY CHARGED BATTERY Fig 43 SERVICE AND ADJUSTMENTS TRANSAXLE MOTION CONTROL LEVER NEUTRAL ADJUSTMENT See Fig 42 The motion control lever has b...

Страница 26: ...ENGINE TO ADJUST THROTTLE CONTROL CABLE The throttle control has been preset at the factory and adjustment should not be necessary If adjustment is nec essary see engine manual TO ADJUST CHOKE CONTRO...

Страница 27: ...Plastic cannot breathe which allows condensation to form and will cause your tractor to rust IMPORTANT NEVER COVER TRACTOR WHILE ENGINE AND EXHAUST AREAS ARE STILL WARM Immediately prepare your tracto...

Страница 28: ...eck replace ignition switch 8 Faulty solenoid or starter 8 Check replace solenoid or starter 9 Faulty operator presence switch es 9 Contact an authorized service center department Engine clicks but wi...

Страница 29: ...mower drive belt 9 Blades improperly installed 9 Reinstall blades sharp edge down 10 Improper blades used 10 Replace with blades listed in parts manual 11 Cloggedmowerdeckventholesfrombuildup of gras...

Страница 30: ...never across the face Do not mow slopes greater than 15 degrees Make turns gradually to prevent tipping or loss of control Exercise extreme caution when changing direction on slopes 1 Fold this page a...

Страница 31: ...entender y seguir todas las instruc ciones sobre la m quina y en el manual antes de empezar Si no se observan las instrucciones de seguridad siguientes se pueden producir lesiones graves o la muerte E...

Страница 32: ...bajo de la m quina Mantener siempre limpia la abertura de descarga Permitir el funcionamiento de la m quina s lo a adultos que tengan familiaridad con las instrucciones Limpiar el rea de objetos como...

Страница 33: ...oconregularidad NUNCA utilice una m quina con un dispositivo de seguridad que no est funcionando correctamente Mantener la m quina libre de hierba hojas u otros re siduos acumulados Limpiar las salpic...

Страница 34: ...A Este tractor viene equipado con un motor de combusti n interna y no se debe usar sobre o cerca de un terreno no desarrollado cubierto de bosques de arbustos o de c sped o menos que el sistema de esc...

Страница 35: ...gura Use las herramientas correctas seg n sea necesario para asegurarse de que est n apretados en forma segura HERRAMIENTAS NECESARIAS PARA EL MONTAJE Un juego de llaves de tubo facilitar el montaje A...

Страница 36: ...anual ETIQUETA Fig 1 Fig 2 AJUSTE DEL ASIENTO Vea Fig 2 Levante el asiento y afloje los pernos de ajuste No quitar los pernos de ajuste Baje el asiento a la posici n de operaci n y si ntese Deslice el...

Страница 37: ...t n orientados hacia adelante antes de deslizar la cortadora de c sped debajo del tractor Deslice la cortadora de c sped debajo del tractor hasta que se encuentre centrada debajo del tractor 2 ARME LA...

Страница 38: ...uadra derecha de la cortadora de c sped H y asegure con una arandela y un resorte de retenci n peque o J AVISO Requiere levantar la plataforma Fig 13 7 INSTALE LOS ESLABONES DE LEVANTAMIENTO TRA SEROS...

Страница 39: ...del motor M M POLEA DEL EMBRAGUE DEL MOTOR M Fig 15 LISTA DE REVISI N ANTES DE OPERAR Y DE DISFRUTAR DE SU TRACTOR NUEVO LE DESEAMOS QUE RECIBA EL MEJOR RENDIMIENTO Y LA MAYOR SATISFACCION DE ESTE PR...

Страница 40: ...ue pueden provocar la muerte heridas graves y o da os a la m quina PELIGRO indica un peligro que si no se evita provoca muerte o lesiones graves ADVERTENCIA indica un peligro que si no se evita puede...

Страница 41: ...INTERRUPTOR DE IGNICI N Se usa para hacer arrancar o hacer parar el motor G SISTEMA DE FUNCIONAMIENTO HACIA ATR S ROS EN POSICI N ON Permite la operaci n del conjunto segador o otro accesorio accionad...

Страница 42: ...damos gafas de seguridad o una m scara de visi n amplia de seguridad usada sobre las gafas B C INTERRUPTOR EMBRAGUE DEL ACCESORIO DESENGANCHADO INTERRUPTOR EMBRAGUE DEL ACCESORIO ENGANCHAR PARADA Vea...

Страница 43: ...reno disparejo spero o en cerros Elija a qu altura cortar el c sped Vea PARA AJUS TAR LA ALTURA DE CORTE DE LA SEGADORA Haga arrancar las cuchillas de la segadora enganchando el control del embrague d...

Страница 44: ...o cambiar la velocidad en cerros Si es absolutamente necesario el parar empuje el pedal de freno r pidamente a la posici n de freno y enganche el freno de estacionamiento Para volver a empezar con el...

Страница 45: ...e Viscosidad Del Aceite en la secci n de Mantenimento de este manual Para cambiar el aceite del motor vea la secci n de Manten imiento en este manual PARAHACERARRANCARELMOTOR VeaFig 16 Al hacer arranc...

Страница 46: ...erar el tractor paralaprimeravez Esteprocesoremover cualquieraireadentro de la transmisi n que se halla formado durante el transporte de su tractor IMPORTANTE SI POR ACASO SU TRANSMISI N DEBE SER REMO...

Страница 47: ...EMP ORADA ALMACEN AMIENTO CADA 50 HORAS Limpiar el filtro de aire Cambiar el aceite del motor Modelos con filtro de aceite Limpiar las aletas de enfriamiento Limpiar la rejilla de aire Cambiar el filt...

Страница 48: ...del operador de viajar marcha atr s NO apagar el motor 02828 POSICI N ROS ON MOTOR EN POSICI N ON OPERACI N NORMAL REMOCI N DE LA CUCHILLA Vea Fig 28 Levante la segadora a su posici n m s alta para pe...

Страница 49: ...adaproxi mada vea las Especificaciones del Producto secci n de este manual Use un medidor en la tapa varilla indicadora del nivel para relleno del aceite para revisar el nivel Mantenga el aceite en la...

Страница 50: ...externas seg n sea necesario Aseg rese que se vuelvan a instalar las tapas de enfriamiento AVISO Si se opera la m quina con una rejilla del c sped blo queada sucia o con las aletas de enfriamiento tap...

Страница 51: ...Fig 33 La plataforma del tractor est equipada con un puerto de lavado como parte del sistema de lavado de la plataforma Se debe utilizar despu s de cada uso 1 Lleve el tractor a un lugar horizontal y...

Страница 52: ...apalanca elevadora al cambiarla de posici n Por el lado derecho de la cortadora desconecte la barra anti balanceo S de la barra posterior derecha de la cortadora D retire el resorte de contenci n y la...

Страница 53: ...o bien h gala girar hacia la derecha para subirla Fig 36 Fig 38 Fig 39 AJUSTE DE DELANTE A ATR S Vea Fig 38 y 39 IMPORTANTE El piso debe quedar bien nivelado de lado a lado Para que el c sped le qued...

Страница 54: ...acia adelante el tractor manualmente Sustituir laszapatasdelfrenoocontactarotrocentrodeserviciocualificado PARA CAMBIAR LA CORREA DE IMPULSI N DE MOVIMIENTO Vea Fig 40 Estacione el tractor en una supe...

Страница 55: ...mbas bater as REGULACI N DE LA PALANCA DE CONTROL DEL MOVIMIENTO NEUTRO DEL CAMBIO MEC NICO Vea Fig 42 La palanca de control del movimiento del cambio mec nico ya viene predefinida por la Casa constru...

Страница 56: ...a Operaci n de este manual MOTOR PARA AJUSTAR EL CABLE DE CONTROL DE LA ACELERACI N El control de la aceleraci n ha sido preajustado en la f brica y no deber a necesitar ajustes Revise los ajustes que...

Страница 57: ...ador conectado MOTOR SISTEMA DE COMBUSTIBLE IMPORTANTE Es important evitar que se forman depositos de goma en partes fundamentales del sistema de combus tible tales como el carburador el filtro del co...

Страница 58: ...allados 8 Revise cambie el solenoide o arrancador 9 Interruptor es que exige n la presencia del operador fallado 9 P ngase en contacto con un centro de servicio cuali ficado El motor suena pero no arr...

Страница 59: ...la cajade la segadora 8 La correa de impulsi n de la segadora est des gastada o desajustada 8 Cambie ajuste la correa de impulsi n de la segadora 9 Las cuchillas est n mal coninstaladas 9 Vuelva a in...

Страница 60: ...nunca transversalmente con respecto a las pendientes No cortar pendientes mayores de 15 grados Haga los virajes gradualmente para evitar volcarse o la p rdida de control Tenga mucho cuidado cuando cam...

Отзывы: