background image

12

CAUTION:  Alcohol blended fuels (called gasohol 

or using ethanol or methanol) can attract moisture 

which leads to sep a ra tion and for ma tion of acids 

during storage.  Acidic gas can damage the fuel 

system of an engine while in storage.  To avoid engine 

problems, the fuel system should be emptied before 

stor age of 30 days or longer.  Drain the gas tank, 

start the engine and let it run until the fuel lines and 

carburetor are empty.  Use fresh fuel next season.  

See Storage In struc tions for additional information.  

Never use engine or carburetor cleaner products in 

the fuel tank or permanent damage may occur.

ADD GASOLINE 

•  Fill fuel tank to bottom of filler neck. Do not overfill.  Use 

fresh, clean, regular un lead ed gasoline with a minimum of 

87 octane.  (Use of  leaded gasoline will increase carbon 

and lead oxide deposits and reduce valve life).  Do not 

mix oil with gasoline.  Purchase fuel in quan ti ties that can 

be used within 30 days to assure fuel freshness.

CAUTION:  Wipe off any spilled oil or 

fuel.  Do not store, spill or use gasoline 

near an open flame.

IMPORTANT:

  WHEN OPERATING IN TEMPERATURES BELOW 

32°F(0°C), USE FRESH, CLEAN WINTER GRADE GAS O LINE 

TO HELP ENSURE GOOD COLD WEATHER START ING.

BEFORE STARTING THE ENGINE

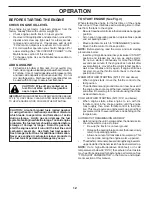
CHECK ENGINE OIL LEVEL

The engine in your tractor  has been shipped, from the 

factory, already filled with sum mer weight oil.  
•  Check engine oil with tractor on level ground.  
• 

Remove oil fill cap/dipstick and wipe clean, reinsert the 

dipstick and screw cap tight, wait for a few seconds, 

remove and read oil level.  If necessary, add oil until  

“FULL” mark on dipstick is reached.  Do not overfill.

•  For cold weather operation you should change oil for 

easier starting (See “OIL VISCOSITY CHART” in the 

Maintenance sec tion of this manual).   

•  To change engine oil, see the Maintenance section in 

this manual.

OPERATION

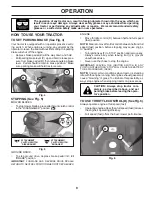
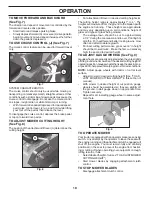
TO START ENGINE (See Fig. 3)

When starting the engine for the first time or if the engine 

has run out of fuel, it will take extra cranking time to move 

fuel from the tank to the engine.
• 

Be sure freewheel control is in the transmission en gaged 

position.

•  Sit on seat in operating position, depress brake pedal 

and set parking brake.

•  Move attachment clutch to “DISENGAGED” position.
•  Move throttle control to choke position.

NOTE: 

Before starting, read the warm and cold starting 

procedures below.
• 

Insert key into ignition and turn key clockwise to “START” 

position and release key as soon as engine starts. 

Do not run starter continuously for more than fifteen 

sec onds per minute. If the engine does not start after 

several attempts, move throttle control to fast position, 

wait a few minutes and try again. If engine still does 

not start, move the throttle control back to the choke 

position and retry.

WARM WEATHER STARTING (50°F/10°C and above)

•  When engine starts, move the throttle control to the 

fast position.

• 

The attachments and ground drive can now be used. If 

the engine does not accept the load, restart the engine 

and allow it to warm up for one minute using the choke 

as described above.

COLD WEATHER STARTING (50°F/10°C and below)
•  When engine starts, allow engine to run with the 

throttle control in the choke position until the engine 

runs roughly, then move throttle control to fast posi-

tion. This may require an engine warm-up period from 

several seconds to several minutes, depending on the 

tem per a ture.

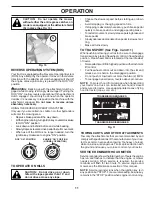
AUTOMATIC TRANSMISSION WARM UP

• 

Before driving the unit in cold weather, the trans mis sion 

should be warmed up as follows:

•  Be sure the tractor is on level ground.
•  Release the parking brake and let the brake slowly 

return to operating position.

•  Allow one minute for transmission to warm up. This 

can be done during the engine warm up period.

• 

The attachments can also be used during the engine warm-

up period after the transmission has been warmed up.

NOTE:

 If at a high altitude (above 3000 feet) or in cold 

temperatures (below 32°F/0°C) the carburetor fuel mixture 

may need to be adjusted for best engine performance. See 

“TO ADJUST CARBURETOR” in the Service and Adjust-

ments section of this manual.

Содержание 85-50

Страница 1: ...TECTION DURING OPERATION Visit our website www poulan pro com WARNING Read this Manual and follow all Warnings and Safety Instructions Failure to do so can result in serious injury IMPORTANT MANUAL Do Not Throw Away 03032 532 43 85 50 09 20 10 TH Printed in the U S A ...

Страница 2: ...op engine and remove keys before dismounting Disengage blades when not mowing Shut off engine and wait for all parts to come to a complete stop before cleaning the machine removing the grass catcher or unclogging the discharge chute Operate machine only in daylight or good artificial light Do not operate the machine while under the influence of alcohol or drugs Watch for traffic when operating nea...

Страница 3: ...ch towed equipment except at the hitch point Follow the manufacturer s recommendation for weight limits for towed equipment and towing on slopes Never allow children or others in or on towed equipment On slopes the weight of the towed equipment may cause loss of traction and loss of control Travel slowly and allow extra distance to stop V SERVICE SAFE HANDLING OF GASOLINE To avoid personal injury ...

Страница 4: ...and the proper tools to service or repair this tractor Please read and retain this manual The instructions will enable you to assemble and maintain your tractor properly Always observe the SAFETY RULES CUSTOMER RESPONSIBILITIES Read and observe the safety rules Follow a regular schedule in maintaining caring for and using your tractor Follow the instructions under Maintenance and Stor age sections...

Страница 5: ...ING TRACTOR FROM SKID TOOLS REQUIRED FOR ASSEMBLY A socket wrench set will make assembly easier Standard wrench sizes are listed 1 1 2 wrench Tire pressure gauge 2 7 16 wrenches Utility knife Pliers Whenrightorlefthandismentionedinthismanual itmeans when you are in the operating position seated behind the steering wheel For battery and battery cable installation see RE PLACINGBATTERY inthe Service...

Страница 6: ...htened securely All tires are properly inflated For shipping purposes the tires were overinflated at the factory Be sure mower deck is properly leveled side to side front to rear for best cutting results Tires must be properly inflated for leveling Check mower and drive belts Be sure they are routed properly around pulleys and inside all belt keepers Check wiring See that all connections are still...

Страница 7: ...ety inform ation about hazards which can result in death serious injury and or property damage DANGER indicates a hazard which if not avoided will result in death or serious injury WARNING indicates a hazard which if not avoided could result in death or serious injury CAUTION indicates a hazard which if not avoided might result in minor or moderate injury CAUTION when used without the alert symbol...

Страница 8: ...dtocontrolenginespeed E ATTACHMENT CLUTCH SWITCH Used to engage the mower blades or other attachments mounted to your tractor F IGNITION SWITCH Used for starting and stopping the engine G REVERSE OPERATION SYSTEM ROS ON POSITION Allows operation of mower or other powered attachment while in reverse H LIGHT SWITCH Turns the headlights on and off J CRUISE CONTROL LEVER Used to set forward movement o...

Страница 9: ...o STOP positionandremovekey Always remove key when leaving tractor to prevent unauthorized use Never use the choke to stop the engine IMPORTANT LEAVING THE IGNITION SWITCH IN ANY POSITION OTHER THAN STOP WILL CAUSE THE BATTERY TO BE DISCHARGED DEAD NOTE Under certain conditions when tractor is standing idle with the engine running hot engine exhaust gases may cause browning of grass To eliminate t...

Страница 10: ...ted when they are slightly offthegroundwhenmowerisatthedesiredcuttingheightin operatingposition Gaugewheelsthenkeepthedeckinprop erpositiontohelppreventscalpinginmostterrainconditions NOTE Adjust gauge wheels with tractor on a flat level surface Adjust mower to desired cutting height See TO AD JUST MOWER CUTTING HEIGHT in this section of manual With mower in desired height of cut position gauge wh...

Страница 11: ...o reposition the machine with the attachment engaged Do not mow in reverse unless absolutely necessary USING THE REVERSE OPERATION SYSTEM Only use if you are certain no children or other bystanders will enter the mowing area Depress brake pedal all the way down Withenginerunning turnignitionkeycounterclockwise to ROS ON position Look down and behind before and while backing Slowly depress reverse ...

Страница 12: ...ngine has run out of fuel it will take extra cranking time to move fuel from the tank to the engine Besurefreewheelcontrolisinthetransmissionengaged position Sit on seat in operating position depress brake pedal and set parking brake Move attachment clutch to DISENGAGED position Move throttle control to choke position NOTE Before starting read the warm and cold starting procedures below Insertkeyi...

Страница 13: ...ol to half 1 2 speed Disengage parking brake Drive tractor forward for approximately five feet then backwards for five feet Repeat this driving procedure three times Your transmission is now purged and now ready for normal operation OPERATION MOWING TIPS Tire chains cannot be used when the mower housing is attached to tractor Mower should be properly leveled for best mowing performance See TO LEVE...

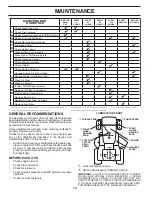
Страница 14: ...MENDATIONS The warranty on this tractor does not cover items that have beensubjectedtooperatorabuseornegligence Toreceive full value from the warranty operator must maintain tractor as instructed in this manual Some adjustments will need to be made periodically to properly maintain your tractor At least once a season check to see if you should make any of the adjustments described in the Service a...

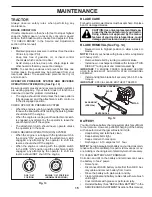
Страница 15: ...e should shut off the engine When the engine is running with the ignition switch in the ROS ON position and the attachment clutch engaged any attempt by the operator to shift into reverse should NOT shut off the engine BLADE CARE Forbestresultsmowerbladesmustbekeptsharp Replace bent or damaged blades CAUTION Useonlyareplacementbladeap proved by the manufacturer of your tractor Using a blade not ap...

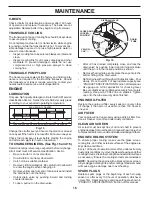
Страница 16: ...e oil filter every season or every other oil change if the tractor is used more than 100 hours in one year OIL DRAIN VALVE 02463 CLOSED AND LOCKED POSITION YELLOW CAP DRAIN TUBE ENGINE COOLING SYSTEM To ensure proper cooling make sure the grass screen cooling fins and other external surfaces of the engine are kept clean at all times Every 100 hours of operation more often under extremely dusty dir...

Страница 17: ...ive the tractor to a level clear spot on your lawn near enough to a water spigot for your garden hose to reach IMPORTANT Make certain the tractor s discharge chute is directed AWAY from your house garage parked cars etc Remove bagger chute or mulch cover if attached 2 Make sure the attachment clutch control is in the DISENGAGED position set the parking brake and stop the engine 3 Threadthenozzlead...

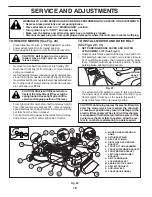
Страница 18: ...ull mower toward you until the bar falls from the hole in bracket Turn tractor steering wheel to the left as far as it will go Slide mower out from under right side of tractor TO INSTALL MOWER AND DRIVE BELT See Figs 20 31 1 SET PARKING BRAKE LEVER AND LOWER ATTACHMENT LIFT See Fig 21 Depress clutch brake pedal all the way down and hold Pull parking brake lever up and hold release pressure from cl...

Страница 19: ...ll go and position mower on right side of tractor with deflector shield Q to the right 2 ASSEMBLEFRONTGAUGEWHEEL W TOFRONT OF MOWER See Fig 22 NOTE Depending on model bracket T may be differ ent than shown but hole for anti sway bar will be in same position location Fromrightsideofmower firstinsert90 endofanti sway bar S into hole in transaxle bracket T located near left rear tire in front of tran...

Страница 20: ... LIFT LINKS C See Fig 29 Insert rod end of rear lift link C into hole U in tractor lift shaft suspension arm and pivot link down to mower Lift rear corner of mower and position slot in link as sembly over pin on rear mower bracket D and secure with large washer and large retainer spring Repeat on opposite side of tractor C REAR LIFT LINK S D RIGHT SIDE REAR MOWER BRACKET U HOLE D C U 9 INSTALL BEL...

Страница 21: ...ransmission disengaged position Pull freewheel control out and into the slot and release so it is held in the disengaged position The rear wheels must lock and skid when you try to manu ally push the tractor forward If the rear wheels rotate then the brake needs to be serviced Contact a qualified service center TO LEVEL MOWER Make sure tires are properly inflated to the PSI shown on tires If tires...

Страница 22: ...t clutch harness A 8 Make sure belt is in all pulley grooves and inside all belt guides and keepers 9 Install mower See TO INSTALL MOWER section in this manual FRONT TO BACK ADJUSTMENT See Figs 35 36 IMPORTANT Deck must be level side to side To obtain the best cutting results the mower blades should be adjusted so the front tip is 1 8 to 1 2 lower than the rear tip when the mower is in its highest...

Страница 23: ...LY AXLE COVER TO START ENGINE WITH A WEAK BATTERY See Fig 39 WARNING Lead acidbatteriesgenerate explosivegases Keepsparks flameand smoking materials away from batteries Alwaysweareyeprotectionwhenaround batteries If your battery is too weak to start the engine it should be recharged See BATTERY in the MAINTENANCE sec tion of this manual If jumper cables are used for emergency starting follow this ...

Страница 24: ...perate properly due to suspected carburetor problems take your tractor to an authorized service center for repair and or adjustment Fig 41 HEADLIGHT WIRE CONNECTOR HOOD 05000 POSITIVE RED CABLE TERMINAL COVER NEGATIVE BLACK CABLE Fig 40 TRANSMISSION REMOVAL REPLACEMENT Should your transmission require removal for service or replacement it should be purged after reinstallation and beforeoperatingth...

Страница 25: ...ALFUELSYSTEMPARTSSUCH AS CARBURETOR FUEL FILTER FUEL HOSE OR TANK DURING STORAGE ALSO EXPERIENCE INDICATES THAT ALCOHOL BLENDED FUELS CALLED GASOHOL OR USING ETHANOLORMETHANOL CANATTRACTMOISTUREWHICH LEADSTOSEPARATIONANDFORMATIONOFACIDSDURING STORAGE ACIDIC GAS CAN DAMAGE THE FUEL SYSTEM OF AN ENGINE WHILE IN STORAGE Empty the fuel tank by starting the engine and let it run until the fuel lines an...

Страница 26: ...ing 7 Faulty ignition switch 7 Check replace ignition switch 8 Faulty solenoid or starter 8 Check replace solenoid or starter 9 Faulty operator presence switch es 9 Contact an authorized service center department Engine clicks but will not start 1 Weak or dead battery 1 Recharge or replace battery 2 Corroded battery terminals 2 Clean battery terminals 3 Loose or damaged wiring 3 Check all wiring 4...

Страница 27: ...led 9 Reinstall blades sharp edge down 10 Improper blades used 10 Replace with blades listed in parts manual 11 Cloggedmowerdeckventholesfrombuildup of grass leaves trash around mandrels 11 Clean around mandrels to open vent holes Headlight s not working if so equipped 1 Switch is OFF 1 Turn switch ON 2 Bulb s or lamp s burned out 2 Replace bulb s or lamp s 3 Faulty light switch 3 Check replace li...

Страница 28: ...used for rental or commercial purposes is limited to 90 days from the date of origi nal purchase 5 This Warranty applies only to products which have been properly assembled adjusted operated and maintained in ac cordance with the instructions furnished This Warranty does not apply to any product which has been subjected to altera tion misuse abuse improper assembly or installation delivery damage ...

Отзывы: