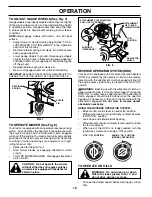
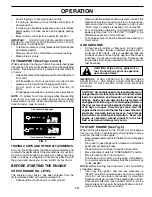
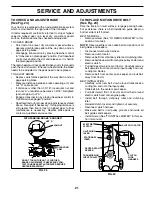
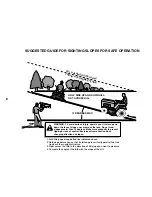
background image

14

FIG. 10

 MOWING TIPS

•      Mower should be properly leveled for best mowing per-

formance.  See “TO LEVEL MOWER HOUSING” in the 
Service and Adjustments section of this manual.

•      The left hand side of mower should be used for trim-

 ming.

•     Drive so that clippings are discharged onto the area 

that has been cut.  Have the cut area to the right of the 
machine.  This will result in a more even dis tri bu tion of 
clippings and more uniform cutting.

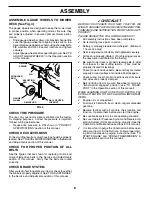
•         When mowing large areas, start by turning to the right so 

that clippings will discharge away from shrubs, fences, 
driveways, etc.  After one or two rounds, mow in the 
opposite direction making left hand turns until fi nished 
(See Fig. 10).

OPERATION

•      If grass is extremely tall, it should be mowed twice to 

reduce load and possible fi re hazard from dried clip-
 pings.  Make fi rst cut relatively high; the second to the 
desired height.

•      Do not mow grass when it is wet.  Wet grass will plug 

mower and leave undesirable clumps.  Allow grass to 
dry before mowing.

•        

Always operate engine at full throttle when mow-
ing 

to assure better mowing performance and proper 

dis charge of material.  Regulate ground speed by se-
 lect ing a low enough gear to give the mower cut ting 
per for mance as well as the quality of cut desired.

•     When operating attachments, select a ground speed 

that will suit the terrain and give best performance of 
the at tach ment being used.

PURGE TRANSMISSION

CAUTION:  Never engage or disengage 
freewheel lever while the engine is run-
 ning.

To ensure proper operation and performance, it is rec om -
mend ed that the transmission be purged before operating 
tractor for the fi rst time. This procedure will remove any 
trapped air inside the transmission which may have de-
 vel oped during shipping of your tractor.

IMPORTANT:

  SHOULD YOUR TRANSMISSION RE 

QUIRE 

REMOVAL FOR SERVICE OR REPLACEMENT, IT SHOULD 
BE PURGED AFTER REINSTALLATION BEFORE OPERATING 
THE TRACTOR.

•         Place tractor safely on level surface with engine off and 

parking brake set.

•      Disengage transmission by placing freewheel control 

in freewheeling position (See “TO TRANSPORT” in this 
section of manual).

•      Sitting in the tractor seat, start engine. After the engine 

is running, move throttle control to slow position. With 
motion control lever in neutral (N) po si tion, slowly dis-
engage clutch/brake pedal. 

•      Move motion control lever to full forward position and 

hold for fi ve (5) seconds. Move lever to full reverse 
position and hold for fi ve (5) seconds. Repeat this 
procedure three (3) times.

NOTE:  

During this procedure there will be no movement 

of drive wheels. The air is being removed from hydraulic 
drive system.
•      Move motion control lever to neutral (N) position. Shut- 

off engine and set parking brake.

•     Engage transmission by placing freewheel control in 

engaged position (See “TO TRANSPORT” in this sec-
 tion of manual).

•         Sitting in the tractor  seat, start engine. After the engine 

is running, move throttle control to half (1/2) speed. 
With motion control lever in neutral (N) position, slowly 
disengage clutch/brake pedal.

•         Slowly move motion control lever forward, after the tractor 

moves approximately fi ve (5) feet, slowly move motion 
control lever to reverse position. After the tractor moves 
approximately fi ve (5) feet return the motion control lever 
to the neutral (N) position. Repeat this procedure with 
the motion control lever three (3) times.

•     Your transmission is now purged and now ready for 

normal op er a tion.

WARM WEATHER STARTING (50° F and above)
•     When engine starts, slowly push choke control in until 

the engine begins to run smoothly. If the engine starts to 
run roughly, pull the choke control out slightly for a few 
seconds and then continue to push the control in slowly.

•      The attachments and ground drive can now be used. If 

the engine does not accept the load, restart the engine 
and allow it to warm up for one minute using the choke 
as described above.

COLD WEATHER STARTING (50° F and below)
•      When engine starts, slowly push choke control in until 

the engine begins to run smoothly. Continue to push 
the choke control in small steps allowing the engine to 
accept small changes in speed and load, until the choke 
control is fully in. If the engine starts to run roughly, pull 
the choke control out slightly for a few seconds and 
then continue to push the control in slowly. This may 
require an engine warm-up period from several sec onds 
to several minutes, depending on the temperature.

AUTOMATIC TRANSMISSION WARM UP

•        

Before driving the unit in cold weather, the trans mis sion 
should be warmed up as follows:

•     Be sure the tractor is on level ground.
•     Place the motion control lever in neu tral.  

Re lease the parking brake and let the clutch/brake 
slowly return to operating po si tion.

•       Allow one minute for transmission to warm up. This 

can be done during the engine warm up period.

•      The attachments can be used during the engine warm-up 

period after the transmission has been warmed up and 
may require the choke con trol be pulled out slight ly.

NOTE:

 If at a high altitude (above 3000 feet) or in cold 

temperatures (below 32 F) the carburetor fuel mixture may 
need to be adjusted for best engine performance. See “TO 
ADJUST CARBURETOR” in the Service and Ad just ments 
section of this manual.

Содержание 195021

Страница 1: ...PROTECTION DURING OPERATION Visit our website www poulan pro com WARNING Read this Manual and follow allWarnings and Safety Instructions Failure to do so can result in serious injury IMPORTANT MANUAL Do Not Throw Away 195021 Rev 2 11 05 04 TR Printed in U S A 02139 ...

Страница 2: ...parking brake stop engine and remove keys before dismounting Disengage blades when not mowing Shut off engine and wait for all parts to come to a complete stop before cleaning the machine removing the grass catcher or unclogging the discharge guard Operate machine only in daylight or good artificial light Do not operate the machine while under the influence of alcohol or drugs Watch for traffic wh...

Страница 3: ...h towed equipment except at the hitch point Follow the manufacturer s recommendation for weight limits for towed equipment and towing on slopes Never allow children or others in or on towed equip ment On slopes the weight of the towed equipment may cause loss of traction and loss of control Travel slowly and allow extra distance to stop V SERVICE SAFE HANDLING OF GASOLINE To avoid personal injury ...

Страница 4: ...tions will enable you to assemble and maintain your tractor properly Always observe the SAFETY RULES CUSTOMER RESPONSIBILITIES Read and observe the safety rules Follow a regular schedule in maintaining caring for and using your tractor Follow the instructions under Maintenace and Stor age sections of this owner s manual WARNING This tractor is equipped with an internal com bustion engine and shoul...

Страница 5: ...apter Seat 2 Keys Slope Sheet Key 1 Oil Drain Tube 1 Knob 1 Washer 17 32 x 1 3 16 x 12 Gauge 4 Washers 3 8 x 3 4 x 14 Ga 4 Wheels 4 Adjusting Bar 4 Retainer Springs double loop 4 Clevis Pins 4 Locknut 3 8 16 4 Shoulder Bolt Gauge Wheels Steering Sleeve 1 Hex Bolt 1 4 28 x 1 1 4 1 Hex nut 1 2 20 ...

Страница 6: ...rd Place seat on seat pan so head of shoulder bolt is positioned over large slotted hole in pan Push down on seat to engage shoulder bolt in slot and pull seat towards rear of tractor Pivot seat and pan forward and assemble adjustment knob and flat washer loosely Do not tighten Lower seat into operating position and sit on seat Slide seat until a comfortable position is reached which allows you to...

Страница 7: ...ve been com pleted Check engine oil level and fill fuel tank with gasoline Place freewheel control in transmission engaged position see TO TRANSPORT in Operation section of this manual Sit on seat in operating position depress clutch brake pedal and set the parking brake Place motion control lever in neutral N position Press lift lever plunger and raise attachment lift lever to its highest positio...

Страница 8: ... for best cutting results Tires must be properly inflated for leveling Check mower and drive belts Be sure they are routed properly around pulleys and inside all belt keepers Check wiring See that all connections are still secure and wires are properly clamped Before driving tractor be sure freewheel control is in transmission engaged position see TO TRANS PORT in the Operation section of this man...

Страница 9: ...s injury or death The safety alert symbol is used to identify safety inform ation about hazards which can result in death serious injury and or property damage DANGER indicates a hazard which if not avoided will result in death or serious injury WARNING indicates a hazard which if not avoided could result in death or serious injury CAUTION indicates a hazard which if not avoided might result in mi...

Страница 10: ... cold engine FREEWHEEL CONTROL Disengages transmission for pushing or slowly towing the tractor with the engine off HEIGHTADJUSTMENTKNOB Usedtoadjustthemower cutting height LIFT LEVER PLUNGER ATTACHMENT LIFT LEVER PARKING BRAKE IGNITION SWITCH THROTTLECONTROL ROS ON POSITION MOTION CONTROL LEVER CLUTCH BRAKE PEDAL FIG 5 FREE WHEEL CONTROL ATTACHMENT CLUTCH SWITCH IGNITION SWITCH Used for starting ...

Страница 11: ... N position IMPORTANT THE MOTION CONTROL LEVER DOES NOT RETURN TO NEUTRAL N POSITION WHEN THE CLUTCH BRAKE PEDAL IS DEPRESSED ENGINE Move throttle control between half and full speed fast position NOTE Failure to move throttle control between half and fullspeed fast position beforestoppingmaycauseengine to backfire Turn ignition key to STOP position and remove key Always remove key when leaving tr...

Страница 12: ...rse operation with the attachment clutch engaged should only be done when the operator decides it is necessary to reposition the machine with the attachment engaged Do not mow in reverse unless absolutely necessary USING THE REVERSE OPERATION SYSTEM Move motion control lever to neutral N position Withenginerunning turnignitionkeycounterclockwise to ROS ON position Look down and behind before backi...

Страница 13: ...e engine or carburetor cleaner products in the fuel tank or permanent damage may occur Transmission Engaged Transmission Disengaged Avoid stopping or changing speed on hills If slowing is necessary move throttle control lever to slower position If stopping is absolutely necessary push clutch brake pedal quickly to brake position and engage parking brake Move motion control lever to neutral N posit...

Страница 14: ...mes NOTE During this procedure there will be no movement of drive wheels The air is being removed from hydraulic drive system Move motion control lever to neutral N position Shut off engine and set parking brake Engage transmission by placing freewheel control in engaged position See TO TRANSPORT in this sec tion of manual Sitting in the tractor seat start engine After the engine is running move t...

Страница 15: ...n high ambient temperatures 2 Service more often when operating in dirty or dusty conditions E N G I N E Replace Oil Filter If equipped Check Transaxle Cooling Check V Belts Replace Fuel Filter 3 2 2 2 2 3 Replace blades more often when mowing in sandy soil 4 Not required if equipped with maintenance free battery 5 Tighten front axle pivot bolt to 35 ft lbs maximum Do not overtighten 1 1 2 2 4 5 C...

Страница 16: ...ECIFICATIONS section of this manual Keep tires free of gasoline oil or insect control chemi cals which can harm rubber Avoid stumps stones deep ruts sharp objects and other hazards that may cause tire damage NOTE To seal tire punctures and prevent flat tires due to slow leaks tire sealant may be purchased from your local parts dealer Tire sealant also prevents tire dry rot and corrosion OPERATOR P...

Страница 17: ...TO CHANGE ENGINE OIL See Figs 14 and 15 Determine temperature range expected before oil change All oil must meet API service classification SG SL Be sure tractor is on level surface Oil will drain more freely when warm Catch oil in a suitable container Remove oil fill cap dipstick Be careful not to allow dirt to enter the engine when changing oil Remove yellow cap from end of drain valve and insta...

Страница 18: ...out Water in engine or transmission will shorten the useful life of your tractor Use compressed air or a leaf blower to remove grass leaves and trash from tractor and mower CLEAN AIR SCREEN Air screen must be kept free of dirt and chaff to prevent engine damage from overheating Clean with a wire brush or compressed air to remove dirt and stubborn dried gum fibers AIR FILTER Your engine will not ru...

Страница 19: ...er will be easier to remove from the right side of trac tor Place attachment clutch switch in DISENGAGED position Move attachment lift lever forward to lower mower to its lowest position Roll belt off electric clutch pulley Disconnect anti sway bar from chassis bracket by removing retainer spring Disconnect suspension arms from rear deck brackets by removing retainer springs Disconnect front links...

Страница 20: ...ent nut on that side To lower one side of mower loosen lift link adjustment nut on that side NOTE Threefullturnsofadjustmentnutwillchangemower height about 1 8 Recheck measurements after adjusting FRONT TO BACK ADJUSTMENT See Figs 20 and 21 IMPORTANT DECK MUST BE LEVEL SIDE TO SIDE IF THE FOLLOWINGFRONT TO BACKADJUSTMENTISNECESSARY BE SURE TO ADJUST BOTH FRONT LINKS EQUALLY SO MOWER WILL STAY LEVE...

Страница 21: ...t tractor for proper stopping distance as stated above Readjust if necessary If stopping distance is still greater than five 5 feet in highest gear further maintenance is necessary Replace brake pads or contact a qualified service center 1 9 16 CLUTCH LOCATOR CLUTCH WIRE HARNESS STATIONARY IDLER TRANSMISSION INPUT PULLEY CLUTCHING IDLER ELECTRIC CLUTCH TO REPLACE MOTION DRIVE BELT See Fig 24 Park ...

Страница 22: ...lly charged battery RED cable last from both batteries TO ADJUST STEERING WHEEL ALIGN MENT If steering wheel crossbars are not horizontal left to right whenwheelsarepositionedstraightforward removesteer ing wheel and reassemble per instructions in the Assembly section of this manual FRONT WHEEL TOE IN CAMBER The front wheel toe in and camber are not adjustable on yourtractor Ifdamagehasoccurredtoa...

Страница 23: ...ontrol has been preset at the factory and ad justment should not be necessary If adjustment is neces sary see engne manual TO ADJUST CARBURETOR Your carburetor is not adjustable If your engine does not operate properly due to suspected carburetor problems take your tractor to an authorized service center for repair and or adjustment FIG 29 REPLACING BATTERY See Fig 28 WARNING Do not short battery ...

Страница 24: ...FUEL SYSTEM PARTS SUCH AS CARBURETOR FUEL FILTER FUEL HOSE OR TANK DURING STORAGE ALSO EXPERIENCE INDICATES THAT ALCOHOL BLENDED FUELS CALLED GASOHOL OR USING ETHANOLORMETHANOL CANATTRACTMOISTUREWHICH LEADSTOSEPARATIONANDFORMATIONOFACIDSDURING STORAGE ACIDIC GAS CAN DAMAGE THE FUEL SYSTEM OF AN ENGINE WHILE IN STORAGE Empty the fuel tank by starting the engine and let it run until the fuel lines a...

Страница 25: ...ignition switch 7 Check replace ignition switch 8 Faulty solenoid or starter 8 Check replace solenoid or starter 9 Faulty operator presence switch es 9 Contact an authorized service center department Engine clicks but will not 1 Weak or dead battery 1 Recharge or replace battery start 2 Corroded battery terminals 2 Clean battery terminals 3 Loose or damaged wiring 3 Check all wiring 4 Faulty solen...

Страница 26: ... pressure 5 Check tires for proper air pressure 6 Worn bent or loose blade 6 Replace sharpen blade Tighten blade bolt 7 Buildup of grass leaves and trash under mower 7 Clean underside of mower housing 8 Mower drive belt worn 8 Replace mower drive belt 9 Blades improperly installed 9 Reinstall blades sharp edge down 10 Improper blades used 10 Replace with blades listed in this manual 11 Clogged mow...

Страница 27: ...used for rental or commercial purposes is limited to 90 days from the date of original purchase 5 This Warranty applies only to products which have been properly assembled adjusted operated and maintained in accor dance with the instructions furnished This Warranty does not apply to any product which has been subjected to alteration misuse abuse improper assembly or installation delivery damage or...

Страница 28: ...28 SERVICE NOTES ...

Страница 29: ...the face Do not mow slopes greater than 15 degrees Make turns gradually to prevent tipping or loss of control Exercise extreme caution when changing direction on slopes 1 Fold this page along dotted line indicated above 2 Hold page before you so that its left edge is vertically parallel to a tree trunk or other upright structure 3 Sight across the fold in the direction of hill slope you want to me...

Страница 30: ...on of part For Techical Assistance call 1 800 829 5886 For a Parts Manual go to our website www poulan pro com support asp NOTE Electrolux Home Products provides parts and service through its authorized distributors and dealers therefore all requests for parts and service should be directed to your local dealer s The philosophy of Electrolux Home Products is to continually improve all of its produ...

Отзывы: