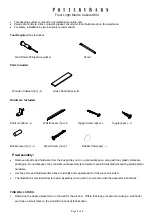


Floor Lngth Medcn Cabinet Wht
Page
2
of
3
2. It is best to mount the bracket to at least (1) stud. Using Figure 1, determine which hole on the wall side bracket will
be over the stud, this hole will take a wood screw alone.
MOUNT WALL BRACKET TO THE WALL
1. Insert the supplied bubble level (e) into the channel of the wall side bracket (b). Position the wall bracket (b) on the
wall and adjust so that the bracket is level and a pre-drilled hole of the bracket aligns with a stud. Then, use a
felt-tipped pen to mark the wall through appropriate pre-drilled holes of the bracket to indicate the locations of the
drywall toggles. Also make sure to mark the bracket itself at each selected pre-drilled hole using the pen. (Please
refer to Figure 1 to determine the location of the hardware.) The locations of the drywall toggles will depend on
how the stud aligns with the bracket. The user should make sure that the stud and the toggles are evenly spaced
along the length of the bracket and that the ends of the bracket should be secured using either a stud-mounted
screw or a drywall toggle.
2. Remove the wall mount bracket and set aside.
3. Using a manual screwdriver, drive a toggle (d) into the drywall at each mark. To install these toggles (d) into the
wall, simply rotate them at the marked location as if they were a large screw, applying smooth even force. DO
NOT HIT THEM WITH A HAMMER AND DO NOT USE A POWER DRILL TO ROTATE THEM. These toggles are
designed to bore themselves into the wall. Continue rotating until the toggle head advances flush with the wall
surface.
4. Once the toggles (d) are installed into the wall at the marked locations, reposition the wall bracket (b) so that the
marked holes of the bracket align with the toggles. Using the supplied toggle screw (c) secure the bracket (b) to
the installed toggles (d). Note: The toggle includes a nut portion that must be “set” into a locked position prior to
using the product. This is done automatically as you rotate the toggle screw into the toggle , but keep in mind that
the screw must be rotated quite a few times before the nut finally reaches this locked position. The nut will create
resistance when it reaches the locked position within the wall.
5. Once the wall bracket is attached to each toggle using the toggle screw, the bracket must be secured to the stud
located along the bracket. Use the supplied stud mount screw (f) to secure the wall bracket (b) to the stud (note,
a pre-drilled hole of the bracket should align with the stud location).
6.
HANG THE PRODUCT ONTO THE MOUNTED WALL BRACKET
1. On the back of your product is one affixed product-mounting bracket. Figure 2.
2. Carefully position the product-mounting bracket slightly above and against the wall mount bracket, insuring
that the two brackets are aligned. Engage the two brackets.
7. Open the Door of cabinet and make a remark for Anchor (g) on the wall through the hole on back bottom rail with
pencil. Then take off the cabinet (A) from the wall. Drill hole on the remark and use Phillips Screwdriver to insert
the Anchor (g) on the pre-drilled hole. Do not “push” or drive the anchor into the wall. Slowly turn the anchor
clockwise while applying pressure until the flange just touches the wall. If using a power drill, use caution as the
hardware can strip. Repeat Step 6 and Re-hang the cabinet (A) onto the mounted wall bracket. Insert the Anchor
screw (h) through back panel bottom hole to mount wall storage to anchor installed on wall. Cover the screw hole
with wooden plug (i). See Figure 3.


