


ODP 200H-II User’s Manual
23
ODP 200H-II User’s Manual
24
7. Command List
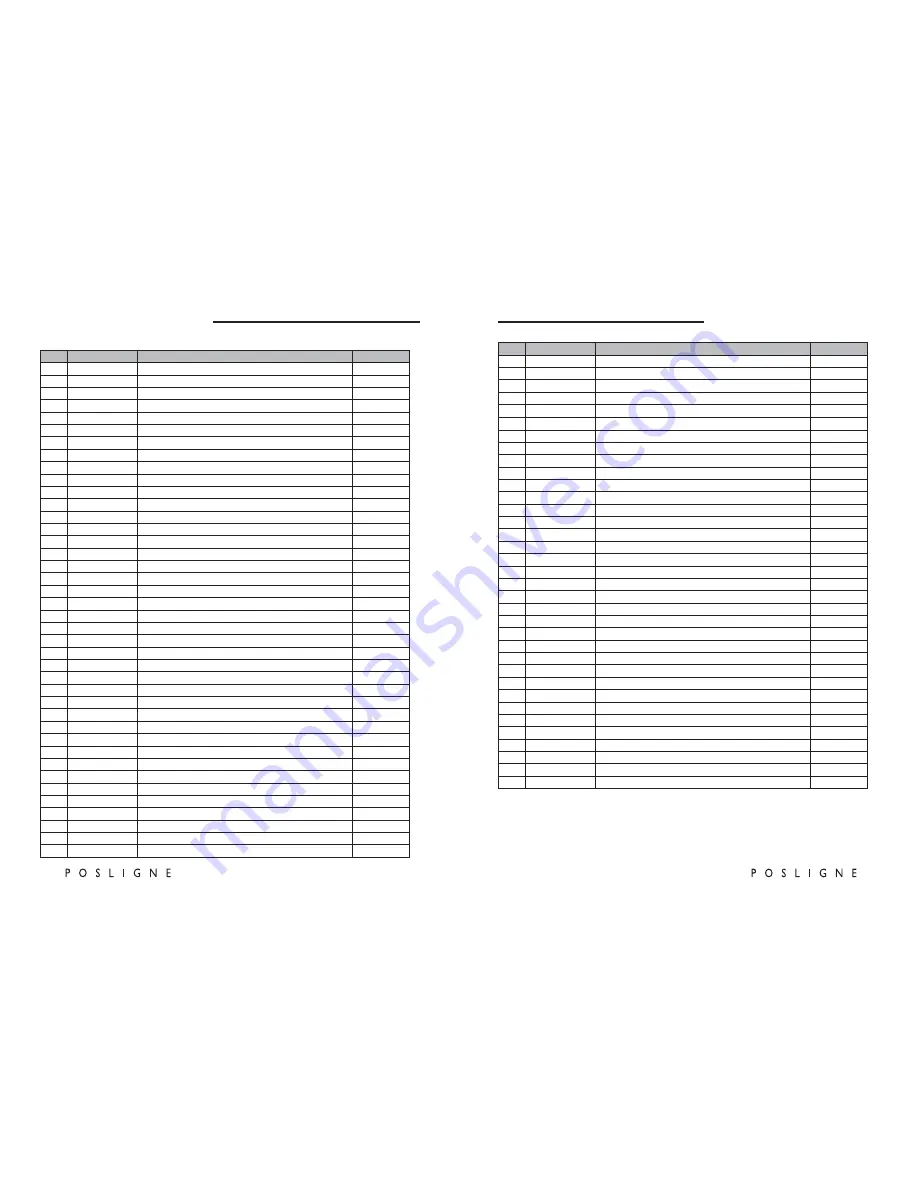
No.
Command
Function
REMARKS
1
HT
Horizontal tab
2
LF
Print and line feed
3
CR
Print and carriage return
4
FF
Print and return to standard mode(in page mode)
5
CAN
Cancel print data in page mode
6
DLE EOT
Real-time status transmission
7
DLE ENQ
Real-time request to printer
8
DLE DC4
Generate pulse at real-time
9
ESC FF
Print data in page mode
10
ESC SP
Set right-side character spacing
11
ESC !
Select print mode(s)
12 ESC $
Set absolute print position
13
ESC %
Select/cancel user-defined character set
14
ESC &
Define user-defined characters
15 ESC *
Set bit-image mode
16 ESC -
Turn underline mode on/off
17 ESC 2
Select default line spacing
18 ESC 3
Set line spacing
19 ESC =
Select peripheral device
20
ESC ?
Cancel user-defined characters
21
ESC @
Initialize printer
22 ESC D
Set horizontal tab positions
23 ESC E
Turn emphasized mode on/off
24 ESC G
Turn double-strike mode on/off
25
ESC J
Print and feed paper using minimum units
26 ESC L
Select page mode
27
ESC M
Select character font
28
ESC R
Select an international character set
29 ESC S
Select standard mode
30 ESC T
Select print direction in page mode
31 ESC V
Turn 90° clockwise rotation mode on/off
32 ESC W
Set printing area in page mode
33 ESC
\
Set relative print position
34 ESC a
Select justification
35
ESC c 3
Select paper sensor(s) to output paper-end signals
36
ESC c 4
Select paper sensor(s) to stop printing
37
ESC c 5
Enable/disable panel buttons
38 ESC d
Print and feed paper
n
lines
39 ESC p
General pulse
40
ESC t
Select character code table
No.
Command
Function
REMARKS
41 ESC {
Turn upside-down printing mode on/off
42 FS p
Print NV bit image
43
FS q
Define NV bit image
44
GS !
Select character size
45 GS $
Set absolute vertical print position in page mode
46 GS *
Define downloaded bit image
47 GS /
Print downloaded bit image
48 GS B
Turn white/black reverse printing mode on/off
49 GS H
Select printing position of HRI characters
50
GS I
Transmit printer ID
51 GS L
Set left margin
52 GS P
Set horizontal and vertical motion units
53 GS V
Select cut mode and cut paper
54 GS W
Set printing area width
55 GS
\
Set relative vertical print position in page mode
56 GS a
Enable/disable Automatic Status Back(ASB)
57
GS f
Select font for HRI characters
58 GS h
Set bar code height
59
GS k
Print bar code
60
GS r
Transmit status
61
GS v 0
Print raster bit image
62 GS w
Set bar code width
< Add >
1
ESC i
Full cut
2
ESC m
Partial cut
3
FS !
Set print mode(s) for Kanji characters
4
FS &
Select Kanji character mode
5
FS -
Turn underline mode on/off for Kanji character
6
FS .
Cancel Kanji character mode
7
FS 2 c1 d1…dk
Define user-defined Kanji characters
8
FS C
Select Kanji character code system
9
FS S 1 2
Set Kanji character spacing
10
FS W
Turn quadruple-size mode on/off for Kanji character
Содержание ODP 200 H-II
Страница 1: ...All specifications are subject to change without notice 3 Thermal Printer ODP 200 H II...
Страница 2: ......
Страница 14: ...ODP 200H II User s Manual 25 ODP 200H II User s Manual 26...
Страница 15: ...Rev 1 0...