background image


Installing the Virtual COM Driver for PD-6807U 

Refer to the following steps for the driver installation.


1.


Connect the USB cable of PD-6807U to your POS terminal. 

2.


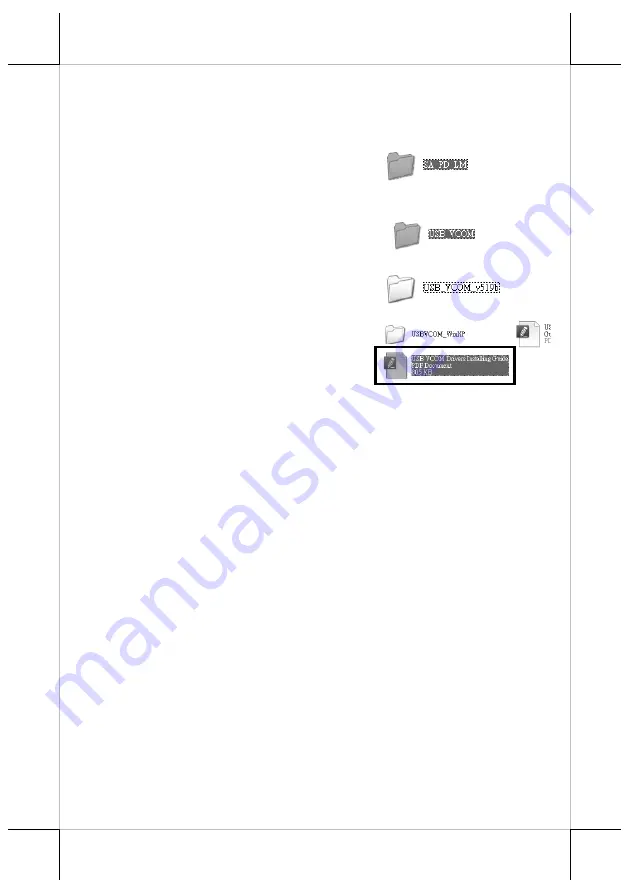
Locate the “SA_PD_LM” folder from 
the “Drivers” folder in the Local Disk 
(C:) of your POS terminal 


3.


You will find the “USB_VCOM” 
folder and double click it. 


4.


Then double click the 
“USB_VCOM_v519bx” folder. 


5.


In the folder, double click the PDF 
named 

USB VCOM Drivers 

Installing Guide

 to open. 


6.


Then, refer to this installation guide to complete the driver 
installation. 

Setting up the PD-6807U Customer Display 

POS Graphics Display Tool

 is a helpful tool designed to assist PD-

6807U users in managing the customer display settings according to 
your personal preference. To start with the tool, you will need to access 
the executable file, 

GraphicsDisplay_Setup Tool.exe,

 under the 

directory  

C:\Drivers\ SA_PD_LM\ GraphicsDisplay_Setup Tool\

. As for the 

more detailed instructions on the operation of the tool, please refer to 
the file named by 

PD6X07 Setup Tool Guide.pdf

 in the same directory. 

Before using the tool to configure the display, determine that you have 
installed the 

Microsoft .NET Framework 3.5

 or above. Also, to avoid 

users from damaging the main board of the display, it is highly 
recommended that the configuration is implemented by professional 
technicians. 


Содержание PD-6807R

Страница 1: ...800 x 480 Adjustable font and background color JPEG graphics display support Support to 13 code pages each having 128 characters Support to 12 international character sets each having 12 characters Slide show and screen saver support Command emulations support ADM Aedex ESC POS Futaba Noritake UTC Powered through the USB or COM port Virtual COM port supported for USB interface Rear mount for PS 30...

Страница 2: ...Views of the PD 6807U PD6807R Front View Rear View Bottom View of PD 6807U Bottom View of PD 6807R Screw Holes TFT LCD Panel USB Port DC IN Power Jack Reserved USB Port RJ45 Port 2 ...

Страница 3: ...emove the rear I O cover of your PS 3000 series POS terminal 2 Insert the USB or RS 232 cable into the POS terminal For PD 6807U model align the A type connector of the USB cable with the USB port of your POS terminal for PD 6807R model have the RJ50 connector of RS 232 cable with a label describing To Host attached to RJ50 port of the POS terminal PD 6807U PD 6807R 3 Align the four screw holes of...

Страница 4: ...B port of the customer display For PD 6807R model attach the RJ45 connector of the RS 232 cable with a label describing To PD to RJ45 port of the customer dispaly PD 6807U PD 6807R 6 Tilt the customer display all the way down Be careful not to touch the LCD panel whiel tilting the screen 7 Break the tab for cable exit from the rear I O cover by using a diagonal cutting nipper To PD 4 ...

Страница 5: ...ded through the cable exit as shown in the figure 10 Press down the cover to close the rear I O compartment 11 Make sure that the customer display is well mounted onto the POS terminal 12 Adjust the customer display up and down in the direction shown by the arrow to the desired angle Cable Exit Do NOT press the displaying area of panel 5 ...

Страница 6: ...play POS Graphics Display Tool is a helpful tool designed to assist PD 6807U users in managing the customer display settings according to your personal preference To start with the tool you will need to access the executable file GraphicsDisplay_Setup Tool exe under the directory C Drivers SA_PD_LM GraphicsDisplay_Setup Tool As for the more detailed instructions on the operation of the tool please...

Страница 7: ...rs Dot Matrix Resolution 800 x 480 display resolution Display Color Font Red Green Blue Yellow Orange White Black Background Black White Blue Multimedia Support JEPG graphics support JEPG Graphics Size 4MB for each max 90MB for total max Active Area 154 08 H x 85 92 V Pixel Pitch 0 1926 H x 0 1790 V Pixel Configuration RGB Vertical Stripe Color Depth 16 7M Viewing Angle 60 70 70 70 degree U D L R ...

Страница 8: ... MEMO 8 ...

Страница 9: ... MEMO 9 ...

Страница 10: ... MEMO 10 ...

Отзывы: