background image

- 5

TM

CHAP.

4

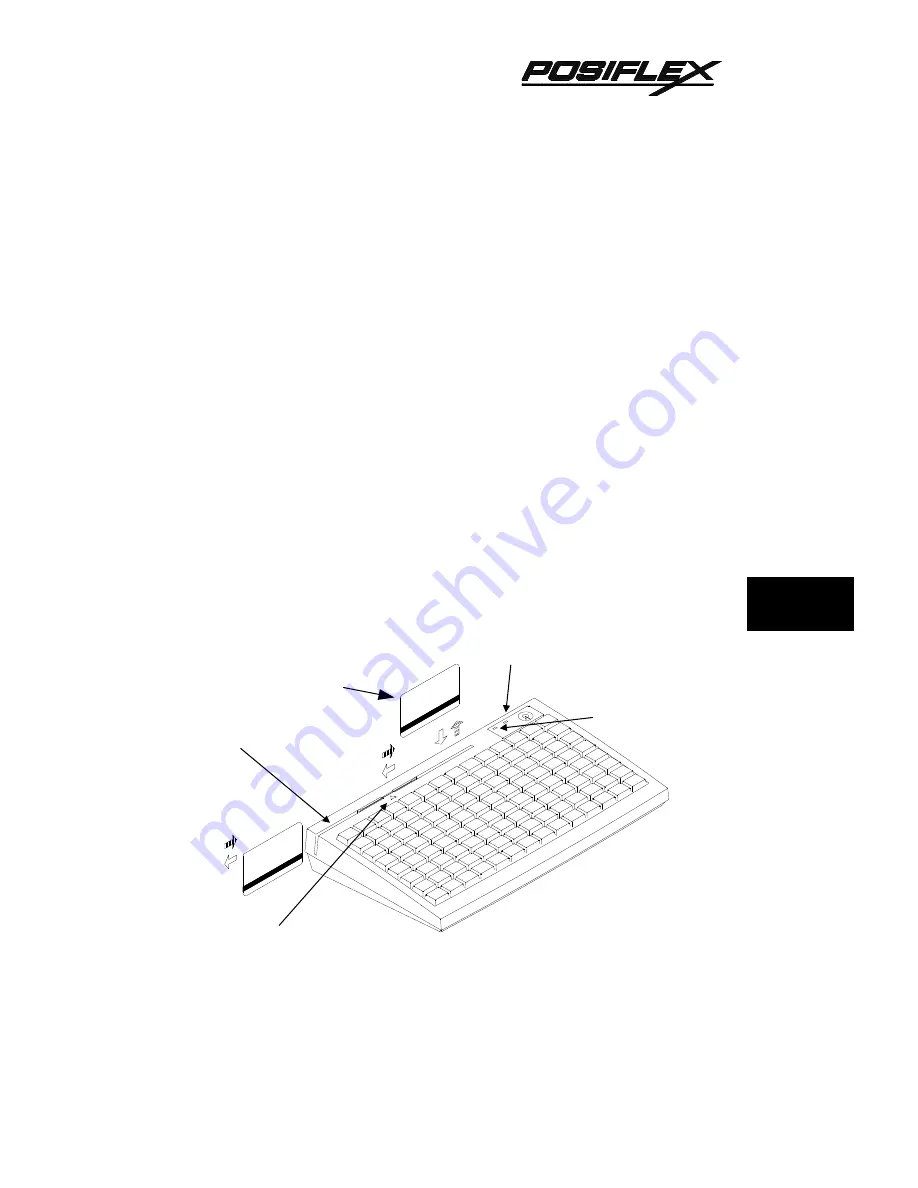
MSR (Magnetic Stripe Reader)

The MSR slot is near the upper edge of the Programmable Keyboard. The

MSR indicator LED is located at the upper left corner of the block containing the

electronic key. There are three choices of the reader types – ISO dual tracks, ISO triple

tracks and JIS types. For card reading, be sure to insert the card to the bottom with

magnetic stripe of ISO card or JIS I track 2 facing right. The movement of an ISO card

can be either inserting the card from the top surface at the right end then sliding the

card to the left out of the slot, or sliding the card from the left of the slot till it reaches

the right end of the slot (ref. Fig. 4-3). Yet the movement of a JIS card is limited to the

leftward movement, i.e. inserting the card from the top surface at the right end then

sliding the card to the left out of the slot (ref. Fig. 4-4). The reverse movement of a JIS

card is not guaranteed. The MSR indicator will light up in green when the MSR is

ready to read, blink during reading, and then give a green light if the reading is

successful. The MSR indicator will turn to be red if the reading fails due to improper

sliding or poor magnetic intensity of the magnetic stripe, the MSR indicator will then

turn back to green when the MSR is again ready to read.

Fig. 4 - 3 Reading magnetic stripe cards of ISO standard

MSR SLOT

MSR INDICATOR

READER HEAD MARK

POWER ON INDICATOR

ISO card

Magnetic stripe

toward user

Содержание KB3100

Страница 1: ...TM KB3100 SERIES PROGRAMMABLE KEYBOARD USER S MANUAL Rev A ...

Страница 2: ...n in an attempt with full strength to assist the user to utilize the powerful programmable keyboard KB 3100 series which consists of a 6 positioned electronic control key and 112 press keys which provides excellent tactile click when pressed and an optional magnetic stripe reader for either ISO or JIS standards The KB 3100 not only is capable of being programmed to transmit whatever code a standar...

Страница 3: ...i TM CHAP 1 CHAP 2 CHAP 3 CHAP 4 CHAP 5 CHAP 6 CHAP 7 OVERVIEW PACKAGE CONTENTS APPLICATION INSTALLATION SERVICE AND SPARE PARTS SPECIFICATIONS PROGRAMMING THE KEYBOARD ...

Страница 4: ...3 PREPARATION 5 1 3 ENTER HOT KEY PROGRAMMING MODE 5 1 3 INPUT THE CONTENT TO BE PROGRAMMED 5 1 4 EXIT HOT KEY PROGRAMMING MODE 5 1 4 UTILITY INSTALLATION 5 2 1 WINDOWS95 INSTALLATION 5 2 1 WINDOWS 3 1 INSTALLATION 5 2 10 DOS INSTALLATION 5 2 15 STARTING PROGRAMMING 5 3 1 UNDER WINDOWS95 5 3 1 UNDER WINDOWS 3 1 5 3 2 UNDER DOS 5 3 3 SHORTCUT UTILITY RWM EXE 5 3 4 STARTING KBM EXE 5 3 5 COMMAND LIS...

Страница 5: ...KEYS 6 1 KEY CAP 6 1 PROGRAMMABILITY 6 1 POSITION CONTROL KEY 6 1 OUTPUT INTERFACE 6 1 MAGNETIC STRIPE READER 6 2 READER SPECIFICATION 6 2 CARD DATA FORMAT 6 2 POWER CONSUMPTION 6 3 MECHANICAL 6 3 ENVIRONMENTAL 6 3 RELIABILITY INFORMATION 6 3 APPLICABLE CONFORMITY 6 3 SERVICE AND SPARE PARTS 7 1 ...

Страница 6: ...iv TM ...

Страница 7: ... 14 matrix and a 6 position control key which is capable of sending answer back codes according to the position of the key FEATURES Powerful programming ability hot key programming programming under Windows multiple page multiple level whole range key content time delay position sense answer back code etc True spill proof structure Reliable and pleasant key click Comfortable key size Alternative b...

Страница 8: ... DESCRIPTION KB3100 Standard model 8 KB non volatile memory KB3100M2 Keyboard with 2 tracks ISO7811 MSR tracks 1 2 KB3100M3 Keyboard with 3 tracks ISO7811 MSR tracks 1 2 3 KB3100MJ Keyboard with 2 tracks JIS II MSR JIS I track 2 JIS II ...

Страница 9: ...cap x 1 Double key w key cap x 2 Control keys 4 pcs set x 1 set Utility software diskette x 1 User s manual x 1 Key cap for single key x 104 OPTION LIST MSR ISO track 1 2 ISO track 1 2 3 or JIS I track 2 JIS II pc Soft dust cover pc Numerical keys 00 0 to 9 set preprinting durability warranted Quad key with key cap set Double key with key cap set Blank key pc Single key top and key cap set ...

Страница 10: ...2 2 TM CHAP 2 ...

Страница 11: ... of the programmable keyboard if such connection is required For installation in a PS2 or a compatible system connect the 6 pin DIN male plug of cable CCBLA 055 2 to the central 6 pin DIN female connector at the bottom of the programmable keyboard as the way for PC Connect the 5 pin DIN male plug through a DIN 5 female mini DIN 6 male transform plug to the PS2 or a compatible system Connect the PS...

Страница 12: ...ssary ref Fig 3 2 3 3 and 3 4 Whenever there comes the need to install a key top onto the programmable keyboard the user should notice that at the bottom of each key top one of the four walls is springy and in the hole on the keyboard to accept the bottom of the key top there is a protuberance at the lower side The user should match the springy wall of key top against the protuberance in the hole ...

Страница 13: ... also double key and quad key available for the user to configure the programmable keyboard such that the most frequently used keys may occupy larger areas The double key occupies two vertically adjacent positions and uses only the bottom position for key content ref Fig 3 3 The quad key occupies a two by two matrical area and uses only the lower right position for key content ref Fig 3 4 An examp...

Страница 14: ...3 4 TM CHAP 3 MAGNETI C STRI PE READER POWER L4 L3 L2 L1 LO LP Fig 3 7 Blank keys Numerical keys Quad key Double key ...

Страница 15: ... out from the switch at positions L0 and L1 The purpose of this electronic key serves 3 folds When the key is switched to and extracted from position L0 the whole keyboard output will be blocked off by hardware to work as a security measure A programmable answer back code for the final position of the 6 position electronic key will be sent by the keyboard to the host computer whenever the key is s...

Страница 16: ...arked as PRG REG Z and GT The effective range of each of the 4 keys can be illustrated by the following table and drawing PRG REG Z GT LP Y N N N L0 Y Y Y Y L1 Y Y Y Y L2 Y Y Y Y L3 Y N Y Y L4 N N N Y LO L1 L2 L3 L4 LP MAGNETI C STRI PE READER POWER 30 30 30 45 45 Fig 4 2 Range for each key type ...

Страница 17: ... definition of each location of this preloaded pattern The purpose of this preloaded page is to serve the software designer so that you won t have to connect an external PC keyboard when you start to program the POS programmable keyboard To preserve this preloaded pattern into a computer file for later use the user should refer to the readme file on the attached diskette in the accessory box and i...

Страница 18: ... Esc F7 F8 F9 F10 F11 F12 Del End PgDn 1 2 3 4 5 6 7 8 9 0 _ ï Tab Q W E R T Y U I O P Cap A S D F G H J K L Enter Enter Shift Shift Z X C V B N M Shift Shift Ctrl Alt Space Space Space Space Space Space Space Space Alt Ctrl PRINT OUT OF PRELOADED KEY DEFINITIONS FOR PAGE LP ...

Страница 19: ...ot till it reaches the right end of the slot ref Fig 4 3 Yet the movement of a JIS card is limited to the leftward movement i e inserting the card from the top surface at the right end then sliding the card to the left out of the slot ref Fig 4 4 The reverse movement of a JIS card is not guaranteed The MSR indicator will light up in green when the MSR is ready to read blink during reading and then...

Страница 20: ...4 6 TM CHAP 4 Fig 4 4 Reading magnetic stripe cards of JIS standard JIS card The side with JIS II magnetic stripe toward user ...

Страница 21: ...M EXE that is meant to be called upon under DOS prompt or in the WINDOWS application after proper installation to program the programmable keyboard Yet there are three important points to bear in mind before entering this programming program l As a common practice on applying any software the user is advised to make a backup copy of the programming utility before he she uses it l It is also recomm...

Страница 22: ...is switched to a new position there will be a time delay as determined in the configuration of the keyboard programming utility and is adjustable by r and t key presses this time delay is useful to give only the answer back code of the last position of control key when it is turned across multiple positions or when the keyboard receives an enquiry code E7h from the PC or the PST system Here are so...

Страница 23: ...the position control key is not covered by the hot key programming feature ENTER HOT KEY PROGRAMMING MODE To enter the hot key programming mode the user must input the hot key and identify the key on the programmable keyboard to be programmed The so called hot key is a special combination of keys pressed on the standard PC or PS 2 keyboard In KB 3100 series the hot key is defined as pressing and h...

Страница 24: ...he last character of the input instead of being treated as a character for input Pressing the esc key in this mode will abort the hot key programming mode immediately All the rest keys such as the Ctrl Alt Home any function key or arrow key or any key in the numerical keypad on the standard PC or PS 2 keyboard are illegal inputs in this mode The maximum number of key presses acceptable to any key ...

Страница 25: ...n the installation procedures are illustrated step by step graphically below Whenever click is mentioned in the text it means that the user uses a mouse If the user does not use a mouse in the installation procedure the keyboard application can perform the same effect if the user follows the instruction applicable in Windows environment WINDOWS95 INSTALLATION Insert the programmable keyboard utili...

Страница 26: ...2 Fig 5 2 2 Refer to Fig 5 2 3 the dialogue box of the Run command the user may type in A install exe in the command line for Open and click OK just the way like in Fig 5 2 7 or the user may also click Browse to find the installation program with the help of the computer Fig 5 2 3 ...

Страница 27: ...o find the Desktop and click it The screen will look like Fig 5 2 4 Fig 5 2 4 Clicking the Desktop in the Look in command line the resource list will be unfolded Find and click the 3 Floppy A in My Computer to get access of drive A as in Fig 5 2 5 Fig 5 2 5 ...

Страница 28: ...le Install exe or click the file only once and click the Open button as in Fig 5 2 6 Fig 5 2 6 The dialogue box of the Run command reappears with the proper file name in the Open command line Now click OK to start installation Fig 5 2 7 ...

Страница 29: ...er question will show up to ask you if you want to install the utility for the Windows 3 1 or Windows95 as in Fig 5 2 9 The utility will detect automatically which Windows is being used and install itself in a correct way Now let us press the y key to install the utility for the Windows environment Fig 5 2 9 ...

Страница 30: ...es are The default value for this input is shown on the screen like Fig 5 2 10 Fig 5 2 10 However this path can be edited to the actual situation of the user s system by using the left right arrow keys insert delete home end and those keys needed to type in the correct directory path One example is given in Fig 5 2 11 Fig 5 2 11 ...

Страница 31: ...ng if the user wants to install the utility like in Fig 5 2 12 Fig 5 2 12 After the user presses the y key confirming the intention the installation starts and a message COPYING FILES shows up briefly as in Fig 5 2 13 together with some beeps denoting the installation progress from time to time Fig 5 2 13 ...

Страница 32: ... 14 The utility is copied and some modifications of the system parameters of the Windows system are ready yet a restart of Windows is required to make these modifications effective Fig 5 2 14 To restart a Windows95 click the Start button as in Fig 5 2 15 Fig 5 2 15 ...

Страница 33: ...iflex with a keyboard shape icon is in the start menu To restart the Windows95 click Shut Down as in Fig 5 2 16 Fig 5 2 16 When the shut down windows appear click Restart the computer and click Yes as in Fig 5 2 17 After this restart the user is free to program this keyboard Fig 5 2 17 New icon ...

Страница 34: ... Insert the programmable keyboard utility diskette in drive A and double click the icon for Main group as shown in Fig 5 2 18 Fig 5 2 18 When the components of Main group show up double click the File Manager as shown in Fig 5 2 19 Fig 5 2 19 ...

Страница 35: ...like the one in Fig 5 2 20 will show up Now double click the box that stands for drive A Fig 5 2 20 The utilities in the diskette in drive A will show up and now double click the file install exe as shown in Fig 5 2 21 Fig 5 2 21 ...

Страница 36: ... CHAP 5 The following procedures are just like those for Windows95 The screen like Fig 5 2 22 appears Press y key to continue installation Fig 5 2 22 To the question in Fig 5 2 23 press y to continue Fig 5 2 23 ...

Страница 37: ...h to the directory where the current Windows system files are The default value for this input is shown on the screen like Fig 5 2 24 Fig 5 2 24 This path can be edited to the directory where the Windows 3 1 is like the example in Fig 5 2 25 Then press the enter key Fig 5 2 25 ...

Страница 38: ...5 2 14 TM CHAP 5 Press y when the following question ready to install shows up as shown in Fig 5 2 26 Fig 5 2 26 A message COPYING FILES will show up with some beeps as shown in Fig 5 2 27 Fig 5 2 27 ...

Страница 39: ...e restarted to make the newly installed utility work DOS INSTALLATION Insert the programmable keyboard utility diskette in drive A and type under A prompt the following command A install enter The screen will change to Fig 5 2 28 Fig 5 2 28 Answer y to the above question the screen will become to Fig 5 2 29 ...

Страница 40: ...5 2 16 TM CHAP 5 Fig 5 2 29 Answer n to the above question All the necessary files will be copied to the directory POSIFLEX D and the installation is completed ...

Страница 41: ...itial screen when Windows95 starts after proper installation the user may find an icon named as Posiflex as shown in Fig 5 3 1 and double click it Fig 5 3 1 Or the user may find the icon in start menu as shown in Fig 5 3 2 and click it Fig 5 3 2 New icon New icon ...

Страница 42: ...llation is done there is an icon of the group marked as Posiflex Keyboard Utilities in the Program Manager Move this icon to suitable position if required To start programming of the keyboard under Windows 3 1 double click this icon as shown in Fig 5 3 3 Fig 5 3 3 Now to program the KB 3100 or the programmable keyboard of PST systems double click the Posiflex Keyboard Utility icon in the box as sh...

Страница 43: ... the command KBM followed by pressing the enter key The paragraph STARTING KBM EXE applies for the actions to take afterwards The user may also just insert the attached keyboard programming utility diskette in the drive A and type the command KBM followed by pressing the enter key if the utility was not installed under DOS environment There is an advantage in applying the keyboard utility under DO...

Страница 44: ...rd to a tpl file or directly transfer a prestored tpl file to a programmable keyboard without entering the utility KBM EXE which may take more keystrokes For instance the user wants to transfer a file XXX tpl which was saved before to the programmable keyboard he she should type in following command in subdirectory OSIFLEX D RWM XXX tpl enter This operation is quite recommended to be performed on ...

Страница 45: ...ned for KB 2010 and KB 2100 series programmable keyboards and early basic type of PST products respectively and are not applicable in the KB 3100 series However if the programmable keyboard is connected to the system when entering the KBM EXE the program will auto detect the type and size of the programmable keyboard and skip this menu to start reading after getting confirmation the current conten...

Страница 46: ...3 7 for a moment Fig 5 3 7 Then the screen like Fig 5 3 8 will show up with the contents of the 8 keys of the leftmost column of page L1 in the key content area in the example in Fig 5 3 8 these 8 keys happen to be blank By the way if the cursor is moved to the column of KLP the key contents area will show only 6 entries for the answer back codes Posiflex Programmable Keyboard Utility vx xx xx rea...

Страница 47: ... Command list Editing area Key layout map Status bar Program ID Positon control keys Cursor position The commands applicable in the mode that the user enters will be automatically updated at the command list on the screen to work as a reminder so that the user could start programming the keyboard right away with the on line help and the onward command listings However the user shall purchase a tec...

Страница 48: ...move cursor to one column left in cyclic manner Right arrow move cursor to one column right in cyclic manner ENTER enter ASCII code editing mode but if the last edit of the key was in scan code mode then this means enter scan code editing mode Alt A enter ASCII code editing mode Alt C copy the key content of a key or contents of the keys in a page to buffer Alt E erase the current page or all page...

Страница 49: ...inition End go to last position within the key definition PgUp go to one page less in cyclic manner PgDn go to one page next in cyclic manner Up arrow move cursor to one row up in cyclic manner and enter view mode Down arrow move cursor to one row down in cyclic manner and enter view mode Left arrow move cursor to one character left within the key definition Right arrow move cursor to one characte...

Страница 50: ...ne page less in cyclic manner PgDn go to one page next in cyclic manner Up arrow move cursor to one row up in cyclic manner and enter view mode Down arrow move cursor to one row down in cyclic manner and enter view mode Left arrow move cursor to one character left within the key definition Right arrow move cursor to one character right within the key definition Alt A enter view mode Alt D enter ti...

Страница 51: ...Y CONTENTS LENGTH 1 255 byte s key MEMORY Non volatile memory 8KB INTERCHARACTOR OUTPUT SPEED programmable 0 140 msec COMMANDED TIME DELAY programmable 0 240 sec MULTILEVEL 8 levels max DOWN LOAD SPEED 40 sec For 8 KB CONTROL KEY 6 positions with programmable answer back code for each position POSITION CONTROL KEY 6 positions LP L0 L1 L2 L3 L4 key extractable at L0 and L1 Hardware lock off all key...

Страница 52: ...d type ISO 7811 JIS X 6302 Card feed method Manual Manual Card feed direction Bi direction Uni direction Read write function Read only Read only Card feed speed 5 to 55 inches sec 100 1200 mm sec Error rate Less than 0 5 Less than 0 1 Card data format Card standard IATA ABA THRIFT JIS I JIS II Track used Track 1 Track 2 Track 3 Track 2 Rear side Recording method F2F FM F2F FM F2F FM F2F FM F2F FM ...

Страница 53: ... x 210 mm x 57 mm Dimension in inches 13 6 x 8 3 x 2 2 W x D x H ENVIRONMENTAL Operating temperature 0 C to 50 C Storage temperature 20 C to 70 C Relative humidity 90 non condensing Vibration 4G Shock 40G RELIABILITY INFORMATION Push key switch 15 000 000 strokes min Memory 100 years min MSR head life 300 000 passes min APPLICABLE CONFORMITY CE FCC CLASS A ...

Страница 54: ...6 4 TM CHAP 6 ...

Страница 55: ...7 1 TM CHAP 7 SERVICE AND SPARE PARTS MAGNE TIC STRIP E READE R POWER L4 L3 L2 L1 LO LP 105 103 101 102 117 115 118 119 120 106 108 109 110 116 112 111 114 113 104 107 ...

Страница 56: ...LATE 111 1 MKB310BCOVR KB3100 BOTTOM HOUSING 112 1 CCBLA 055 2 CABLE TO PC 113 1 QC 2000 KB3100 KEY CLIP 114 1 BKB341 KB3100 I O BOARD 115 1 CCBLA 214 CABLE I O BOARD CPU 116 1 KB31CPU KB3100 CPU BOARD 2K 116 2 KB31CPU8K KB3100 CPU BOARD 8K 117 1 KB3100MSRKIT 2 MSR ISO 2 TRACKS w cable 117 2 KB3100MSRKIT 3 MSR ISO 3 TRACKS w cable 117 3 KB3100MSRKIT 4 MSR JIS I II w cable 118 1 CLABPSTKB112 KB3100...

Страница 57: ...7 3 TM CHAP 7 ...

Страница 58: ...TM CHAP 7 CHAP 6 CHAP 5 CHAP 4 CHAP 3 CHAP 2 CHAP 1 OVERVIEW PACKAGE CONTENTS APPLICATION INSTALLATION SERVICE AND SPARE PARTS SPECIFICATIONS PROGRAMMING THE KEYBOARD ...

Отзывы: