background image

7

OPERATION

RECOMMENDATIONS fOR CUTTING

1.  When feeding the workpiece into the blade do not 

force the leading edge of the workpiece into the 
blade because the it will deflect the blade, reduce 
the accuracy of cutting and possibly break the 
blade. Allow the saw to cut material by guiding the 

workpiece into the blade as it cuts.

.  The blade teeth cut material ONLY on the down 

stroke. 

3.  You must guide the wood into the blade slowly 

because the teeth of the blade are very small and 
they can only remove wood when they are on the 
down stroke.

4.  There is a learning curve for each person who 

wants to use this saw. During that period of time it is 

expected that some blades will break until you learn 

how to use the saw and receive the greatest benefit 

from the blades.

5.  Best results are achieved when cutting wood less 

than one inch (5.4 mm) thick.

6.  When cutting wood thicker than one inch (25.4 mm), 

the user must guide the wood very slowly into the 

blade and take extra care not to bend or twist the 

blade while cutting in order to maximize blade life.

7.  When teeth of scroll saw blade worn out, must  

replace the new blade. Check the blade frequently 

for best cutting results. Scroll saw blades generally 
stay sharp for 1/2 to 2 hours of cutting.

8.  To get accurate cuts, be prepared to compensate for 

the blade’s tendency to follow the wood grain as you 
are cutting.

9.  This scroll saw is intended to cut wood or wood 

products. 

10. When choosing a blade to use with your scroll saw, 

consider very fine, narrow blades to scroll cut in thin 

wood in /4 in. (6.4 mm) thick or less. Use wider 
blades for thicker materials but this will reduce the 

ability to cut tight curves.

11.  This saw uses 5 in. (127 mm) long pin or plain end 

type blades.

12. Blades wear faster when cutting plywood or particle 

board which is very abrasive. Angle cutting in 

hardwoods reduces blade tooth set faster due to the 

blade deflection.

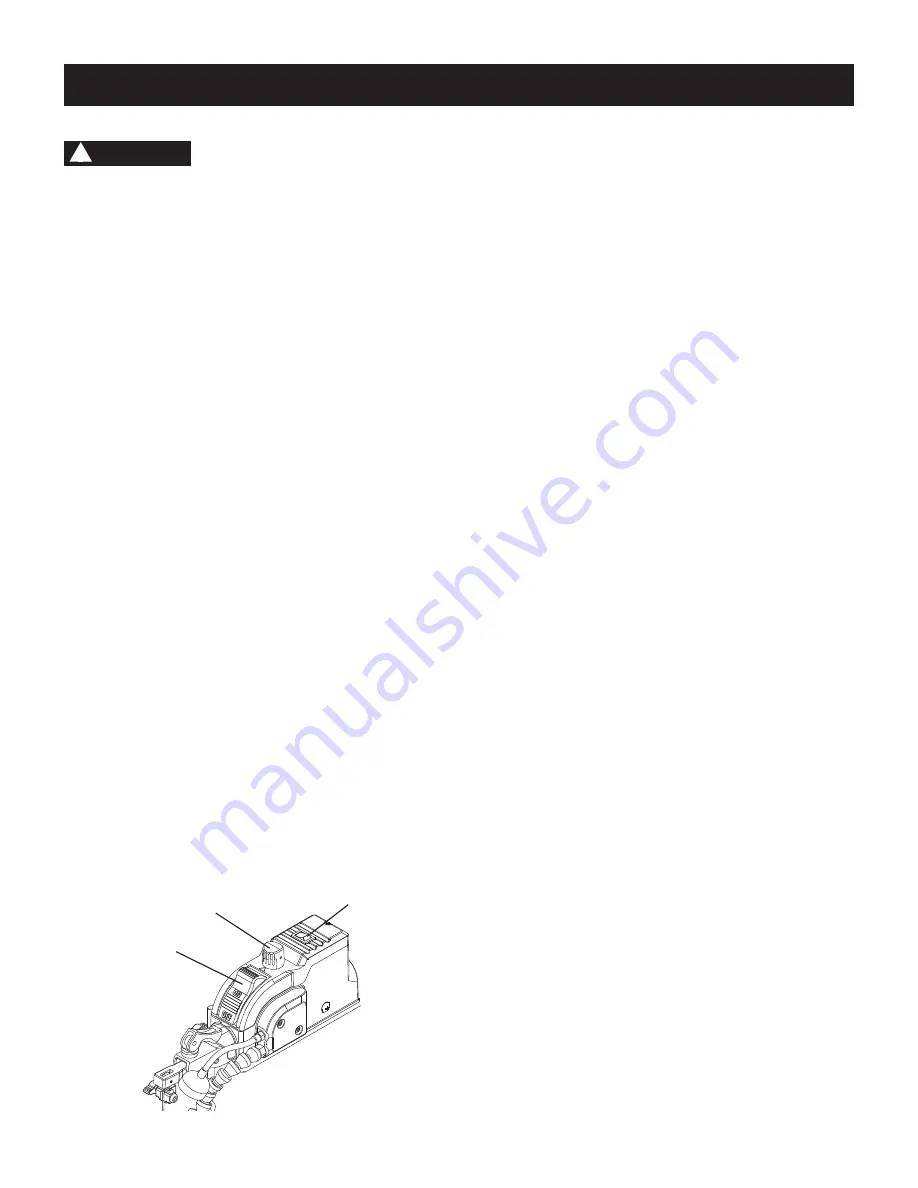
VARIABLE SPEED CONTROL AND ON/Off SWITCH

CAUTION

!

for your own safety, always push the switch 
“Off” when the scroll saw is not in use. Also, in the 

case of power failure (all of your lights go out) push the 
knob “OFF”. Remove the plug from the power source 
outlet to avoid accidental starting. 

ON/Off SWITCH (fIG. P)

.  To turn power ON, press on/off switch () to “ON” 

position.

.  To turn power Off, press on/off switch () to “Off” 

position.

VARIABLE SPEED CONTROL KNOB (fIG. P)

The variable speed control allows greater versatility to 

cut a variety of materials such as wood, plastics, non-

ferrous metals, etc. Depending on the hardness and 

thickness of material, the speed should be reduced to 
allow the blade teeth to remove cut material from the 
kerf.
.  Your saw is equipped with a variable speed control 

knob (). The blade stroke rate may be adjusted by 

simply rotating the 

variable speed control knob (). 

.  Turn the speed control knob clockwise to increase up 

to ,500 strokes per minute (SPM). Turn the speed 
control knob counterclockwise to reduce down to 500 
strokes per minute (SPM).

WORK LIGHT (fIG. P)

1.  To turn work light on, press the rocker switch (3) to 

“ON” position.

2.  To turn work light off, press the rocker switch (3) to 

“Off” position. 

fig. P

3

Содержание PCB375SS

Страница 1: ...ERRA CALADORA DE VELOCIDAD VARIABLE DE 457 MM 18 PULG CATALOG NUMBER PCB375SS Instruction Manual Manuel d instructions Manual de instrucciones www portercable com INSTRUCTIVO DE OPERACIÓN CENTROS DE SERVICIO Y PÓLIZA DE GARANTÍA ADVERTENCIA LÉASE ESTE INSTRUCTIVO ANTES DE USAR EL PRODUCTO ...

Страница 2: ... Use a separate electrical circuit for your tools The scroll saw is wired at the factory for 110 120 Volt operation It must be connected to a 120V 1 6 Amp branch circuit and use a 1 6 Amp time delay fuse or circuit breaker To avoid shock or fire replace power cord immediately if it is worn cut or damaged in any way Product specifications MOTOR TABLE Power Source 120 V 60 Hz 1 6 Amp Size 20 in x 12...

Страница 3: ...Instruction Manual may contain WARNING ICONS a picture symbol intended to alert you to and or instruct you how to avoid a potentially hazardous condition Understanding and heeding these symbols will help you operate your tool better and safer Shown below are some of the symbols you may see DANGER Indicates an imminently hazardous situation which if not avoided will result in death or serious injur...

Страница 4: ... cause permanent eye damage ALWAYS wear Safety Goggles not glasses that comply with ANSI Safety standard Z87 1 Everyday eyeglasses have only impact WARNING resistant lenses They ARE NOT safety glasses NOTE Glasses or goggles not in compliance with ANSI Z87 1 could seriously injure you when they break 13 WEAR A FACE MASK OR DUST MASK Sawing operation produces dust 14 SECURE WORK Use clamps or a vis...

Страница 5: ...perform lay out set up or assemble work on the table when the saw is in operation 12 TO PREVENT INJURIES avoid awkward hand or finger positions where a sudden slip could cause a hand to move into the blade when operating the saw 13 HOLD WORKPIECE FIRMLY against the table top 14 NEVER CUT MATERIAL that is too small to be held safely 15 DO NOT USE dull or bent blades 16 TURN THE SAW OFF AND UNPLUG T...

Страница 6: ...uctions or if you are not certain the tool is properly grounded WARNING WARNING USE only 3 wire extension cords that have three pronged grounding plugs with three pole receptacles that accept the tool s plug Repair or replace damaged or worn cords immediately Use a separate electrical circuit for your tool This circuit must not be less than 18 wire and should be protected with a 1 6 Amp time lag f...

Страница 7: ... to a two contact grounded receptacle The adapter Fig 2 has a rigid lug extending from it that MUST be connected to a permanent earth ground such as a properly grounded receptacle box In all cases make certain the receptacle is properly grounded If you are not sure have a qualified electrician check the receptacle CAUTION Fig 1 Fig 2 Three Pronged Plug Grounding Prong Properly Grounded Three Prong...

Страница 8: ...with care If needed get the assistance of someone to lift and move the scroll saw If any part is missing or damaged do not attempt to assemble the scroll saw or plug in the power cord until the missing or damaged part is correctly replaced TABLE OF LOOSE PARTS ITEM DESCRIPTION QUANTITY A Scroll saw assembly 1 B Blade bag 5 in pin end blade 1 3 mm hex key 1 STAND C Side bracket upper support 2 D Si...

Страница 9: ... UNPACKING YOUR SCROLL SAW A B C D E F H G ...

Страница 10: ...able top bevel scale Worktable LED work light ON OFF switch Blade storage under table Mounting hole Table insert Variable speed control knob Blade guard foot lock knob Stand Blade tension lever Blade holder LED work light 5 in plain end blade Blade holder lock knob Foot pad Front Expanded View ...

Страница 11: ... the table at the angle desired for bevel cutting VARIABLE SPEED ON OFF CONTROL KNOB Variable switch dial allows greater versatility when cutting a variety of materials Adjust the speed to the desired setting between 500 to 1500 strokes per minute SPM by turning the control knob clockwise or counter clockwise WOODWORKING TERMS BLADE TOOTH SET The total width the blade will cut based on the distanc...

Страница 12: ...ect quantities 2 Bag F H Attach one end of front bracket upper support 1 to top of leg 2 using one bolt 3 and nut 4 The stand leg is placed on the outside of the brackets NOTE The left side of the bracket has only one hole and the right side has two holes Only hand tighten at this point DO not tighten bolts with a wrench until stand is properly aligned see step 8 before tightening The front and re...

Страница 13: ...ll keep your saw cutting efficiently 1 2 3 5 6 2 4 Fig E BLADE REMOVAL AND INSTALLATION PLAIN END BLADE REMOVAL AND INSTALLATION This scroll saw accepts 5 inch 127 mm plain end or pin end blades to cut a wide variety of materials Plain end type blades are recommended whenever fine accurate and intricate work is being performed on 3 4 in 19 mm or thinner material It will take slightly longer to ass...

Страница 14: ...e tightly by using a hex key through the screw 4 Fig I 5 Tighten the blade tension by pressing down the blade tension lever 1 If too loose turn lever clockwise Fig I Overtightening blade will cause blade breakage NOTE The blade tension lever must always be down to make tension adjustments Release the blade tension lever only during blade changing operations If the blade is tightened too tight the ...

Страница 15: ...ly located in the upper 4 and the lower 3 blade holders 3 To tension the blade 1 lower the blade tension lever 5 Check the tension on the blade If tension is too tight turn the blade tension lever 5 counterclockwise If tension is too loose turn the blade tension lever 5 clockwise NOTE If the blade is over tightened the lever will be difficult to lower and could result in damage to the blade holder...

Страница 16: ... for the best use of blades and speeds on various materials Use this table as an example but practice and your own personal preference will determine the best selection method WARNING Fig O TEETH INCH TPI BLADE WIDTH INCH BLADE THICKNESS INCH BLADE SPM MATERIAL CUT 9 5 15 0 110 2 8 mm 0 018 0 46 mm 400 1200 Medium turns on 1 4 in 6 35 mm to 1 3 4 in 44 45 mm wood soft metal hardwood 15 28 055 110 ...

Страница 17: ...ith your scroll saw consider very fine narrow blades to scroll cut in thin wood in 1 4 in 6 4 mm thick or less Use wider blades for thicker materials but this will reduce the ability to cut tight curves 11 This saw uses 5 in 127 mm long pin or plain end type blades 12 Blades wear faster when cutting plywood or particle board which is very abrasive Angle cutting in hardwoods reduces blade tooth set...

Страница 18: ...ce down against the table Do not force the leading edge of the workpiece into the blade it may deflect the blade reduce accuracy of cutting and possibly break the blade 8 When the cut is complete move the trailing pieces of the workpiece beyond the blade guard foot Turn the scroll saw OFF Fig Q ANGLE CUTTING FIG Q R S To avoid injury always keep your hands off the underneath of the table during op...

Страница 19: ...face of the workpiece 5 Secure the blade guard foot in place by tightening the blade guard foot lock knob QUANTITY DESCRIPTION 2 Small C clamps 1 Ruler or measuring tape 1 12 inch 304 8 mm straight scrap of wood Thickness to match workpiece 1 A piece of wood metal plastic etc with a straight edge CAUTION 11 6 Remove the workpiece from the blade before turning the scroll saw ON Set the desired spee...

Страница 20: ...TION 3 Place the workpiece on the table with the workpiece hole 4 over the access hole in the table 5 4 Install the blade 3 through the hole in the workpiece and press the blade tension lever 2 5 Follow the process 3 8 under the section of FREEHAND CUTTING 6 When finish the cutting turn the scroll saw OFF remove the blade from the blade holders and remove the workpiece from the table Fig U 1 4 2 3...

Страница 21: ...n An occasional coat of paste wax on the work table will allow the wood being cut to glide smoothly across the work surface To avoid shock or fire hazard if the power lead is worn or cut in any way replace it immediately WARNING WARNING LUBRICATION Ball bearings in the scroll saw are packed with grease at the factory and require no further lubrication Use only mild soap and a damp cloth to clean t...

Страница 22: ...nded accessories should be used with this product A complete line of accessories is available from your Porter Cable Factory Service Center or a Porter Cable Authorized Warranty Service Center Please visit our Web Site www portercable com for a catalog or for the name of your nearest supplier WARNING Do not use any accessory unless you have completely read the Instruction Manual for that accessory...

Страница 23: ... BLADE REMOVAL AND INSTALLATION section 2 Reduce feed rate See BLADE REMOVAL AND INSTALLATION section 3 Use narrow blade See BLADE SELECTION section 4 Avoid side pressure on blade See BLADE REMOVAL AND INSTALLATION section Motor will not run 1 Defective cord or plug 2 Defective motor 3 Blown overload breaker 1 Replace defective parts before using saw again See ELECTRICAL REQUIREMENTS AND SAFETY se...

Страница 24: ...K6X CR RE TRUSS HD SCREW M4 0 7 6 1 36EW SIDE COVER 2 0K71 CR RE TRUSS HD SCREW M5 0 8 8 2 36F1 CLAMP HANDLE 1 0K72 CR RE TRUSS HD SCREW M5 0 8 12 2 36F2 SPECIAL BOLT 2 0K7F CR RE ROUND WASHER HD SCREW M5 0 8 8 4 36F3 LOCKING ROD 1 0K7X CR RE TRUSS HD ROUND NECK SCREW M6 1 0 10 1 36F6 GUIDE BLOCK 1 0KA5 CR RE PAN HD TAPPING SCREW M4 16 20 1 36FA SHAFT PIVOT 1 0KBA CR RE PAN HD TAPPING SCREW M5 16 ...

Страница 25: ...25 18 IN 457 MM VARIABLE SPEED SCROLL SAW SCHEMATIC B Hareware Bag ...

Страница 26: ...FS SIDE BRACKET LOWER SUPPORT 2 36FT REAR BRACKET UPPER SUPPORT 1 36FU STAND LEG 2 36FV STAND LEG 2 36JB FRONT BRACKET UPPER SUPPORT 1 3EPT F LABEL 2 3EPU R LABEL 2 3EXM G HARDWARE BAG 0J4W FLAT WASHER φ8 2 18 1 5 4 0JPS HEX HD BOLT M8 1 25 45 4 0KRR SERRATED TOOTHED HEXAGON FLANGE NUT M8 1 25 T 7 5 24 0Z1G CAP HD SQ NECK BOLT M8 1 25 12 20 2LBF SLEEVE 2 36FL FOOT PAD SMALL FRONT 2 36JA FOOT PAD L...

Страница 27: ...27 notes ...

Страница 28: ...so trademarks for one or more Porter Cable and Delta products 2 BY 4 890TM Air America AIRBOSSTM Auto Set B O S S Bammer Biesemeyer Builders Saw Charge Air Charge Air Pro CONTRACTOR SUPERDUTY Contractor s Saw Delta DELTA Delta Industrial DELTA MACHINERY DESIGNTM Delta Shopmaster and Design Delta X5 Deltacraft DELTAGRAM Do It Feel it DUAL LASERLOC AND DESIGN EASY AIR EASY AIR TO GOTM ENDURADIAMOND ...

Отзывы: