background image

ASSEMBLY

6

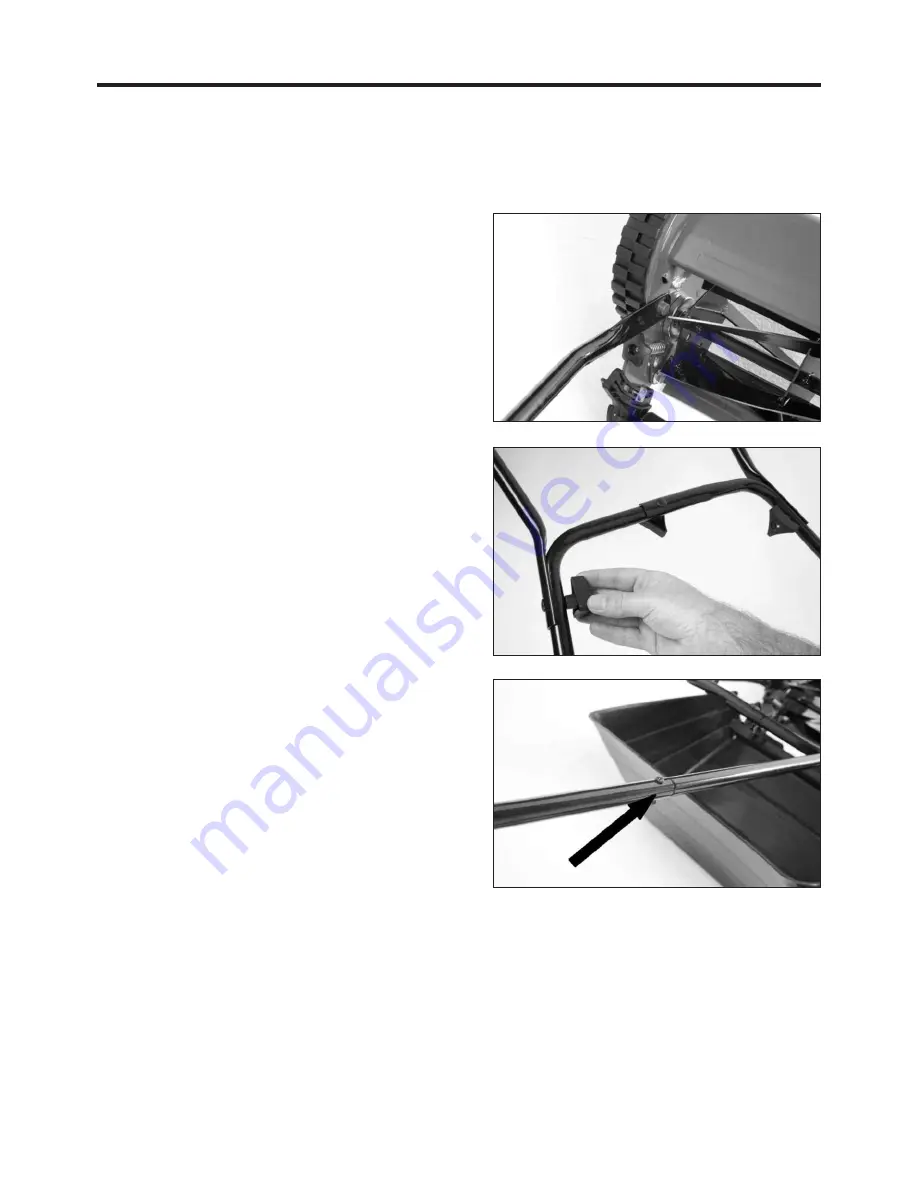
Fig. 2

Fig. 3

Fig. 4

Follow these steps to assemble the handles onto the mower

See Figs 2, 3 and 4

1. Attach the lower handles to the mower

body (Fig. 2) by locating the handles over
the two lugs on either side of the mower
body.

2. Attach the handle extensions using the

coach bolt provided (Fig. 3).

3. Slide the upper handle over the handle

extensions and secure either side with
the nuts and screws provided. (Fig. 4).

Содержание Eco Mow 40

Страница 1: ...Eco Mow 40 Hand Push Reel Mower Model No 101REEL40 Operator s Manual To reduce the risk of injury the user must read and understand the Operator s Manual Save this manual WARNING...

Страница 2: ...correctly It is important to consult these instructions in order to acquaint yourself with the tool its proper use and safety precautions Please observe the general maximum operating times as well as...

Страница 3: ...gerous Environments Do not use the product in damp or wet locations or if the grass is wet enough to be slippery Work Area Clear the area to be cut before each use Remove all objects such as rocks bro...

Страница 4: ...acilities parks and sports centres on farms or in the forestry sector Unpacking Carefully remove the product from the box Inspect the product carefully to make sure no breakage or damage occurred duri...

Страница 5: ...tting height adjustment knobs 5 Catcher support chain 6 Grass catcher 7 Lower handles 8 Handle extensions 9 Upper handle 10 Coach bolts 5 1 2 3 4 5 6 7 8 9 10 Fig 1 SPECIFICATIONS Name Pope ECO MOW 40...

Страница 6: ...Attach the lower handles to the mower body Fig 2 by locating the handles over the two lugs on either side of the mower body 2 Attach the handle extensions using the coach bolt provided Fig 3 3 Slide...

Страница 7: ...6 Fig 7 1 In order for the mower to work effectively the fixed blades must be set correctly 2 Using the two adjustment knobs carefully turn each knob slowly in a clockwise direction until the rotatin...

Страница 8: ...t roller 2 Release the two adjustment knobs which are on each side of the cutting height roller 3 Set the height of the roller to give the required height of cut 4 It is important that when adjusting...

Страница 9: ...already mowed This will make the mower a bit easier to push and it will also help catch any spots that you might have missed on the last row where there s a little bit of grass left over 3 Experiment...

Страница 10: ...ore each use For your own safety replace worn or damaged parts without delay After each use Cleaning IMPORTANT Maintenance and cleaning work should be performed after each use Remove all grass cutting...

Страница 11: ...alterations or modifications have not been attempted to the product The failure is not as a result of normal wear and tear Failures due to the following are not covered Replacing worn or damaged blade...

Страница 12: ...Pope is a Registered Trademark of Toro Australia Pty Ltd 53 Howards Rd Beverley South Australia 5009 Made in China to Pope s Specifications...

Отзывы: