Pontiac 2009 Torrent Скачать руководство пользователя страница 306

Engine Air Cleaner/Filter

The engine air cleaner/filter is located in the engine
compartment on the passenger’s side of the vehicle.
See Engine Compartment Overview on page 5-12
for more information on location.

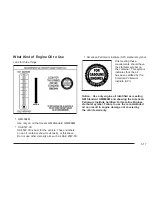
When to Inspect the Engine Air
Cleaner/Filter

Inspect the air cleaner/filter at the Maintenance

II

intervals and replace it at the first oil change after each
50,000 mile (80 000 km) interval. See Scheduled
Maintenance on page 6-4 
for more information. If you
are driving in dusty/dirty conditions, inspect the filter
at each engine oil change.

How to Inspect the Engine Air
Cleaner/Filter

To inspect the air cleaner/filter remove the filter from the
vehicle and lightly shake the filter to release loose dust
and dirt. If the filter remains caked with dirt, a new filter
is required.

To inspect or replace the engine air cleaner/filter, do the
following:

1. Turn off the engine.

2. Disconnect the air flow sensor electrical connector.

3. Loosen the screws on the clamps holding the air

outlet duct in place. Do not pry the clamps off.

5-20

Содержание 2009 Torrent

Страница 1: ...ormation Center DIC 3 43 Audio System s 3 66 Driving Your Vehicle 4 1 Your Driving the Road and the Vehicle 4 2 Towing 4 26 Service and Appearance Care 5 1 Service 5 3 Fuel 5 5 Checking Things Under t...

Страница 2: ...Pictures symbols and words work together to explain vehicle operation Keep this manual in the vehicle for quick reference Canadian Owners A French language copy of this manual can be obtained from you...

Страница 3: ...something that could damage your vehicle Many times this damage would not be covered by the vehicle s warranty and it could be costly The notice tells what to do to help avoid the damage There are al...

Страница 4: ...ke System ABS g Audio Steering Wheel Controls or OnStar Brake System Warning Light Charging System I Cruise Control B Engine Coolant Temperature O Exterior Lamps Fog Lamps Fuel Gage Fuses i Headlamp H...

Страница 5: ...raint Systems 1 39 Where to Put the Restraint 1 42 Lower Anchors and Tethers for Children LATCH 1 44 Securing a Child Restraint in a Rear Seat Position 1 52 Securing a Child Restraint in the Right Fro...

Страница 6: ...le and confuse you or make you push a pedal when you do not want to Adjust the driver s seat only when the vehicle is not moving If the vehicle has a manual seat it can be moved forward or rearward 1...

Страница 7: ...the lever repeatedly upward or downward Power Seat To adjust the seat Slide the control forward or rearward to move the seat forward or rearward Move the front and rear of the control up or down to r...

Страница 8: ...d seat on to the high setting Both indicator lights will be lit Press the switch a second time to turn the heated seat to the low setting One indicator light will be lit Press the switch a third time...

Страница 9: ...If either seatback is not locked it could move forward in a sudden stop or crash That could cause injury to the person sitting there Always push and pull on the seatbacks to be sure they are locked T...

Страница 10: ...front of you In a crash you could go into it receiving neck or other injuries The lap belt cannot do its job either In a crash the belt could go up over your abdomen The belt forces would be there no...

Страница 11: ...int is at the same height as the top of the occupant s head This position reduces the chance of a neck injury in a crash Pull the head restraint up to raise it To lower the head restraint press the bu...

Страница 12: ...Loading the Vehicle on page 4 20 CAUTION Things you put on this seatback can strike and injure people in a sudden stop or turn or in a crash Remove or secure all items before driving On vehicles with...

Страница 13: ...k 2 Continue raising the seatback until the seatback re engages CAUTION If either seatback is not locked it could move forward in a sudden stop or crash That could cause injury to the person sitting t...

Страница 14: ...f either seatback is not locked it could move forward in a sudden stop or crash That could cause injury to the person sitting there Always push and pull on the seatbacks to be sure they are locked CAU...

Страница 15: ...top of the seatback to release the seatback 3 Fold the seatback forward to the desired position To recline the seatback do the following 1 Lift and hold the lever located on top of the seatback 2 Til...

Страница 16: ...ured or killed In the same crash you might not be if you are buckled up Always fasten your safety belt and check that your passenger s are restrained properly too CAUTION It is extremely dangerous to...

Страница 17: ...buckled up a person would not survive But most crashes are in between In many of them people who buckle up can survive and sometimes walk away Without safety belts they could have been badly hurt or k...

Страница 18: ...Put someone on it Get it up to speed Then stop the vehicle The rider does not stop 1 14...

Страница 19: ...The person keeps going until stopped by something In a real vehicle it could be the windshield or the instrument panel 1 15...

Страница 20: ...ng a safety belt or not But your chance of being conscious during and after an accident so you can unbuckle and get out is much greater if you are belted And you can unbuckle a safety belt even if you...

Страница 21: ...for people of adult size Be aware that there are special things to know about safety belts and children And there are different rules for smaller children and infants If a child will be riding in the...

Страница 22: ...the strong pelvic bones and you would be less likely to slide under the lap belt If you slid under it the belt would apply force on your abdomen This could cause serious or even fatal injuries The sho...

Страница 23: ...o loose It will not give as much protection this way CAUTION You can be seriously hurt if your shoulder belt is too loose In a crash you would move forward too much which could increase injury The sho...

Страница 24: ...tection this way CAUTION You can be seriously hurt if your lap belt is too loose In a crash you could slide under the lap belt and apply force on your abdomen This could cause serious or even fatal in...

Страница 25: ...an be seriously injured if your belt is buckled in the wrong place like this In a crash the belt would go up over your abdomen The belt forces would be there not on the pelvic bones This could cause s...

Страница 26: ...red if your belt goes over an armrest like this The belt would be much too high In a crash you can slide under the belt The belt force would then be applied on the abdomen not on the pelvic bones and...

Страница 27: ...houlder belt under your arm In a crash your body would move too far forward which would increase the chance of head and neck injury Also the belt would apply too much force to the ribs which are not a...

Страница 28: ...sh you would not be restrained by the shoulder belt Your body could move too far forward increasing the chance of head and neck injury You might also slide under the lap belt The belt force would then...

Страница 29: ...ss the body CAUTION You can be seriously injured by a twisted belt In a crash you would not have the full width of the belt to spread impact forces If a belt is twisted make it straight so it can work...

Страница 30: ...s you more slowly If the shoulder portion of a passenger belt is pulled out all the way the child restraint locking feature may be engaged If this happens let the belt go back all the way and start ag...

Страница 31: ...lt just push the button on the buckle For outboard seating positions slide the latch plate up the safety belt webbing when the safety belt is not in use The latch plate should rest on the stitching on...

Страница 32: ...Pretensioners This vehicle has safety belt pretensioners for front outboard occupants Although the safety belt pretensioners cannot be seen they are part of the safety belt assembly They can help tigh...

Страница 33: ...e to the safety belt 1 Remove the guide from its storage clip on the back of the seatback 2 Place the guide over the belt and insert the two edges of the belt into the slots of the guide 3 Be sure tha...

Страница 34: ...chest These parts of the body are best able to take belt restraining forces 4 Buckle position and release the safety belt as described previously in this section Make sure that the shoulder belt cros...

Страница 35: ...r pregnant women as for anyone the key to making safety belts effective is wearing them properly Safety Belt Extender If the safety belt will fasten around you you should use it But if a safety belt i...

Страница 36: ...oes the shoulder belt rest on the shoulder If yes continue If no try using the rear safety belt comfort guide See Rear Safety Belt Comfort Guides under Lap Shoulder Belt on page 1 26 for more informat...

Страница 37: ...ety Belt Comfort Guides under Lap Shoulder Belt on page 1 26 According to accident statistics children and infants are safer when properly restrained in a child restraint system or infant restraint sy...

Страница 38: ...properly In a crash the child would not be restrained by the shoulder belt The child could move too far forward increasing the chance of head and neck injury The child might also slide under the lap...

Страница 39: ...angled if a shoulder belt is wrapped around their neck and the safety belt continues to tighten Never leave children unattended in a vehicle and never allow children to play with the safety belts Airb...

Страница 40: ...rash forces an infant or a child will become so heavy it is not possible to hold it during a crash For example in a crash at only 25 mph 40 km h a 12 lb 5 5 kg infant will suddenly become a 240 lb 110...

Страница 41: ...ver put a rear facing child restraint in the right front seat Secure a rear facing child restraint in a rear seat It is also better to secure a forward facing child restraint in a rear seat If you mus...

Страница 42: ...e a label saying that it meets federal motor vehicle safety standards The restraint manufacturer s instructions that come with the restraint state the weight and height limitations for a particular ch...

Страница 43: ...rotected by any bony structure This alone could cause serious or fatal injuries To reduce the risk of serious or fatal injuries during a crash young children should always be secured in appropriate ch...

Страница 44: ...B provides restraint for the child s body with the harness A booster seat C D is a child restraint designed to improve the fit of the vehicle s safety belt system A booster seat can also help a child...

Страница 45: ...on A child can be endangered in a crash if the child restraint is not properly secured in the vehicle When securing an add on child restraint refer to the instructions that come with the restraint whi...

Страница 46: ...irbag inflates This is because the back of the rear facing child restraint would be very close to the inflating airbag A child in a CAUTION Continued CAUTION Continued forward facing child restraint c...

Страница 47: ...that an unsecured child restraint can move around in a collision or sudden stop and injure people in the vehicle Be sure to properly secure any child restraint in your vehicle even when no child is in...

Страница 48: ...se the vehicle s safety belts to secure the restraint following the instructions that came with that restraint and also the instructions in this manual When installing a child restraint with a top tet...

Страница 49: ...op of the child restraint to the vehicle A top tether anchor is built into the vehicle The top tether attachment B on the child restraint connects to the top tether anchor in the vehicle in order to r...

Страница 50: ...nstructions for your child restraint If the child restraint does not have a top tether one can be obtained in kit form for many child restraints Ask the child restraint manufacturer whether or not a k...

Страница 51: ...ting position where the child restraint will be placed Do not secure a child restraint in a position without a top tether anchor if a national or local law requires that the top tether be attached or...

Страница 52: ...s or use the vehicle s safety belts to secure the restraint following the instructions that came with the child restraint and the instructions in this manual CAUTION Do not attach more than one child...

Страница 53: ...lled Notice Do not let the LATCH attachments rub against the vehicle s safety belts This may damage these parts If necessary move buckled safety belts to avoid rubbing the LATCH attachments Do not fol...

Страница 54: ...anchors for the desired seating position 1 2 Put the child restraint on the seat 1 3 Attach and tighten the lower attachments on the child restraint to the lower anchors 2 If the child restraint manuf...

Страница 55: ...are using a dual tether route the tether around the headrest or head restraint If the position you are using has an adjustable headrest or head restraint and you are using a single tether raise the he...

Страница 56: ...d restraint say that the top strap must be anchored In Canada the law requires that forward facing child restraints have a top tether and that the tether be attached If the child restraint does not ha...

Страница 57: ...ush down on the child restraint pull the shoulder portion of the belt to tighten the lap portion of the belt and feed the shoulder belt back into the retractor When installing a forward facing child r...

Страница 58: ...under certain conditions See Passenger Sensing System on page 1 66 and Passenger Airbag Status Indicator on page 3 29 for more information including important safety information A label on the sun vi...

Страница 59: ...or local law requires that the top tether be anchored or if the instructions that come with the child restraint say that the top strap must be anchored In Canada the law requires that forward facing c...

Страница 60: ...o the buckle until it clicks Position the release button on the buckle so that the safety belt could be quickly unbuckled if necessary 5 Pull the rest of the shoulder belt all the way out of the retra...

Страница 61: ...se of the top tether See Lower Anchors and Tethers for Children LATCH on page 1 44 for more information 8 Push and pull the child restraint in different directions to be sure it is secure If the airba...

Страница 62: ...enger With roof rail airbags the word AIRBAG will appear along the headliner or trim Even if you do not have a right front passenger seat in your vehicle there is still an active frontal airbag in the...

Страница 63: ...estraints to the safety belts Everyone in your vehicle should wear a safety belt properly whether or not there is an airbag for that person CAUTION Airbags inflate with great force faster than the bli...

Страница 64: ...r them Young children and infants need the protection that a child restraint system can provide Always secure children properly in your vehicle To read how see Older Children on page 1 32 or Infants a...

Страница 65: ...Where Are the Airbags The driver s airbag is in the middle of the steering wheel The right front passenger s airbag is in the instrument panel on the passenger s side 1 61...

Страница 66: ...rson causing severe injury or even death The path of an inflating airbag must be kept clear Do not put anything between an occupant and an airbag and do not attach or put anything on the steering whee...

Страница 67: ...If the vehicle goes into an object at an angle the airbags could inflate at a different crash speed than if the vehicle goes straight into the object Thresholds can also vary with specific vehicle des...

Страница 68: ...t have occupant seating positions How Does an Airbag Restrain In moderate to severe frontal or near frontal collisions even belted occupants can contact the steering wheel or the instrument panel In m...

Страница 69: ...able to steer the vehicle nor does it prevent people from leaving the vehicle CAUTION When an airbag inflates there may be dust in the air This dust could cause breathing problems for people with a h...

Страница 70: ...17 and Event Data Recorders on page 7 17 Let only qualified technicians work on the airbag systems Improper service can mean that an airbag system will not work properly See your dealer retailer for...

Страница 71: ...isk to the rear facing child is so great if the airbag deploys CAUTION A child in a rear facing child restraint can be seriously injured or killed if the right front passenger airbag inflates This is...

Страница 72: ...g system or the passenger sensing system When the passenger sensing system has turned off the right front passenger frontal airbag the off indicator will light and stay lit to remind you that the airb...

Страница 73: ...Reinstall the child restraint following the directions provided by the child restraint manufacturer and refer to Securing a Child Restraint in the Right Front Seat Position on page 1 54 5 If after rei...

Страница 74: ...etect that person and enable the right front passenger frontal airbag 1 Turn the vehicle off 2 Remove any additional material from the seat such as blankets cushions seat covers seat heaters or seat m...

Страница 75: ...that can affect how the system operates CAUTION Stowing of articles under the passenger seat or between the passenger seat cushion and seatback may interfere with the proper operation of the passenge...

Страница 76: ...ket seat heater or a comfort enhancing pad or device installed under or on top of the seat fabric could also interfere with the operation of the passenger sensing system This could either prevent prop...

Страница 77: ...e safety belt reminder light is working See Safety Belt Reminders on page 3 27 for more information Keep safety belts clean and dry See Care of Safety Belts on page 5 90 Airbags The airbag system does...

Страница 78: ...y belt assemblies that were used during any crash may have been stressed or damaged See your dealer retailer to have the safety belt assemblies inspected or replaced If the vehicle has the LATCH syste...

Страница 79: ...itions 2 19 Retained Accessory Power RAP 2 20 Starting the Engine 2 20 Engine Coolant Heater 2 21 Automatic Transmission Operation 3 4L V6 with 5 Speed 2 22 Automatic Transmission Operation 3 6L V6 wi...

Страница 80: ...in the path of a closing window Do not leave the keys in a vehicle with children The key can be used for the ignition and all locks The key has a bar coded key tag that the dealer retailer or qualifie...

Страница 81: ...not cause interference 2 This device must accept any interference received including interference that may cause undesired operation of the device Changes or modifications to this system by other than...

Страница 82: ...is pressed again within five seconds See DIC Vehicle Personalization on page 3 59 for additional information Pressing Q may arm the content theft deterrent system See Content Theft Deterrent on page...

Страница 83: ...a transmitter is lost or stolen a replacement can be purchased and programmed through your dealer retailer When the replacement transmitter is programmed to the vehicle all remaining transmitters mus...

Страница 84: ...vehicles If your vehicle is low on fuel do not use the remote start feature The vehicle may run out of fuel If your vehicle has the remote start feature the RKE transmitter functions will have an inc...

Страница 85: ...turn the key to ON RUN to drive the vehicle After a remote start the engine will automatically shut off after 10 minutes unless a time extension has been done or the vehicle s key is inserted into the...

Страница 86: ...ough the DIC See REMOTE START under DIC Vehicle Personalization on page 3 59 for additional information Vehicles that have the remote vehicle start feature are shipped from the factory with the remote...

Страница 87: ...or stop your vehicle Locking your doors can help prevent this from happening To lock or unlock a door use the key from the outside or the door lock from the inside Power Door Locks The power door lock...

Страница 88: ...o access them To set the security locks do the following 1 Insert the key into the lock above the rear door security lock label and turn it to the horizontal position 2 Close the door 3 Repeat the ste...

Страница 89: ...al wiring or other cable connections must pass through the seal between the body and the liftgate or liftglass Make sure all other windows are shut Turn the fan on your climate control system to its h...

Страница 90: ...en the liftgate if this happens remove the interior trim plug located at the base of the liftgate from inside the vehicle Use a tool to push the service release lever located on the latch until you he...

Страница 91: ...e with the windows closed is dangerous They can be overcome by the extreme heat and suffer permanent injuries or even death from heat stroke Never leave a child a helpless adult or a pet alone in a ve...

Страница 92: ...a closing window Do not leave keys in a vehicle with children When there are children in the rear seat use the window lockout button to prevent unintentional operation of the windows The window switc...

Страница 93: ...ar seat passengers from operating the windows Press the lockout button located with the power window switches to turn the feature on and off The window switch has a light that will come on when the sw...

Страница 94: ...the theft deterrent system do one of the following 1 Unlock the doors with the RKE transmitter 2 Insert the key in the ignition and turn it from the LOCK OFF position PASS Key III Electronic Immobili...

Страница 95: ...ht on the instrument panel comes on when trying to start the vehicle there may be a problem with your theft deterrent system Turn the ignition off and try again If the engine still does not start and...

Страница 96: ...smith who can service PASS Key III to have a new key made Do not leave the key or device that disarms or deactivates the theft deterrent system in the vehicle Starting and Operating Your Vehicle New V...

Страница 97: ...r is in P Park The steering can bind with the wheels turned off center If this happens move the steering wheel from right to left while turning the key to ACC ACCESSORY If this does not work then the...

Страница 98: ...Do not race the engine immediately after starting it Operate the engine and transmission gently to allow the oil to warm up and lubricate all moving parts The vehicle has a Computer Controlled Cranki...

Страница 99: ...sion gently until the oil warms up and lubricates all moving parts Notice The engine is designed to work with the electronics in the vehicle If you add electrical parts or accessories you could change...

Страница 100: ...rated for at least 15 amps 4 Before starting the engine be sure to unplug and store the cord as it was before to keep it away from moving engine parts to prevent damage The length of time the heater...

Страница 101: ...transmission shift lock control system You must fully apply the brake pedal and then press the shift lever button before you can shift from P Park when the ignition key is in ON RUN If you cannot shif...

Страница 102: ...ovides the best fuel economy If you need more power for passing and you are Going less than about 35 mph 55 km h push the accelerator pedal about halfway down Going about 35 mph 55 km h push the accel...

Страница 103: ...he fluid temperature lowers to the normal temperature range the transmission will return to the normal shift patterns Towing or driving on long hills can cause the transmission fluid temperature to be...

Страница 104: ...transmission shift lock control system You must fully apply the brake pedal and then press the shift lever button before you can shift from P Park when the ignition is in ON RUN If you cannot shift o...

Страница 105: ...is Going less than 35 mph 55 km h push the accelerator pedal about halfway down Going about 35 mph 55 km h or more push the accelerator pedal all the way down The vehicle will shift down to the next g...

Страница 106: ...forward gears can be selected While using the MSM Manual Shift Mode feature the vehicle will have operation similar to a manual transmission You can use this for sport driving or when driving hilly ro...

Страница 107: ...luid temperature to be higher than normal If the transmission fluid temperature will not cool you may need to pull over and check the transmission fluid level You should also check the engine coolant...

Страница 108: ...ess the release button Hold the release button in as you move the brake lever all the way down Make sure to release the parking brake before driving the vehicle If the parking brake is applied and the...

Страница 109: ...move the key and take it with you If you can leave the vehicle with the key the vehicle is in P Park Leaving the Vehicle With the Engine Running CAUTION It can be dangerous to leave the vehicle with t...

Страница 110: ...ic shift lock release system The shift lock release is designed to Prevent ignition key removal unless the shift lever is in P Park with the shift lever button fully released and Prevent movement of t...

Страница 111: ...unnels deep snow that may block underbody airflow or tail pipes The exhaust smells or sounds strange or different The exhaust system leaks due to corrosion or damage The vehicle s exhaust system has b...

Страница 112: ...aust on page 2 33 CAUTION It can be dangerous to get out of the vehicle if the automatic transmission shift lever is not fully in P Park with the parking brake firmly set The vehicle can roll Do not l...

Страница 113: ...ated in the lower center of the mirror to turn automatic dimming on or off The indicator light comes on when this feature is on For vehicles with OnStar press the O located on the lower part of the mi...

Страница 114: ...hnologies and live advisors to provide a wide range of safety security information and convenience services If the airbags deploy the system is designed to make an automatic call to OnStar Emergency a...

Страница 115: ...scribed below or for a full description of OnStar services and system limitations see the OnStar Owner s Guide in the glove box or visit onstar com U S or onstar ca Canada contact OnStar at 1 888 4 ON...

Страница 116: ...tar button to have an OnStar advisor locate a business or address and download driving directions to the vehicle Voice guided directions to the desired destination will play through the audio system s...

Страница 117: ...ity and reception when the service is needed and technology that is compatible with the OnStar service Not all services are available everywhere particularly in remote or enclosed areas or at all time...

Страница 118: ...top of the vehicle that is longer or wider than the luggage carrier like paneling plywood or a mattress the wind can catch it while the vehicle is being driven This can cause a driver to lose control...

Страница 119: ...ail and against the siderail Lock the crossrails to the far forward and backward location to make sure the load is evenly distributed on the luggage carrier Do not stand on the plastic lower body pane...

Страница 120: ...may have to flip this panel upward in order to gain access to the cargo cover To use the panel in the lower position do the following 1 Insert the front corners of the panel into the lower guides 2 Sl...

Страница 121: ...n the back of the panel to lock it in place The panel can be used in this position when you have to place a flat or spare tire in the rear cargo area To use the panel in the upper position do the foll...

Страница 122: ...ear edge of the vehicle Make sure to place the table leg securely onto the liftgate lock striker Notice Driving with the panel extended into the table position could damage your vehicle Always have th...

Страница 123: ...unroof glass panel and sunshade press the switch rearward and release it To stop the sunroof before it is completely open press the switch rearward again The sunshade cannot be closed with the sunroof...

Страница 124: ...NOTES 2 46...

Страница 125: ...tte Lighter 3 18 Climate Controls 3 19 Climate Control System 3 19 Outlet Adjustment 3 23 Passenger Compartment Air Filter 3 23 Warning Lights Gages and Indicators 3 24 Instrument Panel Cluster 3 25 S...

Страница 126: ...mpass 3 48 DIC Warnings and Messages 3 50 DIC Vehicle Personalization 3 59 Audio System s 3 66 Setting the Clock 3 66 Radio s 3 69 Using an MP3 Radio with CD or Six Disc CD Player 3 88 Using an MP3 Ra...

Страница 127: ...NOTES 3 3...

Страница 128: ...Instrument Panel Overview 3 4...

Страница 129: ...n page 3 29 H Rear Window Wiper Washer on page 3 10 Fog Lamps on page 3 15 I Outside Power Mirrors on page 2 35 J Instrument Panel Brightness on page 3 15 K Cruise Control on page 3 10 L Tilt Wheel on...

Страница 130: ...ss near or on the horn symbols on the steering wheel pad to sound the horn Tilt Wheel The vehicle has a tilt wheel that lets the steering wheel be adjusted The tilt lever is located on the left side o...

Страница 131: ...a turn When the turn is finished the lever will return automatically Raise or lower the lever until the indicator arrow on the instrument panel starts to flash to signal a lane change Hold it there un...

Страница 132: ...igh beam headlamps to signal a driver in front of you that you want to pass To flash the high beams from low beam pull the turn signal multifunction lever all the way towards you Then release it Winds...

Страница 133: ...placement on page 5 50 Heavy snow or ice can overload the wiper motor A circuit breaker will stop the motor until it cools down Clear away snow or ice to prevent an overload Windshield Washer CAUTION...

Страница 134: ...asher Fluid on page 5 32 Cruise Control Cruise control lets a speed of about 25 mph 40 km h or more be maintained without keeping your foot on the accelerator Cruise control does not work at speeds be...

Страница 135: ...ering wheel I On Off Press I to turn the cruise control system on and off RES Resume Press to resume a set speed and to accelerate the speed SET Set Press to set a speed and to decrease the speed CANC...

Страница 136: ...e goes about 1 mph 1 6 km h faster Reducing Speed While Using Cruise Control If the cruise control system is already engaged Push and hold the SET until the desired lower speed is reached then release...

Страница 137: ...exterior lamp control is located on the turn signal multifunction lever O Exterior Lamp Control Turn the control with this symbol on it to operate the exterior lamps The exterior lamp control has the...

Страница 138: ...panel lights and other lamps will not be on When the exterior lamp band is turned to the headlamp position the low beam headlamps come on The other lamps that come on with the headlamps will also com...

Страница 139: ...e on The fog lamps will go off whenever the high beam headlamps are turned on When the high beam headlamps are turned off the fog lamps will come on again Some localities have laws that require the he...

Страница 140: ...dition these lamps come on when the Remote Keyless Entry RKE unlock button is pressed It stays on for 20 seconds or until a door is opened After the door is opened and then closed the light remains on...

Страница 141: ...loads plugged into accessory power outlets EPM works to prevent excessive discharge of the battery It does this by balancing the generator s output and the vehicle s electrical needs It can increase e...

Страница 142: ...um amperage rating of 20 amperes Check with your dealer retailer before adding electrical equipment When adding electrical equipment be sure to follow the installation instructions included with the e...

Страница 143: ...n runs continuously with the ignition on The fan must be turned on to run the air conditioning compressor There will be some airflow noticeable from the various outlets when driving even with the fan...

Страница 144: ...ssor unless the outside air is at or below freezing Recirculation mode cannot be selected while in defrost mode This helps prevent window fogging To defrost the windows faster turn the temperature kno...

Страница 145: ...ncel the recirculation mode Recirculation Press to turn the recirculation mode on An indicator light comes on to show recirculation is on The air inside the vehicle will be recirculated through the cl...

Страница 146: ...ehicles with the remote start feature the rear defogger will automatically turn on See Remote Keyless Entry RKE System Operation on page 2 4 Notice Do not use anything sharp on the inside of the rear...

Страница 147: ...entering the vehicle This filter removes certain particles from the air including pollen and dust particles Reductions in airflow which may occur more quickly in dusty areas indicate that the filter...

Страница 148: ...or replacement Paying attention to the warning lights and gages could prevent injury Warning lights come on when there may be or is a problem with one of the vehicle s functions Some warning lights co...

Страница 149: ...esigned to let you know at a glance how your vehicle is running You will know how fast you are going how much fuel you are using and many other things you will need to drive safely and economically Un...

Страница 150: ...old odometer then it must be If not then it is set at zero and a label must be put on the driver s door to show the old mileage reading when the new odometer was installed Trip Odometer Your trip odo...

Страница 151: ...eral seconds to remind the front passenger to buckle their safety belt This only occurs if the passenger airbag is enabled See Passenger Sensing System on page 1 66 for more information The passenger...

Страница 152: ...ou are driving your airbag system may not work properly Have your vehicle serviced right away CAUTION If the airbag readiness light stays on after the vehicle is started or comes on while driving it m...

Страница 153: ...g status indicator it means that the right front passenger frontal airbag is enabled may inflate If the word OFF or the off symbol is lit on the passenger airbag status indicator it means that the pas...

Страница 154: ...urn off all your accessories such as the radio and air conditioner Brake System Warning Light Your vehicle s hydraulic brake system is divided into two parts If one part is not working the other part...

Страница 155: ...page 5 33 for more information If the light comes on while you are driving pull off the road and stop carefully You may notice that the pedal is harder to push or the pedal may go closer to the floor...

Страница 156: ...ar brakes See Brake System Warning Light on page 3 30 For vehicles with a Driver Information Center DIC see DIC Warnings and Messages on page 3 50 for all brake related DIC messages Traction Control S...

Страница 157: ...ght not be covered by the vehicle warranty Never drive with the engine coolant temperature warning light on Engine Coolant Temperature Gage This gage measures the temperature of the vehicle s engine c...

Страница 158: ...ed inflate to the proper pressure See Tires on page 5 51 for more information When the Light Flashes First and Then is On Steady This indicates that there could be a problem with the Tire Pressure Mon...

Страница 159: ...not be covered by the vehicle warranty Notice Modifications made to the engine transmission exhaust intake or fuel system of the vehicle or the replacement of the original tires with other than those...

Страница 160: ...turn the light off If the vehicle has been driven through a deep puddle of water the vehicle s electrical system might be wet The condition is usually corrected when the electrical system dries out A...

Страница 161: ...placed or if the battery has run down The diagnostic system is designed to evaluate critical emission control systems during normal driving This can take several days of routine driving If this has be...

Страница 162: ...ion see DIC Warnings and Messages on page 3 50 After having the oil changed you will need to reset the light See Engine Oil on page 5 15 and Scheduled Maintenance on page 6 4 for more information Secu...

Страница 163: ...ehicle and turn off the ignition Wait for 10 seconds and restart your vehicle This may correct the condition See Service Vehicle Soon Light on page 3 41 for more information The vehicle may be driven...

Страница 164: ...es on page 3 50 for more information All Wheel Drive Disabled Light This light will come on when the rear drive system is overheating An ALL WHEEL DRIVE OFF message will appear in the Driver Informati...

Страница 165: ...roperly closed Service Vehicle Soon Light This light comes on if a condition exists that requires the vehicle to be taken in for service If the light comes on see your dealer retailer for service as s...

Страница 166: ...when you turn a corner or speed up The gage takes a few seconds to stabilize after the ignition is turned on and will go back to empty when you turn the ignition off For your fuel tank capacity see C...

Страница 167: ...air temperature when viewing the trip and fuel information If there is a problem with the system that controls the temperature display the numbers will be replaced with dashes If this occurs have the...

Страница 168: ...urrent distance traveled in either miles mi or kilometers km since the last reset for the trip odometer This display will also show the outside air temperature in either degrees Fahrenheit F or degree...

Страница 169: ...more information Blank Display This display shows no information Vehicle Information Menu Items T Vehicle Information Press this button to scroll through the following displays OIL LIFE Press the vehi...

Страница 170: ...re condition is detected by the system while driving a message advising you to check the pressure in a specific tire will appear in the display See Inflation Tire Pressure on page 5 59 and DIC Warning...

Страница 171: ...ch additional transmitters at this time repeat Step 3 Each vehicle can have a maximum of four transmitters matched to it 6 To exit the programming mode you must cycle the key to LOCK OFF CALIBRATE COM...

Страница 172: ...you live the compass may give false readings The compass must be set to the variance zone in which the vehicle is traveling To adjust for compass variance use the following procedure Compass Variance...

Страница 173: ...ther magnetic item Turn off the vehicle move the magnetic item then turn on the vehicle and calibrate the compass To calibrate the compass use the following procedure Compass Calibration Procedure 1 B...

Страница 174: ...uld take any messages that appear on the display seriously and remember that clearing the messages will only make the messages disappear not correct the problem The following are the possible messages...

Страница 175: ...e in circles at less than 5 mph 8 km h to complete the calibration See DIC Compass on page 3 48 for more information CALIBRATION COMPLETE This message displays when the compass calibration is complete...

Страница 176: ...t comes on See Tire Pressure Light on page 3 34 DRIVER DOOR OPEN This message displays when the driver door is not closed properly Close the door completely ENGINE HOT A C Air Conditioning OFF This me...

Страница 177: ...e vehicle is driven The vehicle may be driven at a reduced speed while this message is on but acceleration and speed may be reduced Anytime this message stays on the vehicle should be taken to your de...

Страница 178: ...re Have the vehicle serviced by your dealer retailer as soon as possible when this message is displayed PASSENGER DOOR FRONT REAR OPEN This message displays when one or more of the passenger doors are...

Страница 179: ...ctrical system checked by your dealer retailer immediately Connecting a battery charger to your vehicle while the ignition is in any position other than LOCK OFF may cause this message to appear If yo...

Страница 180: ...he vehicle The vehicle usually restarts however you may want to take the vehicle to your dealer retailer before turning off the engine See PASS Key III Electronic Immobilizer Operation on page 2 17 fo...

Страница 181: ...ilable to assist you with directional control of the vehicle Adjust your driving accordingly See StabiliTrak System on page 4 6 This message displays only while the ignition is in ON RUN Any of the fo...

Страница 182: ...essage only displays while the ignition is in ON RUN and disappears after 10 seconds unless it is acknowledged or an urgent warning appears Any of the following conditions may cause the TCS to turn of...

Страница 183: ...battery it is recommended that the headlamps are turned off 2 Press the vehicle information button until FEATURE SETTNGS Settings PRESS V TO SELCT Select appears on the DIC display 3 Press the set res...

Страница 184: ...is displayed on the DIC AUTO LOCK This feature allows you to select when the vehicle s doors will automatically lock See Programmable Automatic Door Locks on page 2 10 for more information Press the...

Страница 185: ...in To select a setting press the set reset button while the desired setting is displayed on the DIC REMOTE LOCK This feature allows you to select the type of feedback you will receive when locking the...

Страница 186: ...ting is displayed on the DIC DELAY LOCK This feature allows you to select whether or not the locking of the vehicle s doors and liftgate will be delayed When locking the doors and liftgate with the po...

Страница 187: ...LIGHTNG Lighting This feature allows you to select whether or not to have the exterior lights turn on briefly during low light periods after unlocking the vehicle using the RKE transmitter Press the v...

Страница 188: ...while the desired setting is displayed on the DIC REMOTE START If your vehicle has this feature it allows you to turn the remote start off or on The remote start feature allows you to start the engine...

Страница 189: ...he set reset button while the desired setting is displayed on the DIC FEATURE SETTNGS Settings PRESS V TO EXIT This feature allows you to exit the feature settings menu Press the vehicle information b...

Страница 190: ...Defensive Driving on page 4 2 Notice Contact your dealer retailer before adding any equipment Adding audio or communication equipment could interfere with the operation of the vehicle s engine radio o...

Страница 191: ...MM DD YYYY hour minute month day and year 3 Press the pushbutton located under any one of the tabs to be changed 4 To increase the time or date do one of the following Press the pushbutton below the s...

Страница 192: ...ollowing Press SEEK or s REV Turn f counterclockwise The date does not automatically display To see the date press MENU and then softkey below the H tab while the radio is on The date with display tim...

Страница 193: ...has a Rear Seat Entertainment RSE system it has a CD DVD radio See Rear Seat Entertainment RSE System on page 3 110 for more information on the vehicle s RSE system Radio with CD MP3 shown Base Radio...

Страница 194: ...tures to work improperly If this happens contact the radio station Playing the Radio O Power Volume Press to turn the system on and off Turn clockwise or counterclockwise to increase or decrease the v...

Страница 195: ...WMA and RDS Features Press to display additional text information related to the current FM RDS or XM station or MP3 WMA song A choice of additional information such as Channel Song Artist and CAT ca...

Страница 196: ...m the following steps 1 Tune to the desired radio station 2 Press the FAV button to display the page where the station is to be stored 3 Press and hold one of the six pushbuttons until a beep sounds W...

Страница 197: ...ined If a station s frequency is weak or if there is static decrease the treble To quickly adjust bass midrange or treble to the middle position press the pushbutton positioned under the BASS MID or T...

Страница 198: ...position To quickly adjust all speaker and tone controls to the middle position press the f knob for more than two seconds until a beep sounds Finding a Category CAT Station If the radio has XM the C...

Страница 199: ...le and it must be returned to your dealer retailer for service Loc or Locked This message displays when the THEFTLOCK system has locked up the radio Take the vehicle to your dealer retailer for servic...

Страница 200: ...starts to play the track number displays The CD player can play the smaller 3 inch 8 cm single CDs with an adapter ring Full size CDs and the smaller CDs are loaded in the same manner Care of CDs If p...

Страница 201: ...y pulls back into the player Z EJECT Press to eject CD s To eject the CD that is currently playing press and release this button A beep sounds and Ejecting Disc displays Once the disc is ejected Remov...

Страница 202: ...displays Insert one or more discs partway into the slot of the CD player To play tracks from all CDs loaded in a six disc CD player in random order press the pushbutton positioned under the RDM tab u...

Страница 203: ...e the disc is ejected Remove Disc displays The CD can be removed If the CD is not removed after several seconds the CD automatically pulls back into the player If loading and reading of a CD cannot be...

Страница 204: ...re listening or viewing entertainment DVD CD AUX Auxiliary Press to cycle through DVD CD or Auxiliary when listening to the radio The DVD CD text tab and a message showing track or chapter number disp...

Страница 205: ...r a radio with a CD and DVD player it is capable of playing an MP3 WMA CD R or CD RW disc For more information on how to play an MP3 WMA CD R or CD RW disc see Using an MP3 in the index CD Messages If...

Страница 206: ...section for more information Playing a DVD DVD CD AUX Auxiliary Press to cycle through DVD CD or Auxiliary when listening to the radio The DVD CD text tab and a message showing track or chapter number...

Страница 207: ...current track or chapter Press again to go to the previous track or chapter This button might not work when the DVD is playing the copyright information or the previews SEEK Next Track Chapter Press...

Страница 208: ...een is off press this button to turn the screen on Some DVDs begin playing after the previews have finished although there might be a delay of up to 30 seconds If the DVD does not begin playing the mo...

Страница 209: ...n playback mode q Group r Press to cycle through musical groupings on the DVD A disc Nav Navigate Press to display directional arrows for navigating through the menus e Audio Stream Press to cycle thr...

Страница 210: ...the disc Ejecting a Disc Press the Z button on the radio to eject the disc If a disc is ejected from the radio but not removed the radio reloads the disc after a short period of time The disc is stor...

Страница 211: ...adio when a portable audio device is playing The portable audio device continues playing until it is powered off CD AUX CD Auxiliary Press to play a CD when a portable audio device is playing Press ag...

Страница 212: ...sing the CAT category button toggles between compressed and uncompressed audio format MP3 WMA Format If you burn an MP3 WMA disc on a personal computer Make sure the MP3 WMA files are recorded on a CD...

Страница 213: ...root directory of the CD R or CD RW is treated as a folder If the root directory has compressed audio files the directory displays as F1 ROOT All files contained directly under the root directory are...

Страница 214: ...tag then the radio displays the file name without the extension such as mp3 as the track name Track names longer than 32 characters or four pages are shortened Parts of words on the last page of text...

Страница 215: ...folder c T Next Folder Press the pushbutton positioned under the Folder tab to go to the first track in the next folder s REV Reverse Press and hold to reverse playback quickly within an MP3 WMA file...

Страница 216: ...phabetical order Continue pressing either button until the desired artist displays To change from playback by artist to playback by album press the pushbutton located below the Sort By tab From the so...

Страница 217: ...ns Create a folder structure that makes it easy to find songs while driving Organize songs by albums using one folder for each album Each folder or album should contain 18 songs or less Avoid subfolde...

Страница 218: ...and the folder up buttons search playlists Px first and then go to the root folder When the radio displays the name of the folder the radio displays ROOT Order of Play Tracks recorded to the CD R or C...

Страница 219: ...pped if it was the last selected audio source As each new track starts to play the track number and song title displays Z CD Eject Press and release this button to eject the CD R or CD RW that is curr...

Страница 220: ...a reduced volume Release this button to resume playing the file The elapsed time of the file displays RDM Random With the random setting MP3 WMA files on the CD R or CD RW can be played in random rat...

Страница 221: ...listen to the radio when a CD or a DVD is playing The CD or DVD remains inside the radio for future listening or viewing entertainment DVD CD AUX Auxiliary Press to cycle through DVD CD or Auxiliary...

Страница 222: ...nother station If this station was one of the presets choose another station for that preset button No Artist Info No artist information is available at this time on this channel The system is working...

Страница 223: ...phones support all functions and not all phones are guaranteed to work with the in vehicle Bluetooth system See gm com bluetooth for more information on compatible phones Voice Recognition The Blueto...

Страница 224: ...OnStar owner s guide for more information Pairing Information Up to five cell phones can be paired to the in vehicle Bluetooth system The pairing process is disabled when the vehicle is moving The in...

Страница 225: ...system lists all the paired Bluetooth devices If a phone is connected to the vehicle the system will say Is connected after the connected phone Deleting a Paired Phone 1 Press and hold b g for two sec...

Страница 226: ...sponds with Store and repeats the number followed by Please say yes or no If the number is correct say Yes If the number is not correct say No The system will ask for the number to be re entered 4 Aft...

Страница 227: ...the name tag sounds correct say Yes and the name tag is stored After the number is stored the system returns to the main menu Using the Directory Command The directory command lists all of the name ta...

Страница 228: ...l name tags stored in your phone directory and your route destination directory Are you sure you want to do this Please say yes or no Say Yes to delete all name tags Say No to cancel the function and...

Страница 229: ...ds The system responds with Ready followed by a tone 2 Say Call The system responds with Call using phone name Please say the name tag followed by a tone 3 Say the name tag of the person to call If th...

Страница 230: ...inal call To ignore the incoming call continue with the original call with no action Press c x to disconnect the current call and switch to the call on hold Three Way Calling Three Way Calling must be...

Страница 231: ...and the cell phone To Transfer Audio to the Cell Phone During a call with the audio in the vehicle 1 Press b g The system responds with Ready followed by a tone 2 Say Transfer Call The system responds...

Страница 232: ...call This is used when calling a menu driven phone system Account numbers can be programmed into the phonebook for retrieval during menu driven calls Sending a Number During a Call 1 Press b g The sys...

Страница 233: ...hone and Deleting Name Tags Other Information The Bluetooth word mark and logos are owned by the Bluetooth SIG Inc and any use of such marks by General Motors is under license Other trademarks and tra...

Страница 234: ...or rear seat passengers only The driver cannot safely view the video screen while driving and should not try to do so In severe or extreme weather conditions the RSE system might not work until the te...

Страница 235: ...ads attached to the headphones can become worn or damaged if they are not handled or stored properly If the foam ear pads do become damaged or worn out the pads can be replaced separately from the hea...

Страница 236: ...system connect an external auxiliary device to the color coded A V jacks and turn both the auxiliary device and the video screen power on If the video screen is in the DVD player mode pressing the AUX...

Страница 237: ...through the vehicle speakers by selecting AUX as the source on the radio Video Screen The video screen is located in the overhead console To use the video screen do the following 1 Push the release bu...

Страница 238: ...o turn on the video screen display and start the disc The radio can also turn on the video screen display See Radio s on page 3 69 for more information Notice Storing the remote control in a hot area...

Страница 239: ...n to the beginning of the DVD s Play Pause Press this button to start playing a DVD Press this button while a DVD is playing to pause it Press it again to continue playing the DVD When the DVD is play...

Страница 240: ...this button to turn ON OFF subtitles and to move through subtitle options when a DVD is playing The format and content of this function vary for each disc AUX Auxiliary Press this button to switch th...

Страница 241: ...by pressing the display menu button on the remote control In auxiliary mode the picture moves or scrolls Check the auxiliary input connections at both devices Problem Recommended Action The remote co...

Страница 242: ...is no picture or sound Check that the RSE video screen is sourced to the DVD player DVD Display Error Messages The DVD display error message depends on which radio the vehicle has The video screen ca...

Страница 243: ...clean cloth dampened with clean water Use care when directly touching or cleaning the screen as damage can result Theft Deterrent Feature THEFTLOCK is designed to discourage theft of the vehicle s rad...

Страница 244: ...xternal electronic devices are plugged into the accessory power outlet If there is interference or static unplug the item from the accessory power outlet AM The range for most AM stations is greater t...

Страница 245: ...This interference may occur when making or receiving phone calls charging the phone s battery or simply having the phone on This interference causes an increased level of static while listening to th...

Страница 246: ...NOTES 3 122...

Страница 247: ...tem 4 9 Steering 4 10 Off Road Recovery 4 12 Passing 4 12 Loss of Control 4 12 Driving at Night 4 14 Driving in Rain and on Wet Roads 4 14 Before Leaving on a Long Trip 4 15 Highway Hypnosis 4 15 Hill...

Страница 248: ...he vehicle s tires with the same TPC Spec number molded into the tire s sidewall near the size Follow recommended scheduled maintenance Defensive Driving Defensive driving means always expect the unex...

Страница 249: ...250 000 people injured For persons under 21 it is against the law in every U S state to drink alcohol There are good medical psychological and developmental reasons for these laws The obvious way to e...

Страница 250: ...or icy tire tread the condition of the brakes the weight of the vehicle and the amount of brake force applied Avoid needless heavy braking Some people drive in spurts heavy acceleration followed by h...

Страница 251: ...ing down If one of the wheels is about to stop rolling the computer will separately work the brakes at each wheel ABS can change the brake pressure to each wheel as required faster than any driver cou...

Страница 252: ...ictates The Brake Assist feature will automatically disengage when the brake pedal is released or brake pedal pressure is quickly decreased StabiliTrak System The vehicle has the StabiliTrak system an...

Страница 253: ...come on if there is a problem with the system When this light and the SERVICE STABILITRAK message are on the system is not operational Adjust your driving accordingly Traction Control System TCS The...

Страница 254: ...ys The traction control system can be activated again by pressing the traction control button While the traction control system is activated the StabiliTrak TCS warning light comes on the instrument p...

Страница 255: ...he SERVICE ALL WHEEL DRIVE message in the DIC will come on and stay on to indicate there may be a problem with the drive system and service is required See Service All Wheel Drive Light on page 3 40 a...

Страница 256: ...e If you suspect steering system problems such as abnormally high steering effort for a prolonged period of time contact your dealer retailer for service repairs Hydraulic Power Steering 3 6L V6 Engin...

Страница 257: ...mergencies like these First apply the brakes See Braking on page 4 4 It is better to remove as much speed as possible from a collision Then steer around the problem to the left or right depending on t...

Страница 258: ...while passing Look down the road to the sides and to crossroads for situations that might affect a successful pass If in doubt wait Watch for traffic signs pavement markings and lines that could indi...

Страница 259: ...starts to slide ease your foot off the accelerator pedal and quickly steer the way you want the vehicle to go If you start steering quickly enough the vehicle may straighten out Always be ready for a...

Страница 260: ...rences increase A 50 year old driver might need at least twice as much light to see the same thing at night as a 20 year old Driving in Rain and on Wet Roads Rain and wet roads can reduce vehicle trac...

Страница 261: ...cruise control Before Leaving on a Long Trip To prepare your vehicle for a long trip consider having it serviced by your dealer retailer before departing Things to check on your own include Windshield...

Страница 262: ...assist the brakes on a steep downhill slope CAUTION Coasting downhill in N Neutral or with the ignition off is dangerous The brakes will have to do all the work of slowing down and they could get so...

Страница 263: ...nd polish the surface under the tires even more The Traction Control System TCS on page 4 7 improves the ability to accelerate on slippery roads but slow down and adjust your driving to the road condi...

Страница 264: ...Open a window about two inches 5 cm on the side of the vehicle that is away from the wind to bring in fresh air Fully open the air outlets on or under the instrument panel Adjust the Climate Control s...

Страница 265: ...ehicle when stuck in sand mud ice or snow See Rocking Your Vehicle to Get It Out on page 4 20 If the vehicle has a traction system it can often help to free a stuck vehicle Refer to the vehicle s trac...

Страница 266: ...uld free the vehicle If that does not get the vehicle out after a few tries it might need to be towed out If the vehicle does need to be towed out see Towing Your Vehicle on page 4 26 Loading the Vehi...

Страница 267: ...weight includes the weight of all occupants cargo and all nonfactory installed options The Tire and Loading Information label also lists the tire size of the original equipment tires C and the recomm...

Страница 268: ...l be five 150 lb passengers in your vehicle the amount of available cargo and luggage load capacity is 650 lbs 1400 750 5 x 150 650 lbs 5 Determine the combined weight of luggage and cargo being loade...

Страница 269: ...nt Weight 150 lbs 68 kg 2 300 lbs 136 kg C Available Occupant and Cargo Weight 700 lbs 317 kg Item Description Total A Maximum Vehicle Capacity Weight for Example 2 1 000 lbs 453 kg B Subtract Occupan...

Страница 270: ...combined weight of the driver passengers and cargo should never exceed your vehicle s maximum vehicle capacity weight Certification Label A vehicle specific Certification Tire label is found on the re...

Страница 271: ...you to lose control and crash Also overloading can shorten the life of the vehicle Notice Overloading your vehicle may cause damage Repairs would not be covered by your warranty Do not overload your v...

Страница 272: ...towing Dinghy towing is towing the vehicle with all four wheels on the ground Dolly towing is towing the vehicle with two wheels on the ground and two wheels up on a device known as a dolly Here are s...

Страница 273: ...h all of its wheels on the ground If the vehicle is front wheel drive it can be towed with two of its wheels on the ground See Dolly Towing following If the vehicle is all wheel drive it cannot be tow...

Страница 274: ...e the vehicle is being towed remove the 50 amp BATT1 fuse from the engine compartment fuse block and store in a safe location See Engine Compartment Fuse Block on page 5 99 8 Release the parking brake...

Страница 275: ...ly manufacturer s instructions 2 Drive the front wheels onto the dolly 3 Shift the transmission to P Park 4 Firmly set the parking brake 5 Clamp the steering wheel in a straight ahead position with a...

Страница 276: ...f its wheels on the ground If the vehicle is all wheel drive with a 5 speed transmission it cannot be towed with any of its wheels on the ground It must be towed with a platform truck or trailer Dolly...

Страница 277: ...uctions 7 Release the parking brake only after the vehicle being towed is firmly attached to the dolly 8 Turn the ignition to LOCK OFF Dolly Towing All Wheel Drive Vehicles with a 6 speed Transmission...

Страница 278: ...Towing the Vehicle From the Rear Notice Towing the vehicle from the rear could damage it Also repairs would not be covered by the warranty Never have the vehicle towed from the rear 4 32...

Страница 279: ...le The vehicle can tow a trailer if it is equipped with the proper trailer towing equipment To identify the trailering capacity of the vehicle read the information in Weight of the Trailer that appear...

Страница 280: ...osted speed for trailers or no more than 55 mph 90 km h to save wear on the vehicle s parts Three important considerations have to do with weight Weight of the trailer Weight of the trailer tongue Wei...

Страница 281: ...too See Loading the Vehicle on page 4 20 for more information about the vehicle s maximum load capacity If a weight carrying hitch or a weight distributing hitch is being used the trailer tongue A sh...

Страница 282: ...ns between the vehicle and the trailer Cross the safety chains under the tongue of the trailer to help prevent the tongue from contacting the road if it becomes separated from the hitch Instructions a...

Страница 283: ...stem in the Index For more information about carbon monoxide see Engine Exhaust on page 2 33 Towing a trailer requires a certain amount of experience Get to know the rig before setting out for the ope...

Страница 284: ...page 4 6 Following Distance Stay at least twice as far behind the vehicle ahead as you would when driving the vehicle without a trailer This can help to avoid situations that require heavy braking an...

Страница 285: ...d so much that they would get hot and no longer work well On a long uphill grade shift down and reduce the vehicle s speed to around 45 mph 70 km h to reduce the possibility of the engine and the tran...

Страница 286: ...brake pedal Leaving After Parking on a Hill 1 Apply and hold the brake pedal while you Start the engine Shift into a gear Release the parking brake 2 Let up on the brake pedal 3 Drive slowly until th...

Страница 287: ...ent Overview 5 12 Engine Oil 5 15 Engine Oil Life System 5 18 Engine Air Cleaner Filter 5 20 Automatic Transmission Fluid 5 22 Cooling System 5 22 Engine Coolant 5 23 Engine Overheating 5 29 Overheate...

Страница 288: ...ompact Spare Tire 5 87 Appearance Care 5 87 Interior Cleaning 5 87 Fabric Carpet 5 89 Leather 5 89 Instrument Panel Vinyl and Other Plastic Surfaces 5 90 Care of Safety Belts 5 90 Weatherstrips 5 90 W...

Страница 289: ...ld even cause malfunction or damage not covered by the vehicle warranty Damage to vehicle components resulting from the installation or use of non GM certified parts including control module modificat...

Страница 290: ...ithium batteries contained in remote keyless transmitters may contain perchlorate materials Special handling may be necessary For additional information see www dtsc ca gov hazardouswaste perchlorate...

Страница 291: ...side of the Vehicle Things added to the outside of the vehicle can affect the airflow around it This can cause wind noise and can affect fuel economy and windshield washer performance Check with your...

Страница 292: ...ou hear heavy knocking the engine needs service Gasoline Specifications At a minimum gasoline should meet ASTM specification D 4814 in the United States or CAN CGSB 3 5 or 3 511 in Canada Some gasolin...

Страница 293: ...with the specifications described earlier However E85 85 ethanol and other fuels containing more than 10 ethanol must not be used in vehicles that were not designed for those fuels Notice This vehicl...

Страница 294: ...sparks flames and smoking materials away from fuel Do not leave the fuel pump unattended when refueling the vehicle This is against the law in some places Do not re enter the vehicle while pumping fu...

Страница 295: ...the fuel cap turn it clockwise until it clicks Make sure the cap is fully installed The diagnostic system can determine if the fuel cap has been left off or improperly installed This would allow fuel...

Страница 296: ...the inside of the fill opening before operating the nozzle Contact should be maintained until the filling is complete Do not smoke while pumping fuel Do not use a cellular phone while pumping fuel Ch...

Страница 297: ...t is located inside the vehicle to the left of the brake pedal 2 Then go to the front of the vehicle and move the secondary hood release lever to the right 3 Lift the hood Before closing the hood be s...

Страница 298: ...Engine Compartment Overview When you open the hood on the 3 4L V6 here is what you will see 5 12...

Страница 299: ...Checking Engine Oil under Engine Oil on page 5 15 D Brake Fluid Reservoir See Brakes on page 5 33 E Engine Compartment Fuse Block See Fuses and Circuit Breakers on page 5 96 F Remote Positive Termina...

Страница 300: ...When you open the hood on the 3 6L V6 here is what you will see 5 14...

Страница 301: ...on page 5 22 I Windshield Washer Fluid Reservoir See Adding Washer Fluid under Windshield Washer Fluid on page 5 32 Engine Oil Checking Engine Oil It is a good idea to check the engine oil every time...

Страница 302: ...03 Notice Do not add too much oil If the engine has so much oil that the oil level gets above the cross hatched area that shows the proper operating range the engine could be damaged See Engine Compar...

Страница 303: ...troleum Institute API starburst symbol Oils meeting these requirements should have the starburst symbol on the container This symbol indicates that the oil has been certified by the American Petroleum...

Страница 304: ...t on mileage Based on driving conditions the mileage at which an oil change is indicated can vary considerably For the oil life system to work properly the system must be reset every time the oil is c...

Страница 305: ...the light or message comes back on and stays on when the vehicle is started the engine oil life system has not reset Repeat the procedure What to Do with Used Oil Used engine oil contains certain ele...

Страница 306: ...intenance on page 6 4 for more information If you are driving in dusty dirty conditions inspect the filter at each engine oil change How to Inspect the Engine Air Cleaner Filter To inspect the air cle...

Страница 307: ...ews on the clamps that hold the duct in place 9 Reconnect the air flow sensor electrical connector CAUTION Operating the engine with the air cleaner filter off can cause you or others to be burned The...

Страница 308: ...e 6 11 Notice Use of the incorrect automatic transmission fluid may damage the vehicle and the damages may not be covered by the vehicle s warranty Always use the automatic transmission fluid listed i...

Страница 309: ...sing coolant other than DEX COOL can cause premature engine heater core or radiator corrosion In addition the engine coolant could require changing sooner at 30 000 miles 50 000 km or 24 months whiche...

Страница 310: ...uld not get the overheat warning The engine could catch fire and you or others could be burned Use a 50 50 mixture of clean drinkable water and DEX COOL coolant Use a 50 50 mixture of clean drinkable...

Страница 311: ...el Check to see if coolant is visible in the coolant surge tank If the coolant inside the coolant surge tank is boiling do not do anything else until it cools down If coolant is visible but the coolan...

Страница 312: ...gine cooling fan under the hood can start up even when the engine is not running and can cause injury Keep hands clothing and tools away from any underhood electric fan CAUTION Steam and scalding liqu...

Страница 313: ...essure cap and upper radiator hose is no longer hot Turn the pressure cap slowly counterclockwise about one quarter of a turn If you hear a hiss wait for that to stop This will allow any pressure stil...

Страница 314: ...reaches the COLD FILL line 5 Then replace the pressure cap Be sure the pressure cap is hand tight 6 After driving the vehicle check the level in the surge tank again when the cooling system has cooled...

Страница 315: ...running the engine without coolant is not covered by the warranty Notice If the engine catches fire while driving with no coolant the vehicle can be badly damaged The costly repairs would not be cove...

Страница 316: ...ntinue to drive normally If the warning continues pull over stop and park the vehicle right away If there is no sign of steam idle the engine for three minutes while parked If the warning is still dis...

Страница 317: ...t the engine compartment cool down 2 Wipe the cap and the top of the reservoir clean 3 Unscrew the cap and wipe the dipstick with a clean rag 4 Replace the cap and completely tighten it 5 Remove the c...

Страница 318: ...12 for reservoir location Notice When using concentrated washer fluid follow the manufacturer s instructions for adding water Do not mix water with ready to use washer fluid Water can cause the solut...

Страница 319: ...e a leak means that sooner or later the brakes will not work well Do not top off the brake fluid Adding fluid does not correct a leak If fluid is added when the linings are worn there will be too much...

Страница 320: ...a crash Always use the proper brake fluid Notice Using the wrong fluid can badly damage brake hydraulic system parts For example just a few drops of mineral based oil such as engine oil in the brake...

Страница 321: ...ng is wrong with the brakes Properly torqued wheel nuts are necessary to help prevent brake pulsation When tires are rotated inspect brake pads for wear and evenly tighten wheel nuts in the proper seq...

Страница 322: ...als and related accessories contain lead and lead compounds chemicals known to the State of California to cause cancer and reproductive harm Wash hands after handling Vehicle Storage CAUTION Batteries...

Страница 323: ...damage the vehicle 1 Check the other vehicle It must have a 12 volt battery with a negative ground system Notice If the other vehicle s system is not a 12 volt system with a negative ground both vehi...

Страница 324: ...teries And it could save your radio 4 Open the hoods and locate the positive and negative terminal locations on each vehicle You will not need to access your battery for jump starting Your vehicle has...

Страница 325: ...the front of the engine compartment near the engine oil dipstick See Engine Compartment Overview on page 5 12 for more information on the location of the remote positive terminal and the engine oil d...

Страница 326: ...ery has enough water You do not need to add water to the battery installed in your new vehicle But if a battery has filler caps be sure the right amount of fluid is there If it is low add water to tak...

Страница 327: ...Use a remote positive terminal if the vehicle has one 9 Now connect the black negative cable to the negative terminal of the good battery Use a remote negative terminal if the vehicle has one Do not...

Страница 328: ...lowing 1 Disconnect the black negative cable from the vehicle that had the dead battery 2 Disconnect the black negative cable from the vehicle with the good battery 3 Disconnect the red positive cable...

Страница 329: ...icle should be on a level surface If the level is below the bottom of the filler plug hole you ll need to add some lubricant Add enough lubricant to raise the level to the bottom of the filler plug ho...

Страница 330: ...he lubricant and when to change it See Scheduled Maintenance on page 6 4 How to Check Lubricant A Fill Plug B Drain Plug To get an accurate reading the vehicle should be on a level surface If the leve...

Страница 331: ...ncoming drivers flash their high beam headlamps at you for vertical aim If the headlamps need to be re aimed it is recommended that you take the vehicle to your dealer retailer for service Bulb Replac...

Страница 332: ...assembly toward you to release it from the hidden lower headlamp mount The headlamp assembly will need to be carefully disengaged from the vehicle A Sidemarker Lamp B Parking Turn Signal Lamp C Low Hi...

Страница 333: ...7 Reconnect the electrical connector 8 Push the headlamp back into the lower headlamp mount carefully 9 Reinstall the three headlamp assembly screws Taillamps Turn Signal Stoplamps and Back up Lamps A...

Страница 334: ...om the taillamp assembly 6 Pull the bulb out of the bulb socket 7 Push the new bulb straight into the bulb socket until it clicks 8 Insert the bulb socket into the taillamp assembly and turn it clockw...

Страница 335: ...4 Push the new bulb in and turn clockwise to lock into place 5 Push and turn the license plate lamp up through the liftgate opening 6 Reinstall the two screws holding the license plate lamp to the lif...

Страница 336: ...ce the windshield wiper blade assembly 1 Lift the wiper arm away from the windshield 2 Push the release lever B to disengage the hook and push the wiper arm A out of the blade C 3 Push the new wiper b...

Страница 337: ...on page 4 20 CAUTION Continued CAUTION Continued Underinflated tires pose the same danger as overloaded tires The resulting accident could cause serious injury Check all tires frequently to maintain...

Страница 338: ...tire performance criteria have a TPC specification code molded onto the sidewall GM s TPC specifications meet or exceed all federal safety guidelines C DOT Department of Transportation The Department...

Страница 339: ...m Cold Inflation Load Limit Maximum load that can be carried and the maximum pressure needed to support that load A Temporary Use Only The compact spare tire or temporary use tire has a tread life of...

Страница 340: ...um pressure needed to support that load E Tire Inflation The temporary use tire or compact spare tire should be inflated to 60 psi 420 kPa For more information on tire pressure and inflation see Infla...

Страница 341: ...ize aspect ratio is 60 as shown in item C of the illustration it would mean that the tire s sidewall is 60 percent as high as it is wide D Construction Code A letter code is used to indicate the type...

Страница 342: ...degrees to the centerline of the tread Cold Tire Pressure The amount of air pressure in a tire measured in pounds per square inch psi or kilopascals kPa before a tire has built up heat from driving Se...

Страница 343: ...vehicle is designed to seat multiplied by 150 lbs 68 kg See Loading the Vehicle on page 4 20 Occupant Distribution Designated seating positions Outward Facing Sidewall The side of an asymmetrical tir...

Страница 344: ...vides consumers with ratings for a tire s traction temperature and treadwear Ratings are determined by tire manufacturers using government testing procedures The ratings are molded into the sidewall o...

Страница 345: ...ows your vehicle s original equipment tires and the correct inflation pressures for your tires when they are cold The recommended cold tire inflation pressure shown on the label is the minimum amount...

Страница 346: ...til you reach the recommended amount If you overfill the tire release air by pushing on the metal stem in the center of the tire valve Re check the tire pressure with the tire gage Be sure to put the...

Страница 347: ...e levels The TPMS sensors monitor the air pressure in your vehicle s tires and transmit tire pressure readings to a receiver located in the vehicle Each tire including the spare if provided should be...

Страница 348: ...he TPMS from functioning properly Always check the TPMS malfunction telltale after replacing one or more tires or wheels on your vehicle to ensure that the replacement or alternate tires and wheels al...

Страница 349: ...the DIC operation and displays see DIC Operation and Displays on page 3 43 and DIC Warnings and Messages on page 3 50 The low tire pressure warning light may come on in cool weather when the vehicle...

Страница 350: ...rs are missing or damaged The DIC message and the TPMS malfunction light should go off when the TPMS sensors are installed and the sensor matching process is performed successfully See your dealer ret...

Страница 351: ...ds twice to signal the receiver is in relearn mode and TIRE LEARNING ACTIVE message displays on the DIC screen 4 Start with the driver side front tire 5 Remove the valve cap from the valve cap stem Ac...

Страница 352: ...ehicle continues to perform most like it did when the tires were new Any time you notice unusual wear rotate the tires as soon as possible and check wheel alignment Also check for damaged tires or whe...

Страница 353: ...ces where the wheel attaches to the vehicle In an emergency you can use a cloth or a paper towel to do this but be sure to use a scraper or wire brush later if needed to get all the rust or dirt off S...

Страница 354: ...lder consult the tire manufacturer for more information Buying New Tires GM has developed and matched specific tires for your vehicle The original equipment tires installed on your vehicle when it was...

Страница 355: ...n page 5 87 CAUTION If you use bias ply tires on the vehicle the wheel rim flanges could develop cracks after many miles of driving A tire and or wheel could fail suddenly causing a crash Use only rad...

Страница 356: ...8 and Accessories and Modifications on page 5 3 for additional information Uniform Tire Quality Grading Quality grades can be found where applicable on the tire sidewall between tread shoulder and max...

Страница 357: ...om the norm due to variations in driving habits service practices and differences in road characteristics and climate Traction AA A B C The traction grades from highest to lowest are AA A B and C Thos...

Страница 358: ...mum required by law WARNING The temperature grade for this tire is established for a tire that is properly inflated and not overloaded Excessive speed underinflation or excessive loading either separa...

Страница 359: ...TPMS sensors replace them only with new GM original equipment parts This way you will be sure to have the right wheel wheel bolts wheel nuts and TPMS sensors for your vehicle CAUTION Using the wrong r...

Страница 360: ...cause damage to the brakes suspension or other vehicle parts The area damaged by the tire chains could cause you to lose control of the vehicle and you or others may be injured in a crash Use another...

Страница 361: ...require the same correction you would use in a skid In any rear blowout remove your foot from the accelerator pedal Get the vehicle under control by steering the way you want the vehicle to go It may...

Страница 362: ...ing brake firmly 2 Put the shift lever in P Park 3 Turn off the engine and do not restart while the vehicle is raised 4 Do not allow passengers to remain in the vehicle CAUTION Continued CAUTION Conti...

Страница 363: ...formation To access the spare tire and tools 1 Lift the load floor up and pull it out of the vehicle and set it aside 2 Remove the nut retaining the spare tire 3 Remove the compact spare tire See Comp...

Страница 364: ...or center cap if the vehicle has one to reach the wheel bolts 1 Do a safety check before proceeding See Changing a Flat Tire on page 5 76 for more information 2 Loosen all five plastic caps by turning...

Страница 365: ...lace the jack near the flat tire Notice Make sure that the jack lift head is in the correct position or you may damage your vehicle The repairs would not be covered by your warranty 7 Find the arrow o...

Страница 366: ...a vehicle when it is jacked up is dangerous If the vehicle slips off the jack you could be badly injured or killed Never get under a vehicle when it is supported only by a jack CAUTION Raising your ve...

Страница 367: ...igned only for changing a flat tire If it is used for anything else you or others could be badly injured or killed if the vehicle slips off the jack If a jack is provided with the vehicle only use it...

Страница 368: ...e loose after time The wheel could come off and cause an accident When changing a wheel remove any rust or dirt from places where the wheel attaches to the vehicle In an emergency use a cloth or a pap...

Страница 369: ...wheel mounting surface CAUTION Never use oil or grease on bolts or nuts because the nuts might come loose The vehicle s wheel could fall off causing a crash 14 Reinstall the wheel nuts Tighten each n...

Страница 370: ...n the wheel nuts in the proper sequence and to the proper torque specification See Capacities and Specifications on page 5 103 for the wheel nut torque specification 16 Tighten the wheel nuts firmly i...

Страница 371: ...pment could strike someone Store all these in the proper place To store the flat or spare tire and tools 1 Place the wheel wrench into the bag 2 Use the hook and loop fastener straps to secure the bag...

Страница 372: ...wheel stow rod through the hole in the floor 7 Place the flat or damaged tire face down on the load floor with the threaded wheel stow rod sticking up through the center hole of the wheel 8 Install th...

Страница 373: ...rails The compact spare can get caught on the rails which can damage the tire wheel and other parts of the vehicle Do not use the compact spare on other vehicles And do not mix the compact spare tire...

Страница 374: ...sing cleaners read and adhere to all safety instructions on the label While cleaning the vehicle s interior maintain adequate ventilation by opening the vehicle s doors and windows Dust may be removed...

Страница 375: ...t the cleaning process that was used with plain water If any of the soil remains a commercial fabric cleaner or spot lifter may be necessary When a commercial upholstery cleaner or spot lifter is to b...

Страница 376: ...ey can alter the appearance by increasing the gloss in a non uniform manner Some commercial products may increase gloss on the instrument panel The increase in gloss may cause annoying reflections in...

Страница 377: ...ler Follow all manufacturers directions regarding correct product usage necessary safety precautions and appropriate disposal of any vehicle care product Rinse the vehicle well before washing and afte...

Страница 378: ...rior painted surfaces are subject to aging weather and chemical fallout that can take their toll over a period of years To help keep the paint finish looking new keep the vehicle garaged or covered wh...

Страница 379: ...warranty Use only approved cleaners on aluminum or chrome plated wheels The surface of these wheels is similar to the painted surface of the vehicle Do not use strong soaps chemicals abrasive polishe...

Страница 380: ...r dealer s retailer s body and paint shop Underbody Maintenance Chemicals used for ice and snow removal and dust control can collect on the underbody If these are not removed corrosion and rust can de...

Страница 381: ...entification The eighth character in the VIN is the engine code This code helps identify the vehicle s engine specifications and replacement parts See Engine Specifications under Capacities and Specif...

Страница 382: ...dshield wiper motor is protected by a circuit breaker and a fuse If the motor overheats due to heavy snow or ice the wiper will stop until the motor cools If the overload is caused by some electrical...

Страница 383: ...Remove the console cover to access the fuse block Fuses Usage 1 Sunroof Inside Rear View Mirror Compass 2 Rear Seat Entertainment 3 Rear Wiper 4 Liftgate 5 97...

Страница 384: ...ment 15 Climate Control System Remote Function Actuator 16 Canister Vent 17 Radio 18 Cluster Fuses Usage 19 Ignition Switch 20 Body Control Module 21 Communications Integration Module 22 Center High M...

Страница 385: ...e cover first by unlocking both of the tabs in the back Then lift the cover off Do not lift the front of the cover until the tabs at the rear have been unlocked To reinstall fit together the tabs loca...

Страница 386: ...onditioning Clutch 9 Driver Side Low Beam 10 Daytime Running Lamp 2 11 Passenger Side High Beam 12 Passenger Side Park Lamp 13 Horn 14 Driver Side Park Lamp 15 Starter 16 Electronic Throttle Control E...

Страница 387: ...trol Module Battery 35 Trailer Park Lamp 36 Front Wiper 37 Driver Side Trailer Stoplamp Turn Signal 38 Spare Fuses Usage 39 Fuel Pump 40 Not Used 41 All Wheel Drive 42 Regulated Voltage Control 43 Pas...

Страница 388: ...tch in the same location Relays Usage 31 Ignition Main 46 Air Conditioning Compressor Clutch 47 Powertrain 51 Spare Relays Usage 55 Crank 56 Fan 1 58 Passenger Side Trailer Stoplamp Turn Signal 59 Dri...

Страница 389: ...Application Capacities English Metric Air Conditioning Refrigerant R134a For the air conditioning system refrigerant charge amount see the refrigerant caution label located under the hood See your dea...

Страница 390: ...L Automatic 6 Speed 6T70 Transmission 9 5 qt 9 0 L Wheel Nut Torque 100 lb ft 140 Y All capacities are approximate When adding be sure to fill to the approximate level as recommended in this manual R...

Страница 391: ...duled Maintenance 6 4 Additional Required Services 6 6 Maintenance Footnotes 6 7 Owner Checks and Services 6 8 At Each Fuel Fill 6 8 At Least Once a Month 6 9 At Least Once a Year 6 9 Recommended Flui...

Страница 392: ...to keep this vehicle in good working condition Any damage caused by failure to follow scheduled maintenance might not be covered by the vehicle warranty Your Vehicle and the Environment Proper vehicle...

Страница 393: ...See Gasoline Octane on page 5 6 The services in Scheduled Maintenance on page 6 4 should be performed when indicated See Additional Required Services on page 6 6 and Maintenance Footnotes on page 6 7...

Страница 394: ...and reset the system If the engine oil life system is ever reset accidentally service the vehicle within 3 000 miles 5 000 km since the last service Remember to reset the oil life system whenever the...

Страница 395: ...on in At Least Once a Month on page 6 9 Inspect brake system See footnote a Check engine coolant power steering fluid 3 6L V6 engine only and windshield washer fluid levels and add fluid as needed Per...

Страница 396: ...damage or leaks Inspect exhaust system for loose or damaged components Replace engine air cleaner filter See Engine Air Cleaner Filter on page 5 20 Change automatic transmission fluid severe service...

Страница 397: ...and wiper blades if contaminated Replace wiper blades that are worn or damaged See Windshield Wiper Blade Replacement on page 5 50 and Windshield and Wiper Blades on page 5 92 for more information e...

Страница 398: ...t the intervals specified to help ensure vehicle safety dependability and emission control performance Your dealer retailer can assist with these checks and services Be sure any necessary repairs are...

Страница 399: ...ry rotate the tires See Tire Inspection and Rotation on page 5 66 At Least Once a Year Starter Switch Check CAUTION When you are doing this inspection the vehicle could move suddenly If the vehicle mo...

Страница 400: ...t of P Park with normal effort If the shift lever moves out of P Park contact your dealer retailer for service Ignition Transmission Lock Check While parked and with the parking brake set try to turn...

Страница 401: ...ain water to flush any corrosive materials from the underbody Take care to clean thoroughly any areas where mud and other debris can collect Recommended Fluids and Lubricants Fluids and lubricants ide...

Страница 402: ...89021677 in Canada 89021678 Usage Fluid Lubricant Transfer Case Power Transfer Unit With 3 4L V6 engine VERSATRAK Fluid GM Part No U S 12378514 in Canada 88901045 With 3 6L V6 engine SAE 75W 90 Synth...

Страница 403: ...r Engine Air Cleaner Filter 22676970 A1627C Engine Oil Filter 3 4L V6 Engine 25010792 PF47 3 6L V6 Engine 89017524 PF48 Passenger Compartment Air Filter Element 15781507 CF137 Spark Plugs 3 4L V6 Engi...

Страница 404: ...Engine Drive Belt Routing 3 4L V6 Engine 3 6L V6 Engine 6 14...

Страница 405: ...ces performed in the boxes provided See Maintenance Requirements on page 6 2 Any additional information from Owner Checks and Services on page 6 8 can be added on the following record pages You should...

Страница 406: ...Maintenance Record cont d Date Odometer Reading Serviced By Maintenance I or Maintenance II Services Performed 6 16...

Страница 407: ...Maintenance Record cont d Date Odometer Reading Serviced By Maintenance I or Maintenance II Services Performed 6 17...

Страница 408: ...Maintenance Record cont d Date Odometer Reading Serviced By Maintenance I or Maintenance II Services Performed 6 18...

Страница 409: ...Courtesy Transportation 7 10 Collision Damage Repair 7 12 Reporting Safety Defects 7 15 Reporting Safety Defects to the United States Government 7 15 Reporting Safety Defects to the Canadian Governme...

Страница 410: ...manager STEP TWO If after contacting a member of dealership management it appears your concern cannot be resolved by the dealership without further help in the U S call the Pontiac Customer Assistance...

Страница 411: ...program prior to filing a court action use of the program is free of charge and your case will generally be heard within 40 days If you do not agree with the decision given in your case you may reject...

Страница 412: ...igned so that the entire dispute settlement process from the time you file your complaint to the final decision should be completed in approximately 70 days We believe our impartial program offers adv...

Страница 413: ...anada www gm ca My GM Canada is a password protected section of www gm ca where you can save information on GM vehicles get personalized offers and use handy tools and forms with greater ease Here are...

Страница 414: ...or 1 800 833 7668 For Text Telephone devices TTYs Roadside Assistance 1 800 ROADSIDE 762 3743 From Puerto Rico 1 800 496 9992 English 1 800 496 9993 Spanish From U S Virgin Islands 1 800 496 9994 Cana...

Страница 415: ...935 General Motors of Canada also has a Mobility Program Call 1 800 GM DRIVE 463 7483 for details TTY users call 1 800 263 3830 Roadside Assistance Program For U S purchased vehicles call 1 800 ROADSI...

Страница 416: ...is provided to unlock the vehicle if you are locked out A remote unlock may be available if you have OnStar For security reasons the driver must present identification before this service is given Eme...

Страница 417: ...of six requests per year Additional travel information is also available Allow three weeks for delivery Trip Interruption Benefits and Assistance Must be over 250 kilometres from where your trip was s...

Страница 418: ...with the Bumper to Bumper Base Warranty Coverage period in Canada and extended powertrain warranty in both the U S and Canada Several courtesy transportation options are available to assist in reducin...

Страница 419: ...al reimbursement will be limited and must be supported by original receipts This requires that you sign and complete a rental agreement and meet state provincial local and rental vehicle provider requ...

Страница 420: ...of the vehicle A recycled original equipment GM part may be an acceptable choice to maintain your vehicle s originally designed appearance and safety performance however the history of these parts is...

Страница 421: ...If a Crash Occurs Here is what to do if you are involved in a crash Check to make sure that you are all right If you are uninjured make sure that no one else in your vehicle or the other vehicle is i...

Страница 422: ...e If you have a question ask for an explanation Reputable shops welcome this opportunity Managing the Vehicle Damage Repair Process In the event that your vehicle requires damage repairs GM recommends...

Страница 423: ...ministrator NHTSA 1200 New Jersey Avenue S E Washington D C 20590 You can also obtain other information about motor vehicle safety from safercar gov Reporting Safety Defects to the Canadian Government...

Страница 424: ...a Portfolio Owner Manual and Warranty Booklet RETAIL SELL PRICE 35 00 U S plus processing fee Without Portfolio Owner Manual only RETAIL SELL PRICE 25 00 U S plus processing fee Current and Past Model...

Страница 425: ...near crash like situations such as an airbag deployment or hitting a road obstacle data that will assist in understanding how a vehicle s systems performed The EDR is designed to record data related t...

Страница 426: ...vehicle or vehicle owner OnStar If your vehicle has OnStar and you subscribe to the OnStar services please refer to the OnStar Terms and Conditions for information on data collection and use See also...

Страница 427: ...ve Disabled Light 3 40 All Wheel Drive AWD System 4 9 All Wheel Drive Service Light 3 40 Antilock Brake System ABS 4 5 Antilock Brake System Warning Light 3 32 Appearance Care Aluminum or Chrome Plate...

Страница 428: ...ming 5 45 Headlamps Front Turn Signal Sidemarker and Parking Lamps 5 46 Bulb Replacement cont License Plate Lamps 5 49 Replacement Bulbs 5 49 Taillamps Turn Signal Stoplamps and Back up Lamps 5 47 Buy...

Страница 429: ...l Vinyl and Other Plastic Surfaces 5 90 Interior 5 87 Leather 5 89 Tires 5 94 Underbody Maintenance 5 94 Cleaning cont Washing Your Vehicle 5 91 Weatherstrips 5 90 Windshield and Wiper Blades 5 92 Cli...

Страница 430: ...ght 3 41 Delayed Locking 2 9 Locks 2 9 Power Door Locks 2 9 Programmable Automatic Door Locks 2 10 Rear Door Security Locks 2 10 Driver Seat Height Adjuster 1 3 Driver Information Center DIC 3 43 DIC...

Страница 431: ...Protection Operating Mode 5 30 Overheating 5 29 Reduced Power Light 3 39 Starting 2 20 Entry Lighting 3 16 Event Data Recorders 7 17 Extender Safety Belt 1 31 F Filter Engine Air Cleaner 5 20 Finish...

Страница 432: ...Glove Box 2 40 GM Mobility Reimbursement Program 7 7 H Hazard Warning Flashers 3 6 Head Restraints 1 7 Headlamp Aiming 5 45 Headlamps 3 13 Bulb Replacement 5 45 Daytime Running Lamp 3 14 Flash to Pas...

Страница 433: ...Lap Shoulder Belt 1 26 LATCH System for Child Restraints 1 44 License Plate Lamps 5 49 Liftgate Carbon Monoxide 2 11 Light Airbag Readiness 3 28 All Wheel Drive Disabled 3 40 Antilock Brake System ABS...

Страница 434: ...grammable Automatic Door Locks 2 10 Rear Door Security Locks 2 10 Loss of Control 4 12 Low Fuel Warning Light 3 42 Lower Anchors and Tethers for Children 1 44 Luggage Carrier 2 40 Lumbar Manual Contro...

Страница 435: ...Manual 3 99 New Vehicle Break In 2 18 O Odometer 3 26 Odometer Trip 3 26 Off Road Recovery 4 12 Oil Change Engine Oil Light 3 38 Engine 5 15 Pressure Light 3 37 Oil Engine Oil Life System 5 18 Older...

Страница 436: ...ncy Identification 7 18 Programmable Automatic Door Locks 2 10 R Radio Frequency Identification RFID Privacy 7 18 Radio s 3 69 Radios Navigation Radio System see Navigation Manual 3 99 Reception 3 120...

Страница 437: ...90 How to Wear Safety Belts Properly 1 17 Lap Shoulder Belt 1 26 Safety Belts cont Safety Belt Extender 1 31 Safety Belt Use During Pregnancy 1 31 Safety Belts Are for Everyone 1 12 Safety Warnings a...

Страница 438: ...System 4 6 Start Vehicle Remote 2 6 Starting the Engine 2 20 Steering 4 10 Steering Wheel Controls Audio 3 119 Steering Wheel Tilt Wheel 3 6 Storage Areas Center Console Storage Area 2 40 Convenience...

Страница 439: ...Storing a Flat or Spare Tire and Tools 5 85 Tire Sidewall Labeling 5 52 Tire Terminology and Definitions 5 56 Uniform Tire Quality Grading 5 70 Wheel Alignment and Tire Balance 5 72 Wheel Replacement...

Страница 440: ...ings DIC Warnings and Messages 3 50 Hazard Warning Flashers 3 6 Safety and Symbols iii Wheels Alignment and Tire Balance 5 72 Different Size 5 70 Replacement 5 73 Where to Put the Restraint 1 42 Windo...

Отзывы: