SoundStation VTX 1000
Quick Installation Guide
English
SoundStation VTX 1000
Quick Installation Guide
English
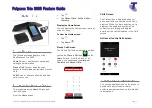
SoundStation VTX 1000 Interface
Menu Button
Displays a menu of
settings and options
Exit Button
Exits from current
screen to previous level
Scroll Buttons
Navigate up or down
through displayed lists
Select Button
Select a highlighted
item from a menu
Conference Button
Call, join, or hang-up
additional call participants
on properly configured
enterprise phone networks
Dialing Keypad
Enter numbers
or letters
LCD
Information and
Input Area
Displays of
information, menus,
and input areas
LEDs
Green
-
Your call is in progress.
Blinking Green
-
A call is incoming.
Red
-
Your call is muted.
Blinking Red
-
Your call is on hold.
This Phone’s Number
Soft Key Functions
Actions you can currently
take, based on the state
of the phone
(555)555-1111
R
EADY
REDIAL
PHBOOK
SPDIAL
Soft Keys
Select the actions that
are currently displayed
Phone Button
Answer an incoming
call, get a dial tone,
initiate an entered call,
or hang up a call
Volume Buttons
Adjust the speaker and
ringer volume
Mute Button
Turn mute on or off
Buttons
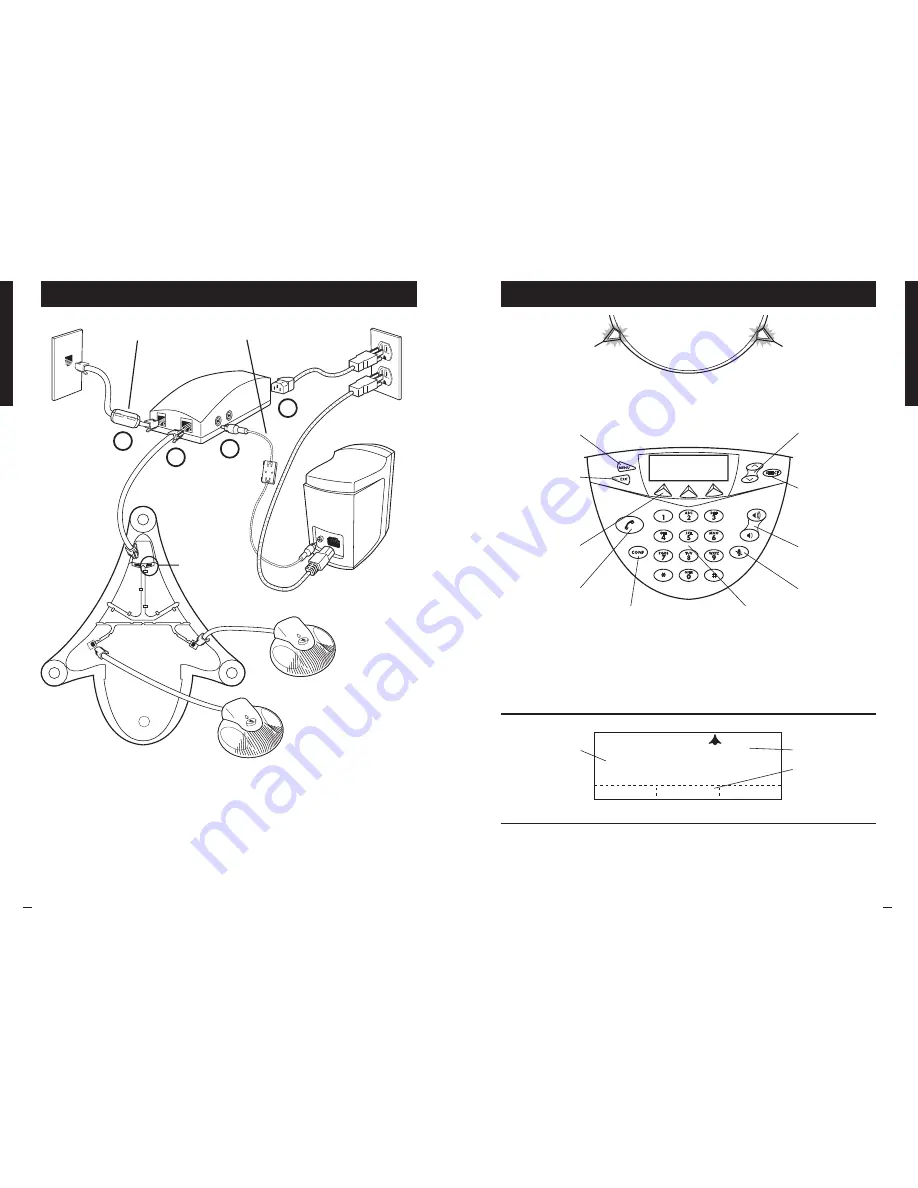
Connection Diagram
The SoundStation VTX1000 is a
conference phone and can only perform
multipoint bridged conference calls on
a properly configured enterprise phone
network or when multipoint calls are
placed through a conference bridge
or a bridging service. Please contact
your telephone system administrator
for further details.
Multipoint Conference Bridging
Note: Also known as
FLASH or R on other
Polycom products.
Install these cables with the bead end of
the cable connected to the Interface Module
4
1
2
3
Position subwoofer on
floor - not on tabletop
Extension Microphones optional
Extend microphones completely
for best performance
1) Cable 1 is for Subwoofer. Ships with Subwoofer ONLY.
2) Start with Cable 2 if Subwoofer is not included.
3) If unit fails to power up, disconnect all cables and
reconnect in sequence shown.
ATTENTION!
Connect Cables in sequence 1 to 4.
Power cables may differ
For future applications
Содержание SoundStation VTX1000
Страница 3: ...1725 07247 015 Rev B SoundStation VTX 1000...
Страница 4: ...SoundStation VTX 1000 SoundStation VTX 1000 SoundStation VTX 1000...
Страница 5: ...SoundStation VTX 1000...
Страница 6: ......


