background image

Polaroid 

Z340 Instant Digital Camera User Manual www.polaroid.com

Playback

Set the data to read-only to prevent images from being erased by mistake.
A protected file has a lock icon         when viewed on Playback mode.
To protect files:
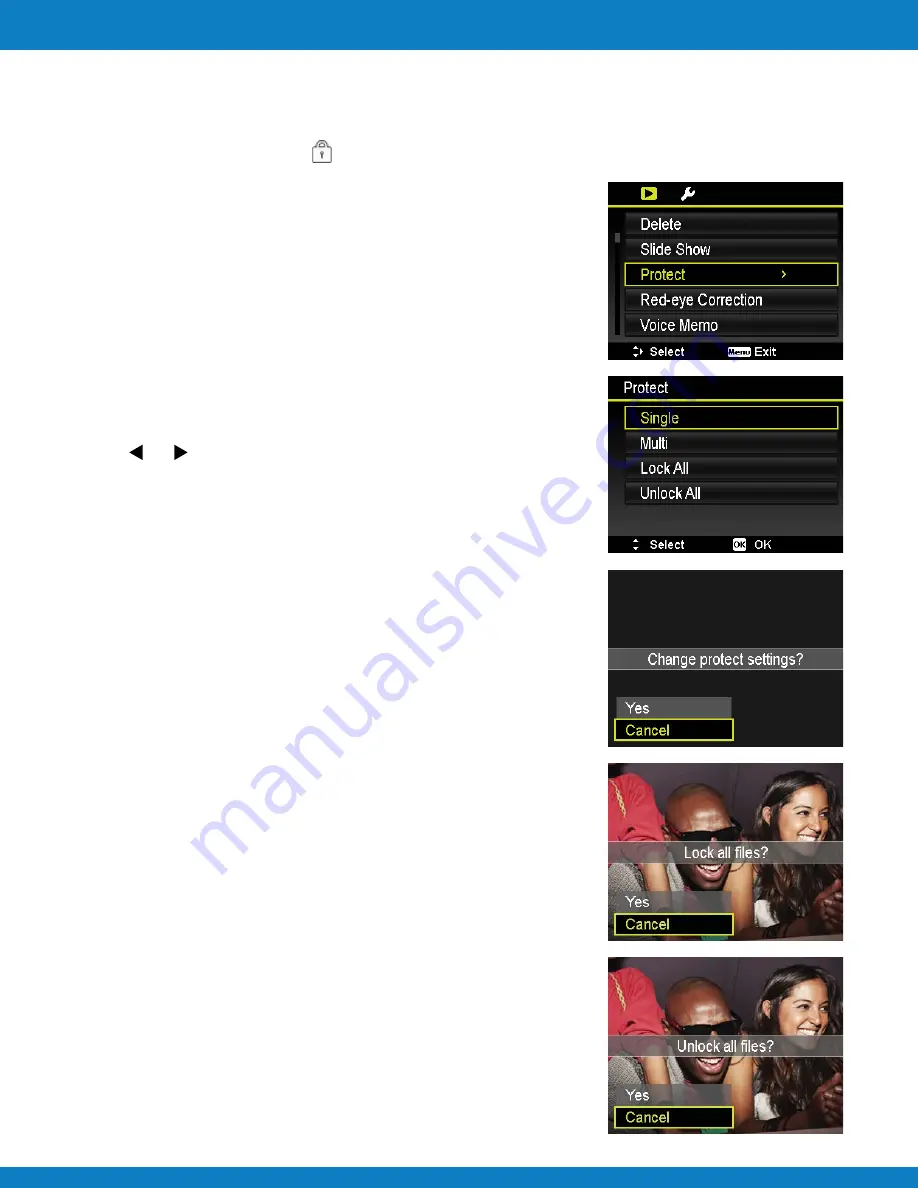
1  From the Playback menu, select 

Protect

.

2  The Protect submenu is displayed on the LCD monitor.
  Available select settings:
 • 

Single

. Select one file to lock/unlock.

 • 

Multi

. Select multiple files from the thumbnail view to 

  lock/unlock.
 • 

Lock All

. Lock all files

 • 

Unlock All

. Unlock all files.

To protect/unprotect a single file:
1 Select 

Single 

in the Protect submenu, the images are 

  displayed on the LCD monitor in single navigation mode.
2  Use      or      keys to scroll the display.
3  When the desired file is displayed on the LCD monitor, press 

 the 

OK 

button to select 

Lock/Unlock

.

4  To close the protect/unprotect function and go back Playback 

 menu, 

select 

Exit

.

To protect/unprotect multiple files:
1  Select Multi in the Protect submenu, the images are displayed 

  in thumbnail view on the LCD monitor. 
2  Use the navigation control to move through the files. 
3  When the desired file is highlighted, press the 

OK 

button to 

  mark/unmark the file clip for protection.
4  Repeat step 3 until all desired files to protect are marked. 
5 Press 

the 

MENU 

button. A confirmation selection appears.

6 Select 

Yes

.

7 Press 

the 

OK 

button to lock files and go back to Playback mode.

To protect all files:
1 Select 

Lock all

 in the Protect submenu. A confirmation 

 message 

appears.

2 Select 

Yes

.

3 Press 

the 

OK 

button to lock all files.

To unlock all files:
1 Select 

Unlock all

 in the Protect submenu. A confirmation 

 message 

appears.

2 Select 

Yes

.

3 Press 

the 

OK 

button to unlock all protected files.

EN-45

Protect

Содержание Z340

Страница 1: ...is guide will help you enjoy your new product or visit www polaroid com For more information consult the user manual on the included CD ROM Instant Digital Camera with ZINK Zero Ink Printing Technolog...

Страница 2: ...h 19 Setting the Focus Mode 19 Using the Function Menu 20 Using Voices Recording 26 Using the Record Menu 31 Recording Videos 37 Playback 39 Viewing in Single Navigation 39 ViewingThumbnails 39 Zoomin...

Страница 3: ...ult the dealer or an experienced radio TV technician for help Warning A shielded type power cord is required in order to meet FCC emission limits and to prevent interference to radio and television re...

Страница 4: ...uct inclusions and accessories to suit their market requirements customer demographics and geographical preferences Products very often vary between retailers especially with accessories such as batte...

Страница 5: ...the camera is used for an extended period of time it is normal for the camera body to feel warm Download all pictures and remove the battery from the camera if you are going to store the camera for a...

Страница 6: ...tional external SD SDHC card Supports up to 4GB on SD card and up to 32GB on SDHC card Easy to use button interface DCF DPOF PictBridge compatibility Slideshow to review still images USB port to trans...

Страница 7: ...rol 5 Menu button 6 Function Delete button 7 Mode Switch Photo mode Movie mode Playback mode 8 Shutter Button 9 Print button 10 Paper tray compartment door 11 Zoom button 12 Tripod screw hole 13 Lens...

Страница 8: ...p recording video or audio clip Zoom button In Photo mode press the zoom button to left to zoom out right to zoom in In Playback mode press to zoom in to magnify still image or zoom out to enter 9 ima...

Страница 9: ...mode options Auto Red eye Reduction Forced On Slow Sync and Forced Off 2 In Playback or Print mode press to view the next image video or audio clip 3 In Playback Movie mode press to forward video pla...

Страница 10: ...nternal memory External storage Your camera supports SD cards of up to 4GB in size It also supports SDHC cards with a maximum capacity of 32GB If there is a storage card inserted in the memory slot th...

Страница 11: ...nt at the back of the camera 3 Insert the battery into the compartment with the terminal facing inside the camera 4 Close the battery compartment Inserting the Battery 1 Connect the camera with the ad...

Страница 12: ...ut compartment To remove the SD SDHC card 1 Open the Memory card Power adapter USB out compartment 2 Gently push the card until it pops out 3 Pull the card out carefully Inserting an SD SDHC Memory Ca...

Страница 13: ...e Date Time 1 Press or to move through the selection 2 Press or keys to change the value for the date and time 3 Press OK to apply 4 If necessary press MENU to close the menu Now you are ready to star...

Страница 14: ...ance Metering Sharpness Quality Photo size AF lamp Indicates the current mode Indicates flash settings Indicates drive mode settings Displays zoom status Indicates the remaining shots available Indica...

Страница 15: ...Indicates battery level 7 Storage media Indicates used storage memory 8 Recording information Displays recording information of the file 9 DPOF Indicates the file is marked for printing 10 Image Size...

Страница 16: ...icates playback mode Indicates file is protected Indicates the file is a video Indicates the button to press on the camera to play a video or audio file Indicates the file number over the total number...

Страница 17: ...e Audio length Played time Playing status Indicates playback mode Indicates file is protected Indicates the button to press on the camera to play a video or audio file Indicates the file number over t...

Страница 18: ...one Guideline In Playback mode the LCD display can be changed into any of the following Basic Full None Changing the LCD Monitor Display EN 17 The OSD information may vary depending on the record mode...

Страница 19: ...s and adjusts the exposure and pressing the Shutter button down fully captures the images When the shake warning icon appears hold the camera steadily with your arms at your side or use a tripod to st...

Страница 20: ...enabled Flash Right button Using Flash This function allows users to define the type of focus when recording a still image or a video clip Setting the Focus Mode EN 19 Flash function is only available...

Страница 21: ...he Function Menu By simply selecting one of the following 31 modes you can capture the image with the most appropriate settings 1 Use the or key to move through the selection 2 Press the OK button to...

Страница 22: ...used to capture warm candle light effects This feature is used to capture portrait pictures with night or dark background This feature enhances skin tone thus facial skin appears smooth This feature...

Страница 23: ...ts the shooting conditions this icon changes to show the detected scene mode The camera changed to Landscape mode automatically Using Intelligent Scene EN 22 Icon Item Description Pre composition Love...

Страница 24: ...together take a group or family portrait Party mode features on Red eye reduction flash and face tracking You ll miss fewer shots and have more time to focus on enjoying the party Using Party Mode Whe...

Страница 25: ...turns green to denote camera shutter and take a shot automatically Using Smile Capture Mode Nothing ruins a great picture more than having your subjects eyes closed Blink Detection provides you with e...

Страница 26: ...pher confirm your whole or half body in the frame and in the right place 4 Press the Shutter button Camera stores the image produced by this step only Using Pre composition Mode Want to take a good im...

Страница 27: ...ding screen layout is displayed on the LCD monitor 2 Press the Shutter button to start recording 3 Press the Shutter button again to stop recording UsingVoices Recording The Photo Size function is use...

Страница 28: ...within the Function menu 2 Use or keys to choose a pattern 3 Press the OK button to start shooting 4 Frame the subject and press the Shutter button to take the first shot 5 Press OK button to continue...

Страница 29: ...ge that will be captured 3 Press the shutter button and the image will be stored in the 2 up layout 1 Select 4 up from Photo Size within the Function menu 2 Press the OK button 3 Press the shutter but...

Страница 30: ...Compensation This sets the white balance for a variety of lighting conditions and permits images to be captured that approach the conditions that are seen by the human eye As you move through the sele...

Страница 31: ...image will appear Use a higher ISO setting in dim conditions and a lower ISO setting in brighter conditions ISO This sets the metering method for calculating the exposure Metering EN 30 Icon Item Des...

Страница 32: ...re settings To go to Record Menu Set the mode switch to Photo Mode 1 Press Menu Button to launch the Record Menu 2 Use the or keys to move through the menu 3 To select an item press or OK button 4 Cha...

Страница 33: ...ng is automatically set to off when you turn off the camera To set the Drive Mode 4 From the Record menu select Drive Mode 5 Use the or keys to go through the selection 6 Press the OK button to save a...

Страница 34: ...Record menu select AF Area 2 Use the or keys to go through the selection 3 Press the OK button to save and apply changes The table below shows the available AF area settings Setting the AF Lamp The AF...

Страница 35: ...tting Saturation The Saturation function lets you adjust the color saturation in your images Use a higher saturation setting for rich colors and a lower saturation setting for more natural tones To se...

Страница 36: ...ital Zoom 2 Use the or keys to go through the selection 3 Press the OK button to save and apply changes The table below shows the available Digital Zoom settings Icon Item Description Intelligent Zoom...

Страница 37: ...when Date Stamp is enabled in AEB Burst mode In vertical or rotated images the date and time on your images still appear horizontally To set Date Stamp 1 From the Record menu select Date Stamp 2 Use t...

Страница 38: ...s of RecordingVideos Press Function button to enable video setting menu before recording a video Movie Size The Movie Size function appears only in Movie mode Use this function to adjust the resolutio...

Страница 39: ...640 X 480 Recording automatically stops when the file reaches 100 MB To record aYouTube video select from the Movie Size function Available recording time for a YouTube video is up to 10 minutes Whit...

Страница 40: ...2 Press the Zoom button counterclockwise left once to enter 9 images mode 3 Use the navigation controls to move through the items 4 Press the OK button to select the image and view it normally Scroll...

Страница 41: ...video 4 During playback press and hold the or keys to fast forward or rewind the video The camera supports forward and rewind speed of up to 4x 5 During playback use the Zoom button to control volume...

Страница 42: ...e key to stop the playback The LCD monitor displays the image in Single navigation mode Playing Voice Memo Voice memo is separately recorded and attached to a captured image See Voice Memo on page 50...

Страница 43: ...ve and apply settings 1 Set the camera to Playback mode 2 View images videos audio clips in Single navigation mode 3 Use the or keys to scroll the display 4 When the desired image video audio clip is...

Страница 44: ...the images videos audio clips Repeat steps 3 to 4 6 To close the Delete function and go back Playback menu select Cancel To delete attached voice memo 1 Set the camera to Playback mode 2 View images...

Страница 45: ...keys to move through the options Select whether to Continue or Exit the slide show 6 Press the OK button to apply selected option To delete all files 1 Select All in the Delete submenu A confirmation...

Страница 46: ...tor press the OK button to select Lock Unlock 4 To close the protect unprotect function and go back Playback menu select Exit To protect unprotect multiple files 1 Select Multi in the Protect submenu...

Страница 47: ...menu selection appears Select whether to Overwrite Save and replace old file with a new one Save As Save the new file as a new one Cancel Cancel red eye correction 8 Press the OK button to save cance...

Страница 48: ...through the selection the preview on the LCD monitor changes synchronously The following table shows the available settings EN 47 Polaroid Color Mode Icon Item Description Off Vintage Color 1 Vintage...

Страница 49: ...Use the Zoom button to change size as zoom in out 6 Use the navigation controls to move the image 7 Press the OK button to apply changes A menu selection appears 8 Select whether to Overwrite Save and...

Страница 50: ...ter selecting size a menu selection appears Select whether to Overwrite Save and replace old file with a new one Save As Save the new file as a new one Cancel Cancel resize 7 Press the OK button to sa...

Страница 51: ...gs To set DPOF on a single image all images 1 Select Single or All on the DPOF submenu 2 For single image use the or keys to scroll and select an image to mark for printing 3 Specify the number of cop...

Страница 52: ...t an image TheTrim function in the Print Menu allows you to trim and immediately print your trimmed image 1 Press the Print button to launch the Print Mode 2 Use the or keys to scroll and select an im...

Страница 53: ...rrection 5 Select Start 6 Press the OK button to start correction 7 After completing Red eye correction a menu selection appears Select whether to Overwrite Print Save and replace the old file with th...

Страница 54: ...on Loading Custom Borders 1 Press the Print button to launch the Print Mode 2 Use the or keys to scroll and select an image to add the border to 3 Press the MENU button to launch the Print Menu 4 Sele...

Страница 55: ...ra is powered off EN 54 This feature allows you to supply up to two customized borders to your camera via a memory card The specifications for the borders are There must be both a 1216 x 912 and a 320...

Страница 56: ...unds produced by the camera 1 From the Setup menu select Sounds 2 Adjusts sound settings 3 Press the OK button to apply changes Setting Sounds The Power Save function allows you to set an idle time af...

Страница 57: ...he navigation controls to adjust date and time value By holding down the or keys the numeric values changes continuously 2 Press the OK button to apply changes Setting Date Time Specify in which langu...

Страница 58: ...able settings are Format Select to format currently used memory Copy to Card Select to copy all files stored in the internal memory to the memory card Setting Memory Kit Use this function to reset the...

Страница 59: ...SB terminal on the camera 3 Turn on the camera 4 The USB mode menu appears on the screen Select Computer by using the or key and press the OK button 5 The PC starts to detect the connection while the...

Страница 60: ...ished Print Mode includes three major settings Print Select An image can then be selected to print Print All Prints all images Print Index Prints all images as thumbnails To set Print Select 1 Use the...

Страница 61: ...File numbering starts from 0001 when a new folder is created Folders names are in the format xxxPDSC If the highest folder number is 999 and the highest file number exceeds 9999 the camera will displa...

Страница 62: ...except the Power button to turn on the LCD The battery is exhausted Charge the battery There is no image file in the memory card Image file format may not be supported Function is only available for...

Страница 63: ...e T Chinese Storage Internal memory 30MB flash memory External memory SD up to 4GB SDHC card up to 32GB guaranteed Color Mode Normal Vintage Color 1 Vintage BW 1 Vintage Color 2 Vintage B W 2 Sepia Ne...

Страница 64: ...cluding battery PaperType and Size 3 x 4 Polaroid ZINK Paper PrintTray Capacity 10 sheets plus ZINK Smartsheet Time to Print Less than 60 seconds Battery Capacity Up to 25 prints per charge Camera Pri...

Отзывы: