background image

- 19 - 

System Setup                                                               


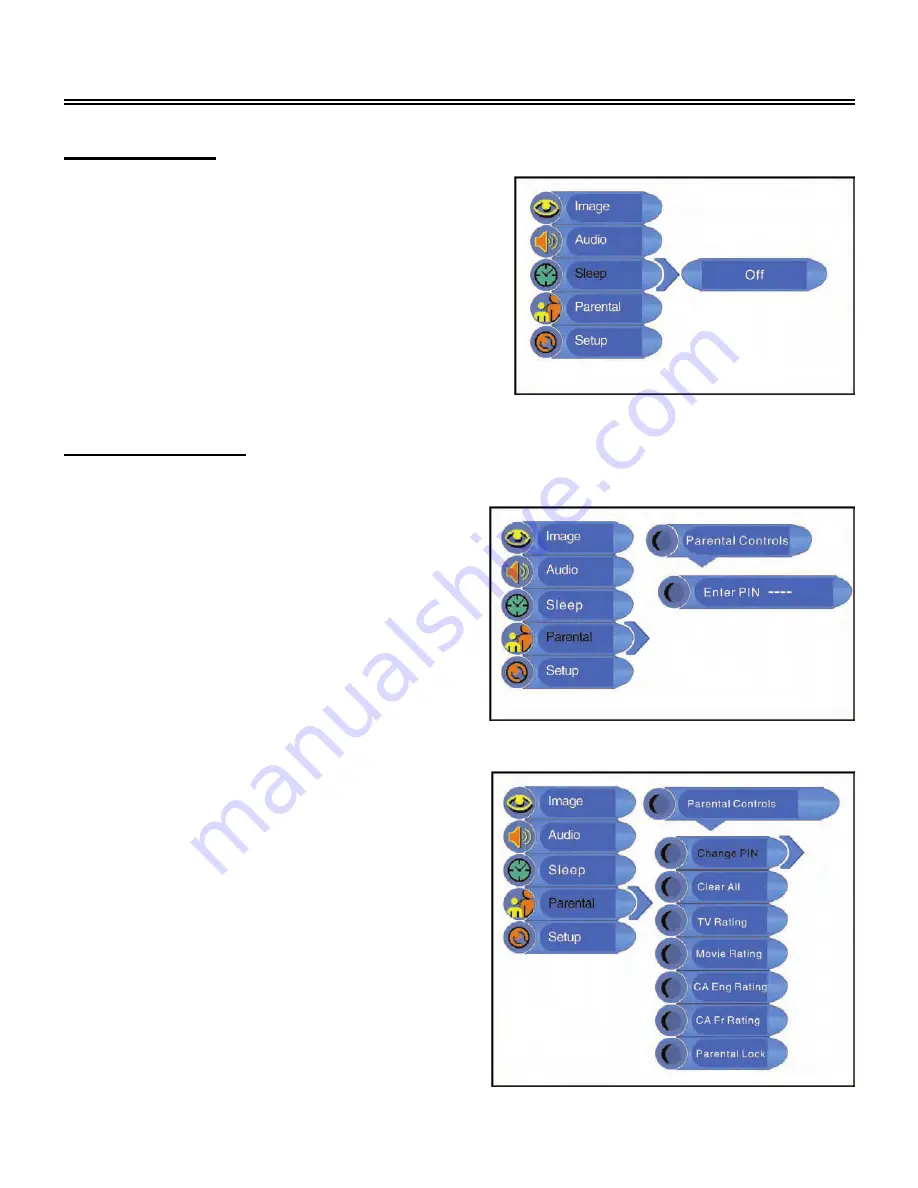
Sleep Setting 


Parental Setting


Note: The Parental Function is the same as that of V-CHIP. 


Press the 

MENU

 button to enter the setup

menu. Press the 

▲▼

 button to select 

Sleep

and press the

 ENTER

 button to enter the menu

shown on the right. 


In the 

Sleep

 setup menu, press the

▲▼

button

to select 15Min, 30Min, 45Min, 60Min, 75Min,

90Min, 105Min, 120Min or Off. Press the 

MENU

button to return to the previous menu. 


Press the MENU button to enter the setup

menu. Press the 

▲▼

 button to select 

Parental

and press the ENTER button to enter the menu

shown on the right. 


In the 

Parental

 setup menu, press the ENTER

button and then use the number buttons to

enter the pin. The default pin is 1111. Then

press the ENTER button to continue and display

the menu as shown on the right.   

Note: The Master password is 3308. This

password is always effective even after you

have selected your own password and changed

it.


Содержание TFT-LCD TV

Страница 1: ......

Страница 2: ...g External AV Signal Source YPbPr 10 Connecting External AV Device AV Output 11 Connecting PC 12 Connecting Power Supply 13 Connecting Earphone 13 Connecting TV Signal Source 14 System Setup 16 Prepar...

Страница 3: ...n made CAUTION These servicing instructions are for use by qualified service personnel only To reduce the risk of electric shock do not perform any servicing other than that contained in the operating...

Страница 4: ...tect the power cord from being walked on or pinched particularly at plugs convenience receptacles and the point where they exit from the apparatus 10 Only use attachments accessories specified by the...

Страница 5: ...4 Accessory List ITEM NAME QTY Remote Control with batteries optional 1 Power Supply Cord 1 Operation Manual 1 Note Accessories and their numbers are subject to modification without prior notice...

Страница 6: ...s to select channels On system setup menu the same function as direction buttons 5 VOL button Press to decrease or increase the volume On system setup menu the same function as direction buttons 6 POW...

Страница 7: ...utput Jack Outputs audio and video for optional external equipment 4 AV and S Video Input Jacks In the S VIDEO mode connect S VIDEO signal input source In the Composite mode connect the external video...

Страница 8: ...ion buttons Used for menu selection in setup menu mode 8 ENTER button Press to confirm a selection 9 INFO button Press to display the current mode input source information 10 POWER button Press to ent...

Страница 9: ...ote control Point the remote control unit from no more than about 7 meters 22 feet from the television and within about 60 degrees of the front of the unit The operating distance may vary depending on...

Страница 10: ...rnal AV signal source to the AV input jacks on the rear panel of the unit Use the S VIDEO cable to connect the external AV signal source to the S VIDEO input jack on the rear panel of the unit After c...

Страница 11: ...nal source to the Y Pb Cb Pr Cr input jacks on the rear panel of the unit After connection turn on the power of the unit and the external AV signal source and press the SOURCE button to select Compone...

Страница 12: ...device s to the audio and video output jacks on the rear panel of the unit Note This television is designed to provide composite video and audio to an external device To avoid potential damage to an...

Страница 13: ...the unit and the other end to the PC VGA output 2 Connect one end of the audio cables to the PC audio input jack on the jack panel of the television and the other end to the PC audio output jack 3 Set...

Страница 14: ...d to the AC100 240V wall outlet Connecting Earphones Connect earphones to the earphone jack on the jack panel of the unit for listening When earphones are connected the television will automatically m...

Страница 15: ...hannel X and then press the button to go to the selected channel immediately Or press the number buttons to input 00X it will go to the selected channel immediately 2 For 10 12 channel Press the numbe...

Страница 16: ...l go to the selected channel Or press the number button to select channel X and then press the button to go to the selected channel immediately Or press the number buttons to input 00X it will go to t...

Страница 17: ...nce to enter the setup menu as shown on the right In the setup menu press the button to select Image and then press the ENTER button to enter the item Press the button to select Press the MENU button...

Страница 18: ...turn to the previous menu Sharpness Setup Press the button to select Sharpness and press the button to adjust the value Press the MENU button to return to the previous menu Advanced Setup Press the bu...

Страница 19: ...ress the button to select Balance and press the button to adjust the level Press the MENU button to return to the previous menu Press the MENU button once to enter the setup menu Press the button to s...

Страница 20: ...Min or Off Press the MENU button to return to the previous menu Press the MENU button to enter the setup menu Press the button to select Parental and press the ENTER button to enter the menu shown on...

Страница 21: ...PIN and press the ENTER button to enter Use the number buttons to enter the new pin you want and then press the ENTER button to confirm Then use the number buttons to enter the new pin again and pres...

Страница 22: ...then press the ENTER button to confirm your selection Press the MENU button to return to the previous menu CA Eng Rating Press the button to select CA Eng Rating and press the ENTER button to enter P...

Страница 23: ...o select CA Fr Rating and press the ENTER button to enter Press the button to select the desired item and then press the ENTER button to confirm your selection Press the MENU button to return to the p...

Страница 24: ...the auto scan mode Tuner Channel Press the button to select the Tuner Channel and press the ENTER button to enter the menu as shown on the right Press the button to select the desired item and press...

Страница 25: ...Press the button to select Channel System and press the ENTER button to enter Press the button to select the desired item and then press the ENTER button to confirm your selection Press the MENU butto...

Страница 26: ...the button to select the Delete Program and press the ENTER button to cancel the skip function which when using the CH button to select channels under normal playback status it will play the channels...

Страница 27: ...Press the button to select CC Mode and press the ENTER button to enter Press the button to select the desired item and then press the ENTER button to confirm your selection Press the MENU button to re...

Страница 28: ...over of the stand 2 Loosen and remove the screws securing the stand to the TV 3 Remove the stand 4 Close the cover Note To remove the stand cover the screen with a soft cloth and place the LCD screen...

Страница 29: ...or muted Make sure the sound setup is correct There is no picture or picture moves up and down Make sure all connections are correct Make sure the unit is in correct video mode The remote control doe...

Страница 30: ...Consumption 60W Dimension 494 184 412mm LXWXH 19 4 x 7 2 x 16 2inch LXWXH Weight About 8 26 Kgs About 18 lbs Ambient Temperature 10 to 45 C 50 to 113 F DESIGN AND SPECIFICATIONS ARE SUBJECT TO CHANGE...

Страница 31: ...not limited to any implied warranties of merchantability or fitness for a particular purpose shall apply after the express warranty period stated in the PPSA and no other express warranty or guaranty...

Отзывы: