background image

48

Polaroid Studio 4 Digital


Video Camera User Guide

www.polaroid-digital.com

49

Polaroid Studio 4 Digital Video Camera User Guide

www.polaroid-digital.com

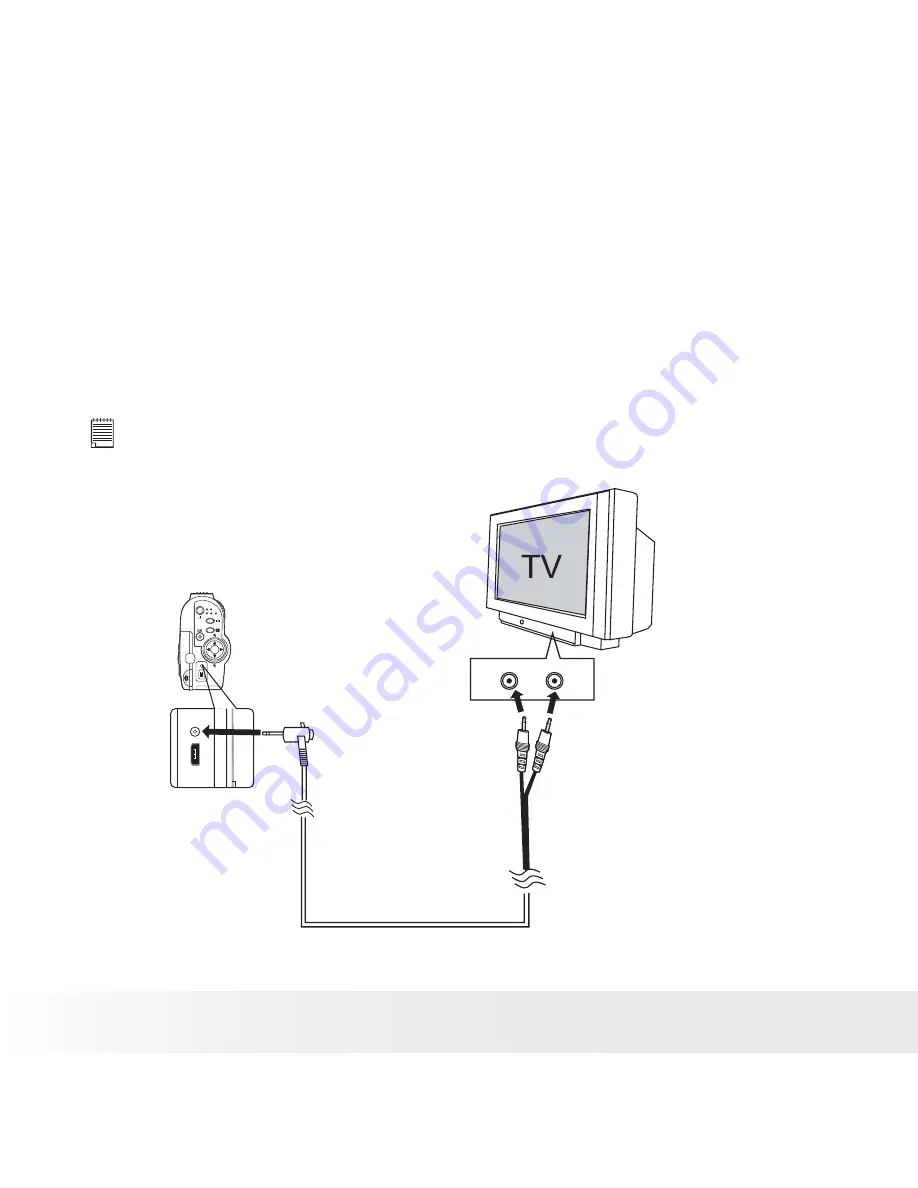
Connecting to a TV

“NTSC” or “PAL” can be selected when the camera is connected to a TV. 

The TV screen now performs as the LCD screen and the LCD screen is 

powered off. 

1.  Connect the camera to a TV via the video cable (supplied) as illustrated.

2.  When the camera is set to Still Image mode or Video mode, you can 

preview the picture you want to take on the TV screen. 

3.  When the camera is set to Playback mode, you can review all 

pictures and video clips in the camera on the TV. 


NOTE:


When  playing  the  pictures  or  videol  clips  on  the  TV,  its  color  may  be  over-

saturated. Manually adjust the color setting on the TV for best color effect. 

USB

Yellow Plug

White Plug

To Audio In Jack

To Video In Jack

Содержание Studio 4

Страница 1: ...www polaroid digital com Studio 4 Digital Video Camera User Guide...

Страница 2: ...tudio 4 Digital Video Camera User Guide www polaroid digital com Product Overview 1 Capture Playback selector 2 Shutter button 3 Hand strap eyelet 4 Lens cap Side View 1 Lens 2 Status LED 3 Microphone...

Страница 3: ...com 1 Power On Off button 2 OK button 3 LCD screen 4 Video output terminal USB port cover 5 Display On Off button 6 Menu button 7 Up Zoom in button 8 Right button 9 Down Zoom out button 10 Left button...

Страница 4: ...ra On and Off 9 Checking the Battery Power Level 10 How to Navigate Menus 10 2 Camera Setting 12 Checking Camera Status 12 Camera Modes 14 Drive Mode 15 Setting the Current Date and Time 16 Setting Da...

Страница 5: ...the Brightness Contrast 38 Setting Sharpness 39 Setting Audio Recording On Off 40 5 Reviewing and Managing Pictures and Video clips 41 Reviewing Pictures on the LCD Screen 41 Reviewing Picture and Vid...

Страница 6: ...ferring Pictures and Video Clips to Mac 60 PhotoImpression 5 0 Hot Plug Function PC Only 61 9 Troubleshooting Problems 63 Troubleshooting 63 10 Getting Help 66 Polaroid digital Online Services 66 Cust...

Страница 7: ...iew pictures on a computer using PhotoImpression or on a TV Save Save pictures to the computer memory by Mass Storage interface Communicate Send pictures over the Internet to family and friends What c...

Страница 8: ...laroid Studio 4 Camera Driver PC ArcSoft PhotoImpression 5 0 PC Mac ArcSoft ShowBiz DVD 1 3 PC Adobe Acrobat Reader PC Mac QuickTime Player Mac DivX PC DivX Doctor II Mac User Guide in PDF Format Hand...

Страница 9: ...TE For best performance and prolonged battery life we recommend the use of AA lithium or rechargeable NiMH Turning the Camera On and Off Pull left to open the LCD screen panel Fully press and hold the...

Страница 10: ...Battery power is low Battery power is exhausted How to Navigate Menus Menus are used to adjust capture and play settings as well as other camera settings like the date time and auto power off 1 In the...

Страница 11: ...n to exit BEEP CLOCK DATE DISP TV SETUP SELECT SET VIEW 2 Press the or button to select a menu item Press the button to enter the submenu POWER OFF LANGUAGE DEFAULT FORMAT SETUP SELECT SET ENGLISH Pre...

Страница 12: ...layed it means that particular feature is not activated Still Image mode Still Image Capture mode Video Auto Daylight Tungsten Fluorescent Cloudy White balance Fine Normal Economic Quality Digital zoo...

Страница 13: ...loudy White balance 17 00 01 19 2005 320X240 00 28 X2 3 Quality Fine Normal Resolution 320 x 240 640 x 480 Video mode Remaining Time Default setting Playback mode Play indicator 1 0001 17 00 01 19 200...

Страница 14: ...Capture Mode Under this mode you can select the image and video settings according to the shooting environment and take pictures and video clips under the settings you have selected For more details...

Страница 15: ...Mode The camera has two modes for taking pictures and video clips Still Image mode Video mode You may switch between these two modes according to the following steps 17 00 01 19 2005 320X240 00 28 Pr...

Страница 16: ...ress the or button to select CLOCK BEEP CLOCK DATE DISP TV SETUP SELECT SET CANCEL 4 Press the button 5 Press the or button to select VIEW 6 Press the button BEEP CLOCK DATE DISP TV SETUP SELECT SET V...

Страница 17: ...the camera to Playback mode 2 Press the button 3 Press the or button to select DATE DISP CLOCK DATE DISP TV FRQUENCY SETUP SELECT SET DATE TIME 4 Press the button 5 Press the or button to select the d...

Страница 18: ...the following steps 1 Set the camera to Playback mode 2 Press the button 3 Press the or button to select POWER OFF FREQUENCY POWER OFF LANGUAGE DEFAULT SETUP SELECT SET OFF 4 Press the button 5 Press...

Страница 19: ...e camera will beep when you press the buttons 1 Set the camera to Playback mode 2 Press the button 3 Press the or button to select BEEP VERSION BEEP CLOCK DATE DISP SETUP SELECT SET OFF 4 Press the bu...

Страница 20: ...ghting frequency Set the frequency to 60Hz for US 50Hz for Europe and Asia 1 Set the camera to Playback mode 2 Press the button 3 Press the or button to select FREQUENCY TV FREQUENCY POWER OFF LANGUAG...

Страница 21: ...you prefer for the LCD screen 1 Set the camera to Playback mode 2 Press the button 3 Press the or button to select LANGUAGE POWER OFF LANGUAGE DEFAULT FORMAT SETUP SELECT SET ENGLISH 4 Press the butto...

Страница 22: ...by the following steps Please refer to Camera Default Settings on page 74 for more details 1 Set the camera to Playback mode 2 Press the button LANGUAGE DEFAULT FORMAT VERSION SETUP SELECT SET CANCEL...

Страница 23: ...AULT FORMAT VERSION BEEP SETUP SELECT SET SET 7 Press the or button to select the desired setting 8 Press the button 9 Press the button ALL DATA WILL BE ERASED FORMAT SELECT SET CONFIRM CANCEL NOTE Da...

Страница 24: ...viewed for maintenance or upgrade 1 Set the camera to Playback mode 2 Press the button 3 Press the or button to select VERSION FORMAT VERSION BEEP CLOCK SETUP SELECT SET CANCEL FORMAT VERSION BEEP CL...

Страница 25: ...he Information Display and the LCD Screen On Off Pressing the button each time switches the LCD screen to the next display mode in the following sequence Capture mode 17 00 01 19 2005 640X480 0008 X2...

Страница 26: ...er pictures already stored in the camera s internal memory or on the memory card Change the drive mode from Video mode to Still Image mode before taking pictures since Video mode is the default captur...

Страница 27: ...infinity 1 0 m to infinity 1 Set the camera to Still Image mode 2 Frame your subject using the LCD screen 3 Hold the camera steady Press the shutter button completely down to take a picture A beep wi...

Страница 28: ...mode 2 Press the button 3 Press the or button to select SELF TIMER Color SELF TIMER RESOLUTION QUALITY CAMERA SELECT SET OFF 4 Press the button Color SELF TIMER RESOLUTION QUALITY CAMERA SELECT SET 1...

Страница 29: ...timer function This setting is also available in Video mode Zoom Feature Your camera is designed with 12X digital zoom This feature lets you zoom in on the central area of a photo or portion of the v...

Страница 30: ...pies more memory space Smaller size pictures and normal quality are easier to email while larger size and fine quality are better for printing Resolution Setting 1 Set the camera to Still Image mode 2...

Страница 31: ...amera to Still Image mode 2 Press the button 3 Press the or button to select QUALITY RESOLUTION QUALITY EV WHITE BAL CAMERA SELECT SET FINE 4 Press the button 5 Press the or button to select the desir...

Страница 32: ...Still Image mode 2 Press the button 3 Press the or button to select EV QUALITY EV WHITE BAL Color CAMERA SELECT SET 4 Press the button 5 Press the or button to select the desired setting 6 Press the b...

Страница 33: ...o select WHITE BAL EV WHITE BAL Color SELF TIMER CAMERA SELECT SET AUTO 4 Press the button 5 Press the or button to select the desired setting 6 Press the button 7 Press the button EV WHITE BAL Color...

Страница 34: ...utton to select Color WHITE BAL Color SELF TIMER RESOLUTION CAMERA SELECT SET NORMAL 4 Press the button 5 Press the or button to select the desired setting 6 Press the button 7 Press the button WHITE...

Страница 35: ...mera to Video mode 2 Frame your subject using the LCD screen 3 Press the shutter button completely down to start recording 4 Press the shutter button again to stop recording or recording stops when th...

Страница 36: ...camera applies when the video clip is recorded Higher resolution makes better quality which occupies more memory space Resolution Setting 1 Set the camera to Video mode 2 Press the button 3 Press the...

Страница 37: ...he camera to Video mode 2 Press the button 3 Press the or button to select QUALITY RESOLUTION QUALITY EV WHITE BAL VIDEO SELECT SET NORMAL 4 Press the button 5 Press the or button to select the desire...

Страница 38: ...s 1 Set the camera to Video mode 2 Press the button 3 Press the or button to select CONTRAST Color CONTRAST SHARPNESS SELF TIMER VIDEO SELECT SET NORMAL 4 Press the button 5 Press the or button to sel...

Страница 39: ...SELECT SET NORMAL 4 Press the button 5 Press the or button to select the desired setting 6 Press the button 7 Press the button CONTRAST SHARPNESS SELF TIMER AUDIO VIDEO SELECT SET SMOOTH NORMAL Use w...

Страница 40: ...taneously You can disable the audio recording if desired 1 Set the camera to Video mode 2 Press the button 3 Press the or button to select AUDIO SELF TIMER AUDIO RESOLUTION QUALITY VIDEO SELECT SET OF...

Страница 41: ...ideo clips Please refer to Camera Modes on page 14 for more details Reviewing Pictures on the LCD Screen 1 Set the camera to Playback mode 2 Press the or buttons to view the pictures taken 1 0001 17 0...

Страница 42: ...to 16 picture and video clip files at a time on the LCD screen by using the Thumbnail function 1 Set the camera to Playback mode 2 Press the button Thumbnail files will be shown on the LCD screen and...

Страница 43: ...3 Press the or button to select THUMBNAIL PROTECT THUMBNAIL DELETE PLAYBACK SELECT SET 2x2 4 Press the button 5 Press the or button to select the desired setting 6 Press the button 7 Press the button...

Страница 44: ...01 19 2005 SELECT PLAY 2 Press the or button to select the video clip you wan to play The icon is shown on LCD screen when a video clip is selected 3 Press the button to start playing video clip Pres...

Страница 45: ...THUMBNAIL PLAYBACK SELECT SET ON ON Protect the selected picture or video clip OFF Remove protection from the selected picture or video clip ALL ON Protect all pictures and video clips in the current...

Страница 46: ...n to select the desired setting 6 Press the button THUMBNAIL DELETE PROTECT PLAYBACK SELECT SET ONE 7 Press the or button to select the desired setting 8 Press the button You may cancel the deletion b...

Страница 47: ...r USA Canada Taiwan Japan etc and PAL for Europe Asia excluding Taiwan and so on You can change the video output system according to the following steps 1 Set the camera to Playback mode 2 Press the b...

Страница 48: ...deo cable supplied as illustrated 2 When the camera is set to Still Image mode or Video mode you can preview the picture you want to take on the TV screen 3 When the camera is set to Playback mode you...

Страница 49: ...ards Consider using these cards for best performance Memory Card Precautions 1 Use only an SD memory card with this camera 2 Electrostatic charge electrical noise and other phenomena can cause data co...

Страница 50: ...nt to record new files onto it format it or delete its files Files contained in the SD card recorded by other cameras may conflict with the Studio 4 camera and valuable data in your existing SD card m...

Страница 51: ...the SD card slot door as illustrated Insert the SD card ensuring that the card is inserted the correct position as illustrated Close the card slot door before using the camera TBA TBA TBA Notched cor...

Страница 52: ...illustrated TBA TBA TBA IMPORTANT Never insert any other object into the camera s SD card slot Doing so creates the risk of damage to the camera and card Should water or any foreign objects ever get...

Страница 53: ...the camera card slot 2 Turn on the camera 3 Procedures are the same as for formatting the internal memory Refer to Formatting the Internal Memory on page 23 for details IMPORTANT You can format a mem...

Страница 54: ...R IMPORTANT For Windows 98SE On Windows 98SE Mass Storage function needs to install the Studio 4 Driver After the installation please restart the Windows before connecting the camera to the PC IMPORTA...

Страница 55: ...he on screen instructions Open Close NOTE If the setup screen does not appear after loading the CD then you can manually start it by double clicking the My Computer icon on your desktop then double cl...

Страница 56: ...mpression also includes a wide variety of printing options ArcSoft ShowBiz 1 3 Movie Making Software ArcSoft ShowBiz 1 3 is an easy to use program that has everything you need to capture your home mov...

Страница 57: ...d the following minimum requirements For Windows Users PC Compatible with Microsoft Windows 98SE Me 2000 or XP Pentium III 800MHz or equivalent processor USB Port 128MB RAM 512MB recommended 400MB fre...

Страница 58: ...STALLED THE SOFTWARE FROM THE ENCLOSED CD PLEASE REFER TO 7 Installing the Software onto a Computer For Windows Users PC Connecting to Your Computer Connecting with the USB Cable USB Series Mini B plu...

Страница 59: ...via the USB cable 3 Double click on My Computer icon on your desktop and then you can see a Removable Disk drive 4 Double click Removable Disk double click DCIM double click 100MEDIA 5 All the picture...

Страница 60: ...camera 2 Set the camera to Playback mode 3 Connect the camera to a computer via the USB cable the systems will automatically recognize the MASS STORAGE drive named Unlablled NOTE This Drive name will...

Страница 61: ...PhotoImpression 5 0 will detect the connection between the camera and the computer automatically When connect the camera to the computer PhotoImpression 5 0 will launch on your desktop automatically P...

Страница 62: ...ou can select the destination which the photos are copied to Click the folder icon Browse for folder Click the OK button to confirm Click OK to start copying The photos have been copied to the compute...

Страница 63: ...ve I cannot upload images to the PC Connection failure Check all cable connections are secured My Studio 4 camera cannot be recognized by the system Conflict with another camera driver or capture devi...

Страница 64: ...d Camera is turned off or Memory is full Turn the camera on or Delete images you no longer need or use another memory card Camera powers off during self timer countdown Batteries are dead Replace batt...

Страница 65: ...ation is ticked and the disconnect is ticked If you change the settings the computer will ask you to restart your PC Click Yes The CD ROM is disconnected You can manually start it by going to the Wind...

Страница 66: ...510 979 5599 Fax 1 510 440 7978 E mail support arcsoftsupport com Web http www arcsoft com en support For Europe For China ArcSoft Europe Support Center ArcSoft China Support Center Ireland Hangzhou...

Страница 67: ...sor 1 1 8 inch 3 2 Mega Pixels CMOS Lens Type 5 elements plus IR filter Aperture F 3 5 Focal Length f 8 66 mm Focal Distance Normal Focus 3 2 ft to 1 m to The focusing range is the distance from the l...

Страница 68: ...included File Format Still Image EXIF 2 2 compatible format JPEG compression Video Clip AVI format Power Supply 2 x AA size batteries included Self timer 10 seconds with beep sound Tripod Socket Yes...

Страница 69: ...ng based on the internal memory and different capacities of SD card Recordable Images Units Images Resolution Quality 16MB Internal Memory 11MB for data storage 32MB SD 64MB SD 2048 x 1536 High 20 55...

Страница 70: ...8 x 1536 High 220 440 880 1760 Normal 288 576 1152 2304 Low 384 768 1536 3072 1600 x 1200 High 364 728 1456 2912 Normal 508 1016 2032 4064 Low 592 1184 1368 4736 1280 x 960 High 560 1120 2240 4480 Nor...

Страница 71: ...lity Video clips can be taken 16MB Internal Memroy 11MB for data storage 640 x 480 Fine 0 46 Normal 0 5 320 x 240 Fine 1 Normal 1 2 32MB SD 640 x 480 Fine 1 2 Normal 1 3 320 x 240 Fine 3 Normal 3 5 64...

Страница 72: ...80 Fine 19 2 Normal 20 8 320 x 240 Fine 48 Normal 56 1GB SD 640 x 480 Fine 38 4 Normal 41 6 320 x 240 Fine 96 Normal 112 NOTE Scene complexity affects a picture s file size For example a picture of tr...

Страница 73: ...com Uninstall the Camera Driver PC For Windows Users PC 1 Click Windows Start button 2 Go to Setting Control Panel 3 Double click Add or Remove Program 4 Choose the Polaroid Studio 4 Camera and Click...

Страница 74: ...posure Compensation White Balance Color Self timer Video Resolution Quality Exposure Compensation White Balance Color Self timer Contrast Sharpness Audio Beep Date Time Display Driver Type TV Frequenc...

Страница 75: ...g activities that reduces battery life Reviewing your pictures on the LCD screen WARNING Batteries should be replaced by an adult Do not mix different types of batteries or new and used batteries Use...

Страница 76: ...g it ALWAYS remove dust or stains with a soft cloth dampened with water or neutral detergent NEVER place hot items on the surface of the Camera NEVER attempt to open or disassemble Camera as this will...

Страница 77: ...e will not occur in a particular installation If this equipment does cause harmful interference to radio or television reception which can be determined by turning the equipment off and on the user is...

Страница 78: ...US 0705 Part No OM3376US006...

Отзывы: