

Deleting files on the player or SD card
To delete a file from the browser screen, use the
[
] or [
] button to highlight a file, and press
MENU
.
On the “Delete File?” screen that appears select
“YES”to delete the selected file and return to the
bowers screen.
or
Select “NO” to return to the Browser Screen.
In the settings menu you can customize various
player settings, such as: power usage, language,
display settings and more.
To access the system settings where you can make
changes to the player, select “settings” from the Main
Menu.
Use the [
] or [
] button to highlight a setting
menu and touch the highlighted file or double tap
the file, the settings menu will open.
You can view electronic books (e-book), that are in TXT
format on the player.
1) Select “e-book” from the Main Menu.
2) Use the [
] or [
] button to highlight a file
and touch the highlighted file or double tap the
file, the e-book will open.
3) Use the [
back] button to go to previous
screens or return to the Main Menu.
4) Press MENU to access the e-book menu at any
time while an e-book file is open.
The settings menu screen includes:
Display Settings:
Change the backlight duration time and screen
brightness.
System Settings:
Set player to factory default settings and touch
screen calibration.
Background:
Select from seven different backgrounds for the
Main Menu.
Language:
Select player language.
System Information:
View device information.
AutoShut Time:
Select duration of time of inactivity that the player
will shut itself down.
Record
Browser
Settings
Video
Photos
e-book
Legal information
Troubleshooting
Limited Warranty
FCC Part 15:
This equipment has been tested and found to comply with the requirements for a
Class B digital device under Part 15 of the Federal Communications Commission (FCC)
rules. These requirements are intended to provide reasonable protection against
harmful interference in a residential installation. This equipment generates, uses and
can radiate radio frequency energy and, if not installed and used in accordance with
the instructions, may cause harmful interference to radio communications. However,
there is no guarantee that interference will not occur in a particular installation. If this
equipment does cause harmful interference to radio or television reception, which can
be determined by turning the equipment off and on, the user is encouraged to try to
correct the interference by one or more of the following measures:
●
Re-orient or relocate the receiving antenna.
●
Increase the separation between the equipment and receiver.
●
Connect the equipment into an outlet on a circuit different from that to which the receiver
is connected.
●
Consult the dealer or an experienced radio/TV technician for help.
Do not attempt to repair or modify this equipment.
Warning: Changes or modifications to this equipment not expressly approved by the party
responsible for compliance could void the user’s authority to operate the equipment.
“This device complies with Part 15 of the FCC Rules. Operation is subject to the following
two conditions:
(1) this device may not cause harmful interference, and
(2) this device must accept any interference received, including interference that may cause
undesired operation.”
Shielded USB cables must be used with this unit to ensure compliance with the Class
B FCC limits.
PLR IP Holdings, LLC, its licensees and affiliates, fully support all electronic waste
initiatives. As responsible stewards of the environment, and to avoid violating established
laws, you should properly dispose of this product in compliance with all applicable regulations,
directives or other governances in the area where you reside. Please check with local
authorities or the retailer where you purchased this product to determine a location where
you can appropriately dispose of the product.
You may also go to HYPERLINK "http://www.polaroid.com" www.polaroid.com and
reference About / Electronic Recycling to learn more about the specific laws in your
area and to locate a collection facility near your home.
If your electronic device has internal memory on which personal or other confidential data
may be stored, you may want to perform a data sanitization process before you dispose of
your device to assure another party cannot access your personal data. Data sanitization
varies by the type of product and its software, and you may want to research the best
sanitization process for your device before disposal. You may also check with your local recycling
facility to determine their data sanitization procedures during the recycling process.
Can not power on
• The battery may be exhausted, please recharge the battery.
Files can not be transferred to the player
•
Check if the driver is installed correctly in the computer by
disconnecting and then reconnecting the player to the computer
•
Check the connection between the player and PC, and confirm the
USB cable is properly connected.
No sound from the headphones
•
Please ensure the volume is turned up, and the headphones are
properly connected.
• Check if the format of music file is supported by the player.
Can not record
• Check if there is enough memory and battery capacity.
Display is in the wrong language
• Please ensure you selected the correct language from the
“Settings” menu.
I cannot display my .jpg files
• Many digital cameras and image editing softwares add hidden
data to the .jpg files. This data can prevent the player from
loading the images. Try to eliminate them by saving the file
with another name.
Resetting the player
If the player malfunctions, you can use the reset function to
restart it.
•
To reset the player, take a metal pin (such as the end of a paperclip),
and push it into the RESET hole to restart the player. Be cafeful
not to insert the pin into the microphone.
This Product as supplied and distributed new by AIT, Inc. (“AIT”) to the
original consumer purchaser and is warranted by AIT against defects in
material and workmanship for a period of one year from your date of
purchase (“Warranty”).
In the unlikely event that this product is defective, or does not perform properly,
you may within one year from your original date of purchase return it to the
authorized service center for repair or exchange.
TO OBTAIN WARRANTY SERVICE:
- Provide proof of the date of purchase within the package (Dated bill of sale)
- Prepay all shipping costs to the authorized service center, and remember
to insure your return.
- Include a return shipping address (no P.O. Boxes), a telephone contact
number, and the defective unit within the package.
- Describe the defect or reason you are returning the product. Your product
will be repaired or replaced, at our option, for the same or similar model of
equal value if examination by the service center determines this product is
defective. Products received damaged as a result of shipping, will require you
to file a claim with the carrier.
The shipping address of the authorized service center is:
AIT, Inc.
ATTN: Returns Department
14-C 53rd Street Brooklyn, NY 11232
IN NO EVENT WILL AIT, ITS MANUFACTURERS, DISTRIBUTORS OR PLR IP
HOLDINGS, LLC BE LIABLE FOR ANY INCIDENTAL, DIRECT, INDIRECT, SPECIAL,
PUNITIVE OR CONSEQUENTIAL DAMAGES (SUCH AS, BUT NOT LIMITED TO,
DAMAGES FOR LOSS OF PROFITS, BUSINESS, SAVINGS, DATA OR RECORDS)
RELATED TO THIS PRODUCT. EXCEPT AS STATED HEREIN, NO OTHER
WARRANTIES SHALL APPLY.
Should you have any questions or problems concerning this product, please
contact our customer service department at:
Customer Support:
1-877-768-8483 (Toll Free)
Monday - Thursday: 9AM - 5PM (EST)
Friday: 9AM - 3PM (EST)
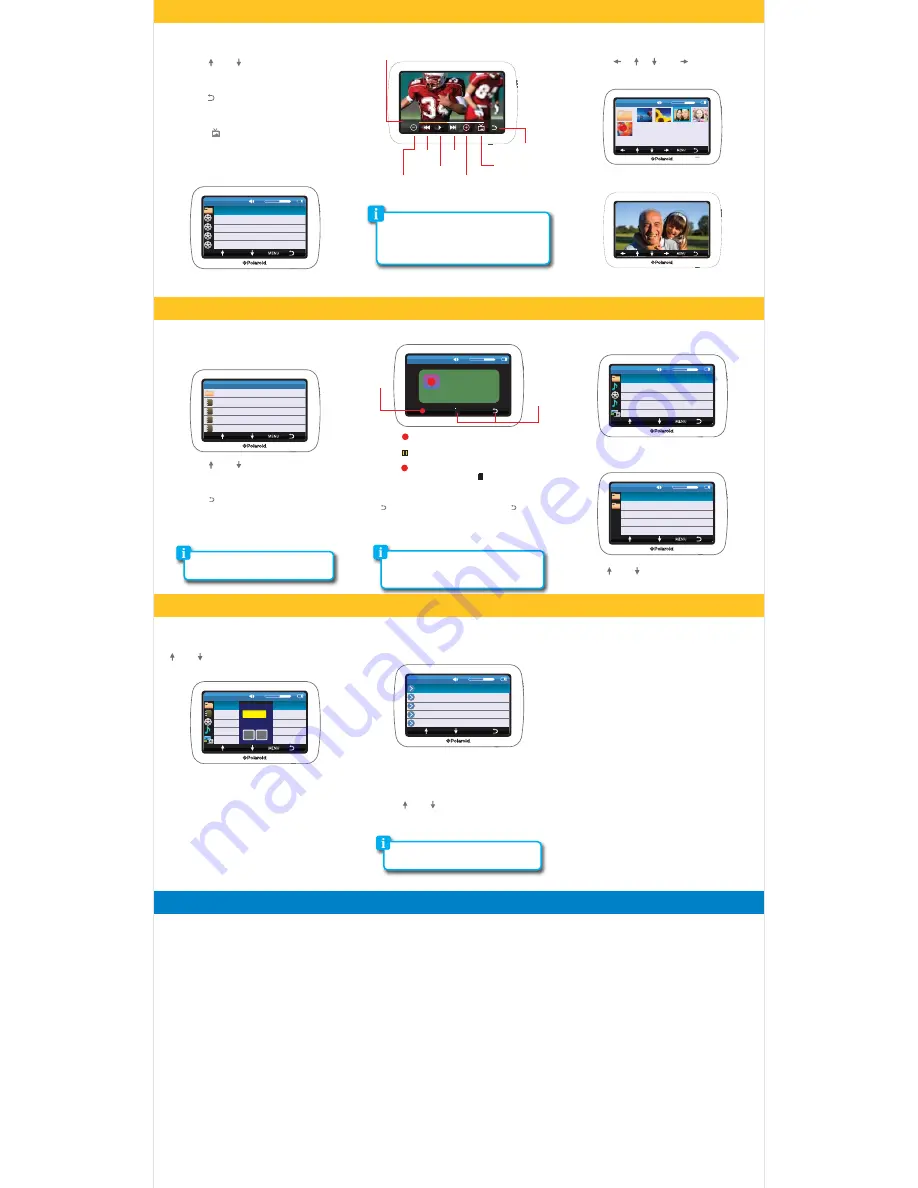
1) To view video files, select “video” from the Main
Menu.
2) Use the [
] or [
] button to highlight a video
file and touch the highlighted file or double tap
the file, the video starts playing.
3) Use the [
back] button to go to previous
screens or return to the Main Menu.
4) To switch between Normal & Wide screen view,
press the [ ] button.
5) To delete a video file, highlight the file and press
MENU, then select “YES” or “NO”.
When returning to a video that was not
finished playing, the player will ask “Continue
Last Play?” Select “NO” to start video from
beginning. Select “YES” to start from current
spot.
The player only supports TXT files with “ANSI”
coding.
Adjust the “Display Settings” and “AutoShut
Time” to extend and optimize battery performance.
To access recorded voice memos, select
“music” from the main menu, scroll to “Voice
Memos” and select the voice memo you
would like to play.
Video Screen
RECORD
memo.txt
memo2.txt
memo3.txt
memo4.txt
record
MIC
17
Ready...
000:00:00
186:43:08
To record voice memos, select “record” from the Main
Menu.
1) Press [ ] to start recording a voice memo.
2) Press [ ] to pause the recording.
3) Press [ ] to continue recording within the
same voice memo or press [ ] to stop recording
and save the voice memo.
4) To stop recording and save the voice memo, press
[ ] at any time while recording. Press [ ] again to
return to the previous menu.
5) Quick press the [
POWER
] button at any time to
return to the main menu.
To view or delete files on the player or Micro SD card
(if inserted), select “browser” from the Main Menu.
If a Micro SD card is inserted in the player, the follow-
ing screen appears - select “SD Card” to acces it.
Use the [
] or [
] button to browse files, and tap
a highlight file to open it.
Stop
recording
& Save
Record/
Pause
RECORD
Lake.wmv
Lake.wmv
Lake.wmv
Favorites
17
video
00:01:00
00:04:00
Elapsed time
counter
Next
Volume
down
Previous
Play/Pause
Volume
up
Screen
View
Return to
previous menu
1) To view photos, select “photos” from the Main
Menu.
2) Use the [
], [
], [
], or [
] button to
highlight a photo and touch the highlighted
photo or double tap the photo to open it.
3) Touch the screen to make the photo interface
appear or
disappear.
4) To delete a photo, highlight the photo and press
MENU, then select “YES” or “NO”.
17
photos
RECORD
memo.txt
memo2.txt
memo3.txt
memo4.txt
E-book
BOOK
BOOK
BOOK
BOOK
RECORD
track1.txt
Lake.wmv
track2.mp3
Photo1.jpg
17
browser
RECORD
Memo1.txt
Lake.wmv
track1.mp3
Photo1.jpg
17
browser
BOOK
Warning!!
Delete File?
yes
no
Flash
SD Card
17
browser
Display Settings
System Settings
Background
Language
System Information
17
settings


