background image

45

Polaroid PhotoMAX PDC 1075 Digital Camera User Guide
www.polaroid-digital.com

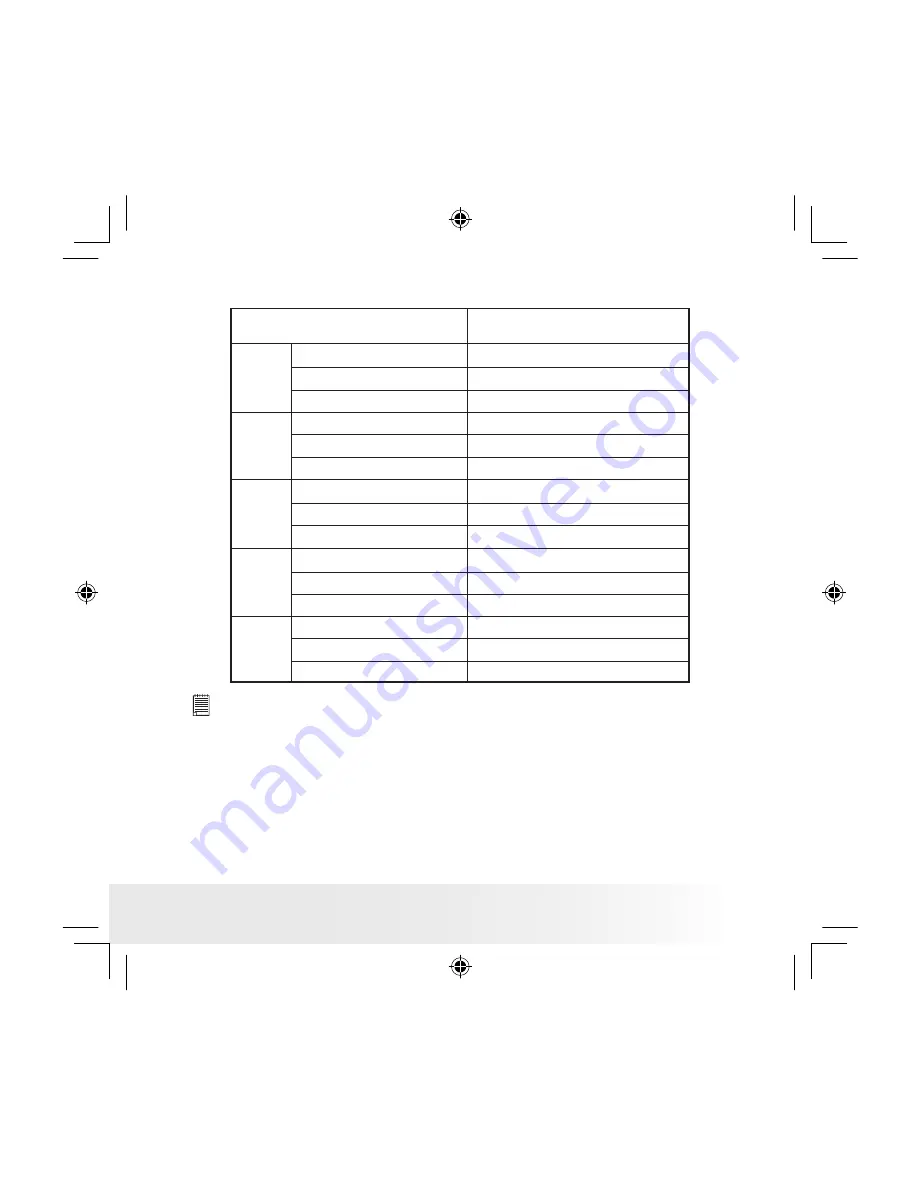
• Capacity of SD Cards

8MB

16MB

32MB

64MB

128MB

SD

Pictures can be taken

Super High 1280 X 960

High 800 X 600

Normal 640 X 480

Super High 1280 X 960

High 800 X 600

Normal 640 X 480

Super High 1280 X 960

High 800 X 600

Normal 640 X 480

Super High 1280 X 960

High 800 X 600

Normal 640 X 480

Super High 1280 X 960

High 800 X 600

Normal 640 X 480

Approx. 11
Approx. 57
Approx. 115
Approx. 21
Approx. 113
Approx. 229
Approx. 49
Approx. 238
Approx. 479
Approx. 98
Approx. 477
Approx. 958
Approx. 202
Approx. 972
Approx. 1947

  NOTE:


Scene  complexity  affects  a  picture’s  file  size.  For  example,  a  picture  of 

trees in autumn has a larger file size than a picture of blue sky at the same 

resolution  and  quality  setting.  Therefore,  the  number  of  pictures  you  can 

store on a card may vary.

PDC 1075 US UM BF.indd

4/30/03, 4:21 PM

45

Содержание PhotoMAX PDC 1075

Страница 1: ...PDC 1075 Digital Camera User Guide www polaroid digital com PDC 1075 US UM BF indd 4 30 03 4 20 PM 1 ...

Страница 2: ...lash 2 Lens 3 Hand strap holder 4 Viewfinder 3 4 2 1 1 Status LED 2 Viewfinder 3 LCD screen 4 OK button 5 Menu button 6 Power button 7 Left button 8 Down button 9 Reset button 10 Right button 11 Up button 12 Capture Playback selector 1 2 4 5 6 7 8 10 11 3 9 12 PDC 1075 US UM BF indd 4 30 03 4 20 PM 2 ...

Страница 3: ...ww polaroid digital com 1 SD card slot 2 USB port 3 Shutter button 2 3 1 Camera Top Camera Bottom 1 Docking station 2 Status LED 2 1 Docking Station Front View 1 USB port on Docking station Docking Station Back View 1 PDC 1075 US UM BF indd 4 30 03 4 20 PM 3 ...

Страница 4: ...ing the Beep Sound On and Off 12 3 Taking Pictures 13 Taking a Picture 13 Taking Continuous Pictures 14 Setting the 2X Digital Zoom 15 Setting Flash Mode 16 Setting Brightness 17 Setting Exposure Compensation 18 Setting the Image Quality 19 Setting Self timer 20 4 Recording Video Clips 21 Recording Video Clips 21 5 Playback of Pictures and Video Clips 22 Turning Picture Video Clip Information Disp...

Страница 5: ... Mass Storage WDM 36 Connecting to Your Computer 37 Transferring and Viewing the Pictures and Video clips on PC 37 Transferring and Viewing the Pictures and Video clips on Mac 38 9 Using the Camera as a Web Cam 39 Setting up NetMeeting 39 Starting NetMeeting 39 10 Troubleshooting Problems 40 Troubleshooting 40 11 Getting Help 42 Online Services 42 Customer Support 42 ArcSoft Software Help 42 12 Ap...

Страница 6: ...ternal memory or a SD card Playback pictures and video clips on the LCD screen or a computer Send the pictures and video clips over the Internet to family and friends Camera Package Contents Pouch The CD ROM includes Polaroid PDC 1075 Camera Driver ArcSoft PhotoImpression PC MicroSoft NetMeeting PC Adobe Acrobat Reader PC Mac Hand Strap USB Cable Registration Card Digital Imaging Products 201 Burl...

Страница 7: ...RTANT Remember to install the driver before recharging battery otherwise the user cannot power on the camera and monitor the Status LED It is normal that the camera is slightly warm while recharging the battery 1 Plug the labelled end of the USB cable into the socket marked on your computer 2 Plug the other end of the USB cable into the USB port on Docking Station The Status LED on Docking Station...

Страница 8: ...uld last for the life of the camera but as is the case with all rechargeable batteries the actual charge held may decline with use Should it ever become necessary to replace the internal battery please visit www polaroid digital com support for service instructions Turning the Camera On and Off Fully press and hold the Power button until the status LED turns green and the camera is on Press and ho...

Страница 9: ...ngs are active If the feature icon is not displayed it means that particular feature is not activated Self timer Picture Quality Camera Status Low Battery Other Features Super High High Pictures can be taken Estimated no only Half Battery A Auto Flash Mode Flash Mode on Flash Mode off Video Mode Continuous Picture Mode Normal Framing Mark Full Battery PDC 1075 US UM BF indd 4 30 03 4 20 PM 9 ...

Страница 10: ...he Power save setting according to the following steps Turn on the camera and set the Capture Playback selector to Capture mode Press Press Press to select Press Press to confirm Press to select AUTO POWER OFF Press to select items Press to exit Auto power off is automatically disabled under the following condition while the camera is connected to a computer or other external devices We highly rec...

Страница 11: ...ing for around 5 seconds using a paper clip or ball point pen The camera will repower and return to the mode prior to the lock up It is important to note that the camera probably needs to be recharged immediately in order to avoid locking up again Reset button Setting Display Language Under this setting you can select the language you prefer for the LCD screen Turn on the camera and set the Captur...

Страница 12: ...sound on and off in any mode When the Beep sound is turned on the camera will beep when you press the buttons Turn on the camera and set the Capture Playback selector to Capture mode Press Press Press to confirm Press to select BEEP SOUND Press to select items Press to exit Press to select Press PDC 1075 US UM BF indd 4 30 03 4 20 PM 12 ...

Страница 13: ... you see inside the viewfinder frame For more accurate framing we recommend the user to frame the subject using the LCD screen Taking a Picture 1 Turn on the camera 2 Set the Capture Playback selector to Capture mode 3 Frame your subject using the LCD screen or viewfinder 4 Press the Shutter button to take a picture Hold the camera steady and a beep sounds when the picture has been taken The LCD s...

Страница 14: ...reen hold down the Shutter button to record continuous pictures You can capture 4 continues pictures each time The capture mode returns to Still Picture automatically after taking continuous pictures Please remember to set the capture mode to Continuous Pictures before taking continuous pictures NOTE The flash does not fire during the continuous mode The number of continuous pictures you can take ...

Страница 15: ...e picture at a time For the digital zoom feature the viewfinder may not reflect the actual image taken We recommend the user to use LCD screen to monitor the zoom feature You can zoom in the subject up to 2X size before the picture is taken 1 Turn on the camera 2 Set the Capture Playback selector to Capture mode 3 Press Up button to zoom in 4 Press Down button to zoom out 5 Press the Shutter butto...

Страница 16: ...es automatically as needed Use this setting to take most pictures Flash on The flash fires for every picture Use this setting indoors in low light Flash off The flash does not fire Use this setting for outdoor pictures or where flash is prohibited or may be distracting Also use when shooting toward a reflective surface such as a window or mirror If you do not have enough light when using this sett...

Страница 17: ...screen to suit your needs Turn on the camera and set the Capture Playback selector to Capture mode Press Press to select Press Press to select items Press NOTE When super bright is selected When bright is selected When normal is selected NOTE This feature is available in both Capture and Playback modes PDC 1075 US UM BF indd 4 30 03 4 20 PM 17 ...

Страница 18: ...e Playback selector to Capture mode Press to select EXPOSURE Press Press to select Press Press to confirm Press to increase or decrease EV value Press to exit Press NOTE A higher EV value is best used for light colored subjects and backlit subjects A lower EV value is best for dark colored subjects and for shooting outdoors on a clear day When shooting under very dark or very bright conditions you...

Страница 19: ...e camera and set the Capture Playback selector to Capture mode Press to select IMAGE QUALITY Press Press to select Press Press to confirm Press to select items Press to exit Press Here are the approximate number of pictures you can expect the camera to hold at each setting Resolution 1280 X 960 Super High Approximately 20 pictures Resolution 800 X 600 High Approximately 110 pictures Resolution 640...

Страница 20: ... will be recorded after 10 seconds Turn on the camera and set the Capture Playback selector to Capture mode Press to select Press Press to select Press to confirm The Status LED flashes to indicate that the countdown is being performed it flashes quicker and the camera beeps after 8 seconds The long beep sounds indicates the picture is successfully taken The self timer turns off automatically afte...

Страница 21: ...he following setting The icon is shown on the LCD screen when the setting is done 4 Frame your subject using the LCD screen 5 Press to zoom in or out 6 Press the Shutter button to start video recording The resolution is set to 320x240 pixel and a counter appears on the top right corner of the LCD screen while recording Press the Shutter button again if you want to stop The capture mode returns to ...

Страница 22: ... and the number of pictures video clips being displayed it appears on the LCD screen when you review pictures or video clips You can choose not to show the Information Display through the following steps Turn on the camera and set the Capture Playback selector to Playback mode Press Press to select Press to confirm Press to select Press NOTE The Information Display will turn on after the camera tu...

Страница 23: ...ppears on LCD screen The total number of pictures and video clips The order of the picture video clip being displayed NOTE The video clip is identified with an icon Reviewing the Pictures 1 Turn on the camera 2 Set the Capture Playback selector to Playback mode 3 Press Left Right button to view the pictures taken PDC 1075 US UM BF indd 4 30 03 4 20 PM 23 ...

Страница 24: ...u can zoom the picture you selected The scale of the zoom is 2X Turn on the camera and set the Capture Playback selector to Playback mode Press Press to select Press Press to select Press to confirm Press Press to move the rectangle to select the area you want to enlarge then press to confirm Press again to exit PDC 1075 US UM BF indd 4 30 03 4 20 PM 24 ...

Страница 25: ...mode Press to select Press Press to confirm Press to select Press Use the to select a picture then press to have a large view Playing the Video Clip 1 Turn on the camera 2 Set the Capture Playback selector to Playback mode 3 Use Left Right button to select the video clip you want to play 4 Press OK button to start playing and press OK button to stop NOTE Icon is shown on the LCD screen when a vide...

Страница 26: ...et the Capture Playback selector to Playback mode Use Left Right button to choose a picture video clip you want to delete Please note that an icon appears on the LCD screen when a video clip is selected Press Press to select Press Press to confirm Press to select YES Press to select CURRENT Press PDC 1075 US UM BF indd 4 30 03 4 21 PM 26 ...

Страница 27: ...Clips You can delete all pictures and video clips in the internal memory or SD card through this setting Turn on the camera and set the Capture Playback selector to Playback mode Press Press Press to select Press Press to confirm Press to select YES Press to select ALL PDC 1075 US UM BF indd 4 30 03 4 21 PM 27 ...

Страница 28: ...or removing a memory card Be sure to orient the card correctly when inserting it Never try to force a memory card into the slot when you feel resistance SD memory cards have a write protect switch which you can use to protect against accidental deletion of picture data Note however if you write protect a SD memory card you must remove write protection whenever you want to record to it format it or...

Страница 29: ...ard turn off your camera gently push the SD card inwards and then release it for the SD card to eject from the SD card slot IMPORTANT Never insert any other objects besides a SD memory card into the camera s card slot Doing so creates the risk of damaging the camera and card Should water or any foreign objects ever get into the card slot immediately turn off the camera and contact your dealer or t...

Страница 30: ... to confirm Press to select YES Press to select REFORMAT Press After the memory storage is formatted the message NO PICTURE appears on the camera LCD screen IMPORTANT You can format a memory card on the camera or on a computer However formatting a memory card on a computer takes much longer Note that the data deleted by a format operation cannot be recovered Make sure you do not have any useful da...

Страница 31: ...r media MO disc computer hard drive etc 3 If a memory card starts to behave abnormally you can restore normal operation by formatting it However we recommend that you always take along with more than one memory card whenever using the camera far away from the home or office 4 We recommend that you format a memory card before using it for the first time after purchasing it or whenever the card you ...

Страница 32: ...er English Windows OS This camera can perform as a Web camera Users must install the camera driver for proper operation For Windows 98SE Users Windows 98SE Mass Storage function needs to install the PDC 1075 Driver For Windows ME 2000 XP Users Directly plug in the camera to transfer and play the pictures and video clips NOTE Microsoft NetMeeting is already bundled with Windows 2000 and XP OS Users...

Страница 33: ...t appear after loading the CD then you can manually start it by double clicking the My Computer Icon on your desktop then double clicking the icon for the CD ROM drive When the CD ROM window opens double click the INSTALL E EXE icon For Macintosh Users MAC NOTE Directly plug in the camera to transfer and navigate the pictures video clips no need to install the driver 1 Before you begin close all o...

Страница 34: ...lendars frames and fantasy templates ArcSoft PhotoImpression also includes a wide variety of printing options Microsoft NetMeeting Web Cam software NetMeeting provides the most complete conferencing solution for the Internet and corporate intranet Powerful features let you communicate with both audio and video collaborate on virtually any Windows based application exchange graphics on an electroni...

Страница 35: ...um II 333MHz or equivalent processor 64MB RAM 128MB recommended USB Port 200MB free disk space Color monitor with high color 16 bit graphic capability or higher CD ROM drive Standard mouse and keyboard Stereo speakers For Macintosh Users MAC PowerPC Processor Mac OS 9 2 X USB Port 64MB RAM 128MB recommended 150MB Free disk space Color monitor with high color 16 bit graphic capability or higher CD ...

Страница 36: ...ode as a driver type in this camera Mass Storage HDD allows the camera to become an external hard disk drive HDD and you may view or download pictures and video clips stored in your camera s internal memory or a SD memory card onto your computer While WDM Driver PC Mode allows you to view pictures and to take video clips on your computer You can choose the Mass Storage WDM by following procedures ...

Страница 37: ... For further detail refer to Using Docking Station on page 7 For Windows Users PC Transferring and Viewing the Pictures and Video Clips on PC 1 Turn on the camera 2 Set the Driver Type to Mass Storage mode 3 Connect the camera to a computer via the USB cable 4 Double click on My Computer icon on your Windows desktop Then you can see a Removable Disk drive 5 Double click Removable Disk double click...

Страница 38: ... to Mass Storage mode 3 Connect the camera to a MAC via the USB cable the systems will automatically recognize the MASS STORAGE drive System will automatically create a Mass Storage named untitled NOTE This Drive name will vary on different versions of MAC OS systems 4 Double click the folder untitled double click DCIM double click 100MEDIA 5 You can copy the pictures and video clips from the 100M...

Страница 39: ...ed to your audio card s Mic in and line out jack respectively Start NetMeeting NOTE For Windows XP 2000 users who use NetMeeting for the first time Go to Start Run type in conf click OK and then follow the on screen set up instruction to set up NetMeeting 1 Double click the NetMeeting icon on the desktop or select the NetMeeting icon from the Windows Start Menu 2 If you need further help on how to...

Страница 40: ...he auto installation file is switched to off or The CD ROM is disconnected Go to the computer desktop Right click on My Computer Click Properties Select Device Manager Double click on CD _ ROM double click on CD R normally the manufacturer s name Click on Settings Ensure both Auto insert notification and disconnect are selected If you change the settings the computer will ask you to restart your P...

Страница 41: ...ra I cannot communicate with NetMeeting successfully Camera does not set to WDM Set the camera to WDM Symptom Problem Solution The user cannot delete the images on the camera through the computer The computer needs 1 2 minute s for the data processing The user has to wait for 1 2 minute s for data process ing before disconnecting the camera from the computer Built in Li polymer rechargeable batter...

Страница 42: ...pport arcsoft com toll free number Fax 1 510 440 1270 E mail support arcsoft com For China For Japan ArcSoft China Support Center Beijing ArcSoft Japan Support Center Tokyo Tel 8610 6849 1368 Tel 81 03 3834 5256 Fax 8610 6849 1367 Fax 81 03 5816 4730 E mail china arcsoft com Web http www mds2000 co jp arcsoft E mail japan arcsoft com and support mds2000 com For Oceania For Europe Middle East ArcSo...

Страница 43: ... Super High Approx 20 pictures Resolution 800 X 600 High Approx 110 pictures Resolution 640 X 480 Normal Approx 224 pictures Self Timer 10 seconds Video Clip Frame rate Approx 15 fps video clip 320 X 240 Approx 15 fps PC camera 320 X 240 Length Approx 60 seconds per video clip Unlimited when connected to computer via USB cable File Format Still Image Compression in JPEG format Video Clip AVI Forma...

Страница 44: ...USB SD card slot Auto Power Off 1 minute 3 minutes OFF Power Supply USB Port Li polymer rechargeable battery non replaceable User can recharge the battery approximately 250 280 times Power Consumption Approximately 60 minutes of continuous usage or approximately 200 images without using flash light Operating System For Windows Users Microsoft Windows 98SE Me 2000 or XP For Macintosh Users Mac OS 9...

Страница 45: ...igh 800 X 600 Normal 640 X 480 Super High 1280 X 960 High 800 X 600 Normal 640 X 480 Approx 11 Approx 57 Approx 115 Approx 21 Approx 113 Approx 229 Approx 49 Approx 238 Approx 479 Approx 98 Approx 477 Approx 958 Approx 202 Approx 972 Approx 1947 NOTE Scene complexity affects a picture s file size For example a picture of trees in autumn has a larger file size than a picture of blue sky at the same...

Страница 46: ...s accessories into any fluid or liquid ALWAYS disconnect the Camera from your PC or TV before cleaning it ALWAYS remove dust or stains with a soft cloth dampened with water or neutral detergent NEVER place hot items on the surface of the Camera NEVER attempt to open or disassemble Camera as this will affect any warranty claim Uninstalling the Camera Driver PC 1 Unplug the camera to PC 2 Go to Wind...

Страница 47: ...es uses and can radiate radio frequency energy and if not installed and used in accordance with the instructions may cause harmful interference to radio communications However there is no guarantee that interference will not occur in a particular installation If this equipment does cause harmful interference to radio or television reception which can be determined by turning the equipment off and ...

Страница 48: ...r Guide www polaroid digital com Distributed by SPECTRA MERCHANDISING INTERNATIONAL INC Chicago Industry Tech Park 4230 North Normandy Avenue Chicago Illinois 60634 USA E mail Address spectra interaccess com PDC 1075 US UM BF indd 4 30 03 4 21 PM 48 ...

Страница 49: ...US 0403 Part No OM837601 R2 Printed in China PDC 1075 US UM BF indd 4 30 03 4 21 PM 49 ...

Отзывы: