background image

8

Polaroid PDC 3370 Digital Camera User Guide

www.polaroid-digital.com

9

Polaroid PDC 3370 Digital Camera User Guide
www.polaroid-digital.com

• Charging the Battery

One piece Lithium Ion rechargeable battery is supplied with the product. 

Please  fully  charge  the  battery  for  up  to  ten  hours  before  you  use  the 

battery  for  the  first  time  after  purchase,  and  it  takes  about  4  hours  to 

fully recharge the battery. Use the power cord and the battery charger to 

charge the battery.

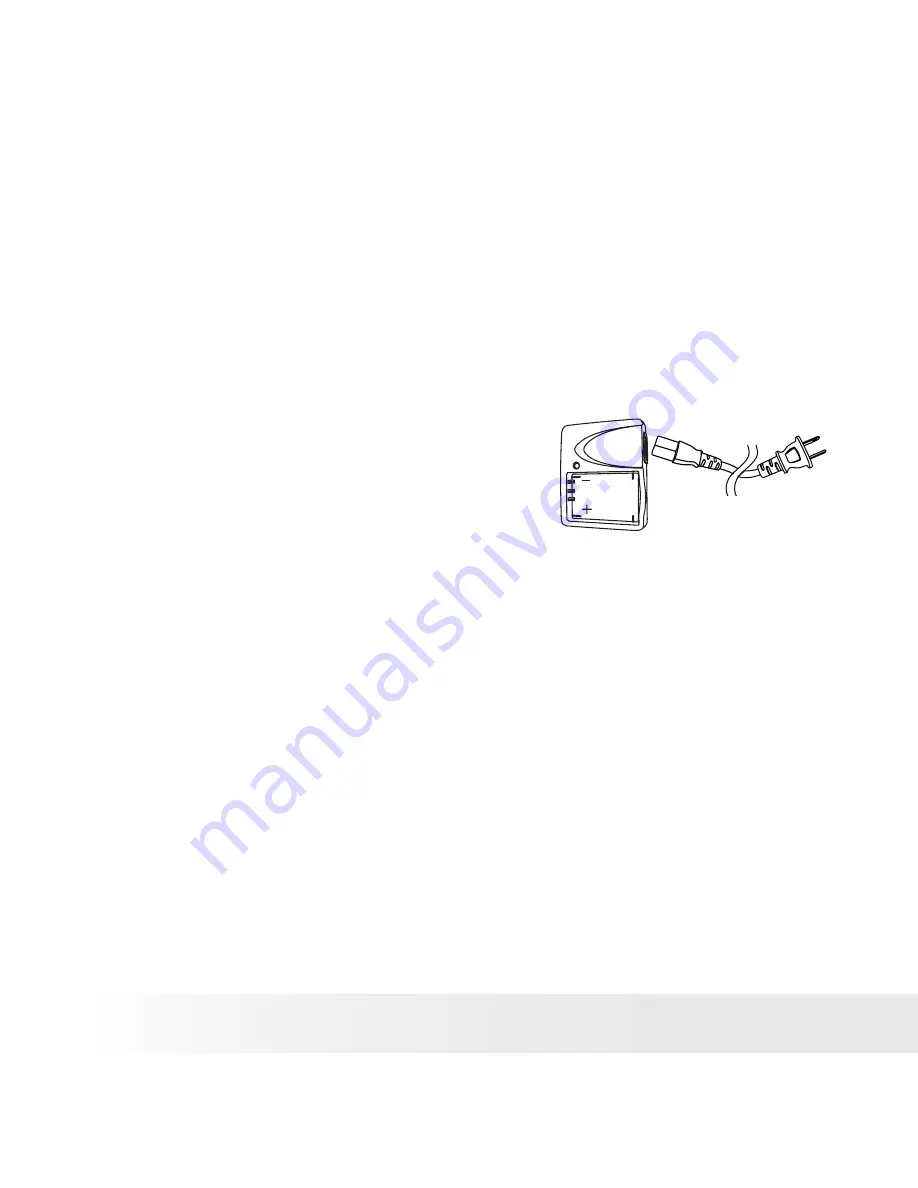
1. Install  the  battery  into  the  battery  charger  as  shown,  ensuring  you 

follow the +/- signs correctly.

2. Plug  the  end  of  the  power  cord  into 

the socket on the battery charger, and 

then  connect  the  power  cord  to  the 

household  power  outlet.  The  charge 

indicator  lights  red  while  charging  and 

changes  to  green  when  the  battery  is 

charged. 

The rechargeable battery should last for the life of the camera, but as is 

the case with all rechargeable batteries the actual charge held may decline 

with use. Should it ever become necessary to replace the battery, please 

visit www.polaroid-digital.com/support/ for service instructions. 

Содержание PDC 3370

Страница 1: ...PDC 3370 Digital Camera User Guide www polaroid digital com ...

Страница 2: ...3 Neck strap holder 4 Microphone 5 Zoom lens 6 Self timer LED 7 Auto Focus LED 8 Viewfinder 1 Power LED 2 Viewfinder 3 Operation LED 4 LCD screen 5 Display button 6 Menu button 7 Joystick Ok button 8 Zoom in button 9 Zoom out button 5 1 2 3 4 6 7 8 9 Back View 1 Zoom lens 2 Speaker 3 Power button 4 Shutter button 5 Mode dial Top View 5 1 2 3 4 ...

Страница 3: ...w polaroid digital com 1 Battery SD card door 2 Tripod mount 3 Docking socket 1 2 3 Bottom View 1 Cover for USB port DC jack 1 Side view 1 Charging LED 2 DC jack 3 Cover for TV out and USB port 4 Power LED 5 Socket 1 2 3 4 5 Docking Station optional ...

Страница 4: ...tup Mode Menu 15 Setting Date and Time 15 Setting Auto Power Off 17 Setting the Sound Effect On Off 18 Setting the Display Language 18 Restoring the Factory Settings 18 Switching the Information Display and LCD Screen on and off 19 3 Taking Pictures 20 Taking Pictures in Still Image Mode 20 Taking Pictures in Macro Mode 21 Taking Continuous Pictures 22 Quick view 22 Using the Flash 23 Setting Self...

Страница 5: ...al with the docking station 44 6 Using SD Card 45 Using the SD Secure Digital Card 45 About DPOF 49 P I M PRINT Image Matching 51 7 Installing the Software into a Computer 52 Installing the Software 52 Software Included with Your Camera 53 Computer System Requirements 54 8 Transferring Pictures To Your Computer 55 Connecting the Camera to Your Computer 55 Transferring Pictures and Video Clips to a...

Страница 6: ...audio clips Here are a few examples of what you can do with your camera Enjoy point shoot operation Adjust the resolution for print or email white balance and exposure compensation to suit light conditions Store pictures video and audio clips to the internal memory or a SD card Playback of pictures video and audio clips on the LCD screen or a computer Send the pictures video and audio clips over t...

Страница 7: ...tage Pouch PDC 3370 Rechargeable Battery USB Cable Neck Strap The CD ROM includes PDC 3370 Driver PC PhotoImpression 4 0 PC Mac Adobe Acrobat Reader PC Mac User Guide in PDF Format AC Adaptor optional Battery Charger Power Cord Video Cable optional Docking station optional PDC 2350 Quick Start Guide Guide de Démarrage rapide Guida Rapida Guía Rápida de Inicio Guia de Início Rápido ML 0403 Part no ...

Страница 8: ...tall the battery into the battery charger as shown ensuring you follow the signs correctly 2 Plug the end of the power cord into the socket on the battery charger and then connect the power cord to the household power outlet The charge indicator lights red while charging and changes to green when the battery is charged The rechargeable battery should last for the life of the camera but as is the c...

Страница 9: ...ow the signs that are shown on outside of the battery door 3 Push the battery in the slot till the blue tab locks it into place 4 Close the battery door by pressing it downwards then slide it back to lock 5 To remove the battery slide the blue tab towards the battery door hinge and pull the battery pack out PDC 3370 PDC 3370 You can use both the rechargeable battery and an AC adaptor DC 5V 1A to s...

Страница 10: ...ing Pictures and Video Clips on a TV on page 44 for details Using the docking station as a battery charger 1 Install the battery into the camera 2 Plug the camera into the docking station 3 Plug the end of the AC adaptor into the DC jack on the docking station and connect the adaptor to a household power outlet When plugged in the docking station the camera will automatically turn off The docking ...

Страница 11: ...wer button Checking the Battery Level Check the battery power level before taking pictures 1 Turn the Mode dial to or then turn on the camera 2 Check the battery power status that appears on the LCD screen Battery has adequate power Only half of the battery power left Battery power is low The warning Battery too low to take a picture or Battery low AF not allowed may appear on the LCD screen Batte...

Страница 12: ...Connect the adaptor as shown to power the camera from a household power outlet The camera automatically switches over to the AC adaptor powered operation when connecting with the AC adaptor and the icon will appear on the LCD screen IMPORTANT Only use the AC 5V output adaptor We recommend users to use the AC adaptor to power the camera when connected to a computer ...

Страница 13: ...tures mode Hold steady Zoom status bar on page 24 Focus mark Best Better Basic Resolution on page 26 Scene on page 32 Auto Night Portrait Night portrait Landscape Sport ISO Speed on page 35 Auto 100 200 VGA 1 3M 3 0M 5 5M Spot Centre Matrix Metering on page 34 EV adjust on page 29 2 0 1 5 1 0 0 5 0 0 5 1 0 1 5 2 0 A Auto Flash Flash On Flash Off Red eye Flash mode indicator on page 23 White Balanc...

Страница 14: ... while the subject is 6 to 23 5 inches 15 to 60cm from the camera Playback Mode Use this mode to playback of or delete pictures video and audio clips stored in the camera s internal memory or a SD card Video Mode Use this mode to record video clips Setup Mode Under this mode you can access the Setup menu to customize your camera settings How to Navigate Menus Use the Joystick OK button to select o...

Страница 15: ...ww polaroid digital com Setup Mode Menu Date and Time Slide show order TV out Language Sound effect Restoring Auto power off DPOF Setting the Date and Time Turn the Mode dial to then turn on the camera Setting the Time Press Switch to Press Switch to ...

Страница 16: ...d digital com Setting the Date Press Press Switch to Switch to Switch to Switch the Joystick towards to select a field such as year month day hour minute Switch the Joystick towards to adjust the value in each field Press the OK button after all fields are set ...

Страница 17: ...setting is 5 minutes Never The power saving function is not active You can change the power saving setting according to the following steps Turn the Mode dial to then turn on the camera Press Switch to NOTE Auto power off is automatically disabled under any one of the following conditions While the camera is recording video or audio clips While the camera is running a slideshow While the camera is...

Страница 18: ...the camera Press Switch to Setting the Display Language Under this setting you can select the language you prefer for the LCD screen Turn the Mode dial to then turn on the camera Press Switch to Restoring the Factory Settings You can easily change all the settings that you have made back to the camera default settings by the following steps Turn the Mode dial to then turn on the camera Press Switc...

Страница 19: ...isplay button the third time will turn off the LCD screen Press it once more will turn on the information display and the LCD screen Display button Press Press LCD screen on Information display on LCD screen on Focus mark and Zoom status bar on other icons off LCD screen off information display off Press Press LCD screen on Information display off NOTE This feature is available in Video Still imag...

Страница 20: ...lens Wide angle 18 inches to infinity 45 7 cm to infinity Telephoto 23 5 inches to infinity 60 cm to infinity NOTE Most settings are saved by the camera when the power is turned off so that the same setting is automatically available when the power is turned on again Make sure you verify your settings when turning the camera on again Shutter button 1 Turn the Mode dial to then turn on the camera 2...

Страница 21: ...e a tripod when not using the flash The Operation LED blinks in red while the camera is processing the picture just taken You can take the next picture when the Operation LED stops blinking and turns off IMPORTANT We strongly recommend the user to take a picture after the focus mark turns green Taking Pictures in Macro Mode Use this mode to capture subjects this close to the lens 6 to 23 5 inches ...

Страница 22: ...stick to repeatedly until the icon appears on the LCD screen The Continuous pictures mode turns off automatically after taking the pictures NOTE The number of continuous pictures you can take depends on the memory available and resolution setting Quick view You can take a quick view of the picture just taken by pressing the OK button This function enables you to delete the pictures you do not like...

Страница 23: ...es Flash Mode On The flash fires for every picture Use this setting in high contrast situations to provide fill light or use it indoors in low light Flash Mode Off The flash does not fire Use this setting for outdoor pictures or where flash is prohibited or may be distracting or when shooting toward a reflective surface such as a window or mirror If there is not enough light when using this settin...

Страница 24: ...econds before the picture is taken Zoom Feature There are two types of zoom in this camera optical zoom and digital zoom Optical zoom alters the focal distance of the lens zoom and its factor range is 1X to 3X Digital zoom is activated after you reach the maximum optical zoom 3X It enlarges the part of the image at the centre of the image screen Digital zoom factor range is 1X to 4X These zoom fea...

Страница 25: ...cal zoom to digital zoom when it reaches the maximum optical zoom indicated with a T where it stops momentarily Keep the zoom button pressed and the zoom will switch over to digital zoom White Square Optical Zoom Digital Zoom 3 Now you can take pictures or record video clips under the zoom setting you just made The zoom setting will remain after taking pictures or recording video clips If you want...

Страница 26: ...ends on the JPEG file compression that the camera applies when the picture is taken Higher resolution and less compression make better quality which occupies more memory space Smaller size pictures with normal quality are easier to email while larger size with fine quality are better for printing To change the resolution setting Turn the Mode dial to or then turn on the camera Press Press Press Sw...

Страница 27: ... digital com To change the quality setting Turn the Mode dial to or then turn on the camera Press Press Press Switch to Switch to Best Low compression and largest file size Better Medium compression and high quality Basic High compression but smallest file size ...

Страница 28: ...ality pictures can be taken Basic quality pictures can be taken 141 8 15 35 176 10 19 44 356 20 38 88 NOTE Scene complexity affects a picture s file size For example the file size of a picture with trees in autumn is larger than that of the blue sky at the same resolution and quality setting Therefore the number of pictures you can store in the camera internal memory or a memory card may vary The ...

Страница 29: ...result when shooting with backlighting indirect indoor lighting and a dark background etc Turn the Mode dial to or then turn on the camera Press Press Press Switch to Switch to NOTE A higher EV value is better used for light coloured and backlit subjects A lower EV value is better for dark coloured and shooting outdoors on a clear day When shooting under very dark or very bright conditions you may...

Страница 30: ...r the type of lighting that is available Turn the Mode dial to or then turn on the camera Press Press Press Switch to Switch to When shooting under these conditions Select this setting AUTO Normal conditions Camera adjusts white balance automatically Outdoor daylight Shade Indoors illuminated by light bulbs Indoors illuminated by fluorescent lighting Tungsten Shade Sun Fluorescent Icons shown on L...

Страница 31: ... dial to or then turn on the camera Press Press Press Switch to Switch to Normal Use when no special effect is needed Ideal for everyday pictures High Increase contrast on the edges of the image Ideal when you want to improve the clarity of an image or if you later may want to crop or cut out specific areas in the picture Low Soften the edges of the image creating a soft focus effect ...

Страница 32: ...ra Press Press Press Switch to Switch to When shooting under these conditions Select this setting AUTO For general picture taking Exposure focus and flash are automatic For night scenes or low lighting conditions For taking portraits For taking subjects that are in motion For distant subjects Sport Portrait Night Landscape Icons shown on LCD For taking portraits at night or in low lighting conditi...

Страница 33: ...n control the colour tones and moods of a picture in this setting Turn the Mode dial to or then turn on the camera Press Press Press Switch to Switch to Normal For taking picures with their original colour Sepia For taking pictures with a brown and antique look B W For taking black and white pictures ...

Страница 34: ...Switch to Switch to Matrix Evaluates the lighting conditions throughout the picture to give an optimum picture exposure Ideal for general picture taking Centre Evaluates the lighting conditions of the subject centred on the LCD screen Ideal for backlit subjects Spot Similar to Centre except the metering is concentrated on a smaller area of the subject centred on the LCD Ideal when an exact exposur...

Страница 35: ...shutter speeds or smaller apertures In a digital camera higher ISO value allows higher shutter speed at the expense of mottled or grain appearing in the final picture You can change the ISO value according to the following steps Set the Mode dial to or then turn on the camera Press Press Press Switch to Switch to 100 200 In the same lighting condition the higher the ISO value is the faster the shu...

Страница 36: ...the LCD screen will decrease while recording video clips Please note that digital zoom function is disabled in Video mode The length of video clip can be recorded Video mode 1 Turn the Mode dial to then turn on the camera 2 Frame your subject using the Viewfinder or LCD screen 3 Press the Shutter button halfway to set the exposure and focus 4 Continue pressing the Shutter button completely down to...

Страница 37: ... LCD Screen 1 Turn the Mode dial to then turn on the camera 2 Switch the Joystick to to scroll and view the pictures taken To zoom the displayed picture When viewing a picture in Playback mode you can zoom in the picture displayed up to 4X by using the Zoom in button and use the Zoom out button to set the zoomined picture back to it is normal scale While using this zoom function you can switch the...

Страница 38: ... Pictures and Video Clips in Thumbnail mode You can view up to 9 pictures and video clips at a time on the LCD screen in Thumbnail mode 1 Turn on the camera in Playback mode 2 Press the Display button once and all icons disappear Press it again and the pictures and video clips will be shown in Thumbnail mode on the LCD screen and the picture latest viewed will be highlit 3 Switch the Joystick to s...

Страница 39: ...ch the Joystick towards to select Voice Memo 5 Switch the Joystick towards to select Record 6 Press the Shutter button to start recording and press it again to stop To play an audio clip 1 Turn on the camera in Playback mode 2 Switch the Joystick towards to select a picture with the icon 3 Press the Menu button 4 Switch the Joystick towards to select Voice Memo 5 Switch the Joystick towards to sel...

Страница 40: ...en The slide show function enables you to view all the pictures and video clips stored in the current storage location one by one To start a slide show Turn the Mode dial to then turn on the camera Press Switch to Press To set the slide show order Turn the Mode dial to then turn on the camera Press Switch to ...

Страница 41: ...ctures and video clips in the menu 1 Turn the Mode dial to then turn on the camera 2 Switch the Joystick to to select a picture video clip to protect or unprotect Press Switch to Press Press Protect Current Protect the selected option Unprotect Current Unprotect the selected option Protect All Protect all the files in the current storage location Unprotect All Unprotect all the files in the curren...

Страница 42: ...delete 3 Switch the Joystick to to delete the selected file 4 Press the OK button to confirm To delete pictures and video clips in the menu 1 Turn the Mode dial to then turn on the camera 2 Switch the Joystick to to select a picture or video clip to delete Press Switch to Press Press Current Delete the selected unprotected option All Delete all the unprotected files in the current storage location...

Страница 43: ...id PDC 3370 Digital Camera User Guide www polaroid digital com Formatting the internal memory Formatting the internal memory erases all data stored in it including the protected files Press Switch to Press Press ...

Страница 44: ...al to then turn on the camera Switch Switch to To connect the camera to a TV When the camera is connected to a TV via the video cable optional the LCD screen will turn off automatically while the TV screen performs as the camera LCD screen 1 Plug the camera into the docking station 2 Connect the docking station with a TV via the video cable optional as illustrated 3 Set the TV to Video mode 4 When...

Страница 45: ...inserting or removing a memory card Be sure to orient the card correctly when inserting it Never try to force a memory card into the slot when you feel resistance SD memory cards have a write protect switch that you can use to protect files from accidental deletion However you must remove the write protection whenever you want to record to it format it or delete its files Files contained in the SD...

Страница 46: ... corner of SD card Removing the SD card To remove the SD card turn off your camera and open the battery door Gently push the SD card inwards and then release it The SD card will eject out from the SD card slot IMPORTANT Never insert any other objects into the camera s card slot Doing so will create the risk of damage to the camera and card slot Should water or any foreign objects ever get into the...

Страница 47: ...rn the Mode dial to then turn on the camera Press Switch to Press Press IMPORTANT You can format a memory card on the camera or on a computer However formatting a memory card on a computer takes much longer time Note that data deleted by formatting operation cannot be recovered Make sure you do not have any useful data currently stored on a memory card before you format it ...

Страница 48: ...k up important data on other media MO disc computer hard drive etc 3 If a memory card starts to behave abnormally you can restore normal operation by formatting it However we recommend that you always take along with more than one memory card whenever using the camera far away from your home or office 4 We recommend that you format a memory card when using it for the first time or whenever the car...

Страница 49: ...rinted Then you can print on a DPOF compatible printer or at a professional print service from the memory card in accordance with the file name and number of copies settings recorded on the card With this camera you should always select images by viewing them on the LCD screen Do not specify images by file name without viewing the file contents PDC 3370 IMPORTANT DPOF print settings can be configu...

Страница 50: ...s Switch to Selecting pictures to be printed 1 Turn the Mode dial to then turn on the camera 2 Switch the Joystick towards to select a picture Press Switch to Press Select Reset to deselect all selected pictures in above operations Press the Menu button to exit and return to normal playback mode NOTE You cannot select video clips under DPOF setting ...

Страница 51: ...ed them See the documentation that came with your printer for full details about PRINT Image Matching Now your digital camera and your printer can speak the same language PRINT Image Matching technology ensures that PRINT Image Matching enabled digital cameras and printers work together perfectly to produce the best possible prints Through this innovative technology the printer is able to instantl...

Страница 52: ... 2000 XP Directly plug in the camera to transfer and play the pictures and video clips There is no need to install the camera driver 1 Before you begin close all other software applications open on your computer 2 Insert the CD supplied into the computer CD ROM Drive 3 The CD User Interface Screen will automatically launch 4 With the mouse click on each software interface button in turn and follow...

Страница 53: ...tware to edit and print the Pictures ArcSoft PhotoImpression 4 0 Picture Editing Software ArcSoft PhotoImpression is an easy to use digital video and image editing program This program enables users to upload still image and movie clips store in your camera You could also edit and retouch your photos then add special effects or place them in cards calendars frames and fantasy templates ArcSoft Pho...

Страница 54: ...r XP Pentium II 333MHz or equivalent processor 64MB RAM 128MB recommended USB Port 200MB free disk space Colour monitor with high colour 16 bit graphic capability or higher CD ROM drive Standard mouse and keyboard Stereo speakers For Macintosh Users MAC PowerPC Processor Mac OS Version 9 2 X USB Port 64MB RAM 128MB recommended 150MB Free disk space Colour monitor with high colour 16 bit graphic ca...

Страница 55: ...B cable into the port on your camera 4 Turn on the camera and an interface New Hardware Found will show on the computer desktop 5 A removable disk drive will be installed onto your computer automatically Connect the camera to your computer via the docking station 1 Plug the camera into the Docking station 2 Plug the labelled end of the USB cable into the socket marked on your computer 3 Plug the o...

Страница 56: ... them to a folder of your choice You can also create sub folders to group them or use the Arcsoft software to edit and manage the pictures or video clips For Macintosh Users MAC NOTE For MAC user directly plug in the camera no need to install the driver 1 Turn on the camera 2 Set the camera to Playback mode 3 Connect the camera to MAC via the USB cable the systems will automatically recognize the ...

Страница 57: ...id PDC 3370 Camera Driver Conflict with another camera driver or capture device If you have another camera installed on your computer remove it and it s driver completely from your system to avoid conflicting with it Camera Driver is not installed You need to install the camera driver for Windows 98SE systems Images do not show on TV Video cable is not connected correctly Make sure the video cable...

Страница 58: ... Or Battery is dead Turn the camera on Or Recharge your battery Image is not recorded when the shutter button is pressed Camera is turned off Or Flash unit is charging Or Memory is full Turn the camera on Or Wait until flash unit charging finishes Or Delete images you no longer need or use another memory card Camera powers off during self timer countdown Battery are dead Recharge your battery LCD ...

Страница 59: ...ry card used by another digital camera I cannot erase pictures All the pictures in memory are protected Unprotected the pictures you want to delete TV out optional with the docking station LCD screen does not appear on the screen of the connected television There is a problem with the camera TV connection Or TV setup is wrong Or Video system is incompatible Use the supplied video cable to connect ...

Страница 60: ...ArcSoft China Support Centre Beijing ArcSoft Japan Support Centre Tokyo Tel 8610 6849 1368 Tel 81 03 3834 5256 Fax 8610 6849 1367 Fax 81 03 5816 4730 E mail china arcsoft com Web http www mds2000 co jp arcsoft E mail japan arcsoft com and support mds2000 com For Oceania For Europe Middle East ArcSoft Australian Support Centre Africa Rest of the World Baulkham Hills New South Wales ArcSoft Europe S...

Страница 61: ...r quality pictures can be taken Basic quality pictures can be taken 141 8 15 35 176 10 19 44 356 20 38 88 Still Image Quality Best 8X compression rate Better 12X compression rate Basic 16X compression rate Self timer 10 seconds Video Clip Limited when using the internal memory 320 X 240 pixel 15fps Approximately 1 minute in QVGA 320 X 240 resolution est 16MB internal memory Using SD card 16 M Appr...

Страница 62: ...1 2 5 inch Zoom Playback mode Digital zoom up to 4X continuous Still image Video modes Digital zoom up to 4X continuous Optical zoom up to 3X continuous Focus Range Normal focus 18 inches to 45cm to Wide 23 5 inches to 60cm to Tele Macro focus 6 23 5 inches 15cm to 60cm The focusing range is the distance from the lens surface to the subject Built in Flash Flash Modes AUTO OFF ON Red eye reduction ...

Страница 63: ...SB SD card slot Auto Power Off 1 3 5 minutes in Capture Playback mode LCD Screen 1 6 TFT colour panel Input Output Terminal USB port Mini B port DC in terminal Power Supply Rechargeable battery included 5V DC Adaptor optional Operating System For Windows Users Microsoft Windows 98SE ME 2000 or XP For Macintosh Users Mac OS Version 9 2 X ...

Страница 64: ...0M 1 3M VGA 5 5M 3 0M 1 3M VGA 5 5M 3 0M 1 3M Better quality pictures can be taken Basic quality pictures can be taken 141 8 15 35 300 18 30 70 610 40 60 140 1230 80 120 290 256M 2800 5600 168 330 300 610 700 1400 VGA 5 5M 3 0M 1 3M 2400 135 240 560 NOTE Scene complexity affects a picture s file size For example the file size of a picture of trees in autumn is larger than that of blue sky at the s...

Страница 65: ...dows 98SE user only because only Windows 98SE needs to install the PDC 3370 driver 1 Open Add Removable Program Properties in Control Panel and select Polaroid Digital Camera program then click Add Remove 2 The following dialogue box appears please click Yes to confirm removing the camera driver 3 The un installation program runs automatically please restart your computer when it is finished ...

Страница 66: ...alance Auto Sharpness Exposure compensation value Normal 0 Scene Auto ISO speed Auto Working Mode Descriptions Default Still Image Mode and Macro Mode 3 0M Auto Setup Mode 5 Min Interval 1Sec Repeat Off Direction Forward NTSC Resolution Flash Auto power off Slide show order Image quality Best TV out optional Language English DPOF Copy 1 Date Off File no Off ...

Страница 67: ...ity non condensing The battery life or image quality may be affected when the camera is operated outside these conditions AC Adaptor The AC Adaptor carries voltage which can be dangerous if live parts are exposed We recommend that you regularly examine the AC adaptor for any breakage NEVER try to repair or open the AC adaptor Camera Cautions NEVER immerse any part of the camera or its accessories ...

Страница 68: ...quipment generates uses and can radiate radio frequency energy and if not installed and used in accordance with the instructions may cause harmful interference to radio communications However there is no guarantee that interference will not occur in a particular installation If this equipment does cause harmful interference to radio or television reception which can be determined by turning the eq...

Страница 69: ...UK 0603 Part No OM3212UK001 ...

Отзывы: