background image

14

Polaroid PDC 3035 Digital Camera User Guide

www.polaroid-digital.com

15

Polaroid PDC 3035 Digital Camera User Guide

www.polaroid-digital.com

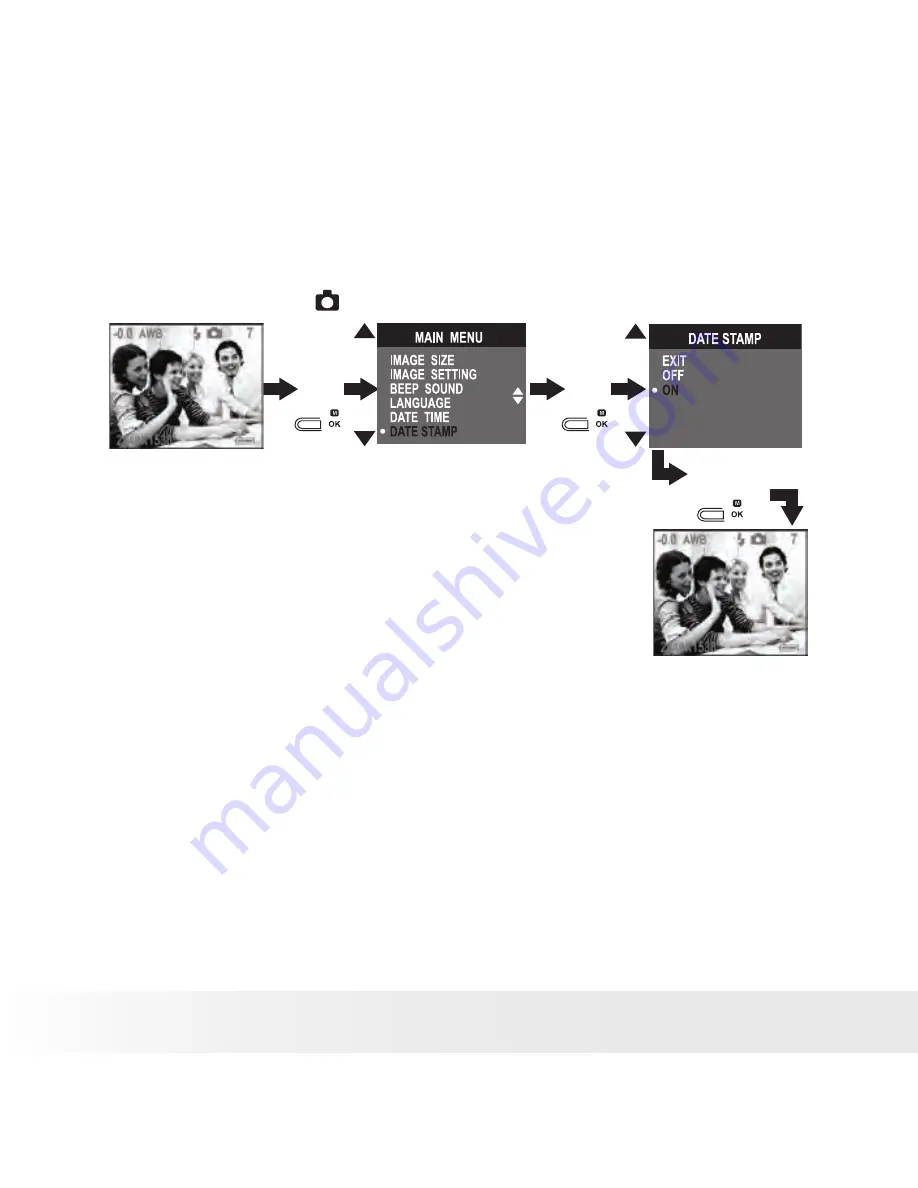
• Setting Date Stamp

Use the Date Stamp setting to imprint the date on your pictures. Make 

sure the camera clock is set to the correct date before setting the Date 

Stamp.

Turn the Mode dial to  , then turn on the camera.

Press

Press

Press

When the date stamp is selected, the pictures taken will have the current 

date  stamped  on  the  bottom  right  corner  while  viewing  them  on  a 

computer or printing them out.

Содержание PDC 3035

Страница 1: ...PDC 3035 Digital Camera User Guide www polaroid digital com ...

Страница 2: ...Hand strap holder 3 Viewfinder 4 Lens 5 Microphone 6 Self timer LED 7 Flash 2 1 3 4 6 7 5 Front View 1 Viewfinder 2 Flash charging LED 3 Speaker 4 Power LED 5 LCD screen 6 Flash Next button 7 Zoom in Down button 8 Zoom out Up button 9 LCD on off Menu OK button 10 Mode dial Rear View 2 4 5 6 7 8 9 10 1 3 ...

Страница 3: ...era User Guide www polaroid digital com 1 Power button 2 Shutter button 3 Mode dial Top View 1 2 3 1 Battery door 2 Tripod mount Bottom View 1 2 1 SMC card door 2 Cover for USB port TV out terminal 3 Hand strap holder Side View 2 3 1 ...

Страница 4: ...ep Sound On and Off 11 Setting the Display Language 12 Setting Date and Time 13 Setting Date Stamp 14 Setting Auto Power off 15 3 Taking Pictures 16 Taking a Picture 16 Using the Flash 16 Zoom In and Out 17 Setting Self timer 18 Setting the Image Resolution 19 Image Setting 20 Setting Frequency 23 4 Recording Video Clips 24 Recording Video Clips 24 5 Reviewing Pictures and Video Clips 25 Reviewing...

Страница 5: ... Pictures 39 Connecting to Your Computer 39 Transferring and Viewing the Pictures and Video Clips on PC 40 Transferring and Viewing the Pictures and Video Clips on MAC 40 9 Using the Camera as a Web Cam PC only 41 Setting up NetMeeting 41 Start NetMeeting 41 10 Troubleshooting Problems 42 Troubleshooting Problems 42 11 Getting Help 44 Polaroid Online Services 44 ArcSoft Software Help 44 12 Appendi...

Страница 6: ...photographer The following are a few examples of how you can use the PDC 3035 digital camera Enjoy point shoot operation Adjust the resolution for print or email white balance and exposure compensation to suit light conditions Store pictures and video clips to the internal memory or a SMC card Playback of pictures and video clips on the LCD screen a TV or computer Send the pictures and video clips...

Страница 7: ...e PC Mac MicroSoft NetMeeting PC Adobe Acrobat Reader PC Mac User Guide in PDF format Registration Card Digital Imaging Products 201 Burlington Road Bedford MA 01730 1434 First Class Postage Required Post Office will not deliver without proper postage Pouch PDC 3035 Quick Start Guide Guide de Démarrage rapide Guida Rapida Guía Rápida de Inicio Guia de Início Rápido ML 0403 Part no OM837657 R1 Prin...

Страница 8: ...se the battery door by pressing it downwards then slide it back to lock Turning the Camera on and off To turn on the camera fully press and hold the Power button until the Power LED lights up in green Press and hold the Power button again then Good Bye will show on the LCD screen and the camera will be off Power button Checking the Battery Level Check the battery power level before taking pictures...

Страница 9: ... not activated Picture Resolution pixel Camera Status Battery Full Battery Empty Other Features 2048 X 1536 1600 X 1200 1280 X 960 Still Image Mode F ON Locked file SMC Card inserted Auto Flash Self timer On Image size Image size Image size Video Mode Flash On Flash Off 2 0 Zoom In 800 X 600 Image size Pictures can be taken F N E L 100MEDIA DSCI0009 00 00 The length of video clip Folder Number of ...

Страница 10: ... of your camera Mode dial Still image Mode Under this mode you can change the image settings and take pictures under the settings you prefer Playback Mode Use this mode to playback or delete pictures video clips stored in the camera s internal memory or a SMC card Video Mode Use this mode to record video clips PC Mode PC Under this mode you can use this camera as a web cam when connected to a PC ...

Страница 11: ...ton for 2 seconds to turn off the LCD screen press and hold it again for 2 seconds will turn on the LCD screen Press and hold 2 Sec Press and hold 2 Sec Setting the Beep Sound On and Off You can turn the beep sound on and off in any mode When the Beep sound is turned on the camera will beep when you press the buttons Turn the Mode dial to then turn on the camera Press Press Press ...

Страница 12: ... Digital Camera User Guide www polaroid digital com Setting the Display Language Under this setting you can select the language you prefer for the LCD screen Turn the Mode dial to then turn on the camera Press Press Press ...

Страница 13: ...ing Date and Time Turn the Mode dial to then turn on the camera Press Press Press Press Press Press the Next button to select a field such as year month day hour minute Press the Up and Down buttons to adjust the value in each field Press the OK button after all fields are set ...

Страница 14: ...ate on your pictures Make sure the camera clock is set to the correct date before setting the Date Stamp Turn the Mode dial to then turn on the camera Press Press Press When the date stamp is selected the pictures taken will have the current date stamped on the bottom right corner while viewing them on a computer or printing them out ...

Страница 15: ...ally after 1 3 5 minute s of inactivity You can change the Auto Power Off setting by the following steps Turn the Mode dial to then turn on the camera NOTE When OFF is selected the LCD will turn off after five minutes Press and hold the OK button for two seconds to turn on LCD Press Press Press You can also set Auto power off in Playback mode ...

Страница 16: ...reen or viewfinder 3 Press the Shutter button to take a picture holding the camera steadily A beep will sound when the picture has been taken Using the Flash Use the flash when you take pictures at night indoors or outdoors in heavy shadows The flash setting can be changed in Still image mode Flash Range 3 3 feet to 6 6 feet 1 m to 2 m In Still image mode press the button repeatedly to scroll thro...

Страница 17: ... flash and Flash on modes the camera fires a brief preflash flash before the regular flash to avoid red glare in your subject s eyes Please hold the camera steady until the second flash has finished otherwise you will get blured images NOTE Flash is not available in Video mode Never touch or block the flash with your fingers Doing so can soil these components and interfere with the correct flash o...

Страница 18: ...t in timer Place the camera on a flat surface or use a tripod when using the Self timer Turn the Mode dial to then turn on the camera Press Press Press Press the shutter button and the camera starts to countdown The camera beeps and the Self timer LED blinks slowly for 6 seconds then quickly for 4 seconds before the picture is taken The Self timer turns off automatically after taking the picture ...

Страница 19: ...camera to hold at each setting based on the 16MB internal memory You can expand the memory with a SMC card please refer to SMC Card Storage Capacities on page 46 for further details F Fine 2048 X 1536 approximately 9 pictures N Normal 1600 X 1200 approximately 25 pictures E Economy 1280 X 960 approximately 27 pictures L Low 800 X 600 approximately 101 pictures NOTE Scene complexity affects a pictu...

Страница 20: ...nge from 1 5EV to 1 5EV in order to compensate for current lighting conditions This setting can be used to obtain better results when shooting with backlighting indirect indoor lighting and a dark background etc Turn the Mode dial to then turn on the camera Press Press Press Press NOTE A higher EV value is better used for light colored and backlit subjects A lower EV value is better for dark color...

Страница 21: ...colour of a subject appear more natural under the type of lighting that is available Turn the Mode dial to then turn on the camera Press Press Press Press Auto Normal conditions Camera adjusts white balance automatically Outdoor Outdoor daylight Shade Shade Light bulb Indoors illuminated by light bulbs Fluorescent Indoors illuminated by fluorescent lighting ...

Страница 22: ...Mode dial to then turn on the camera Press Press Press Press Normal Use when no special effect is needed Ideal for everyday pictures Sharp Increases contrast on the edges of the picture Ideal when you want to improve the clarity of a picture or if you later may want to crop or cut out specific areas in the picture Soft Softens the edges of the picture creating a soft focus effect ...

Страница 23: ...aroid digital com Setting Frequency In order to take a better indoor picture the camera needs to be set to suit the correct lighting frequency For US set the frequency to 60Hz 50Hz for Europe Turn the Mode dial to then turn on the camera Press Press Press ...

Страница 24: ...ixels 1 Turn the Mode dial to then turn on the camera 2 Frame your subject using the LCD screen or viewfinder 3 Press the Zoom in and out buttons to zoom your subject 4 Press the Shutter button completely down to start recording The recording time will appear on the LCD screen 5 Press the Shutter button again to stop recording or recording stops when the current storage location is full NOTE Flash...

Страница 25: ...nd Down buttons to view the pictures taken Index Viewing You can view small thumbnail shots of several images on your LCD screen by selecting the Index Viewing Mode To do that turn the mode dial to then turn on the camera Press Press Press 100MEDIA Thumbnail The camera displays up to nine pictures on the LCD each time Single The camera displays one picture in full screen on the LCD each time ...

Страница 26: ...p you want to playback 3 The LCD screen shows PLAY AVI YES NO when a video clip is selected Press the Up and Down buttons to select YES and press the Menu Ok button to play the video clip Press the Menu Ok button again to stop playing Protecting Pictures and Video Clips from Deletion Turn the Mode dial to then turn on the camera Press Press Press To remove protection repeat the above steps ...

Страница 27: ...DC 3035 Digital Camera User Guide www polaroid digital com Deleting Pictures or Video Clips Turn the Mode dial to then turn on the camera To delete one picture or video clip Press Press Press Press 100MEDIA DSCI0008 ...

Страница 28: ...PDC 3035 Digital Camera User Guide www polaroid digital com To delete all pictures and video clips Press Press Press Press NOTE Protected pictures and video clips cannot be deleted Remove protection before deleting ...

Страница 29: ...The video output signal can be switched NTSC or PAL to accommodate different signal systems For example NTSC for USA Canada Taiwan Japan etc and PAL for Europe Asia excluding Taiwan etc You can change the video output system according to the following steps Turn the Mode dial to then turn on the camera Press Press Press ...

Страница 30: ... performs as the camera LCD screen 1 Connect the camera to the TV using the TV out cable supplied as illustrated 2 Set the TV to Video mode 3 When the camera is set to Playback mode you can review all the pictures and video clips stored in the internal memory or the SMC card on the TV 4 When the camera is set to Still image mode or Video mode you can only preview the subjects on the TV screen TV o...

Страница 31: ...ideo clips to the built in Nand flash memory or delete pictures and video clips from the built in Nand flash memory while a memory card is installed in the camera Memory Card Precautions 1 Use only a SMC memory card with this camera Proper operation is not guaranteed when any other type of cards is used 2 Electrostatic charge electrical noise and other phenomena can cause data corruption or even l...

Страница 32: ...the slot when you feel resistance Inserting a SMC Card not included Turn off the camera and open the SMC card door as illustrated Insert the SMC card ensuring the card is inserted correctly as illustrated On the inner side of the SMC card slot there is a diagram showing the proper insertion orientation Removing a SMC Card not included To remove the SMC card turn off your camera then open the SMC c...

Страница 33: ...rd erases all the pictures and video clips including protected data Removing the SMC card during formatting may damage the card You can format a memory card on the camera or on a computer However formatting a memory card on a computer takes much longer Note that data deleted by formatting operation cannot be recovered Make sure you have no useful data stored on a memory card before formatting it P...

Страница 34: ...use under English Windows OS For Windows 98SE Windows 98SE Mass Storage function needs to install the PDC 3035 Driver For Windows ME 2000 XP Directly plug in the camera to transfer and play the pictures and video clips For PC Users This camera can act as a web camera you must install the Camera Driver if you want to use the camera as a web camera NOTE Microsoft NetMeeting is already bundled with W...

Страница 35: ...llow the on screen instructions Open Close NOTE If the setup screen doesn t appear after loading the CD then you can manually start it by double clicking the My Computer icon on your desktop then double clicking the icon of the CD Rom drive When the CD Rom window open double click the INSTALL E EXE icon For Macintosh Users MAC 1 Before you begin close all other software applications open on your c...

Страница 36: ...ltiple file format support and a lot more For further help on how to use PhotoStudio 4 0 go to Help to access the Help Topics Visit http www arcsoft com for all your FAQ s tips and technical support ArcSoft Funhouse 1 0 Picture Editing Software ArcSoft Funhouse is an image entertainment application that enables users to create picture fantasies by combining their personal pictures with a wide vari...

Страница 37: ...ing tools and a wide selection of templates for frames edges and backgrounds for enhancing images For further help on how to use ArcSoft PhotoPrinter 2000 click the on the top right hand corner to access the Help Topics Visit http www arcsoft com for all your FAQ s tips and technical support Microsoft NetMeeting Web Cam software NetMeeting provides the most complete conferencing solution for the I...

Страница 38: ... XP Pentium II 333MHz or equivalent processor 64MB RAM 128MB recommended USB Port 200MB free disk space Colour monitor with high colour 16 bit graphic capability or higher CD Rom drive Standard mouse and keyboard Stereo speakers For Macintosh Users MAC PowerPC Processor Mas OS Version 9 2 or above USB Port 64MB RAM 128MB recommended 150MB Free disk space Colour monitor with high colour 16 bit grap...

Страница 39: ...refer to 7 Installing the Software onto a Computer For Windows and Macintosh Users PC MAC Connecting to Your Computer Connecting with the USB Cable USB Series Mini B Plug Connects to your PDC 3035 USB Series A Plug Connects to your Computer 1 Turn the Mode dial to or then turn on the camera 2 Plug the labelled end of the USB cable into the USB port marked on your computer 3 Plug the other end of t...

Страница 40: ...o a folder of your choice You can also create sub folders to group them or use the Arcsoft software to manage the pictures For Macintosh Users MAC Transferring and Viewing Pictures and Video clips on Mac NOTE For MAC users directly plug in the camera no need to install the driver 1 Turn the Mode dial to or then turn on the camera 2 Connect the camera to the Mac the systems will automatically recog...

Страница 41: ...ur PC monitor or a flat surface Starting NetMeeting NOTE For Windows XP 2000 users who use NetMeeting for the first time Go to Start Run type in conf click OK and then follow the on screen set up instruction to set up NetMeeting 1 Double click the NetMeeting icon on the desktop or select the NetMeeting icon from the Windows Start Menu 2 If you need further help on how to use Microsoft NetMeeting s...

Страница 42: ...r system to avoid conflicting with your PDC 3035 I cannot upload the images from the internal memory of the PDC 3035 camera to PC The SMC Card is inserted inside the SMC Card slot Remove the SMC card from the card slot Refer to Removing a SMC Card on page 28 for more detail I cannot turn on my PDC 3035 Camera after inserting a SMC Card The SMC Card is not inserted all the way in or card slot door ...

Страница 43: ...d the disconnect are ticked If you change the settings the computer will ask you to restart your PC Click Yes For Windows 98SE only The LCD on My PDC 3035 Camera has frozen when you insert a SMC card into your PDC 3035 camera No response from any of the function buttons Ensure you only use a new or formatted SMC card for your PDC 3035 camera Do not have the NetMeeting function When the camera is c...

Страница 44: ...oft China Support Centre Beijing ArcSoft Japan Support Centre Tokyo Tel 8610 6849 1368 Tel 81 03 3834 5256 Fax 8610 6849 1367 Fax 81 03 5816 4730 E mail china arcsoft com Web http www mds2000 co jp arcsoft E mail japan arcsoft com and support mds2000 com For Oceania For Europe Middle East ArcSoft Australian Support Centre Africa Rest of the World Baulkham Hills New South Wales ArcSoft Europe Suppo...

Страница 45: ... connected to the computer via video capture software Limited when using the internal memory 3 minutes in CIF mode 320 X 240 pixel 10fps est 16MB internal memory Using SMC card 8 M Approx 1 5 Min 16 M Approx 3 Min 32 M Approx 6 Min 64 M Approx 12 Min 128 M Approx 24 Min File Format Still image JPEG format Video Clip AVI format Flash range 3 3 feet to 6 6 feet 1 m to 2 m External Connectors USB por...

Страница 46: ...Insert the batteries with the correct polarity Remove exhausted batteries from the camera immediately Do not short the supply terminals Do not dispose the batteries in fire Remove batteries from the camera when not in use Rechargeable batteries are not recommended These instructions should be retained for future reference SMC Card Storage Capacity F 2048 X 1536 N 1600 X 1200 E 1280 X 960 L 800 X 6...

Страница 47: ...era or its accessories into any fluid or liquid ALWAYS disconnect the Camera from your PC before cleaning it ALWAYS remove dust or stains with a soft cloth dampened with water or neutral detergent NEVER place hot items on the surface of the Camera NEVER attempt to open or disassemble Camera as this will affect any warranty claim Uninstalling the Camera Driver PC only 1 Unplug the camera from the c...

Страница 48: ...quipment generates uses and can radiate radio frequency energy and if not installed and used in accordance with the instructions may cause harmful interference to radio communications However there is no guarantee that interference will not occur in a particular installation If this equipment does cause harmful interference to radio or television reception which can be determined by turning the eq...

Страница 49: ...UK 0903 Part No OM3236UK003 ...

Отзывы: