background image

8

Polaroid PDC 2070 Digital Camera User Guide

www.polaroid-digital.com

9

Polaroid PDC 2070 Digital Camera User Guide

www.polaroid-digital.com

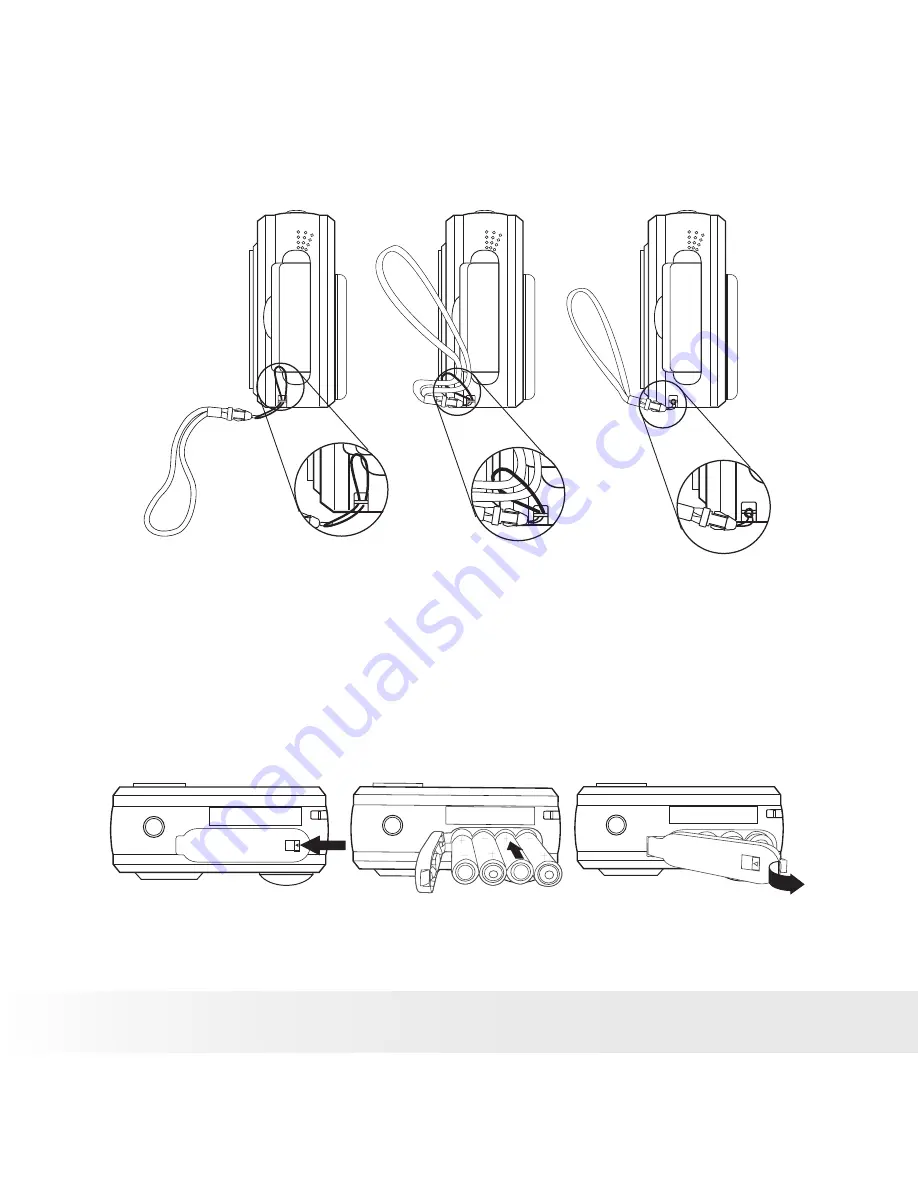
• Attaching the Hand Strap

• Installing the Batteries

4  x  AAA  Alkaline  batteries  are  supplied  with  the  product.  For  more 

guidelines on battery usage, please see 

Using your batteries

.

1.  To open the battery door, slide the button on it.

2.  Insert  the  batteries  as  shown,  ensuring  you  follow  the  +/-  signs 

correctly.

3.  To close the battery door, slide the button and press the battery door 

back to position and then release the button.

Содержание PDC 2070

Страница 1: ...PDC 2070 Digital Camera User Guide www polaroid digital com...

Страница 2: ...roid digital com Product Overview 1 Flash 2 Lens 3 Self timer LED 4 USB port 5 Viewfinder 2 1 3 4 5 1 Status LED 2 Viewfinder 3 LCD screen 4 Menu OK button 5 Up button 6 Down button 7 SMC slot 8 Power...

Страница 3: ...2070 Digital Camera User Guide www polaroid digital com 1 Flash Previous button 2 Quality Next button 3 Shutter button 1 2 3 1 Battery compartment 2 Hand strap holder 3 Tripod mount 1 2 3 1 SMC slot 2...

Страница 4: ...f Saves Battery 10 2 Camera Setting 11 Checking Camera Status 11 Setting the Display Language 12 Setting Date and Time 13 3 Taking Pictures 14 Taking a Picture 14 Setting the Picture Quality 14 Settin...

Страница 5: ...irements 38 6 Transferring Pictures Audio and Video Clips To Your Computer 39 Before Transferring Pictures 39 Connecting to Your Computer 39 Transferring and Viewing the Pictures and Video Clips to PC...

Страница 6: ...o the internal memory or a SMC Set Up Select various camera and video recording settings Communicate Use the camera as a web camera What can I do with my Digital Pictures View View pictures on the LCD...

Страница 7: ...ine Batteries USB Cable The CD ROM includes Polaroid PDC 2070 Camera PC ArcSoft Software Suite PC Mac MicroSoft NetMeeting PC Adobe Acrobat Reader PC Mac User Guide in PDF format PDC 2070 Registration...

Страница 8: ...ries are supplied with the product For more guidelines on battery usage please see Using your batteries 1 To open the battery door slide the button on it 2 Insert the batteries as shown ensuring you f...

Страница 9: ...D screen comes on the Status LED will be off Press and hold the Power button again Good Bye will show on the LCD screen and the camera will be off Status LED Power button Checking the Battery Level Ch...

Страница 10: ...a is designed to switch off automatically after 60 seconds default setting of inactivity You can change the Auto Power Off setting by the following steps Turn on the camera set the Mode selector to Ca...

Страница 11: ...uality Camera Status Full Low Other Features High Quality Low Quality 1600 X 1200 1280 X 960 640 X 480 Pictures can be taken Still Picture F ON Lock file F OFF Unlock file SMC Card inserted A Auto Fla...

Страница 12: ...Guide www polaroid digital com Setting the Display Language Under this setting you can select the language you prefer for the LCD screen Turn on the camera set the Mode selector to Capture mode the S...

Страница 13: ...selector to Capture mode the Status LED blinks once Use Previous or Next button to select a field such as year month day hour minute second Use the Up or Down buttons to adjust the value in the field...

Страница 14: ...G file compression that the camera applies when you take the picture Resolution refers to the number of pixel in a digital picture Higher resolution and less compression makes better quality which occ...

Страница 15: ...gh Resolution 1600 X 1200 Fine 8 pictures High Resolution 1600 X 1200 Normal 20 pictures Medium Resolution 1280 X 960 Fine 14 pictures Medium Resolution 1280 X 960 Normal 30 pictures Low Resolution 64...

Страница 16: ...ooting toward a reflective surface such as a window or mirror If you do not have enough light when using this setting your pictures will be too dark A Auto Flash mode the flash fires automatically as...

Страница 17: ...links once Press Press Press The icon appears on LCD screen Press Shutter button to perform self timer A timer appears in the centre of LCD screen and the camera beeps indicating self timer is activat...

Страница 18: ...18 Polaroid PDC 2070 Digital Camera User Guide www polaroid digital com Setting the Date Stamp Turn on the camera set the Mode selector to Capture mode the Status LED blinks once Press Press Press...

Страница 19: ...ing can be used to obtain better result when shooting with backlighting indirect indoor lighting a dark background etc NOTE A higher EV value is best used for light coloured subjects and backlit subje...

Страница 20: ...e balance can help to make the colours of a subject appear more natural under the type of lighting that is available Turn on the camera set the Mode selector to Capture mode the Status LED blinks once...

Страница 21: ...ode selector to Capture mode the Status LED blinks once Press Press Press Press Normal Use when no special effect is needed Ideal for everyday pictures Sharp Increases contrast on the edges of the pic...

Страница 22: ...set the Mode selector to Capture mode the Status LED blinks once Press Press Press Reviewing the Pictures 1 Turn on the camera 2 Set the Mode selector to Playback mode the Status LED blinks once 3 Pre...

Страница 23: ...on enables you to view the picture taken at a better angle Turn on the camera set the Mode selector to Playback mode the Status LED blinks once Press Press Press NOTE This function only keeps the pict...

Страница 24: ...id PDC 2070 Digital Camera User Guide www polaroid digital com Protecting the Pictures from Deletion Turn on the camera set the Mode selector to Playback mode the Status LED blinks once Press Press Pr...

Страница 25: ...te One Picture Turn on the camera set the Mode selector to Playback mode the Status LED blinks once Press Press Press NOTE The protected file s can not be deleted Please note that selecting ERASE ALL...

Страница 26: ...udio and Video Clips Recording Audio Clips 1 Turn on the camera set the Mode selector to Capture mode the Status LED blinks once Press Press Press 2 Press Shutter button to start if you want to stop p...

Страница 27: ...the status LED turns green while recording video clip Playback Video Clips on LCD Screen IMPORTANT Audio clips can only playback in PC MAC when connected to the computer Please refer to Transferring...

Страница 28: ...gital com Protecting Audio Clip s and Video Clip s Protecting Audio Clip s 1 Turn on the camera 2 Set the Mode selector to Playback mode the Status LED blinks once 3 Use Previous or Next button to sel...

Страница 29: ...e www polaroid digital com Protecting Video Clip s 1 Turn on the camera 2 Set the Mode selector to Playback mode the Status LED blinks once 3 Use Previous or Next button to select the video clip you w...

Страница 30: ...Turn on the camera 2 Set the Mode selector to Playback mode the Status LED blinks once 3 Use Previous or Next button to select the video clip you want to delete Press Press Press NOTE The protected fi...

Страница 31: ...et the Mode selector to Playback mode the Status LED blinks once 3 Use Previous or Next button to select the audio clip you want to delete Press Press Press Press NOTE The protected file s can not be...

Страница 32: ...uilt in Nand flash memory while a memory card is installed in the camera NOTE Please refer to Capacity of SMC card section for the number of pictures can be stored in SMC card IMPORTANT Make sure you...

Страница 33: ...ory Turn on the camera set the Mode selector to Playback mode Press Press Press IMPORTANT Formatting internal memory and a SMC erases all the pictures audio and video clips including protected ones Yo...

Страница 34: ...driver but if you want to use NetMeeting function please install the driver first IMPORTANT If the computer requests you to install the Windows operating system during the software installation place...

Страница 35: ...ow the on screen instructions Open Close NOTE If the setup screen doesn t appear after loading the CD then you can manually start it by double clicking the My Computer Icon on your desktop then double...

Страница 36: ...ultiple file format support and a lot more For further help on how to use PhotoStudio 4 0 go to Help to access the Help Topics Visit http www arcsoft com for all your FAQ s tips and technical support...

Страница 37: ...ArcSoft VideoImpression 1 6 Movie Making Software ArcSoft VideoImpression is an easy to use video and image editing software program The program enables users to create and edit new videos using exist...

Страница 38: ...um II 333MHz or equivalent processor 64MB RAM 128MB recommended USB Port 200MB free disk space Colour monitor with high colour 16 bit graphic capability or higher CD ROM drive Standard mouse and keybo...

Страница 39: ...make sure you have installed the software from the CD For Windows and Macintosh Users PC MAC Connecting to Your Computer Connecting with the USB Cable USB Series A Plug Connects to your PDC 2070 USB S...

Страница 40: ...ou can also create sub folders to group them or use the Arcsoft software to edit and manage the pictures or video audio clips For Macintosh Users MAC Transferring and Viewing the Pictures Audio clips...

Страница 41: ...on the other end 3 Put your PDC 2070 on top of your PC monitor or another flat surface 4 In NetMeeting menu go to Tool Option and select Audio tab then click the Tuning Wizard button 5 In the Audio T...

Страница 42: ...creen set up instruction to set up NetMeeting 1 Double click the NetMeeting icon on the desktop or select the NetMeeting icon from the Windows Start Menu 2 If you need further help on how to use Micro...

Страница 43: ...nstall the driver Check the USB controller in your BIOS if they are activated If these do not work contact your national customer support representative Symptom Problem Solution I cannot upload the im...

Страница 44: ...tting Ensure Auto insert notification is ticked and the disconnect is ticked If you change the settings the computer will ask you to restart your PC Click Yes Only for Windows 98SE ME user The LCD on...

Страница 45: ...rcSoft China Support Centre Beijing ArcSoft Japan Support Centre Tokyo Tel 8610 6849 1368 Tel 81 03 3834 5256 Fax 8610 6849 1367 Fax 81 03 5816 4730 E mail china arcsoft com Web http www mds2000 co jp...

Страница 46: ...X 960 pixel Approx 14 pictures 640 X 480 pixel Approx 51 pictures Normal quality 1600 x 1200 pixel Approx 20 pictures 1280 X 960 pixel Approx 30 pictures 640 X 480 pixel Approx 116 pictures Video Clip...

Страница 47: ...Picture Compression in JPEG format after download to PC via USB depend on application used Video Clip AVI format Audio Clip WAV format External Connector USB SMC slot Auto Power Off After 30 60 or 90...

Страница 48: ...960 Low 640x480 High 1600x1200 Middle 1280x960 Low 640x480 High 1600x1200 Middle 1280x960 Low 640x480 8M 16M 32M 64M 128M 8 20 14 30 52 98 16 40 28 61 105 198 32 81 56 122 212 398 65 163 114 245 425 7...

Страница 49: ...f batteries or new and used batteries Use recommended or equivalent type of batteries only Insert the batteries with the correct polarity Remove exhausted batteries from the camera immediately Do not...

Страница 50: ...ts accessories into any fluid or liquid ALWAYS disconnect the Camera from your PC or TV before cleaning it ALWAYS remove dust or stains with a soft cloth dampened with water or neutral detergent NEVER...

Страница 51: ...uipment generates uses and can radiate radio frequency energy and if not installed and used in accordance with the instructions may cause harmful interference to radio communications However there is...

Страница 52: ...UK 0303 Part No OM837464 R3...

Отзывы: