background image

50

Polaroid izone300™ Digital Camera User Guide

www.polaroid.com

51

Polaroid izone300™ Digital Camera User Guide
www.polaroid.com

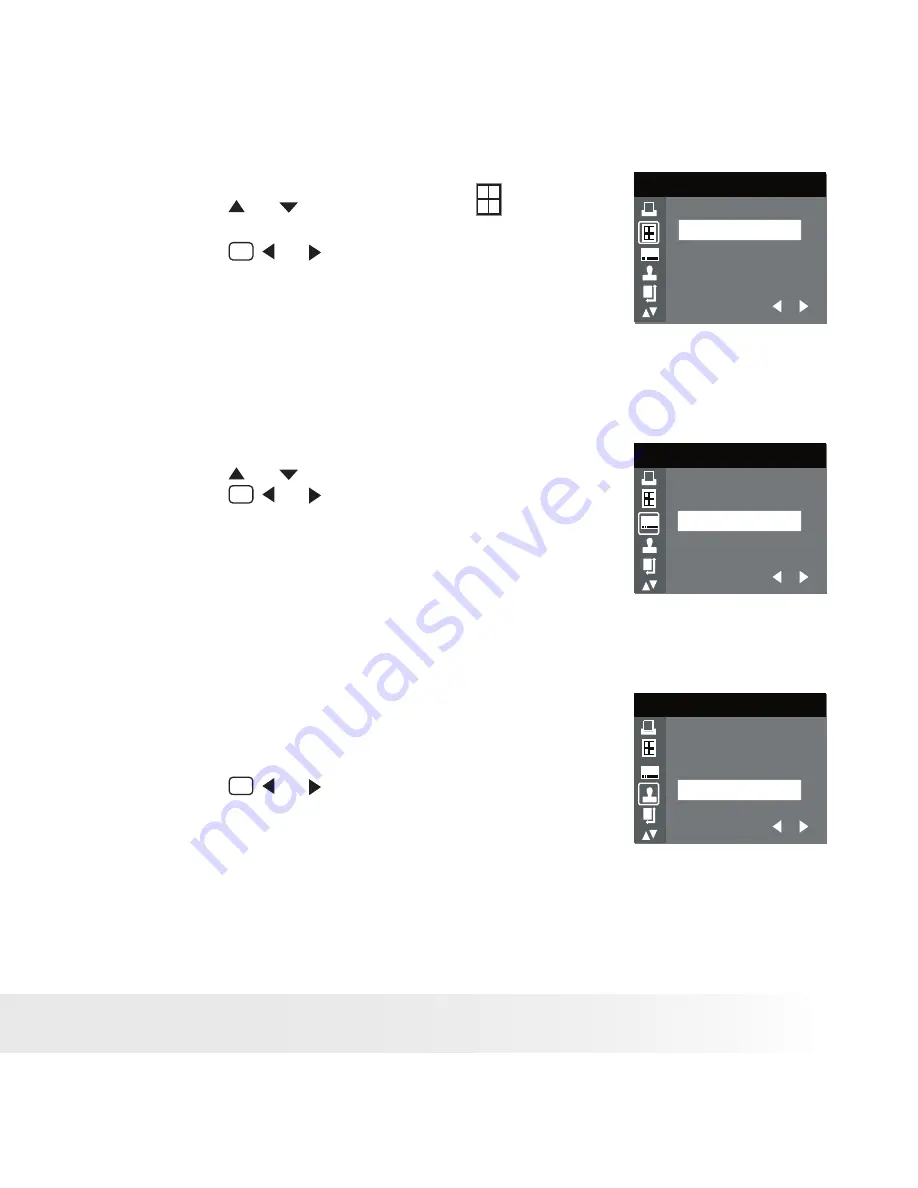
Selecting Print Layout

1.  Press the   or   button to select   (N-UP 

LAYOUT).

2.  Press the 

M

 or 

SET

 button to specify the 

number of printed images on a page. 

N-UP LAYOUT

0 1

1

DEFAULT
DEFAULT
DEFAULT

DEFAULT 

Print settings differ according to the printer model. 

1/2/4/6/8 

Print 1/2/4/6/8 on a page. 

BORDERLESS  Print right to the edge of the page. 

Setting the File Name On/Off

1.  Press the   or   button to select (FILE NAME). 

2.  Press the 

M

 or 

SET

 button to select 

“DEFAULT”, “ON” or “OFF”. 

FILE NAME

0 1

1

DEFAULT

DEFAULT
DEFAULT

DEFAULT  Print settings differ according to the printer model. 

ON    

Add the file name to the printed image. 

OFF   

Print without the file name. 

Setting the Date Stamp On/Off

1.  Press the UP or DOWN button to select (DATE 

STAMPING). 

2.  Press the 

M

 or 

SET

 button to select 

“DEFAULT”, “ON” or “OFF”. 

DATE STAMPING

0 1

1

DEFAULT

DEFAULT

DEFAULT

DEFAULT  Print settings differ according to the printer model. 

ON    

Add the date stamp to the printed image. 

OFF   

Print without the date stamp. 

Содержание izone 300

Страница 1: ...www polaroid com Digital Camera User Guide...

Страница 2: ...tter button 2 Flash 3 Viewfinder 4 Power button 5 Lens 6 Self Timer LED 1 Viewfinder 2 Saving LED 3 LCD screen 4 Menu Left button 5 Down button 6 Flash Battery charge LED 7 Capture Playback mode butto...

Страница 3: ...3 Polaroid izone300 Digital Camera User Guide www polaroid com 1 USB port 2 SD card slot 1 USB port 2 USB plug Docking Station...

Страница 4: ...t Feature 16 Checking the Battery Power Level 16 How to Navigate Menus 17 2 Camera Setting 18 Checking Camera Status 18 Camera Modes 20 Drive Mode 20 Setup Menu 20 Formatting the Internal Memory 22 Se...

Страница 5: ...for Video Clips 40 5 Reviewing and Managing Pictures and Video Clips 41 Reviewing the Pictures 41 Reviewing Picture and Video Clip Files in Thumbnail 41 Auto Play 42 Playing the Video Clip 44 Protect...

Страница 6: ...ing Pictures and Video Clips 67 10 Using the Camera as a Web Cam PC Only 68 Setting up NetMeeting 68 Start NetMeeting 69 11 Troubleshooting Problems 72 12 Getting Help 73 Polaroid Online Services 73 C...

Страница 7: ...Here are a few examples of what you can do with your camera Enjoy point shoot operation Adjust the resolution for print or email Store pictures and video clips to the internal memory or a SD card Play...

Страница 8: ...c Microsoft NetMeeting PC Adobe Acrobat Reader PC Mac User Guide in PDF format Registration Card Digital Imaging Products 201 Burlington Road Bedford MA 01730 1434 First Class Postage Required Post Of...

Страница 9: ...9 Polaroid izone300 Digital Camera User Guide www polaroid com Attaching the Hand Strap Using the Docking Station...

Страница 10: ...Adapter 1 Put the jack of USB connector through one ring of the tether 2 Put the plug of AC adapter through the other ring of the tether 3 Connect the AC adapter with the USB connector Electric curren...

Страница 11: ...adapter DC 5V 500 mA with a 3 5 x 1 35 x 9 mm female plug Positive Center to charge the battery Visit www polaroid com for detailed information on an adapter For a full battery charge we recommend tu...

Страница 12: ...et marked on your computer Plug the other end of the USB cable into the USB port on the camera The battery begins charging and the battery charge LED on the camera blinks The LED stops blinking and re...

Страница 13: ...he battery charge LED on the camera blinks The LED stops blinking and remains on when battery is fully charged 3 Using an AC adapter If your camera comes with the USB connector and the tether follow m...

Страница 14: ...amera Connect the adapter to the household power outlet The battery begins charging and the battery charge LED on the camera blinks The LED stops blinking and remains on when battery is fully charged...

Страница 15: ...d the camera will power off NOTE Make sure that the Flash Battery charge LED remains lighted before shooting The camera is designed with an automatic power off feature to conserve battery life After a...

Страница 16: ...the Reset button gently holding for around 5 seconds using a paper clip or ball point pen The camera will power off automatically It is important to note that the camera probably needs to be recharge...

Страница 17: ...d auto power off M SET M 1 Press the M button to enter the menu bar Press it again to exit 2 Press the or button to select a menu item Press the SET button to enter the submenu Press the M button to r...

Страница 18: ...isplayed are not activated Still Image mode Self timer On Digital Zoom Status Number of remaining pictures Battery Level Full Adequate Low Exhausted Capture Mode Still Image Video Image Resolution 204...

Страница 19: ...ips Auto Daylight Cloudy Tungsten Fluorescent Resolution 640 X 480 320 X 240 Remaining Time Recording Indicator 640 X 480 00 00 28 Default Setting Playback Mode 02 10 1600 x 1 200 Picture Looked File...

Страница 20: ...ode Under this mode you can select the image and video settings according to shooting preference and take pictures and video clips under the settings you have selected For more details please refer to...

Страница 21: ...DE D STILL VIDEO DRIVE MODE 4 Press the SET button 5 Press he or button to select the desired drive mode 6 Press the SET button NOTE Still Image mode is the default capture mode This setting is also a...

Страница 22: ...5 Press the or button to select the desired setting 6 Press the SET button REALLY WANT TO FORMAT FORMAT OK CANCEL NOTE Data deleted by a format operation cannot be recovered Make sure you do not have...

Страница 23: ...ress the or button to select DATE FORMAT 6 Press the SET button DATE TIME SETUP DATE FORMAT SET 7 Press the or button to select the desired setting 8 Press the SET button DATE FORMAT DD MM YY MM DD YY...

Страница 24: ...the Setup menu 3 Press the or button to select AUTO OFF 4 Press the SET button SETUP SET FORMAT DATE TIME AUTO OFF BEEP FREQUENCY 5 Press the or button to select the desired setting 6 Press the SET bu...

Страница 25: ...P FREQUENCY SET 5 Press the or button to select the desired setting 6 Press the SET button BEEP ON OFF SET Setting Frequency In order to take a better indoor picture the camera needs to be set to suit...

Страница 26: ...ou prefer for the LCD screen 1 Set the camera to Still Image mode 2 Access the Setup menu 3 Press the or button to select LANGUAGE 4 Press the SET button SETUP DATE TIME AUTO OFF BEEP FREQUENCY LANGUA...

Страница 27: ...g 6 Press the SET button NOTE This setting is configured for images only DATE STAMP ON OFF SET Resetting to Default Settings You can easily change all the settings you made back to the camera default...

Страница 28: ...LCD Screen On and Off Pressing the button each time switches the LCD screen to the next display mode in the following sequence Capture mode Press Press Press Press 2048 X 1536 10 H X0 1 2048 X 1536 10...

Страница 29: ...y 3 2 feet to infinity 1 meter to infinity 1 Set the camera to Still Image mode 2 Frame your subject using the LCD screen or the viewfinder 3 Hold the camera steady Press the shutter button completely...

Страница 30: ...s through the flash modes in the following sequence When you press the Flash button the icon according to the flash setting you selected will appear on the LCD screen You can now take pictures using t...

Страница 31: ...shooting towards a reflective surface such as a window or a mirror If there is not enough light when using this setting your pictures may turn out dark The flash fires automatically as needed Use thi...

Страница 32: ...LF TIMER ON OFF 5 Press the or button to select the desired setting 6 Press the SET button SELF TIMER ON OFF SET 7 The icon will appear on the LCD screen NOTE To disable the self timer function repeat...

Страница 33: ...ode 2 Press the button to zoom in Press the button to zoom out The zoom factor is shown on the LCD screen M SET 2048 X 1536 10 1 5 H Digital Zoom Factor For the digital zoom feature the viewfinder doe...

Страница 34: ...occupies more memory space Smaller size pictures and normal quality are easier to email while larger size and fine quality are better for printing Image Size Setting 1 Set the camera to Still Image mo...

Страница 35: ...Quality Setting 1 Set the camera to Still Image mode 2 Press the M button 3 Press the or button to select QUALITY 4 Press the SET button D HIGH NORMAL LOW QUALITY 5 Press the or button to select the d...

Страница 36: ...c 1 Set the camera to Still Image mode 2 Press the M button 3 Press the or button to select EXPOSURE 4 Press the SET button D AUTO EXPOSURE 5 Press the or button to select the desired setting 6 Press...

Страница 37: ...Still Image mode 2 Press the M button 3 Press the or button to select WHITE BALANCE 4 Press the SET button WHITE BALANCE AUTO DAYLIGHT CLOUDY TUNGSTEN FLUORESCENT 5 Press the or button to select the...

Страница 38: ...page 21 for more details Recording Video Clips Use the Video mode to record video clips The recording time displayed on the LCD screen will decrease and the icon will blink while recording 1 Set the c...

Страница 39: ...ution that the camera applies when the video clip is recorded Higher resolution makes better quality which occupies more memory space 1 Set the camera to Video mode 2 Press the M button 3 Press the or...

Страница 40: ...Video mode 2 Press the M button 3 Press the or button to select WHITE BALANCE 4 Press the SET button WHITE BALANCE AUTO DAYLIGHT CLOUDY TUNGSTEN FLUORESCENT D SETUP 5 Press the or button to select the...

Страница 41: ...e the or button to view the pictures taken The icon is shown on the LCD screen when a picture is selected Reviewing Picture and Video Clip Files in Thumbnail You can view up to 9 picture and video cli...

Страница 42: ...interval according to the following steps 1 Set the camera to Playback mode 2 Press the M button 3 Press the or button to select AUTO PLAY 4 Press the SET button AUTO PLAY ON SETUP SET 5 Press the or...

Страница 43: ...etting 10 Press the SET button INTERVAL 1 SEC 10 SEC SET Start Auto Play Perform steps 1 2 3 and 4 on page 42 5 Press the or button to select ON 6 Press the SET button AUTO PLAY ON SETUP SET The camer...

Страница 44: ...t or Unprotect Picture s or Video Clip s 1 Set the camera to Playback mode 2 Press the M button 3 Press the or button to select PROTECT 4 Press the SET button PROTECT LOCK THIS UNLOCK THIS LOCK ALL UN...

Страница 45: ...o Clip s 1 Set the camera to Playback mode 2 Press the M button 3 Press the or button to select ERASE 4 Press the SET button ERASE ERASE THIS ERASE ALL 5 Press the or button to select the desired sett...

Страница 46: ...before printing Refer to the user guide that comes with your printer and make preparations paper ink cassette cartridge etc as required Turn on the camera and the printer 2 Selecting PictBridge mode S...

Страница 47: ...tions Printing may resume once the problem is solved PRINT SETTING ERRORS CANCEL CONTINUE SET Printing operation may still fail with some errors even if you press the SET button after selecting CONTIN...

Страница 48: ...CONNECTED displays on the LCD screen indicating a proper connection to the printer Do not connect the USB cable to the camera until PictBridge is enable and when prompted by the PLEASE CONNECT TO DEVI...

Страница 49: ...all images in the camera s internal memory or a memory card according to the specified settings ALL INDEX All images in the camera s internal memory or a memory card are given an index and printed acc...

Страница 50: ...PPORTED may appear on the LCD screen after selecting a particular setting The camera s print settings are not supported by the printer In this case select DEFAULT for this particular setting or visit...

Страница 51: ...le Name On Off 1 Press the or button to select FILE NAME 2 Press the M or SET button to select DEFAULT ON or OFF FILE NAME 0 1 1 DEFAULT DEFAULT DEFAULT DEFAULT Print settings differ according to the...

Страница 52: ...lect the paper size The following paper sizes are available 8 x 10 4 x 6 A4 and default SIZE 0 1 1 DEFAULT DEFAULT 4 X 6 DEFAULT Print settings differ according to the printer model Printing 1 Press t...

Страница 53: ...amera you should always select images by viewing them on the LCD screen Do not specify images by file name without viewing the file contents NOTE Print settings are configured for images only Make sur...

Страница 54: ...L IMAGES SET THIS IMAGE The selected picture in a memory card will be printed up to 99 copies ALL IMAGES All pictures in a memory card will be printed up to 99 copies for each picture NOTE To print a...

Страница 55: ...nter s card slot as illustrated Location of the card slot may vary from printer to printer model NOTE Make sure you turn off the camera before inserting or removing a memory card 14 Press the Print bu...

Страница 56: ...rd Precautions 1 Use only an SD memory card with this camera 2 Electrostatic charge electrical noise and other phenomena can cause data corruption or even loss Always make sure that you always back up...

Страница 57: ...SD card may be distorted or lost when the card is inserted in the izone300 camera We strongly recommend the user to use a NEW or formatted SD card for the izone300 camera The manufacturer is not liabl...

Страница 58: ...ven damage the memory card Formatting the SD Card Formatting the SD card erases all files stored in it including the protected ones Removing the SD card during formatting may damage the card 1 Insert...

Страница 59: ...COPY TO CARD COPY CANCEL SET 7 Press the or button to select the desired setting 8 Press the SET button COPY TO CARD COPY CANCEL SET In the above operation you can exit to the normal Playback mode by...

Страница 60: ...performance in graphics and sound when you re watching video clips on your PC it is recommended to install the DirectX ver 9 0 or above It can be downloaded from http www microsoft com directx IMPORTA...

Страница 61: ...he on screen instructions Open Close NOTE If the setup screen does not appear after loading the CD then you can manually start it by double clicking the My Computer icon on your desktop then double cl...

Страница 62: ...s for quick image referencing The unique album structure of the program makes file access convenient On top of that you can acquire files from various sources including digital cameras scanners video...

Страница 63: ...virtually any Windows based application exchange graphics on an electronic whiteboard transfer files use the text based chat program and much more Using your PC and the Internet you can now hold face...

Страница 64: ...III 450MHz or equivalent processor 128MB RAM 512MB recommended USB Port DirectX 9 0 or higher 500MB free disk space Color monitor with high color 16 bit graphic capability or higher CD ROM drive Stand...

Страница 65: ...t the camera to the PC Camera mode when you want to use the PC Camera function Mass Storage mode allows the camera to become an external hard disk drive and you may view and download pictures and vide...

Страница 66: ...or Docking Station USB Series A Plug connects to your PC izo 1 Turn off the camera 2 Plug Series A of the USB cable into the marked socket on your computer 3 Plug Series Mini B of the USB cable into...

Страница 67: ...your choice You can also create sub folders to group them or use the PhotoBase software to edit and manage the pictures or video clips For Macintosh Users Mac NOTE For Mac user directly plug in the ca...

Страница 68: ...e camera into the docking station For further details refer to Using the Docking Station on page 9 2 Plug the labelled end of the USB cable into the socket marked on your computer Plug the other end o...

Страница 69: ...een set up instruction to set up NetMeeting 1 Double click the NetMeeting icon on the desktop or select the NetMeeting icon from the Windows Start Menu 2 If you need further help on how to use Microso...

Страница 70: ...other camera driver or capture device If you have another camera installed on your computer remove it and it s driver completely from your system to avoid conflicting with your izone300 Incorrect driv...

Страница 71: ...ave operation is complete Or Removing the memory card before the save operation is complete If the battery indicator is on the LCD screen replace batteries with a full set of new ones as soon as possi...

Страница 72: ...a paper clip or ball pen An error message appears on the LCD screen before or during printing Printer may not support some advanced print features Or Some fault occurs with the printer Or Print setti...

Страница 73: ...na ArcSoft Europe Support Center ArcSoft China Support Center Ireland Hangzhou Tel 353 0 61 702087 Tel 86 571 88210575 Fax 353 0 61 702001 E mail support arcsoft com cn E mail eurosupport arcsoft com...

Страница 74: ...Length 8 66 mm Focal Distance Normal Focus 3 2 ft to 1 m to The focusing range is the distance from the lens surface to the subject Focus Zones center LCD Screen 1 5 TFT color panel Built in Flash Mod...

Страница 75: ...tible format JPEG compression Video Clip AVI format Power Supply One lithium ion rechargeable battery integrated Self timer 10 seconds with beep sound Connectivity With computer via USB cable and dock...

Страница 76: ...d on the internal memory and different capacities of SD card Recordable Images Units Images Resolution Quality 8MB Internal Memory 3MB for data storage 16MB Internal Memory 11MB for data storage 32MB...

Страница 77: ...y 128MB SD 256MB SD 512MB SD 1GB SD 2048 x 1536 High 140 280 560 1120 Normal 216 432 864 1728 Low 220 440 880 1760 1600 x 1200 High 248 496 992 1984 Normal 360 720 1440 2880 Low 384 768 1536 3072 640...

Страница 78: ...MB SD 640 x 480 2 6 320 x 240 2 9 64MB SD 640 x 480 5 1 320 x 240 5 1 128MB SD 640 x 480 9 6 320 x 240 10 256MB SD 640 x 480 19 2 320 x 240 20 6 512MB SD 640 x 480 37 7 320 x 240 40 1 1GB SD 640 x 480...

Страница 79: ...for Windows 98SE users only because only Windows 98SE needs to install the izone300 driver 1 Open Add Remove Program Properties in Control Panel and select Polaroid Digital Cam program then click Add...

Страница 80: ...Compensation White Balance for Pictures Flash Mode Video Resolution White Balance Date Format Auto Power Off Beep Frequency Language Date Stamp Twain Driver Default 2048 x 1536 High Auto Auto Auto Fla...

Страница 81: ...rence Tips Your Safety Maintenance Your Camera should only be operated within the following environmental conditions 32 104 Fahrenheit 0 40 Celsius 20 85 relative humidity non condensing Battery life...

Страница 82: ...een tested and found to comply with the limits for Class B digital device pursuant to Part 15 of the FCC Rules These limits are designed to provide reasonable protection against harmful interference i...

Страница 83: ...ct the equipment into an outlet on a circuit different from that to which the receiver is needed Consult the dealer or an experienced radio TV technician for help Shielded cable must be used with this...

Страница 84: ...US 1105 Part No OM3392US008...

Отзывы: