background image

22

Polaroid iON 230 Digital Camera User Guide

www.polaroid-digital.com

23

Polaroid iON 230 Digital Camera User Guide
www.polaroid-digital.com

4 Recording Video Clips

• Recording Video Clips

1.  Turn on the camera.  

2.  Set the Capture/Playback selector to Capture mode.

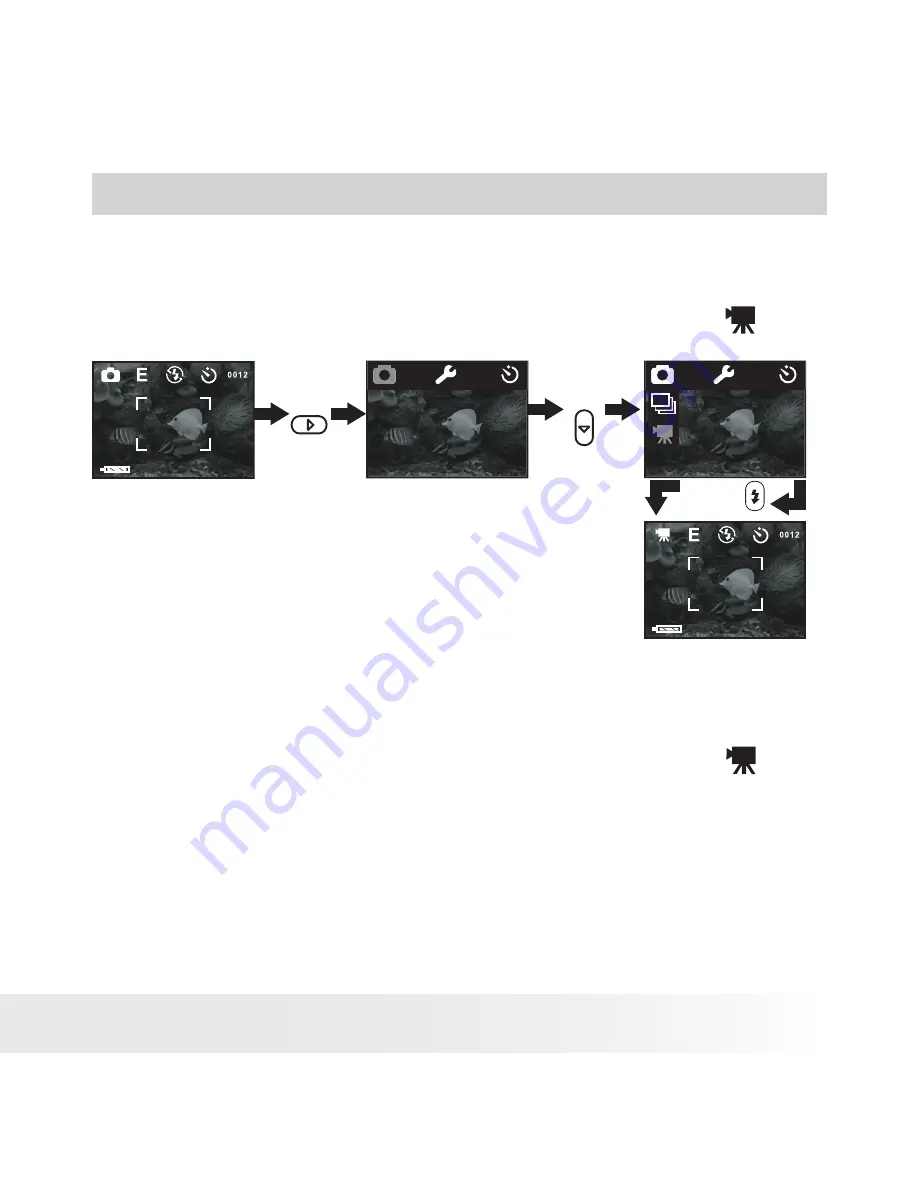
3.  Select the Video mode through the following setting.  The 

 icon is 

shown on the LCD screen when the setting is done.

Press 

Press

Press

4.  Frame  your  subject  using  the  LCD  screen  or 

viewfinder.

5.  Press  Up  or  Down  button  to  zoom  in  or  zoom 

out.

6.  Press  the  Shutter  button  to  start  video 

recording, press the Shutter button again if you 

want to stop.

The capture mode returns to Still Picture automatically after recording a 

video clip.  Please remember to set the capture mode to Video 

 before 

recording a video clip.

In video mode, the resolution is set to 320x240 pixels. You can record 

video  clip  for  approximately  60  seconds  per  video  clip.  Using  a  SD 

(Secure Digital) card can lengthen the video recording time.

Содержание ION 230

Страница 1: ...iON 230 Digital Camera User Guide www polaroid digital com...

Страница 2: ...cator 3 Lens 4 Flash 5 Viewfinder 2 1 3 4 5 1 Power Flash charge LED 2 Viewfinder 3 LCD screen 4 Display button 5 Flash OK button 6 Power button 7 Left button 8 Down Zoom out button 9 Hand strap holde...

Страница 3: ...tton 4 USB port 5 Hole for tripod adaptor Camera Bottom View 2 3 1 4 5 Camera Top View 1 DC jack 2 USB port 3 Eject button 4 Status LED 5 USB port Docking Station Front View 5 4 DC 1 2 3 Docking Stati...

Страница 4: ...omatic Power Off Saves Battery 13 Setting Language 14 3 Taking Pictures 15 Taking a Picture 15 Taking Macro Picture 15 Taking Continuous Pictures 16 Setting the 2X Digital Zoom 17 Setting Flash Mode 1...

Страница 5: ...Transfer Pictures 37 Mass Storage WDM 37 Connecting to Your Computer 38 Transferring and Viewing the Pictures and Video clips on PC 38 Transferring and Viewing the Pictures and Video clips on Mac 39...

Страница 6: ...en or a computer Send the pictures and video clips over the Internet to family and friends Camera Package Contents Registration Card Digital Imaging Products 201 Burlington Road Bedford MA 01730 1434...

Страница 7: ...7 Polaroid iON 230 Digital Camera User Guide www polaroid digital com Attaching the Hand Strap Using Docking Station...

Страница 8: ...via the Docking Station Install the battery into the camera Plug the end of the AC Adaptor into the DC Jack on the Docking Station and connect the adaptor to the household power outlet Place the came...

Страница 9: ...connect the adaptor to the household power outlet The battery begins charging and the battery charge indicator on the camera blinks The LED will remain solid when it has finished charging 4 Using USB...

Страница 10: ...and the camera is on Press and hold the Power button again the camera will be off Power button Checking the Battery Level Check the battery power level before taking pictures 1 Turn the camera on 2 Ch...

Страница 11: ...ettings are active If the feature icon is not displayed it means particular feature is not activated Picture Quality Camera Status Other Features Full Middle Low Super Fine Fine Economy Pictures can b...

Страница 12: ...Sound On and Off You can turn the Beep sound on and off in any mode When the Beep sound is turned on the camera will beep when you press the buttons Turn on the camera and set the Capture Playback sel...

Страница 13: ...tery life You will need to press the Power button if you want to turn on the camera again You can change Power Save Setting by the following steps Turn on the camera and set the Capture Playback selec...

Страница 14: ...laroid digital com Setting Language Using this setting you can select the language you prefer for the LCD screen Turn on the camera and set the Capture Playback selector to Capture mode Press to confi...

Страница 15: ...nder 4 Press the Shutter button to take a picture Hold the camera steady until you hear a second beep it means the picture has been taken The LCD screen shows the number of pictures that still can be...

Страница 16: ...old down the Shutter button to record continuous pictures You can capture 4 pictures in continuous pictures mode The capture mode returns to Still Picture automatically after taking continuous picture...

Страница 17: ...nly one picture at a time For the digital zoom feature the viewfinder may not reflect the actual image taken We recommend the user to use LCD screen to monitor the zoom feature You can zoom in or zoom...

Страница 18: ...o take most pictures Flash on The flash fires for every picture Use this setting indoors in low light Flash off The flash does not fire Use this setting for outdoor pictures or where flash is prohibit...

Страница 19: ...ser Guide www polaroid digital com Setting LCD Brightness You can set the brightness level of the LCD screen to suit your needs Turn on the camera and set the Capture Playback selector to Playback mod...

Страница 20: ...the Capture Playback selector to Capture mode Press to confirm Select EXIT to exit Press Press Press Press Press Press to confirm Select EXIT to exit Press Press Press Press Press NOTE A higher EV va...

Страница 21: ...urn on the camera and set the Capture Playback selector to Capture mode Press to confirm Select EXIT to exit Press Press Press Press QUALITY EXPOSURE SOUND AUTO OF F LANGUAGE DRIVER EXIT Here are the...

Страница 22: ...appears on LCD screen when you press the Shutter button the subject will be recorded after 10 seconds Turn on the camera and set the Capture Playback selector to Capture mode Press to confirm Press P...

Страница 23: ...using the LCD screen or viewfinder 5 Press Up or Down button to zoom in or zoom out 6 Press the Shutter button to start video recording press the Shutter button again if you want to stop The capture m...

Страница 24: ...button press it again will turn off the LCD screen Pressing the Display button one more time will turn on the information display and the LCD screen LCD screen on Information display on LCD screen on...

Страница 25: ...n on the camera and set the Capture Playback selector to Playback mode Press Press Press Playing the Video Clip 1 Turn on the camera 2 Set the Capture Playback selector to Playback mode 3 Use Left but...

Страница 26: ...Video Clip Turn on the camera Set the Capture Playback selector to Playback mode Use Up Down button to choose a picture video clip you want to delete Please note that an icon appears on the LCD screen...

Страница 27: ...eleting All Pictures Video Clips You can delete all pictures and video clips in the internal memory or SD card through this setting Turn on the camera and set the Capture Playback selector to Playback...

Страница 28: ...fore inserting or removing a memory card Be sure to orient the card correctly when inserting it Never try to force a memory card into the slot when you feel resistance SD memory cards have a write pro...

Страница 29: ...o remove the SD card turn off your camera gently push the SD card inwards and then release it for the SD card to eject from the SD card slot IMPORTANT Never insert any other objects besides a SD memor...

Страница 30: ...ss Press Press Press Press to confirm Select EXIT to exit Press After the memory storage is formatted the message NO PICTURE appears on the camera LCD screen IMPORTANT You can format a memory card on...

Страница 31: ...nt data on other media MO disc computer hard drive etc 3 If a memory card starts to behave abnormally you can restore normal operation by formatting it However we recommend that you always take along...

Страница 32: ...ed with Windows 2000 and XP OS Users using Windows 2000 or XP do not need to install this software from the CD ROM For Windows 98SE On Windows 98SE Mass Storage function needs to install the iON 230 D...

Страница 33: ...p screen doesn t appear after loading the CD then you can manually start it by double clicking the My Computer Icon on your desktop then double clicking the icon for the CD ROM drive When the CD ROM w...

Страница 34: ...erencing The unique album structure of the program makes file access convenient On top of that you can acquire files from various sources including digital cameras scanners video devices and removable...

Страница 35: ...on virtually any Windows based application exchange graphics on an electronic whiteboard transfer files use the text based chat program and much more Using your PC and the Internet you can now hold f...

Страница 36: ...0 or XP Pentium II 333MHz or equivalent processor 64MB RAM 128MB recommended USB Port 200MB free disk space Colour monitor with high colour 16 bit graphic capability or higher CD ROM drive Standard mo...

Страница 37: ...Storage or WDM Windows Driver Mode as a driver type in this camera Mass Storage HDD allows the camera to become an external hard disk drive HDD and you may view or download pictures and video clips s...

Страница 38: ...n Please put the camera into the Docking Station first For further detail refer to Using Docking Station on page 7 For Windows Users PC Transferring and Viewing the Pictures and Video Clips on PC 1 Tu...

Страница 39: ...Driver Type to Mass Storage mode 3 Connect the camera to a MAC via the USB cable the systems will automatically recognize the MASS STORAGE drive System will automatically create a Mass Storage named...

Страница 40: ...ur microphone not included and speakers not included to your audio card s Mic in and line out jack separately Start NetMeeting NOTE For Windows XP 2000 users who use NetMeeting for the first time Go t...

Страница 41: ...in your BIOS if it is activated If this does not work contact your national customer support representative My CD Installation wizard does not work The auto installation file is switched to off or Th...

Страница 42: ...ce is shining directly onto the lens during recording Position the camera so sunlight does not shine directly onto the lens Pictures are not displayed A memory card with non DCF pictures recorded with...

Страница 43: ...t arcsoft com For China For Japan ArcSoft China Support Centre Beijing ArcSoft Japan Support Centre Tokyo Tel 8610 6849 1368 Tel 81 03 3834 5256 Fax 8610 6849 1367 Fax 81 03 5816 4730 E mail china arc...

Страница 44: ...mer 10 seconds Video Clip Frame rate Approx 15 fps video clip 320 X 240 Approx 10 fps PC camera 320 X 240 Length Approx 60s per video clip Unlimited when connected to computer via USB cable File Forma...

Страница 45: ...60 800 X 600 8 21 43 21 40 95 40 80 180 98 171 381 202 351 777 8MB SD Card 16MB SD Card 32MB SD Card 64MB SD Card 128MB SD Card NOTE Scene complexity affects a picture s file size For example a pictur...

Страница 46: ...ALWAYS remove dust or stains with a soft cloth dampened with water or neutral detergent NEVER place hot items on the surface of the Camera NEVER attempt to open or disassemble Camera as this will aff...

Страница 47: ...ill not occur in a particular installation If this equipment does cause harmful interference to radio or television reception which can be determined by turning the equipment off and on the user is en...

Страница 48: ...UK 0303 Part No OM837666 R1...

Отзывы: