background image

18

Polaroid i836 Digital Camera User Guide

www.polaroid.com

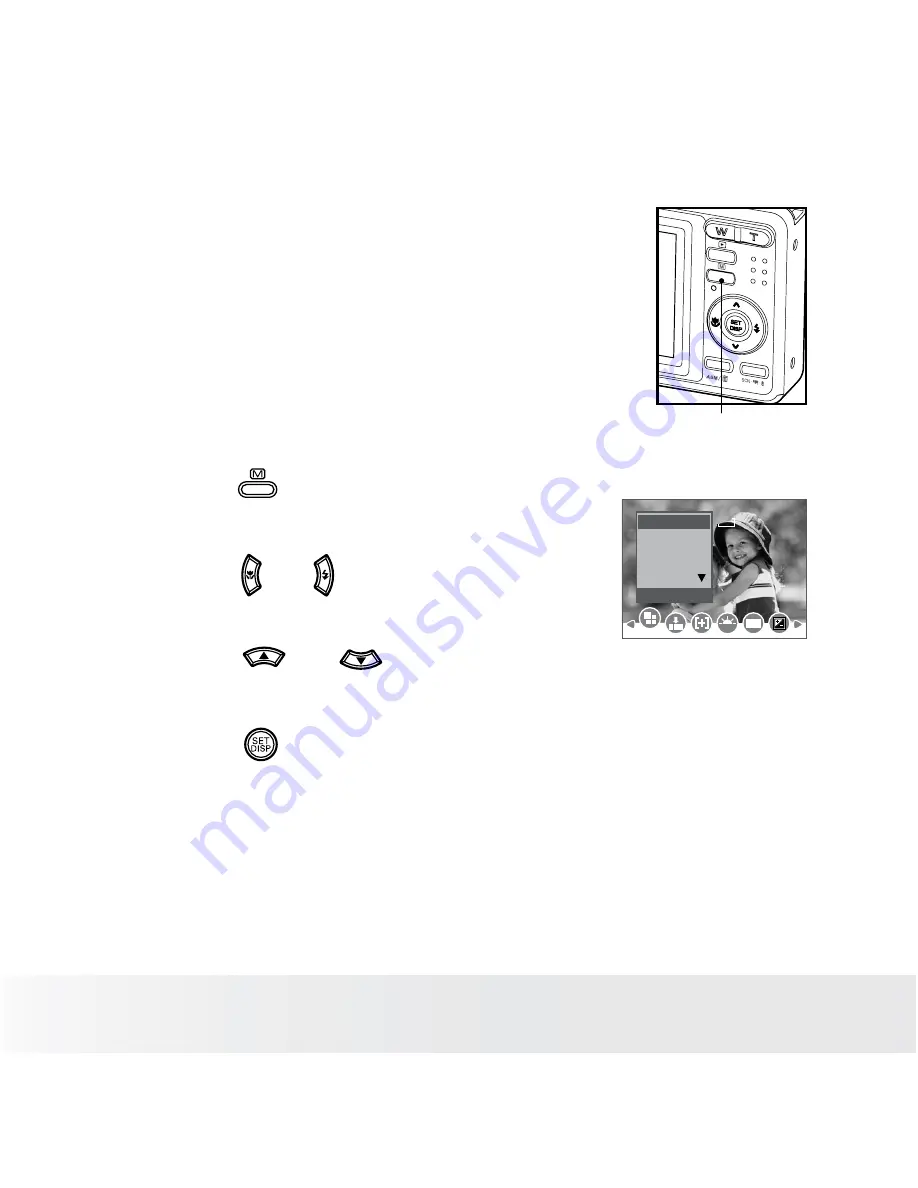
• How to Navigate Menus

Menus  are  used  to  select  capture  and  play 

settings, as well as other camera settings like the 

Date/Time and Auto Power Off.

Menu button

1.  Press the 

 button to enter a menu bar and 

press it again to exit.

2.  Press the   and   buttons to scroll left and 

right through the menu bar.

Resolution

3:2

16:9

7M

8M

WB

ISO

8M

6M
4M

3.  Press  the 

  and 

  buttons  to  scroll  up 

and down through menu options. 

4.  Press  the 

  button  to  enter  a  submenu  or 

confirm your choice.

Содержание I836 - Digital Camera - Compact

Страница 1: ...Manual Questions Need Some Help This manual should help you understand your new product or visit www polaroid com support If you still have questions call our help line found on the insert with this...

Страница 2: ...button switches among the Aperture Priority Shutter Priority and Manual Exposure mode See Page 41 9 10 11 12 13 14 15 16 17 18 19 20 21 9 Zoom out Thumbnail button 10 Playback mode button 11 Power Aut...

Страница 3: ...e Menus 18 Setup Menu 19 Adjusting the Sounds 20 Selecting Auto Review Period 21 Power Saving Settings 22 Setting the Date and Time 23 Setting the Display Language 24 File No Reset Setting 25 Choosing...

Страница 4: ...rding Video Clips 62 Setting the Video Size 63 5 Recording Audio Clips 64 Recording a Audio Clip 64 Recording a Voice Memo for the Desired Image 65 6 Managing Pictures and Video Clips 66 Reviewing Pic...

Страница 5: ...Camera 96 Computer System Requirements 97 10 Transferring Pictures and Video Clips to a Computer 98 Before Transferring Files 98 Connecting to Your Computer 98 Transferring Pictures and Video Clips to...

Страница 6: ...tal camera has A high quality glass lens system for exposures from 6 inches to infinity including 3 times optical and 4 times digital zoom modes Built in flash with five modes Auto Red eye Always On S...

Страница 7: ...deliver without proper postage i836 The CD ROM includes Polaroid i836 Camera Driver PC ArcSoft MediaImpression PC Mac ArcSoft Print Creations PC Mac Adobe Acrobat Reader PC Mac User Guide in PDF forma...

Страница 8: ...duct For a detailed guideline on battery usage please see Using Your Batteries on page 9 1 Open the camera s battery SD card door by pushing it outwards as illustrated 2 Insert the batteries as shown...

Страница 9: ...rably by limiting the following activities Reviewing the pictures on the LCD screen Use the optical viewfinder if applicable to frame the subject when taking pictures Reduce the excessive use of the f...

Страница 10: ...the camera 2 Check the battery power level that appears on the LCD screen Battery power is full Battery power is adequate 0 7EV 9999 AUTO IN 8M Battery power is exhausted Please replace the battery T...

Страница 11: ...s are active Those particular features whose icons are not displayed are not activated Capture Modes Still Image Mode 0 7EV 9999 IN 8M F2 8 1 30 2 AUTO 4 5 6 8 9 10 11 12 19 20 21 8 13 14 22 23 18 16...

Страница 12: ...8 F5 2 13 Focus Mark 14 Shutter Speed 1 2000 sec 8 sec 15 White balance AUTO 48 16 Histogram 17 Highlight OFF 51 18 ISO Sensitivity 50 100 200 400 800 1600 AUTO 49 19 Light Metering 47 20 Stabilizer 5...

Страница 13: ...7 2 9 1 3 5 6 8 10 4 No Description Icon Ref Page 1 Video Mode 58 2 Video Size 16 9 59 3 Focus Mark 4 White Balance AUTO 48 5 Light Metering 47 6 Internal Memory IN SD Card 7 Battery Power Level 10 8...

Страница 14: ...836 Digital Camera User Guide www polaroid com Audio Mode IN 00 09 12 4 1 3 2 No Description Icon Ref Page 1 Audio mode 60 2 Internal Memory IN SD Card 3 Battery Power Level 10 4 Remaining Recording T...

Страница 15: ...59 1 3 2 IN 6 150 6 5 IN 7 150 Play 8 7 9 320 2 0EV F2 8 1 30 2008 01 01 18 59 2008 01 01 18 59 Play 4 No Description Icon Ref Page 1 Resolution 8M 2 DPOF 3 Recording info 4 Date Time 5 Playback mode...

Страница 16: ...deo settings according to the shooting environment For more details refer to Taking Pictures on page 33 Recording Video Clips on page 58 and Recording Audio Clips on page 60 Playback Mode This mode al...

Страница 17: ...lips and audio clips Selecting these three modes as follows PROGRAM SELECT OK 1 Press the button to set the camera to capture mode 2 Press the button to access the scene mode palette 3 Press button to...

Страница 18: ...ings like the Date Time and Auto Power Off Menu button 1 Press the button to enter a menu bar and press it again to exit 2 Press the and buttons to scroll left and right through the menu bar Resolutio...

Страница 19: ...Press the or button to choose Setup 3 Press the button to enter the setup menu Menu button 4 Press the button to exit the setup menu SETUP MENU 1 3 Select Exit Sounds Auto Review 3 Sec Power Save 1 Mi...

Страница 20: ...ve 1 min Date Time Language English OK Sounds Select Shutter On START UP 1 Beep On Volume 7 Press the button Shutter You can turn the shutter sound on or off in the Setup mode When the shutter sound i...

Страница 21: ...r button 4 Press the or button to select the desired setting Setup Menu 1 3 Select Exit Sounds Auto Review 3 sec Power Save 1 min Date Time Language English Setup Menu 1 3 Select Sounds Auto Review Po...

Страница 22: ...Setup Menu 1 3 Select Exit Sounds Auto Review 3 sec Power Save 1 min Date Time Language English 1 Min 3 Min 5 Min 1 3 5 MIN The camera is designed to power off automatically to save battery life afte...

Страница 23: ...month day hour minute and date format 5 Press or button to adjust the value in the field and select the date format 6 Press the button Setup Menu 1 3 Select Exit Sounds Auto Review 3 sec Power Save 1...

Страница 24: ...Press the or button 4 Press the or button to select the desired setting 5 Press button Setup Menu 1 3 Select Sounds Auto Review Power Save Date Time Language OK English Espa ol Deutsch Fran ais Italia...

Страница 25: ...s the setup menu 2 Press the or to select ICON File No 3 Press the or button 4 Press the or button to select the desired setting Setup Menu 2 3 Select Exit File No Series TV Out NTSC USB Computer Star...

Страница 26: ...yback mode 5 150 IN 2008 01 01 18 59 8M 2 0EV F2 8 1 30 5 150 IN 2008 01 01 18 59 8M 2 0EV F2 8 1 30 Set this Yes Start up Image Select OK 2 Press the or button to select a desired image 3 Press the b...

Страница 27: ...ess the or button to select the desired picture 14 Press button The image that you choose will stored in directory as a startup image Start up Image Select OK Off System My image 15 Press the button t...

Страница 28: ...the desired setting 5 Press the button Setup Menu 2 3 Select OK File No Yes TV Out No USB Start up Image Format NOTE Data deleted by a format operation is not recoverable Make sure you do not have an...

Страница 29: ...he camera displays the battery level correctly set the type to match the batteries used 1 Access the setup menu 2 Press or to select Battery Type 3 Press the or button 4 Press or to select the type yo...

Страница 30: ...ase refer to Camera Default Settings on page 108 for more details 1 Access the setup menu 2 Press or to select Reset All 3 Press the or button 4 Press or to select YES 5 Press the button Setup Menu 3...

Страница 31: ...each time switches the LCD screen to the next display mode in the following mode Still Image Mode 0 7EV 1 IN 8M 2 1 0 7EV 8M 2 AUTO 1 IN Press Press Press Press 0 7EV 2 0 7EV 2 About Crossing Lines T...

Страница 32: ...ode Press IN 5 150 8M 2008 01 01 18 59 Press Press IN 5 150 8M 2008 01 01 18 59 2 0EV F2 8 1 30 NOTE You can not change the LCD status in the following situation Recording video clips or audio files P...

Страница 33: ...by the camera when the power is turned off so that the same setting is automatically available when the power is turned on again Make sure you verify your settings when turning the camera on again 1 S...

Страница 34: ...ed when you take the picture If the shutter speed is slow your image may become blurred the shake warning icon may appear on the LCD screen Should you see the shake warning the use of a tripod or enab...

Страница 35: ...subjects very close to the lens Wide Angle 0 5 3 3 ft 15 cm 1 0 m Telephoto 1 3 3 3 ft 40 cm 1 0 m 0 7EV 1 IN 8M AUTO Macro 1 Set the camera to Still Image mode 2 Press the button and the icon appears...

Страница 36: ...OK 1 Set the camera to Still Image mode 2 Press the button to show the scene shooting mode screen 3 Press the or button to select the desired setting 4 Press the button 5 Capture procedures are the s...

Страница 37: ...Shooting an image of backlit scene by changing the camera s metering Smile Capture Used for locating smiles in your pictures see page 57 Children Take a still image to capture moving children Night Sc...

Страница 38: ...nc Off Macro Off On SET DISP OSD On Guide Line OSD Off Menu Resolution 8M 3 2 16 9 6M 4M 2M VGA Drive Mode Off 2 sec 10 sec Double Burst Stabilizer Off On Face Tracking Off On Photo Frame Off On Beep...

Страница 39: ...m 1 0 m Telephoto 1 3 ft 3 3 ft 0 4 m 1 0 m 1 Set the camera to Still Image mode 2 Press the button to cycle through the flash settings and select the one you need The icon according to the flash sett...

Страница 40: ...ng S Slow Sync The flash fires regardless of the surrounding brightness In low light conditions slow shutter speed provides better lighting of the background that is out of range of the flash Off The...

Страница 41: ...requirements 1 Set the camera to Program mode 2 Press the ASM button to select the ASM mode 3 To exit the ASM Mode press the button to show the scene shooting mode screen 4 Press the or button to sel...

Страница 42: ...perture value to match the brightness The main purpose of using the shutter priority mode is to have a faster shutter speed to freeze the action of fast moving subjects or to have a slower shutter spe...

Страница 43: ...up and down through menu options 5 Press the button Display Option Description Off Single shot Record a single image 2 2 SEC Take a picture after a count down of 2 seconds 10 10 SEC Take a picture af...

Страница 44: ...ically disabled in the Continuous mode 2 0EV 9999 IN 8M AUTO Zoom Feature There are two types of zoom in this camera optical zoom and digital zoom Optical zoom alters the focal distance and its factor...

Страница 45: ...ress the or buttons a red square will show on the zoom status bar as illustrated The white square in the bar indicates the zoom status T stands for Tele and W stands for Wide Keep the button pressed a...

Страница 46: ...size pictures with normal quality are easier to email while larger size with fine quality are better for printing Resolution setting 1 Set the camera to Still Image mode 2 Press the button Resolution...

Страница 47: ...Multi Spot 3 Press the or button to select Metering 4 Press the and button to select the desired setting 5 Press the button Option Description Light is measured from the entire shooting screen but gi...

Страница 48: ...e WB ISO Auto Daylight Cloudy Tungsten Fluor_H 4 Press the and button to select the desired setting 5 Press the button Option Description AUTO Automatic adjustment Use this for most picture taking sce...

Страница 49: ...ISO value allows higher shutter speed at the expense of mottled or grain appearing in the final picture ISO WB ISO Auto 50 100 200 400 AUTO 1 Set the camera to Still Image mode 2 Press the button 3 P...

Страница 50: ...de 2 Press the button 3 Press the or button to select Exposure Exposure WB ISO 0EV 4 Press the and button to select the desired setting 5 Press the button NOTE A higher EV value is better used for lig...

Страница 51: ...mode 2 Press the button 3 Press the or button to select AEB AEB Off On 4 Press the and button to select the desired setting 5 Press the button Setting the Highlight This function makes the background...

Страница 52: ...mode 2 Press the button 3 Press the or button to select Sharpness Sharpness Hard Normal Soft 4 Press the and button to select the desired setting 5 Press the button Option Description Increases contra...

Страница 53: ...and button to select the desired setting 5 Press the button Option Description Off No effect is added to the image B W Convert image to black white Sepia Recorded image will be stored in a sepia tone...

Страница 54: ...ress or button to select Date Stamp Date Stamp Off Date Date Time 4 Press and button to select the desired setting Option Description Off Do not add the recorded date time to printed images Date Only...

Страница 55: ...tivity and faster shutter speeds to brighten up your pictures this feature helps prevent blurry images caused by hand camera shake or subject movement 1 Set the camera to Still Image mode 2 Press the...

Страница 56: ...tton to select the desired setting NOTE The camera uses the single AF window to automatically set the focus When the shutter button is pressed halfway the camera starts focusing until it locks onto yo...

Страница 57: ...the camera to Still Image mode 2 Press the button to show the scene shooting mode screen 3 Press the or button to select Smile Capture 4 Press the button Smile Capture SELECT OK 5 Frame your subject...

Страница 58: ...ss the shutter button again NOTE There is a 15 second time out to detect the smiles If no smile is detected after 15 seconds the camera will not take photos Should this happen you must press the shutt...

Страница 59: ...on to show the scene shooting mode screen 3 Press the or button to select Photo Stitch 4 Press the button 5 Press the shutter button to take the first picture 6 Press the button to delete the first pi...

Страница 60: ...cts eyes are open Blink Detection SELECT OK PROGRAM SELECT OK 1 Set the camera to Still Image mode 2 Press the button to show the scene shooting mode screen 3 Press the or button to select Blink Detec...

Страница 61: ...ss or button to select Photo Frame Off Photo Frame 4 Press and button to select the desired setting Option Description Off Taking pictures without Photo Frame Frame 1 Little Animals Frame 2 Pirate Fra...

Страница 62: ...the camera to Video mode See page 17 NOTE The icon will appear on the LCD screen indicating the Video mode is activated 00 01 30 IN 2 Frame your subject using the LCD screen 3 Press the Shutter butto...

Страница 63: ...Press the button Movie Size 16 9 640 320 WB Movie Size 5 Press the and button to select the desired setting 6 Press the button NOTE 16 9 is suitable for viewing on TV is the default value suitable for...

Страница 64: ...on completely down to start recording 3 Press the Shutter button again to stop recording or recording stops when the current memory is full 00 09 12 IN 00 02 20 REC NOTE The voices are recorded from t...

Страница 65: ...oice Memo Select OK 5 150 IN 2008 01 01 18 59 8M REC voice Start 2 0EV F2 8 1 30 5 150 IN 2008 01 01 18 59 8M REC voice Stop 00 00 2 0EV F2 8 1 30 3 Press the button 4 Press the or button to select Vo...

Страница 66: ...18 59 2 0EV F2 8 1 30 1 Set the camera to Playback mode 2 Use the and buttons to view the pictures taken Magnifying Trimming the Displayed Picture 5 0x SET 1 Set the camera to Playback mode 2 Use the...

Страница 67: ...screen 1 Set the camera to PLAYBACK mode 2 Press the button 3 Press the or button to select ROTATE 4 Press the button 5 Press the or button to select Rotate to rotate the image and select Save to save...

Страница 68: ...button Option Icon Description Red Eye Removal Remove subject s red eyes from the images Dynamic Lighting Enhance the color and contrast automatically B W Convert image to black white Sepia Recorded i...

Страница 69: ...3 Press the or button to select RESIZE 4 Press the button 5 Press the or button to select the desired setting 6 Press the button Resize Select OK Resize Select OK 6M 4M 2M VGA NOTE The resized image...

Страница 70: ...the button and up to 9 thumbnail files appear on the LCD screen 3 Press the or button to select a thumbnail file 4 Press the or button to view the file in full screen Running a Slide Show on the LCD s...

Страница 71: ...tton to select ICON 8 Press the or to select the animation effect for each file to display Setting Repeat On Off 9 Press the button to select ICON 10 Press the or to select the desired setting Running...

Страница 72: ...video clip 4 Press the button again to pause 5 Press the or button to stop the video clip 00 01 30 PLAY 00 01 30 IN Play 2008 01 01 18 59 WT Playing Audio Clips 1 Set the camera to the Playback mode 2...

Страница 73: ...the Playback mode 2 Press the and buttons to select the desired image that has the voice memo recorded 3 Press the button to start playing the voice memo 4 Press the button again to pause 5 Press the...

Страница 74: ...ed setting 6 Press the button SINGLE Protect the selected picture video or audio clip LOCK ALL Protect all of the pictures video and audio clips in the current memory UNLOCK ALL Remove protection from...

Страница 75: ...ton Remove Protection from All Pictures Video and Audio Clips 5 Press the button 6 Press the button 5 150 IN 8M Unlock all Yes 2008 01 0118 59 NOTE The icon appears on the LCD screen when you review t...

Страница 76: ...lip 6 Press the or button to select the picture video or audio clip you want to delete 7 Press the button Delete Single All Select OK NOTE You can also press the button to delete a single file 5 150 I...

Страница 77: ...eo output system according to the following steps 1 Access the setup menu 2 Press the or button to select TV Out 3 Press the or button Setup Menu 2 3 Select EXIT File No Series TV Out NTSC USB Compute...

Страница 78: ...r guide that comes with your printer and make preparations paper ink cassette cartridge etc as required Turn on the camera and the printer 2 Connecting the camera to the printer Refer to Camera Printe...

Страница 79: ...job The printer will stop printing and eject the paper CANCELLING Printing Errors If for some reason an error occurs during or before printing press button to exit and reconfigure printing settings O...

Страница 80: ...other end of the USB cable into the USB port on your camera 3 Press the or to select Printer SELECT Pictbridge Menu 1 2 Select Print Standard Image Single Quality Auto Layout Auto Paper Size Auto CONN...

Страница 81: ...ilable SINGLE Print the selected image in the camera s internal memory or a memory card according to specified settings ALL Print all images in the camera s internal memory or a memory card according...

Страница 82: ...idge Menu Setup 5 150 8M PictBridge Menu Setup IN 2008 01 01 18 59 Press NOTE The value for number of copies is 1 to 30 Selecting Print Quality Pictbridge Menu 1 2 Select OK Print Image Quality Layout...

Страница 83: ...r according to the printer model Full Print a full size picture on the selected paper 1 2 250 Specify the number of printed images on a page Selecting Paper Size 1 Access the PictBridge menu 2 Press t...

Страница 84: ...the PictBridge menu 2 Press the or button to select the desired setting 3 Press the button Pictbridge Menu 2 2 Select OK Paper Type Auto Date Off File No On Reset AUTO Print settings differ according...

Страница 85: ...format 1 Access the PictBridge menu 2 Press the or button to select the desired setting 3 Press the button Pictbridge Menu 1 2 Select OK Print Image Quality Layout Paper Size Standard Index Dpof STAND...

Страница 86: ...ted Then you can print on a DPOF compatible printer or at a professional print service from the memory card in accordance with the file name and number of copies settings recorded on the card With thi...

Страница 87: ...lect the desired setting DPOF Single All Reset Select OK DPOF Select OK SINGLE The selected picture in a memory card will be printed out up to 30 copies ALL All pictures in a memory card will be print...

Страница 88: ...he setting 11 Power off the camera 12 Remove the memory card from the camera and insert it into the printer s card slot as illustrated Location of the card slot may vary from printer to printer model...

Страница 89: ...1 Use only a SD memory card with this camera 2 Electrostatic charge electrical noise and other phenomena can cause data corruption or even loss Always make sure that you always back up important data...

Страница 90: ...conflict with the i836 camera and valuable data in your existing SD card may be distorted or lost when the card is inserted in the i836 camera We strongly recommend the user to use a NEW or formatted...

Страница 91: ...ates the risk of damage to the camera and card Should water or any foreign objects ever get into the card slot immediately turn off the camera remove the battery or disconnect the AC adapter and conta...

Страница 92: ...Image Format No 3 Access the setup menu 4 Press the or button to select Format 5 Press the button 6 Press the or button to select the desired option 7 Press the button Setup Menu 2 3 Select OK File No...

Страница 93: ...utton 5 Press the or button to select ICON Copy To Card 6 Press the or button to select the desired setting 7 Press the button SINGLE Copy a selected image or video clip ALL Copy all the files in the...

Страница 94: ...se read the ReadMe file in the CD first IMPORTANT For Windows 98SE Windows 98SE needs to install your digital camera Driver for Mass Storage function After the installation please restart the Windows...

Страница 95: ...on screen instructions Open Close NOTE If the setup screen does not appear after loading the CD then you can manually start it by double clicking the My Computer icon on your desktop then double clic...

Страница 96: ...e creativity in you Print Creations brings together ArcSoft s latest printing applications into one great user experience Starting from the Print Creations Launch Pad you can access any of ArcSoft s g...

Страница 97: ...or equivalent processor USB Port 256MB RAM 512MB recommended DirectX 9 0 or higher 500MB or above free disk space HDD space Color monitor with high color 16 bit graphic capability or higher CD ROM dri...

Страница 98: ...Onto a Computer If your OS is Windows 98se You must install the i836 camera driver from the supplied CD first Connecting to Your Computer Connect the camera directly to your computer 1 Turn on the cam...

Страница 99: ...ck on My Computer on your PC desktop and you will see a Removable Disk drive 4 Double click Removable Disk double click DCIM double click any directory folder under DCIM 5 All the pictures video and a...

Страница 100: ...ac via the USB cable the systems will automatically recognize the MASS STORAGE drive System will automatically create a Mass Storage named DIGITALCAM NOTE This Drive name will vary from different vers...

Страница 101: ...her camera driver or capture device If you have another camera installed on your computer remove it and it s driver completely from your system to avoid conflicting with it My CD Installation wizard d...

Страница 102: ...es are dead Orient the batteries correctly Or Replace or recharge the batteries Camera suddenly powers off Auto Power Off function is activated Or Batteries are dead Turn the camera on Or Replace or r...

Страница 103: ...e There is no response from the camera while pressing any buttons The LCD screen is frozen or the camera is hanged Remove and re install the battery or batteries to reset the camera Your valuable data...

Страница 104: ...Center Ireland Hangzhou Tel 353 0 61 702087 Tel 86 571 88210575 Fax 353 0 61 702001 E mail support arcsoft com cn E mail eurosupport arcsoft com Web http www arcsoft com cn new support For Japan For...

Страница 105: ...ace to the subject Macro Focus Wide Angle 0 5 ft 3 3 ft 15 cm 1 0 m Telephoto 1 3 ft 3 3 ft 40 cm 1 0 m LCD Screen 2 7 LTPS TFT panel Built in Flash Modes Auto Red Eye Reduction Always On Slow Sync OF...

Страница 106: ...luded Self timer Off 2 sec 10 sec Double Burst File Format Still Image EXIF 2 2 compatible format JPEG compression DCF compatible Support DPOF Video Clip AVI Audio WAV Power Supply AA alkaline battery...

Страница 107: ...ows 98SE user only because only Windows 98SE needs to install the i836 driver 1 Open Add Remove Program Properties in Control Panel and select Polaroid Digital Camera program then click Add Remove 2 T...

Страница 108: ...Image Resolution 8M Quality Fine Metering Multi White Balance for Pictures Auto ISO Auto Exposure 0 Drive Mode Off AEB Off Highlight Off Sharpness Normal Effect Off Date Stamp Off Stabilizer Off Face...

Страница 109: ...le No Series TV Out NTSC USB Computer Start up Image Format No Battery Type Alkaline Reset All No Playback Mode Protect Off Slide Show 3 Sec NOTE The default language for the LCD screen may vary with...

Страница 110: ...AYS remove dust or stains on the camera with a soft cloth dampened with water or neutral detergent NEVER place hot items on the surface of the camera NEVER attempt to open or disassemble the camera as...

Страница 111: ...ot occur in a particular installation If this equipment does cause harmful interference to radio or television reception which can be determined by turning the equipment off and on the user is encoura...

Страница 112: ...US 0808 Part No OMi836US001...

Отзывы: