background image

80

Polaroid i639 Digital Camera User Guide

www.polaroid.com

81

Polaroid i639 Digital Camera User Guide
www.polaroid.com

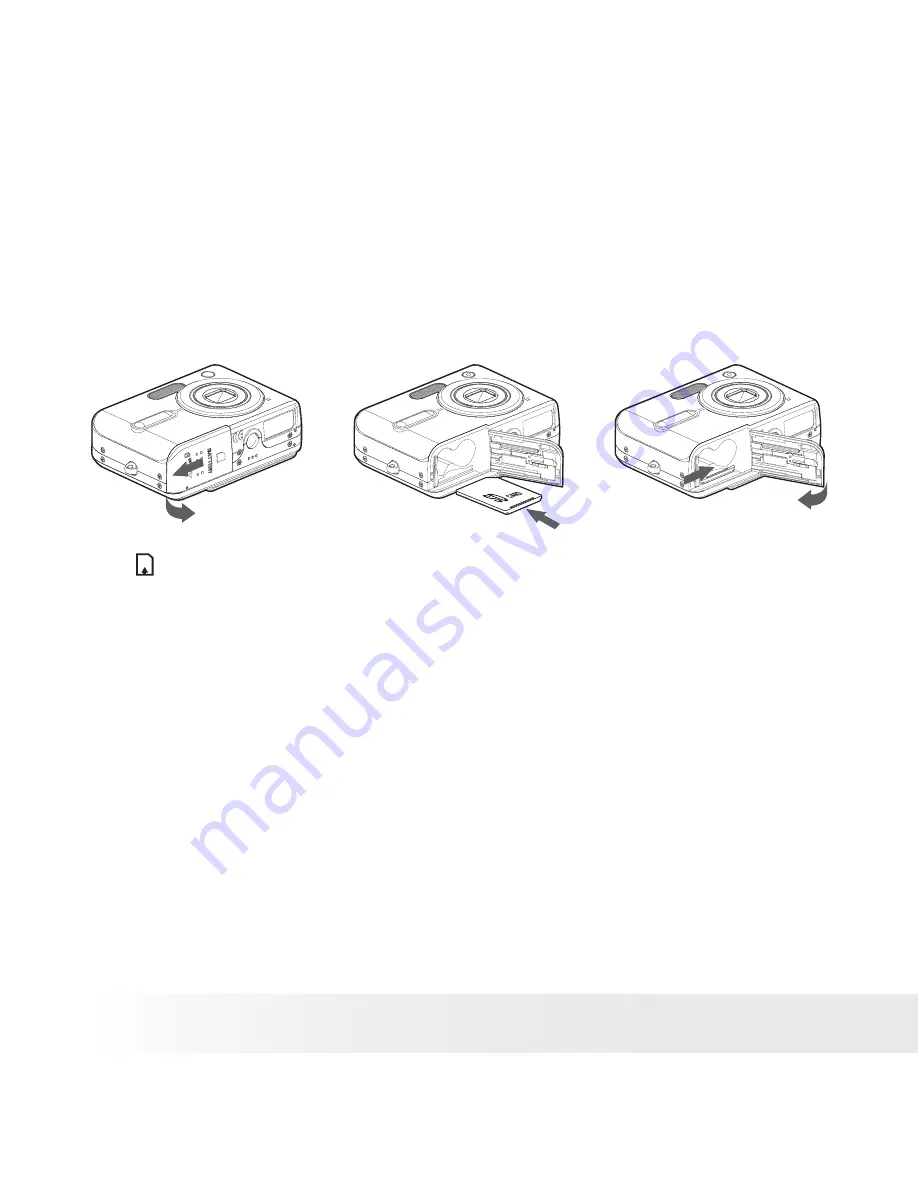
Inserting a SD 

card

1.  Turn off the camera. 

2.  Open the SD card door by pushing it outwards as illustrated.

3.  Insert the SD card and ensure the card is inserted the correct position 

as illustrated.

4.  Close the SD card door by pressing it downwards and then slide it 

back to lock. 

The   icon will appear on the LCD screen when a SD card is inserted into 

the camera. 

Содержание i639

Страница 1: ...www polaroid com User Guide i639 6 0 Megapixels Digital Camera...

Страница 2: ...2 Flash 3 Lens 4 Power button 5 Self timer LED 6 DC IN jack 7 USB AV OUT port 8 Microphone 8 9 Speaker 10 Zoom out Thumbnail button 11 LCD Screen 12 Power Auto Focus LED 13 Zoom in button 14 Playback...

Страница 3: ...amera User Guide www polaroid com 19 Macro Left button 20 Scene mode Erase Up button 21 Flash Right button 22 Self time Continuous Down button 23 Set Adjust button 23 19 20 21 22 24 Tripod mount 25 Ba...

Страница 4: ...o Navigate Menus 18 Setup Menu 19 Adjusting the Beep Sound Volume 20 Selecting start up Sound 20 Selecting Auto Review Period 21 Power Saving Settings 22 Setting the Date and Time 23 Setting the Displ...

Страница 5: ...2 Recording Audio Clips 52 Recording a Voice Memo for the Desired Image 53 6 Managing Pictures and Video clips 54 Reviewing Pictures 54 Rotating the Displayed Picture 55 Changing the Image Size 56 Rev...

Страница 6: ...rements 88 10 Transferring Pictures and Video Clips To a Computer 89 Before Transferring Files 89 Connecting to Your Computer 89 Transferring Pictures and Video Clips to a Computer 90s 11 Troubleshoot...

Страница 7: ...manual settings and options Outstanding features that your i639 digital camera has A high quality glass lens system for exposures from 2 6 inches to infinity including 3 times optical and 4 times digi...

Страница 8: ...ostage i639 The CD ROM includes Polaroid i639 Camera Driver PC ArcSoft PhotoStudio 5 5 PC ArcSoft PhotoStudio 4 3 Mac ArcSoft VideoImpression 2 PC Mac Adobe Acrobat Reader PC Mac User Guide in PDF for...

Страница 9: ...d with the product For a detailed guideline on battery usage please see Using Your Batteries on page 104 1 Open the camera battery door by pushing it outwards as illustrated 2 Insert the batteries as...

Страница 10: ...ousehold power outlet The camera automatically switches over to AC adapter powered operation The AC adapter can be used with or without the battery in place IMPORTANT We recommend the user to use the...

Страница 11: ...cking the Battery Level Check the battery power level before taking pictures 1 Turn on the camera 2 Check the battery power level that appears on the LCD screen Battery power is full Battery power is...

Страница 12: ...view the camera LCD screen to check which camera settings are active Those particular features whose icons are not displayed are not activated Camera Modes Still Image Mode 1 0 200 50 2 IN x4 0 F2 8 1...

Страница 13: ...ontinuous Pictures 39 11 Battery Power Level 11 12 Internal Memory IN SD Card 13 Optical Digital Zoom Bar 41 Digital Zoom Factor X 1 0 X 4 0 40 14 Focus Mark 15 Shake Warning 16 Number of Remaining Pi...

Страница 14: ...14 Polaroid i639 Digital Camera User Guide www polaroid com Video Mode 00 10 00 IN No Description Icon Ref Page 1 Video Mode 50 2 Video Size 51 3 Remaining Recording Time 00 01 03...

Страница 15: ...15 Polaroid i639 Digital Camera User Guide www polaroid com Audio Mode 00 10 00 IN No Description Icon Ref Page 1 Audio mode 52 2 Remaining Recording Time 00 00 13...

Страница 16: ...7M IN IN 2 20 150 20 150 1 5 3 4 6 No Description Icon Ref Page 1 Playback mode 54 2 Audio Clip Length 00 02 10 3 Date 2005 08 01 4 Time 18 39 5 File Number 4 9 6 Video Clip Length 00 01 20 Camera Mo...

Страница 17: ...0 and Recording Audio Clips on page 52 Playback Mode This mode allows the review rotation protection or deletion of pictures and video clips from the camera You also can add a voice memo to a picture...

Страница 18: ...er camera settings like the Date Time and Auto Power Off Menu button 1 Press the or button to enter a menu bar and press it again to exit 2 Press the and buttons to scroll left and right through the m...

Страница 19: ...the camera in Capture mode and Playback mode 1 Press the button 2 Press the or button to choose SETUP 3 Press the button to enter the setup menu Menu button 4 Press the button to exit the setup menu...

Страница 20: ...d setting SETUP MENU 1 3 SELECT EXIT SOUNDS AUTO REVIEW 3 SEC POWER SAVE 1 MIN DATE TIME LANGUAGE ENGLISH SOUNDS SELECT VOLUME START UP SOUND 1 OK 6 Press the button Selecting start up Sound 1 Access...

Страница 21: ...AUTO REVIEW 3 SEC POWER SAVE 1 MIN DATE TIME LANGUAGE English 2 Press the or button to select AUTO REVIEW 3 Press the button 4 Press the or button to select the desired setting SETUP MENU 1 3 SELECT S...

Страница 22: ...LANGUAGE ENGLISH 1 Access the setup menu 2 Press the or button to select POWER SAVE 3 Press the button 4 Press or to select the desired setting 5 Press the button SETUP MENU 1 3 SELECT SOUNDS AUTO REV...

Страница 23: ...DATE TIME 3 Press button 4 Press the or button to select a field such year month day hour minute and date format 5 Press or button to adjust the value in the field and select the date format DATE TIME...

Страница 24: ...p menu SETUP MENU 1 3 SELECT EXIT SOUNDS AUTO REVIEW 3 SEC POWER SAVE 1 MIN DATE TIME LANGUAGE ENGLISH 2 Press the or button to select LANGUAGE 3 Press the button 4 Press the or button to select the d...

Страница 25: ...uter 1 Access the setup menu 2 Press the or to select ICON FILE NO 3 Press the button 4 Press the or button to select the desired setting SETUP MENU 2 3 SELECT EXIT FILE NO SERIES TV OUT NTSC USB COMP...

Страница 26: ...choose a recorded image in your camera as your own startup image 1 Set the camera to Playback mode S IMAGE USER 1 USER 2 2 Press the or button to select a desired image 3 Press the button 4 Press the...

Страница 27: ...ELECT OK 9 Press the or button to select the desired picture 10 Press button The image that you choose will stored in directory as a startup image 11 Press the button to exit the menu NOTE The startup...

Страница 28: ...RMAT 3 Press button DELETE ALL FILES SET MENU NOTE Data deleted by a format operation is not recoverable Make sure you do not have any useful data currently stored in the internal memory before you fo...

Страница 29: ...g steps Please refer to Camera Default Settings on page 105 for more details 1 Access the setup menu SETUP MENU 3 3 SELECT EXIT RESET ALL NO 2 Press or to select RESET ALL 3 Press the button 4 Press o...

Страница 30: ...On Off Press the button each time switches the LCD screen to the next display mode in the following mode Still Image Mode 1 0 200 50 2 IN Press Press Press About Crossing Lines The crossing lines on t...

Страница 31: ...31 Polaroid i639 Digital Camera User Guide www polaroid com Video Mode 00 10 00 IN Press Playback Mode 2006 08 01 18 39 6M IN 150 150 Press...

Страница 32: ...and may corrupt other pictures already stored on the camera s internal memory or a memory card Taking Pictures in Normal Mode Take a single picture at approximately 2 6 inches to infinity 80 cm to in...

Страница 33: ...Focus LED Focus mark Shutter speed Aperture value F2 8 1 30 NOTE Still Image mode is the capture mode by default When the camera highlights the focus mark in red and the Auto Focus LED remains blinks...

Страница 34: ...o capture subjects this close to the lens Wide End 0 2 3 2 ft 5 cm 1 m Telephoto 1 6 3 2 ft 50 cm 1 m 1 Set the camera to Still Image mode 2 Press the button and the icon appears on the LCD screen 3 C...

Страница 35: ...background to focus on the subject LANDSCAPE Used for the wide scenic views NIGHT SCENE Shooting the subject while keeping the background night scenery KIDS Take a still image to capture moving kids B...

Страница 36: ...aking a picture in the normal Capture mode See page 32 Setting Flash Mode Flash Range Wide 0 2 8 6 ft 5 cm 2 6 m Telephoto 1 6 5 ft 50 cm 1 5 m 1 Set the camera to Still Image mode 2 Press the button...

Страница 37: ...picture Use this setting in high contrast situations to provide fill light or use it indoors in low light S slow sync The flash fires regardless of the surrounding brightness In low light conditions s...

Страница 38: ...s and select the one you need Display Option Description Single shot Record a single image 2 2 SEC Take a picture after a count down of 2 seconds 10 10 SEC Take a picture after a count down of 10 seco...

Страница 39: ...k succession 1 Set the camera to Still Image mode 2 Press button repeatedly until the icon appears on the LCD screen 3 Capture procedures are the same as for taking a picture in the normal capture mod...

Страница 40: ...at the centre of the image screen Digital zoom factor range is 1X to 4X These zoom features let you zoom in the central area of an image and photograph only the enlarged portion of the picture NOTE Us...

Страница 41: ...The white square in the bar indicates the zoom status T stands for Tele and W stands for Wide Keep the button pressed and the camera switches from optical zoom to digital zoom when it reaches the maxi...

Страница 42: ...which occupies more memory space Smaller size pictures with normal quality are easier to email while larger size with fine quality are better for printing Resolution setting 1 Set the camera to Still...

Страница 43: ...e or button to select QUALITY 4 Press the or button to select the desired setting 5 Press the button Setting Light Metering 1 Set the camera to Still Image mode 2 Press the button METERING CENTER MULT...

Страница 44: ...mode 2 Press the button 3 Press the or button to select SHARPNESS SHARPNESS HARD NORMAL SOFT 4 Press the or button to select the desired setting 5 Press the button Option Description Increases contra...

Страница 45: ...and moods of a picture 1 Set the camera to Still Image mode 2 Press the button 3 Press the or button to select EFFECT EFFECT OFF B W SEPIA NEG ART 4 Press the or button to select the desired setting 5...

Страница 46: ...and time are displayed on the picture by default You can hide one or both of them by the following steps 1 Set the camera to Still Image mode 2 Press the button 3 Press or button to select DATE STAMP...

Страница 47: ...is the current selection WHITE BALANCE DAYLIGHT AUTO 4 Press the or button to select the desired setting 5 Press the button Option Description AUTO Automatic adjustment Outdoor daylight Cloudy Indoor...

Страница 48: ...er shutter speeds or smaller apertures In a digital camera higher ISO value allows higher shutter speed at the expense of mottled or grain appearing in the final picture ISO AUTO 50 ISO 50 100 200 1 S...

Страница 49: ...ing a dark background and so on 1 Set the camera to Still Image mode 2 Press the button 3 Press the or button to select EXPOSURE EXPOSURE 1 0 2 1 0 1 2 4 Press the or button to select the desired sett...

Страница 50: ...l decrease in seconds while recording 1 Set the camera to Video mode NOTE The icon will appear on the LCD screen indicating the Video mode is activated 2 Frame your subject using the LCD screen 3 Pres...

Страница 51: ...a to Video mode 2 Press the button 3 Press the or button to select MOVIE SIZE MOVIE SIZE 4 Press the or button to select the desired setting 5 Press the button NOTE is the default value suitable for v...

Страница 52: ...io Clips Recording a Audio Clip 1 Set the camera to Audio mode 2 Press the Shutter button completely down to start recording 3 Press the Shutter button again to stop recording or recording stops when...

Страница 53: ...voice memo VOICE MEMO ON 3 Press the button 4 Press the or button to select VOICE MEMO 5 Press button IN 5 120 SET MENU 2005 01 01 12 40 6 Press the button to start recording 7 Press the button again...

Страница 54: ...nt memory before editing an image Reviewing Pictures 1 Set the camera to Playback mode 2 Use the and buttons to view the pictures taken IN 15 120 2005 01 01 12 40 Magnifying the Displayed Picture 1 Se...

Страница 55: ...a better review angle on the LCD screen 1 Set the camera to PLAYBACK mode 2 Press the button 3 Press the or button to select ROTATE 4 Press the or button to select the desired setting 5 Press the but...

Страница 56: ...ne helps to share with families and friends 1 Set the camera to PLAYBACK mode 2 Press the button 3 Press the or button to select RESIZE RESIZE 4 Press the or button to select the desired setting 5 Pre...

Страница 57: ...up to 9 thumbnail files appear on the LCD screen 3 Press the or button to select a thumbnail file 4 Press the button to view the file in full screen IN 2005 01 1011 12 1 2 3 Running a Slide Show on th...

Страница 58: ...7 Press the button to select ICON SET MENU 10 SEC YES IN 5 120 2005 01 1011 12 8 Press the or to select the desired setting Running a Slide Show 9 Press the button to start a slide show 10 Pressing th...

Страница 59: ...Screen 1 Set the camera to Playback mode 2 Press the and buttons to select the desired video clip 3 Press the button to start playing the video clip 4 Press the button again to pause 5 Press the butt...

Страница 60: ...Set the camera to the Playback mode 2 Press the and buttons to select the desired audio clip 3 Press the button to start playing the audio clip 4 Press the button again to pause 5 Press the button to...

Страница 61: ...the camera to the Playback mode 2 Press the and buttons to select the desired image that has the voice memo recorded 3 Press the button to start playing the voice memo 4 Press the button again to pau...

Страница 62: ...NGLE Protect the selected picture video or audio clip LOCK ALL Protect all of the pictures video and audio clips in the current memory UNLOCK ALL Remove protection from all protected pictures video an...

Страница 63: ...ton Remove Protection from All Pictures Video and Audio Clips 5 Press the button 6 Press the button 5 120 UNLOCK ALL FILES SET MENU IN 2005 01 01 12 40 NOTE The icon appears on the LCD screen when you...

Страница 64: ...Audio Clip 6 Press the or button to select the picture video or audio clip you want to delete 7 Press the button 5 120 SET MENU IN NOTE You can also press the button to delete a single file Deleting A...

Страница 65: ...Japan etc and PAL for Europe Asia excluding Taiwan etc You can change the video output system according to the following steps 1 Access the setup menu 2 Press the or button to select TV Out 3 Press th...

Страница 66: ...a Be sure battery level is full before printing Refer to the user guide that comes with your printer and make preparations paper ink cassette cartridge etc as required Turn on the camera and the print...

Страница 67: ...fore printing press button to exit and reconfigure printing settings OPERATIONG ERROR NOTE Please refer to the printer s user guide for the solutions Printing may resume once the problem is solved Sel...

Страница 68: ...Location of USB socket will vary from printer to printer 2 Plug the other end of the USB cable into the USB port on your camera SELECT PICTBRIDGE MENU 1 2 SELECT PRINT STANDARE IMAGE SINGLE QUALITY NO...

Страница 69: ...LE ALL ALL SINGLE Print the selected image in the camera s internal memory or a memory card according to specified settings Print all images in the camera s internal memory or a memory card according...

Страница 70: ...the or button to select a desired image and press the or button to set the number of copies 2005 01 01 12 26 6 24 MENU 2005 01 01 12 26 6 24 MENU X00 Press Press or SET SET 2005 01 01 12 26 6 24 MENU...

Страница 71: ...lable AUTO FINE DRAFT NORMAL AUTO Print settings differ according to the printer model Selecting Print Layout 1 Access the PictBridge menu 2 Press the or button to select the desired setting 3 Press t...

Страница 72: ...Press the button The following paper size are available AUTO 3X5 4X6 5X7 6X8 AUTO Print settings differ according to the printer model Selecting Paper Type 1 Access the PictBridge menu 2 Press the or...

Страница 73: ...TO Print settings differ according to the printer model ON Add the date stamp to the printed image OFF Print without the date stamp Setting the File Name On Off 1 Access the PictBridge menu 2 Press th...

Страница 74: ...s refer to Resetting to Default Setting on page 29 Selecting Print format 1 Access the PictBridge menu 2 Press the or button to select the desired setting 3 Press the button PICTBRIDGE MENU 1 2 SELECT...

Страница 75: ...ted Then you can print on a DPOF compatible printer or at a professional print service from the memory card in accordance with the file name and number of copies settings recorded on the card With thi...

Страница 76: ...picture in a memory card will be printed out up to 30 copies ALL All pictures in a memory card will be printed out up to 30 copies for each picture RESET Returns to the normal playback mode 6 Press th...

Страница 77: ...ard from the camera and insert it into the printer s card slot as illustrated Location of the card slot may vary from printer to printer model NOTE Make sure you turn off the camera before inserting o...

Страница 78: ...Memory card precautions 1 Use only a SD memory card with this camera 2 Electrostatic charge electrical noise and other phenomena can cause data corruption or even loss Always make sure that you always...

Страница 79: ...ant to record new files onto it format it or delete its files Files contained in the SD card recorded by other cameras may conflict with the i639 camera and valuable data in your existing SD card may...

Страница 80: ...the SD card door by pushing it outwards as illustrated 3 Insert the SD card and ensure the card is inserted the correct position as illustrated 4 Close the SD card door by pressing it downwards and t...

Страница 81: ...ny other object into the camera s SD card slot Doing so creates the risk of damage to the camera and card Should water or any foreign objects ever get into the card slot immediately turn off the camer...

Страница 82: ...XIT FILE NO SERIES TV OUT NTSC USB COMPUTER S IMAGE FORMAT 3 Access the setup menu 4 Press the or button to select FORMAT 5 Press the button 6 Press the button DELETE ALL FILES MENU SET IMPORTANT SD c...

Страница 83: ...n the internal memory to a memory card 1 Insert an SD card into the camera 2 Turn on the camera 3 Set the camera to the Playback mode COPY TO CARD SINGLE ALL 4 Press the button 5 Press the or button t...

Страница 84: ...e 2005 01 01 12 40 5 120 SET MENU IN 9 Press the button Copy All Files 8 Press the button COPY ALL CAMERA FILES TO A CARED MENU SET NOTE With a memory card inserted into the camera the card memory has...

Страница 85: ...ss Storage function needs to install the i639 Driver After the installation please restart the Windows before connecting the camera to the PC IMPORTANT For Windows Me 2000 XP Directly plug in the came...

Страница 86: ...ow the on screen instructions Open Close NOTE If the setup screen does not appear after loading the CD then you can manually start it by double clicking the My Computer icon on your desktop then doubl...

Страница 87: ...and all at once enhancement to the pictures on your computer for example removing red eye and cloning objects to a different picture Add special effects or place them in cards calendars frames and fa...

Страница 88: ...tium III 450MHz or equivalent processor USB Port 128MB RAM 256 MB recommended 500MB free disk space Color monitor with high color 16 bit graphic capability or higher CD ROM drive Standard mouse and ke...

Страница 89: ...CLOSED CD PLEASE REFER TO 8 Installing the Software Onto a Computer Connecting to Your Computer Connect the camera directly to your computer 1 Turn the camera Off 2 Plug the labelled end of the USB ca...

Страница 90: ...Disk double click DCIM double click any directory folder under DCIM 5 All the pictures video and audio clips are in the directory folder Highlight the pictures video and audio clips and drag them to...

Страница 91: ...e will vary from different version of Mac OS system 4 Double click the folder INTERNAL EXTERNAL to enter sub folder DCIM 5 Double click the folder DCIM and then any subfolder inside 6 You can copy the...

Страница 92: ...on your computer remove it and it s driver completely from your system to avoid conflicting with it My CD Installation wizard does not work The auto installation file is switched off or The CD ROM is...

Страница 93: ...ter button is pressed Camera is turned off Or Flash unit is charging Or Memory is full Turn the camera on Or Wait until flash unit charging finishes Or Delete images you no longer need or use another...

Страница 94: ...ctures recorded onto a memory card used by another digital camera I cannot erase pictures All the pictures in memory are protected Unprotected the pictures you want to delete TV out Symptom Symptom So...

Страница 95: ...Support Center Ireland Hangzhou Tel 353 0 61 702087 Tel 86 571 88210575 Fax 353 0 61 702001 E mail support arcsoft com cn E mail eurosupport arcsoft com Web http www arcsoft com cn new support For Ja...

Страница 96: ...CCD Lens Type 6 elements Aperture F 2 8 4 8 Focal Length 5 95 17 14 mm Focal Distance Normal Focus 2 6 ft to 80 cm to The focusing range is the distance from the lens surface to the subject LCD Screen...

Страница 97: ...ile Format Still Image EXIF 2 2 compatible format JPEG compression DCF compatible Support DPOF Video Clip AVI Audio WAV Power Supply AA alkaline battery x 2 Self timer 2 sec 10 sec Double Size W 89 mm...

Страница 98: ...ch setting based on the internal memory and different capacities of SD card Recordable Images Units Images Resolution Quality 16MBInternalMemory 32MBSD 64MBSD 128MBSD 2 7 14 28 4 14 28 56 6 21 54 108...

Страница 99: ...24 448 216 432 964 s 83 168 335 158 319 636 242 487 971 100 201 402 183 369 737 275 554 1105 125 252 502 234 470 938 359 722 1440 250 504 1005 493 992 1978 743 1495 2981 1490 3000 5981 2505 5041 10051...

Страница 100: ...www polaroid com Recordable Video Length Units Seconds Resolution Video clips can be taken 16MB Internal Memory 4 21 59 32MB SD 23 89 233 64MB SD 47 183 478 128MB SD 96 370 968 256MB SD 192 743 1947...

Страница 101: ...as a larger file size than a picture of blue sky at the same resolution and quality setting Therefore the number of pictures and length of video clips you can store on a memory card may vary Recordabl...

Страница 102: ...Windows 98SE user only because only Windows 98SE needs to install the i639 driver 1 Open Add Remove Program Properties in Control Panel and select Polaroid i639 program then click Add Remove 2 The fo...

Страница 103: ...s Normal Flash Mode Auto Flash Date stamp Date Metering Multi Digital Zoom ON Effect OFF Video Mode Video Resolution 320 X 240 Metering Multi White Balance for Video Clips Auto Setup Mode Capture mode...

Страница 104: ...he LCD screen to take pictures Excessive use of the flash WARNING Batteries should be replaced by an adult Do not mix different types of batteries or new and used batteries Use recommended or equivale...

Страница 105: ...ge which can be dangerous if live parts are exposed We recommend that you regularly examine the AC adapter for any breakage NEVER try to repair or open the AC adapter Camera Cautions NEVER immerse any...

Страница 106: ...to provide reasonable protection against harmful interference in a residential installation This equipment generates uses and can radiate radio frequency energy and if not installed and used in accord...

Страница 107: ...t be used with this unit to ensure compliance with the Class B FCC limits Under the environment with electrostatic discharge the product may malfunction and require user to reset the product US 0706 P...

Отзывы: