background image

14


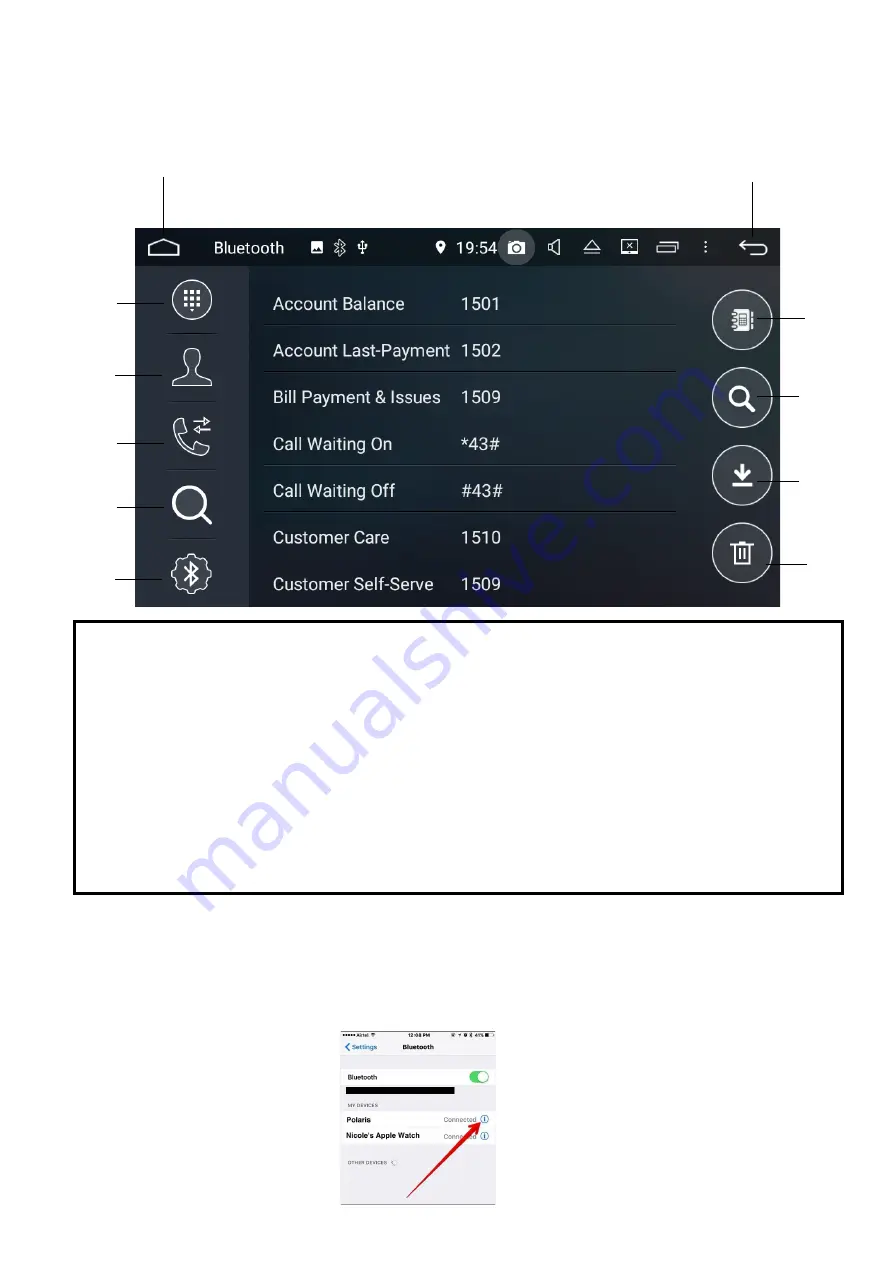
Contacts 


1.


Home. 


2.


Back to previous screen.


3.


Keypad.


4.


Contacts. 


5.


Received / Dialled / Missed menu.


6.


Paired Devices.


7.


Settings.


8.


Phonebook.


9.


Search Phonebook.


10.


Import Contacts. 


11.


Trash Pairing.


7


4


5


6


8


9


10


11


3


1


Notes: 

When importing contacts, your phone will ask for permission. Please select 

YES


on your device. 


If you have an iPhone: If you find that your phonebook will not import, please go into 
the settings on your phone > blue tooth settings > Look for Polaris > 


select the information icon > 


turn Sync contacts on:


2


Содержание ToyotaLUXX

Страница 1: ...User manual Owners Manual please read before using this product ...

Страница 2: ... damaged or tampered with in any way this includes in stalling foreign mapping or software onto the SD card The installation of 3rd party apps that may cause harm to the unit Warranty Terms The ToyotaLUXX is covered for 3 years and includes Defective Equipment Defective Cables Not Covered under warranty Abuse Improper installation Alteration to Cables includes cutting of any cables Accidents Water...

Страница 3: ... 9 10 11 Bluetooth 12 18 Radio 18 19 Music via USB 20 21 Movies via USB 22 CD player 23 DVD player 23 24 Navigation 25 Camps Australia POIs 26 27 Other features 28 30 Settings 31 35 Multitasking split screen 36 37 Additional Camera Optional 38 How to view the Reverse Cameras 39 Car play Android Auto Optional 40 Touch button panel 41 Shortcuts 41 Specifications 42 43 Returns Procedure 44 ...

Страница 4: ...the initial start up after this the unit will load instantaneously unless reset Once the unit has loaded it will appear with the main menu interface Swipe left to access more features Please note that some apps have been installed by Polaris via Google Play store ...

Страница 5: ...Wi Fi that you wish to connect to and follow the prompts 2 The other way in which you can connect to Wi Fi is to select the settings icon select network internet Wi Fi select the Wi Fi that you wish to connect to and follow the prompts Please Note If you are connecting to Wi Fi via your personal hotspot you will be using your phones data Connecting Bluetooth 1 Go into your phones Bluetooth setting...

Страница 6: ... bluetooth device by following the normal procedure through your device This usually involves going into your devices bluetooth settings and scanning for other bluetooth devices The Toyota Luxx s bluetooth ID is Polaris Select Polaris on your device when your device asks you for a passcode please enter 0000 For a more in depth look at the bluetooth settings please see page 12 18 7 Once the unit ha...

Страница 7: ...To automatically scan select the magnifying glass icon The unit will run through a complete scan and will automatically set your pre set stations to the radio frequencies with the strongest signal within your area Select a pre set down the bottom of the screen and hold down until it changes to your desired station ...

Страница 8: ...reached your desired station select a pre set down the bottom of the screen and hold down long press until it changes to your desired station For a more in depth view at the radio features please see page 18 19 Date Time Select settings from the main menu Select System Date Time If you are planning on always being connected to Wi Fi via your mobile phone then you can simply set the date and time t...

Страница 9: ... google account you can sign up online which is completely free Head over to www gmail com click on more options create account Follow all the necessary prompts to create your free google account Once you have set up your account select play store from the main menu follow the prompts to sign in Once you are signed in you are free to start downloading 3rd party apps such as navigation or Spotify P...

Страница 10: ... your android device to allow for debugging select yes If debugging was successful Android drive mode will automatically load Note If you are having trouble connecting your android phone make sure that debugging is enabled You can usually find debugging in developer options A quick google search of your make and model should help with finding this feature on your phone Android Drive Mode This feat...

Страница 11: ... from the easy connection menu On your iPhone open airplay or screen mirroring and select EC Mirror CJ Please Note When connecting via Wi Fi please be aware that the response time will depend on how strong your signal is If the connection is weak the response time will be slow When connecting via Wi Fi the ToyotaLUXX and your android phone must be connected to the same network If you are on the ro...

Страница 12: ...th you can receive calls regardless of what feature you are using Receiving a call call in progress 1 3 4 1 Minimise bluetooth call 2 Incoming phone number 3 Keypad Notes Minimising the bluetooth call will allow you to access other features on the Toyota Luxx 5 6 2 4 Answer 5 Hang up 6 Switch sound between handset and unit ...

Страница 13: ...bers 3 Back to previous screen 4 Keypad 5 Contacts 6 Dialled Received Missed calls 7 Paired Devices 8 Settings 9 Delete number 10 Call 11 Hang up 12 Switch sound between handset and unit Keypad Making a Call To make a call select bluetooth from the main menu 3 4 5 6 7 8 12 ...

Страница 14: ...10 Import Contacts 11 Trash Pairing 7 4 5 6 8 9 10 11 3 1 Notes When importing contacts your phone will ask for permission Please select YES on your device If you have an iPhone If you find that your phonebook will not import please go into the settings on your phone blue tooth settings Look for Polaris select the information icon turn Sync contacts on 2 ...

Страница 15: ...ack to previous screen 3 Keypad 4 Contacts 5 Received Dialled Missed menu 6 Paired devices 7 Settings 8 Missed Calls 9 Received Calls 10 Dialled Calls 11 Delete 3 4 5 8 9 10 1 Received Dialled Missed calls 2 11 6 7 ...

Страница 16: ...000 in You can also connect your bluetooth device by following the normal procedure through your device This usually involves going into your devices bluetooth settings and scanning for other bluetooth devices The Toyota Luxx s bluetooth ID is Polaris Select Polaris on your device when your device asks you for a passcode please enter 0000 For a more in depth look at the bluetooth settings please s...

Страница 17: ...7 4 5 6 3 1 2 8 9 10 11 1 Home 2 Back to previous screen 3 Keypad 4 Contacts 5 Received Dialled Missed menu 6 Paired Devices 7 Settings 8 Device name 9 PIN number 10 Auto Answer 11 Auto connect on off Notes If the auto answer feature is on The ToyotaLUXX will automatically answer the call after three rings If Auto Connect is turned on bluetooth will automatically connect to the last paired phone u...

Страница 18: ...t you can skip forward and back pause and play through BT music Notes BT music is limited in features we recommend that if you use streaming services such as Spotify or Apple music to download the app directly onto the Toyota Luxx Radio The ToyotaLUXX has AM and FM built into it You can set up to 30 FM pre sets and 30 AM pre sets To see how to set these up please see pages 7 8 Back Play pause Forw...

Страница 19: ...gh different stations manually Hold button down to scan 5 Back to previous screen 6 Radio pre set channel 7 Automatic scan 8 Equaliser 9 Scan for Long Range distant or short Range frequencies local 10 Stereo or mono sound 11 Search for Radio station 12 Alternative Frequency 13 Traffic Announcement 14 Toggle between AM FM frequency 15 Program Type 5 15 ...

Страница 20: ...o the glove box The third USB port is located in the head unit 1 4 5 6 7 9 10 11 1 Home 2 Toggle between show song title only or song artist and album 3 Repeat all Repeat 1 Shuffle 4 Back to previous screen 5 Equaliser 6 Time Elapsed Bar 7 Skip Back 8 Pause play 9 Song Information 10 Skip forward 11 USB SD card contents menu 8 3 2 ...

Страница 21: ...21 USB SD card Contents Menu 1 2 3 1 Home 2 Back to previous screen 3 Memory device list 4 Music files found on device 4 ...

Страница 22: ...view your movie files select video from the main menu 2 1 3 4 5 6 7 8 1 Home 2 Back to previous screen 3 Equaliser 4 Shuffle Repeat Repeat all 5 Skip back 6 Pause Play 7 Skip forward 8 Change to full screen 9 USB SD card contents menu 9 ...

Страница 23: ...ect DVD from the main menu 1 Home 2 Track list 3 Back to previous screen 4 Skip back 5 Pause play 6 Skip forward 7 Repeat 1 Repeat all 8 Shuffle 9 Equaliser 1 2 3 4 5 6 7 8 DVD player Please insert a DVD into the head unit If the DVD doesn t load automatically please select DVD from the main menu 9 ...

Страница 24: ...n 3 Skip back 4 Pause play 5 Stop 6 Skip Forward 7 Rewind 8 Fast forward 9 Equaliser 10 More Options 11 Go back to DVD menu 12 Subtitles on off 13 Change language if applicable 14 Repeat 1 Repeat All 15 Shuffle 16 Filters through different scenes 17 Back to previous menu 10 ...

Страница 25: ...ard at the time of purchase Please be aware that the mapping data is provided by HEMA but the software is run by OziExplorer To enter into your off road navigation please enter the OziExplorer app from the main menu For help on how to use the OziExplorer android software please visit www oziexplorer com OziExplorer Android The HEMA maps and Tom Tom maps only require a GPS signal to work No interne...

Страница 26: ...in the iGo Australia 1 Select main menu 2 Select new Route 3 Select places 4 Tap in the search name or category bar 5 Double check where you want to search for your Camps locations Please note that if there are no locations in specified area the category will not appear 6 Scroll down and select the Camps logo ...

Страница 27: ... 9 Navigate to the destination If you wish to view the Camps POIs on the map 1 Select Main Menu 2 Select Settings 3 Select Navigation View 4 Select Map appearance 5 Scroll down until you see Place Markers 6 Scroll down until you see your Camps icon 7 Select show on map ...

Страница 28: ... for navigation Gallery View Manage photos Google Chrome Use Google Chrome to browse the internet when connected to Wi Fi Amplifier Sound management Google play store Open Google play store for downloading apps onto the unit Clock Show clock Email Set up email account ...

Страница 29: ...yota Luxx DVR Allows you to plug in an aftermarket DVR camera via USB for recording GPS Info Displays satellite strength information Gmail View Manage your Gmail account Google Open Google search bar File Explorer Explore all your files on the unit and on your external devices Search Search the Toyota Luxx CD DVD CD DVD player F Cam View front camera if applicable ...

Страница 30: ... Reader Allows you to view PDF documents AV Out Audio Visual Out Autoplay Car Play Android Auto USB dongle feature Instructions View the ToyotaLUXX instructions here EasyConnect Android Drive mode or mirror your iPhone Manage Files View copy and paste your files here ...

Страница 31: ...to this unit VPN Add VPN details Apps Notifications App Info Lists all the apps downloaded on the device Ability to change individual Apps settings Notifications Control which apps send you notifications App Permissions Lists all the apps that are using certain permissions For example what apps are using contacts or location Default Apps Which apps are the default program Special App Access N A to...

Страница 32: ...driving Rear View Ruler add guidelines to reverse camera Reversing Track Display Reversing X mirror Steering Wheel control settings Factory Settings Password is 126 See page 33 For in depth Factory settings Upgrade and restore factory settings Update MCU Update Android Restore System to factory settings Display Brightness Level Adjust brightness Night brightness level Adjust brightness for night W...

Страница 33: ... Show Screenshot in status bar Will add screen shot icon in status bar Storage Shows storage settings Google Play protect Google play protect regularly scans apps for harmful behaviour Shows the apps that were recently scanned Find My Device Allows you to find the device in case it gets stolen Security Update Security Update status Location Shows what apps are using location Show passwords Display...

Страница 34: ...t size Display size Magnification Large mouse cursor Interaction controls Click after cursor stops moving Auto rotate screen Touch and hold delay Audio on screen text Mono Audio Captions Experimental High Contrast text Colour Correction Colour Inversion Google Shows Google settings System Languages Input Date Time Backup Reset About Machine ...

Страница 35: ...ration N A to this unit Wheel Key default configs N A to this unit Panel Control Settings Recalibrate the Touch panel keys Touch key study N A to this unit Touchscreen Calibration Recalibrate the touch screen Canbus Settings Change CANbus settings according to your vehicle If you are using a special module you will not need to change any of these settings Amp Settings Change amp volume App Select ...

Страница 36: ...e Please note Some apps may not be supported To view 2 apps in split screen open the first app Once your first app has loaded press the back icon to return to the main menu Open your second app and once this has loaded press the back icon to return to the main menu Select multitask icon from the taskbar up the top ...

Страница 37: ... size and appear on the right hand side To exit multitask split screen select the multi tasking icon and the right hand side app will appear with a cross underneath Touch the cross to close the app Simply drag the app that appears on the left hand side to open in full screen Please note Some apps may not be supported ...

Страница 38: ...a in via the front camera in put If you wish to view the additional camera for a nominated time interval after reverse is disengaged then you can turn this function on via the settings Car Settings Factory Settings Type password 126 Select other Otherwise you can view the additional camera via the CAM icon on the main menu ...

Страница 39: ... Drive gear From the main menu find your Cam App The camera that will appear is your second camera whichever camera is plugged into the Front camera input To switch to the Reverse Camera touch the screen select icon on the screen Viewing the cameras whilst in Reverse gear When you engage reverse the reverse camera will appear on the screen and to switch to the second camera whichever camera is plu...

Страница 40: ...your phone in with your genuine cable into the dongle Step 3 Select AutoPlay from the main menu Step 4 Apple Car play or Android Auto should appear on screen depending on which phone you have Please note For Android phones you must have the Android Auto app installed on your phone as well Troubleshooting If you are having trouble with this device unplug your phone and select settings in the top le...

Страница 41: ...ral settings You can also access widgets wallpaper and general settings by holding your finger down anywhere on the screen in the main menu interface 5 6 7 8 9 1 GPS SD card slot 2 Internal Mic 3 RESET Hole 4 SD Card Slot 5 Standby 6 Home 7 Navigation 8 Mute 9 AUX Not available in AUS version 10 Eject CD DVD 11 Back to previous screen 12 Volume up 13 Volume down 14 USB input 10 11 12 13 14 1 2 3 4...

Страница 42: ...080P HW DVR USB Camera Screen Hanstar screen GPS Frequency 1 5GHz Google Maps APP comes pre installed on device Will need to use data from personal hotspot on the road Street Navigation Australia Wide TomTom Navigation with iGo Nextgen Software platform loaded onto an SD card Off Road Navigation HEMA maps with OziExplorer platform loaded onto an SD card GPS Dual Zone Yes can listen to music whilst...

Страница 43: ...n the screen to switch camera views NOTES Optional Extra Car Play Android Auto USB Dongle Car play Android Auto USB dongle available NOTES Optional Extra Bluetooth Function Hands free Yes compatible with BT 2 0 for most brand phones Import Phonebook Yes with alphabetic search function Stream audio via Bluetooth Yes Supports external microphone Yes included in the unit CD DVD Video Output Range 1 0...

Страница 44: ...as exhausted all options and determines that the unit needs to be sent back for assessment please visit www polarisgps com au warranty returns returns form Please print and fill out the return form and include a copy with the goods For a speedy return process please try and be as detailed as possible when describing the fault 3 Package the item up and send back to TO Polaris ATTN Returns PO Box 72...

Отзывы: