background image

-2-

P/N 9924924 Rev 01  12/13

GENERAL INSTALLATION:

1. Place the vehicle in “PARK” and turn the key to 

“OFF” position. Remove the key from the vehicle.

2. Slide the seat forward and remove.
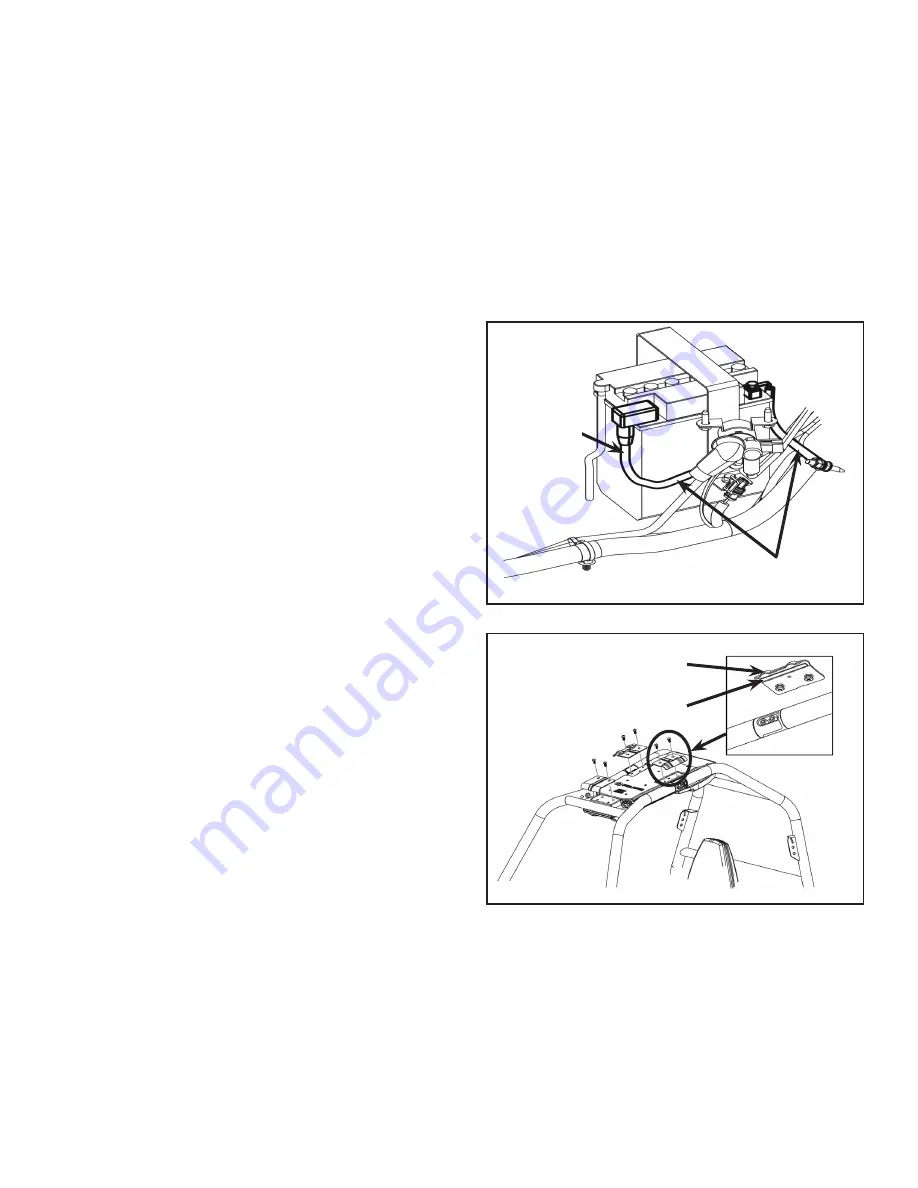
3. Disconnect positive battery cable from battery with 

Phillips screwdriver. Figure 1.

4. Remove front rack and center cover underneath it.
5. Remove roof, rear panel, and mirror if installed. Roof 

and rear panel can be reinstalled later, but the mirror 

will not fit with the audio system installed.

Battery Cables 

Under Seat

Figure 1

IMPORTANT:

  Your Polaris ACE AUDIO KIT is exclusively designed for your vehicle. Please read the 

installation instructions thoroughly before beginning. Installation is easier if the vehicle is clean and 

free of debris. For your safety, and to ensure a satisfactory installation, perform all installation steps 

correctly in the sequence shown. Before you begin, thoroughly review the instructions. Ensure that 

you have all the required tools and the skills necessary to complete this installation.

APPROXIMATE ASSEMBLY TIME: 

30 minutes

Tools Required:

 T30 

Torx 

Driver 

    Side 

Cutter


10 mm Deep-Well Socket or Nut Driver   

Phillips Screwdriver

Positive 

Battery 

Cable 

6. Place one foam strip on the inside curved surface of 

each of the stamped mounting brackets. Figure 2.

Figure 2

Foam Strip

Curved 

Surface

Содержание ACE AUDIO 2879703

Страница 1: ...se System 2879703 2 1 Harness Audio 2412730 1 Instructions 9924924 Service Hardware Kit 2205570 1 IMPORTANT Mirror kit PN 2879712 will not work with the audio system Roof windshield rear panels will work with audio system Refer to manual included with the audio kit for system operation Two people are required to install this kit Do not attempt to install this kit by yourself Main system is control...

Страница 2: ...exclusively designed for your vehicle Please read the installation instructions thoroughly before beginning Installation is easier if the vehicle is clean and free of debris For your safety and to ensure a satisfactory installation perform all installation steps correctly in the sequence shown Before you begin thoroughly review the instructions Ensure that you have all the required tools and the s...

Страница 3: ... the screws to 6 ft lbs 8 1 Nm 8 Route the wire harness into the hole and down inside the right side ROPS tube then out the hole at the bottom of the tube Figure 4 Figure 4 Wire Harness Rubber Grommet Figure 3 ROPS Bracket ELECTRICAL CONNECTIONS 9 Remove five plastic retainers and splash shield from inside upper right front fender Figure 5 Figure 5 Remove Plastic Retainers Splash Shield ...

Страница 4: ...rness from audio system to harness extension Route harness over main strut tube and into bus bar area Figure 6 11 Connect red main power wire to battery power terminal on bus bar Connect black ground and orange keyed power wires to corresponding posts on bus bar Figure 7 12 Bundle up any extra wire and secure wire harness under main body panel shown on previous page Figure 7 Figure 6 Black Wire Re...

Страница 5: ... 5 P N 9924924 Rev 01 12 13 SERVICE KIT Antenna Plug Connector Cap Screw Bracket 2205570 Foam Strip ...

Отзывы: