


Technical specification / user manual T6-RC
4 / 5
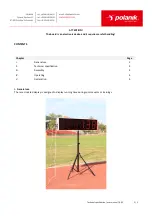
III. Assembly
1.
Set up the clock in a suitable place.
2.
Connect the clock to power supply.
3.
The clock tests led display units (all segments light up for about 2s). Then the clock shows time 0s. and it is
ready to use.
IV. Operating
1.
Standalone operation
Operate the display with the handheld keypad:
a)
press
USTAW/SET
to adjust first two digits (hours HH), while the digits are fleshing press
+
to set up their
initial value, then press
USTAW/SET
again to adjust next two digits (minutes MM), repeat the sequence to set
up last group (seconds SS),
b)
press
START
to start measuring time from the initially adjusted value,
c)
press
STOP
to stop measuring time,
2. Operation with chronometer
Preparation for use:
-connect the board with the chronometer using the included cable
-switch on the power of the board
-switch on the chronometer (see the instruction manual of the chronometer)
a) when the power is on the chronometer display shows the producer name and the version of the program, and then
the main menu is displayed:
Timekeeping –
measuring time
Settings –
options
OFF
– switching off the chronometer
Clear races
– clears the memory of the chronometer, recorded results and races are erased
b) use keys:
up ˄
,
down ˅, ENTER
and numeric keys to operate the chronometer;
press
ESC
to display
the
main menu,
c) the chronometer settings:
START-NO
STOP-NO
Arming – 0s
Resolution – 1/100sec
Rounding – IAAF rounded


