


PNI SENSOR CONFIDENTIAL DOCUMENT
DOM DST Evaluation Guide R01
03/2021
Page 4 of 14
•
If you only have one module, only one device will appear in the selection.
•
Each module is identified by a unique serial number.
•
Serial number can be found on the sticker on the Module.
5.
Once the Module is connected via BLE to the mobile phone, you’ll be brought to a Services
page of the App.
6.
Choose Direction of Motion Service
7.
Keep the module on a stable surface to allow gyro bias learning [at least 30 seconds].
8.
Secure module on body so it is stable and does not move.
9.
For best results, start the test in open skies where an accurate initial location can be
determined using the iPhone’s GPS. Starting in open skies with GPS will automate user step
scaling and starting location. Contact our FAE Team at
your application will not have any GPS access.
10.
While in Direction of Motion Service with a screen view of a map and good acquisition of your
starting point, select “Start” at the top left corner of the map.
•
After hitting “Start”, wait about 3 seconds before walking. This allows the module to
learn its orientation in relationship to the user’s body.
•
Once started, “Start” will toggle to “Stop.”
11.
Start walking - Start in open skies and walk for one minute outdoors.
12.
Once a good starting location and automatic user initial stride length is learned (one minute
with good GPS), move from outdoors to indoors and back outdoors for testing.
13.
At the end of walk press “Stop”.
14.
Take a screen shot if you would like to save a visual record.
•
Once you leave Direction of Motion Service page, the tracking run will be erased.
15.
Export JSON log for data analysis and for Playback of the run.
•
DOM Playback mode can recreate the run.
3 DETAILED STEPS
3.1
Charging
The DOM DST module can be used in continuous mode connected via BLE to the phone for 4 hours.
After 2-3 hours of use, we recommend charging the module before further testing.
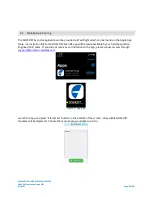
To charge the module, slide the DOM DST module into the wireless charger and apply power to the
charger using the micro-USB connector. Make sure the small arrow on top of the DST module points
towards the USB charger as in Figure 2 when sliding it onto the charger. A red LED will light up on the
bottom of the charger and when charging is complete, the LED will turn solid green. To fully charge the
battery from low battery condition, it will take about an hour.
Note: In this prototype version of the DOM DST module hardware, there is no battery charge level
indicator.
If the battery is nearly full, the charger LED may stay red and not turn green. This is a function of the
charger IC which we are not able to change at this time. The battery will charge even with the red LED,
keep it in the charger for an hour to guarantee a full charge.


