background image

Users Guide: iMFD User Guide 


Version 2.0 May 16, 2013 

www.plxdevices.com


(408)745-7591 


15 

4.5


Two Parameter Gauges 


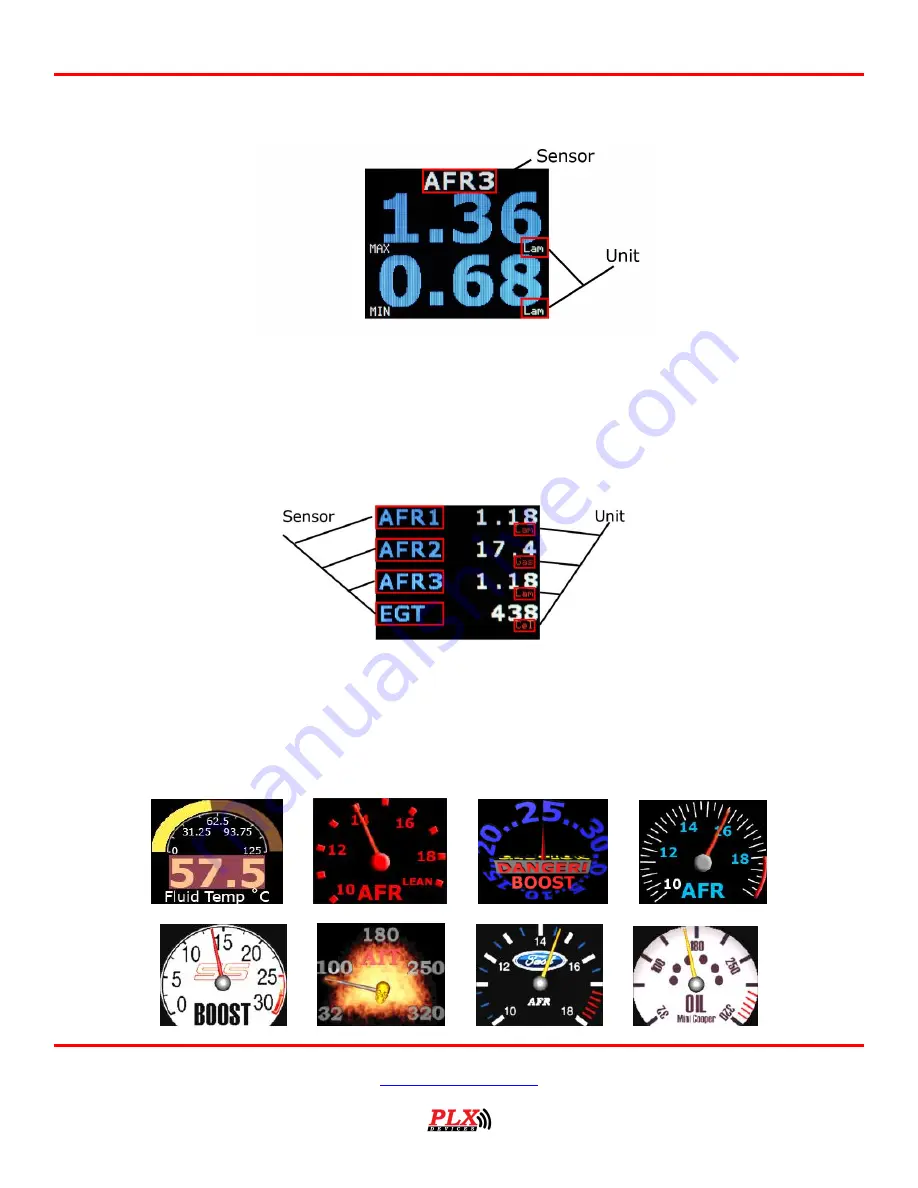
2 parameter gauges represent sensor data by showing 2 sensors simultaneously on the same screen. 
Touch LEFT – RIGHT to switch between sensors. Touch DOWN to switch to 4 parameter view. Touch UP to 
switch to peak and hold gauges. 


4.6


Four Parameter Gauges 


4 parameter gauges represent sensor data by showing all 4 parameters simultaneously on the same 
screen. Touch LEFT – RIGHT to switch between sensors. Touch DOWN to switch to custom gauge view. 
Touch UP to switch to 2 parameter gauges. 
 

4.7


Custom Gauge 


Содержание DM-100

Страница 1: ...2 0 May 16 2013 www plxdevices com 408 745 7591 DM 100 OBDII Touch OLED Gauge A Silicon Valley California Company DM 100 OBDII Touch Universal OLED Multi Gauge User Guide This Product has Patents Pending Designed by PLX Devices Inc in Sunnyvale CA PLX Devices 2013 All Rights Reserved ...

Страница 2: ...M 100 OBDII Control Box 6 2 2 Color OLED Gauge Head 7 2 3 Touch Screen Interface 7 2 4 Navigating the Menus 8 2 4 1 Gauges 8 2 4 2 OBDII Parameters 9 3 HARDWARE 9 3 1 Connecting Power 9 3 2 iMFD Daisy Chain 10 3 3 Programmable SM OBDII 11 3 3 1 Termination 11 3 3 2 Data Polling 12 3 3 3 Programming Sensors Modules 12 3 4 Setup Sensors 13 3 5 Special Note about the DM 100 OBDII Touch 13 4 STANDARD ...

Страница 3: ... OBD II SENSORS 17 6 ENGINE CHECK 18 6 1 Viewing Trouble Codes 18 6 2 Resetting Trouble Codes 19 7 SETUP 19 7 1 Customizing Colors 19 7 2 Connect to PC 20 7 3 Warnings 20 7 4 General Setup 21 7 4 1 Set Defaults 22 7 4 2 Boot State 22 7 4 3 OBD Diag 22 7 4 4 Boot Screen 22 7 5 The Color Palette 22 7 6 Wallpaper Backgrounds 22 7 7 Sensor Table 22 8 TECHNICAL SPECIFICATIONS 23 8 1 DM 100 OBDII Touch ...

Страница 4: ...Users Guide iMFD User Guide Version 2 0 May 16 2013 www plxdevices com 408 745 7591 4 9 REVISION HISTORY 23 ...

Страница 5: ...gic architecture sensor detection circuitry and customizable gauge implementation 1 2 Warnings To prevent fire or shock hazard do not expose this product to rain or moisture Do not operate this product under direct sunlight or in high temperatures Damage and malfunction may occur Do not operate this product while driving This may interfere with driving operations resulting in an accident Do not us...

Страница 6: ...ents The DM 100 comes with PC software The PC software allows you to do the following 1 Upload 8 Wallpapers 160 x 128 pixels to the DM 100 2 Upload Custom Gauges 100 Frames to the DM 100 3 Update DM 100 Sensor Table If new sensors are available sensor table must be updated Minimum System Requirements Windows XP or higher operating system Pentium 4 Celeron 1GHz Athlon Duron 1GHz 512MB Ram 2 Overvie...

Страница 7: ... NOT CONNECT TO COMPUTER s MONITOR OUTPUT 3 Connect to Control Box Remote port 2 3 Touch Screen Interface Note RIGHT and LEFT touch screen locations are slightly above the center line of the gauge In Gauge Mode While the DM 100 is in Gauge Mode touch Left Right to switch between the gauge parameters available Touch Up Down to switch between the type of gauge style you wish to view Please refer to ...

Страница 8: ...o switch between pages Please refer to section 2 4 for more details how to navigate the menu system Setup Mode While in the DM 100 is in Setup Mode follow the arrows on the screen to navigate and setup your gauge At any time touch and hold both Left Right for 3 seconds to enter and exit the setup menu 2 4 Navigating the Menus 2 4 1 Gauges ...

Страница 9: ...ter connector into your cigarette lighter power plug in your vehicle Option 2 Hardwire your power connection WARNING CONNECTING THE DM 100 IN REVERSE POLARITY WILL DAMAGE THE UNIT CHECK CONNECTIONS BEFORE POWERING ON DAMAGE TO THE DM 100 WILL VOID YOUR WARRANTY The DM 100 accepts 12 18V DC for power Connect the negative wire black to your vehicle s ground This is usually the negative terminal of y...

Страница 10: ... most basic setup is to have one DM 100 and one Sensor Module connected in the iMFD chain Make sure that the sensor module has the termination jumper INSTALLED Use the 1ft serial cable provided to make the connection Again please note that your DM 100 Touch Already has 4 built in SMs Multiple Sensor Setup If you have more sensor modules simply connect them in between the DM 100 and the Sensor Modu...

Страница 11: ... DM 100 Touch includes two products in one It combines a DM 100 and 4 programmable SM OBDII modules into one product 3 3 1 Termination There are 2 options Terminated and NOT Terminated When the SM OBD is terminated it resembles the following diagram When the SM OBD is NOT Terminated it resembles the following diagram ...

Страница 12: ...rmance for sensor 1 3 3 3 Programming Sensors Modules Each sensor module can be programmed into any of the available OBDII sensors Lists of the sensors are below and can be programmed in the following setup menu Keep in mind that your vehicle may not support all the sensors listed below 1 ABS THROTTLE Absolute Throttle Position 2 ENGINE RPM 3 VEHICLE SPEED 4 ENGINE LOAD 5 TIMING 6 INTAKE MAP Manif...

Страница 13: ...II Touch 3 5 Special Note about the DM 100 OBDII Touch If you wish to detect sensors from the SM OBDII you MUST connect the TX from the SM OBD to the RX of Sensors with the supplied 1ft serial cable See diagram below Be sure you set the SM OBDII to TERMINATED See section 3 3 for more information 4 Standard Gauges 4 1 Analog Gauges Graphical Analog gauges represent sensor data the same way a typica...

Страница 14: ...ime graphical form The sensor data is plotted on the y axis and time is plotted on the x axis Touch LEFT RIGHT to switch between sensors Touch DOWN to switch to peak hold Touch UP to switch to numeric gauges 4 4 Peak and Hold The DM 100 can detect both minimum and maximum values The peak and hold function works in any gauge mode and you are not limited to having to remain on this screen for the DM...

Страница 15: ...creen Touch LEFT RIGHT to switch between sensors Touch DOWN to switch to 4 parameter view Touch UP to switch to peak and hold gauges 4 6 Four Parameter Gauges 4 parameter gauges represent sensor data by showing all 4 parameters simultaneously on the same screen Touch LEFT RIGHT to switch between sensors Touch DOWN to switch to custom gauge view Touch UP to switch to 2 parameter gauges 4 7 Custom G...

Страница 16: ...r frames of 160 x 128 pixels in JPG BMP TIFF or GIF format Each image corresponds to a specific measured value to your custom gauge parameter For example if your custom gauge is set to WAT water temperature from the SM FluidTemp with the units set to Cel Celsius Toggle to the corresponding analog gauge to determine your minimum and maximum range Notice that on the bottom left of the above analog g...

Страница 17: ...s to properly detect the DM 100 5 OBD II Sensors The DM 100 OBDII in the OBDII Sensors Mode displays sensor information in a page format To navigate to this mode please refer to section 2 4 navigating the menu system By pressing the RIGHT and LEFT button toggles between the 5 available pages Page1 Sensor Standard Units Metric Units Throttle Position Engine Speed rev min rev min Vehicle Speed MPH K...

Страница 18: ...sure PSI Kpa Ambient Air Temperature Fahrenheit Celsius Page6 Sensor Standard Units Metric Units Catalytic Converter Bank 1 Sensor 1 Fahrenheit Celsius Catalytic Converter Bank 2 Sensor 1 Fahrenheit Celsius Catalytic Converter Bank 1 Sensor 2 Fahrenheit Celsius Catalytic Converter Bank 2 Sensor 2 Fahrenheit Celsius ECU Voltage Volts Volts 6 Engine Check 6 1 Viewing Trouble Codes This mode views yo...

Страница 19: ...ol 6 Computer Output Circuit 7 Transmission 8 Transmission 9 SAE Reserved 0 SAE Reserved Fourth and Fifth Digits These digits along with the others are variable and relate to a particular problem For example a P0171 code means P0171 System Too Lean Bank 1 To lookup your particular code visit http www obd codes com trouble_codes 6 2 Resetting Trouble Codes This mode is used to clear your engine che...

Страница 20: ...ers for warnings The DM 100 monitors 4 parameters simultaneously and evaluates if any trigger points have been exceeded If any of the 4 parameter trigger points have been exceeded then the DM 100 will evaluate if a warning message should appear on the display based on the scheme setting To better explain this feature please take a look at an example Example Parameter 1 is set to read AFR Parameter...

Страница 21: ...OR P4 This means that if any parameter 1 4 is TRUE a warning will trigger For this example a warning will trigger What if the scheme is set to P1 AND P2 AND P3 AND P4 This means that all parameter 1 4 must be true to trigger a warning For this example a warning will not trigger Several other scheme combinations are available for you to fully customize your warnings as they work on the same princip...

Страница 22: ... color image formatted to the size of 160 x 128 pixels as your wallpaper background You may want to upload your company s logo a picture of your vehicle or any other image your imagination takes you Your custom wallpaper can be uploaded to the DM 100 via USB port with the http plxdevices com product_info php id MULTDM100TOUCH You have the option to select a different wallpaper background for analo...

Страница 23: ... be limited to repairing or replacing under the discretion of PLX Devices any part proven defective This warranty is limited to the repair or replacement of parts in the manufactured good and the necessary labor done to affect its repair or replacement SERVICE UNDER WARRANTY In the unlikely event that your PLX Devices hardware should fail during the warranty period a Return Material Authorization ...

Отзывы: