background image


Attention 


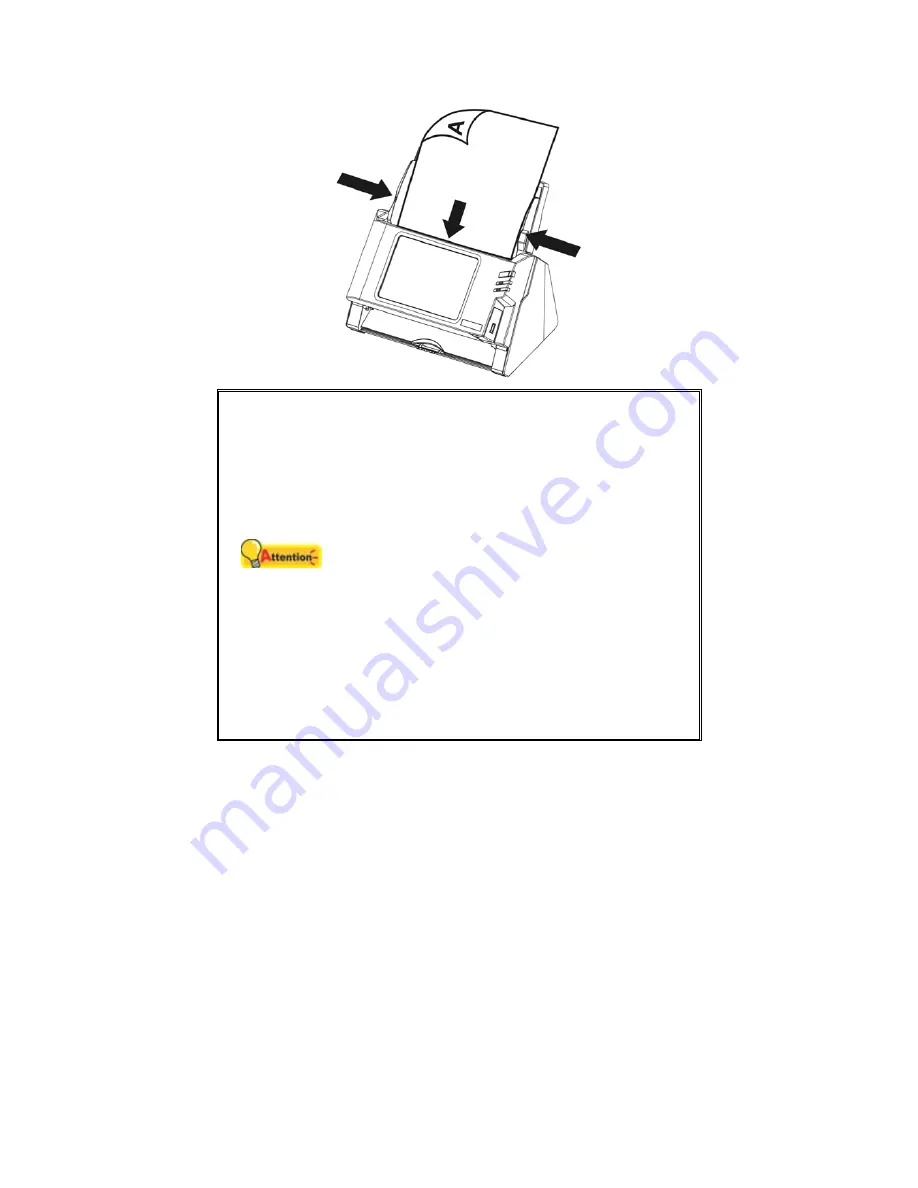
DO NOT load more than 50 sheets of paper 

(70 g/m

2

, 18 lb.) to the ADF. 


Paper scanned from the ADF must be a 

minimum of 5.08 x 5.08 cm (2” x 2”, W x L). 


Make sure there are no gaps between the 

document stack and the paper-width slider; 

otherwise, the scanned images can be 

skewed. 


Although the documents should be loaded 

firmly in place ensuring optimum scanning 

accuracy, they should never be wedged in 

so tightly that the process of feeding them 

through the scanner is strained. 


Do not load additional paper into the ADF 

while the unit is feeding and scanning. 

S

CANNING 

D

OCUMENTS


39 

Содержание eScan Series

Страница 1: ...Installation Usage Maintenance ...

Страница 2: ...ertain documents for example checks bank notes I D cards government bonds or public documents may be prohibited by law and or subject to criminal prosecution We recommend you to be responsible and respectful of the copyrights laws when you are scanning books magazines journals and other materials Environmental Information Recycle or disposal at end of life information please ask local distributors...

Страница 3: ...bout 11 Wifi 12 Calibration 13 Power Saving 14 History 15 Reset 17 Scan Settings 18 File Name 18 Initial Default 21 Sending 32 Sending Settings 32 CHAPTER II SCANNING 36 Preparing Documents 36 Checking Document Conditions 36 Loosening Documents 37 Placing Documents 38 Scanning Documents 39 Editing the Scanned Documents 45 Saving the Scanned Documents 50 Save to USB 51 Save to PC 52 Save to Mobile ...

Страница 4: ...r 70 Calibrating the Scanner 73 CHAPTER IV TROUBLESHOOTING 75 Clearing Paper Jams 75 APPENDIX A SPECIFICATIONS 77 APPENDIX B CUSTOMER SERVICE AND WARRANTY 78 Service Support Information 78 Statement of Limited Warranty 78 FCC Radio Frequency Statement 80 ...

Страница 5: ...anner check the box contents to make sure all parts are included If any items are damaged or missing please contact the vendor where you purchased your scanner or our customer service directly Chapter I describes how to install and configure the scanner Chapter II describes how to use your scanner Chapter III describes how to maintain and clean your scanner Chapter IV contains technical support in...

Страница 6: ...he procedure i Seal this device in a plastic bag for it to adapt to room conditions ii Wait for 1 2 hours before removing this device from the bag 2 Do use the AC adapter provided with the scanner Use of other AC adapter may lead to malfunction 3 Keep the space around the AC adapter clear in case you need to quickly unplug the AC adapter during emergencies 4 Damaged wire could cause fire or electr...

Страница 7: ... Scanner 2 AC Adapter 3 Paper Chute 4 Quick Guide 5 Application CD ROM 6 Calibration Sheet 7 Cleansing Cloth 8 Pad Module 1 Save the box and packing materials in case you need to transport this scanner in the future 3 ...

Страница 8: ...h slider for the paper size you are using 6 PAPER CHUTE Helps keep the paper in place Install the paper chute before using the scanner 7 PAPER CHUTE EXTENSION Extends to hold longer paper 8 ADF AUTOMATIC DOCUMENT FEEDER Automatically feeds a stack of documents for scanning 9 SCREEN SAVER BUTTON Press this button to enter the panel screen saver mode and you may press this button again to wake up th...

Страница 9: ...this to turn the scanner ON or OFF 14 POWER RECEPTOR Connects the scanner to a standard AC power outlet by the included AC adapter 15 ETHERNET PORT Connects the scanner to a port on the Ethernet hub by the Ethernet cable 5 ...

Страница 10: ...ntion Choose a Proper Site First Always place your scanner on a level smooth and strong surface before proceeding the scanner setup or any scanning task Tilted or uneven surface may cause paper feeding errors scanner damage or personal injury Avoid using the scanner in a dusty environment Dust particles and other foreign objects may damage the unit S St te ep p 1 1 I In ns st ta al ll l t th he e ...

Страница 11: ...2 Install the paper chute by aligning and inserting the tabs of the paper chute into their slots on the scanner 3 Close the panel unit by pushing it back down until it snaps back into place 7 ...

Страница 12: ...eptor 2 Plug the other end of the AC adapter into a standard AC power outlet 3 Plug the end of the Ethernet cable to the Ethernet port at the rear of the scanner 4 Plug the other end of the Ethernet cable to an available port on the Ethernet hub2 CONFIGURING THE SYSTEM After powering on the system you can press the System Setting on the screen to enter the System Setting interface 2 The Ethernet h...

Страница 13: ...ion includes the following items eScan Client and Supports eScan Client You may download eScan Client application program for Windows and Mac system from this page Please install the eScan Client application program on the user s PC before users try the Save to PC function Press the button to download the desired file to the USB flash drive 9 ...

Страница 14: ...Supports You may download Plustek PDF Tool Windows and Plustek TIFF Tool Windows application program from this page Press the button to download the desired file to the USB flash drive 10 ...

Страница 15: ...tems About Wifi Calibration Power Saving History and Reset About You can set the system language and update the driver version in this page Tap on Language column to enter Language setting dialog select the desired language then press OK to confirm the setting 11 ...

Страница 16: ...sion Please insert the USB drive containing the update file Tap on the USB drive icon to start the update process Wifi You can activate the Wifi function in this page Select the available Wifi provider and enter the password if it is necessary 12 ...

Страница 17: ...or colors of the scanned image and the original vary a lot This allows you to adjust and compensate for variations that can occur in the optical component over time by its nature Insert the special calibration sheet into the ADF of the scanner with an arrow toward the scanner buttons Press Start to start the calibration process 13 ...

Страница 18: ...e power consumption when the scanning process is finished the scanner light source will turn itself off and the scanner will enter a lower power mode without delay time You can set the Screen Timeout time in this page 14 ...

Страница 19: ... can set the History function Clear all history and export the system Log in this page You may activate the History function to memorize the information entered by users so that the user doesn t have to enter the entire information every time The information includes Email addresses FTP server addresses FTP user accounts and cloud user accounts 15 ...

Страница 20: ...firm the setting Tap on Log column to enter the following page The Log file keeps system operation records and device information You can e mail this log file and detail problem descriptions back to the service provider to troubleshoot the system Press the button to download the log file 16 ...

Страница 21: ...Reset You can reset the system in this page 17 ...

Страница 22: ...n ng gs s Scan Settings includes the following items File Name and Initial Default File Name You may name the saved files in this page You can see the file naming example on the top of the screen immediately after you make any adjustments The file name extension is automatically added according to the file format you set up 18 ...

Страница 23: ...e Prefix to display prefix in the file name The text you enter here will become the file name prefix You can activate Date to display date in the file name Select the desired format of Date in the following dialog 19 ...

Страница 24: ...n activate Time to display time in the file name Select the desired format of Time in the following dialog Tap on Serial Number column to select the desired format of Serial Number in the following dialog 20 ...

Страница 25: ...result here will be the Initial Default settings for the user scan interface If you activate Auto return to default settings function and select the desired time period every time the scan process is completed the system will return to these default settings after the preset time 21 ...

Страница 26: ...ct The selected result will be applied to COLOR MODE button in the user scan interface Select the desired Color Mode in the popup dialog Available color modes Color Gray and Black White Press OK to confirm the settings or press Cancel to exit this dialog 22 ...

Страница 27: ...Format You can set two formats for user to select The selected result will be applied to FORMAT button in the user scan interface 23 ...

Страница 28: ...ats PDF JPG TIFF PNG BMP Multi Page PDF and Multi Page TIFF Press OK to confirm the settings or press Cancel to exit this dialog Resolution You can set two resolutions for user to select The selected result will be applied to QUALITY button in the user scan interface 24 ...

Страница 29: ...desired Resolution in the popup dialog Available dpi values 100dpi Lower 200dpi Standard 300dpi Good 400dpi Better and 600dpi Best Press OK to confirm the settings or press Cancel to exit this dialog Scan Mode 25 ...

Страница 30: ...The selected result will be applied to SCAN MODE button in the user scan interface Available scan modes Simplex and Duplex Press OK to confirm the settings or press Cancel to exit this dialog Compression Adjust the Compression quality in this page 26 ...

Страница 31: ...ess level the contrast level and the gamma level of the image Watermark You can activate the Watermark function and decide to use image or text as the Watermark Switch on this function to add watermark on the scanned images 27 ...

Страница 32: ...If you select Use Image as the Watermark you have to upload the desired image and select the desired position 28 ...

Страница 33: ...ed text select the desired position and adjust the Transparency the Text Size and the Text Angle Punch Hole Removal You can activate the Punch Hole Removal function Switch on this function to remove the hole marks aligned along with the edge of the scanned document 29 ...

Страница 34: ...ank Page Removal function Switch on this function to remove blank pages after the document is scanned Adjust the Sensitivity level in the following dialog Press OK to confirm the settings or press Cancel to exit this dialog Blank Page Split 30 ...

Страница 35: ...lit function Switch on this function to split the scanned document by blank page Reset to Default Tap on Reset to Default column to reset the scan settings to default factory settings The following dialog opens to confirm the setting 31 ...

Страница 36: ...nations Available options are USB PC Mobile Mail FTP and Clouds USB Switch on the USB function to enable sending the scanned file to the USB flash drive PC Switch on the PC function to enable sending the scanned file to the desired PC Mobile Switch on the Mobile function to enable sending the scanned file to the desired mobile device Mail 32 ...

Страница 37: ...the page Enter Sender Sender address and Attachment Size MB to complete the settings FTP Switch on the FTP function to enable sending the scanned file to the desired FTP server Press the button to set the FTP server Enter Server Port Account and Password then press OK to test the FTP server setting If the connection is success the FTP server information will display on the top of the page If the p...

Страница 38: ... Settings dialog press the button to select the desired cloud server Enter Account and Password then press OK to test the cloud server setting If the connection is success the cloud server information will display on the top of the page If the preset cloud server is the only destination you can activate Use this cloud as the only destination function 34 ...

Страница 39: ...d as the only destination function you can switch on the desired cloud servers to enable the cloud server option in the user scan interface The available options are Dropbox Google Drive Evernote Box SharePoint and SharePoint SSL 35 ...

Страница 40: ...s Normal paper whose size and ream weight meet the requirements stated in Appendix A Specifications of this guide Notched paper Coated paper e g brochure Attention To prevent paper feeding errors and damages to the ADF unit strictly follow the instructions below Remove all small objects e g paper clips pins staples or any other fasteners attached before loading the paper into the ADF Make sure the...

Страница 41: ...e ADF to scan photographic sheets or particularly valuable document originals wrinkles or other damages can happen in case of paper feeding errors DO NOT place paper with wet ink or correction fluid into the ADF Wait few minutes for it to get dry L Lo oo os se en ni in ng g D Do oc cu um me en nt ts s Before loading documents into the ADF loosen them as follows 1 Fan the documents so that no two p...

Страница 42: ...d faces towards the paper chute For double sided scans load the desired page order of documents face down so that the side to be scanned faces towards the paper chute 2 If you need to scan longer documents pull out the paper chute extension and stacker to provide further support for the documents 3 Adjust the paper width slider for the paper size you are using The paper width slider should be gent...

Страница 43: ...the document stack and the paper width slider otherwise the scanned images can be skewed Although the documents should be loaded firmly in place ensuring optimum scanning accuracy they should never be wedged in so tightly that the process of feeding them through the scanner is strained Do not load additional paper into the ADF while the unit is feeding and scanning SCANNING DOCUMENTS 39 ...

Страница 44: ...4 Tap on to select scan QUALITY 5 If it is necessary you may tap on to adjust Advanced Settings 6 When you are satisfied with all the scan settings tap on to scan the desired document Advanced Settings If it is necessary you may adjust all the scan settings in this Advanced Settings page 40 ...

Страница 45: ...Mode Select the desired Scan Mode in the popup dialog Available scan modes Simplex and Duplex Color Mode Select the desired Color Mode in the popup dialog Available color modes Color Gray and Black White 41 ...

Страница 46: ...opup dialog Available file formats PDF JPG TIFF PNG BMP Multi Page PDF and Multi Page TIFF Resolution Select the desired Resolution in the popup dialog Available dpi values 100dpi Lower 200dpi Standard 300dpi Good 400dpi Better and 600dpi Best 42 ...

Страница 47: ...paper Size in the popup dialog Available paper sizes Auto A4 A5 B5 Letter Legal and Invoice Compression Adjust the Compression quality in the popup dialog Press OK to confirm the settings or press Cancel to exit this dialog 43 ...

Страница 48: ...s level and the contrast level of the image Press OK to confirm the settings or press Cancel to exit this dialog Watermark Switch on or off the Watermark function Switch on this function to add watermark on the scanned images 44 ...

Страница 49: ...d document by blank page Reset to Default Tap on this button to reset the scan settings to default factory settings EDITING THE SCANNED DOCUMENTS The scanned image will be displayed on the screen All scanned images are displayed on the screen as thumbnails you may view up to 8 miniatures of the scanned images at the same time The number displayed on the upper right corner of each image is the sequ...

Страница 50: ...e desired scanned image from the miniatures to re arrange the image order You can manually transpose the selected image within the same scan task by drag and drop operation Select a single image on the screen by pointing on that thumbnail Drag the selected image to the desired place The selected image is moved to the new place and automatically renumbered 46 ...

Страница 51: ...ess the mark to go to the upper page For example from page 7 to page 3 press the mark to go to the lower page For example from page 2 to page 6 and press the mark to go to the last page The upper number of indicates current page and the lower number indicates total pages 47 ...

Страница 52: ...pecific functions Press Save to save the scanned image press Cancel to cancel the scan images If you want to insert scan documents just select the desired scanned image on the screen Press button to start scanning the following dialog will appear to confirm the location 48 ...

Страница 53: ...the same time Double click on the desired scanned image to enter image editing window You can enlarge the scanned image by moving your two fingers away on the screen or zoom out the scanned image by pinching your two fingers together on the screen Click on the upper right corner to exit the image editing window 49 ...

Страница 54: ...ted borders of your image You may adjust the selected rectangle area for applying this function Deletes the selected scanned image SAVING THE SCANNED DOCUMENTS In the Save As dialog you may rename the scanned document in Saving File column and select the desired saving destination in Select a Destination section Available options are USB PC Mobile Mail FTP and Clouds Press Back button to return to...

Страница 55: ...canned document to the USB flash drive If you see the following dialog the scanned document is successfully saved to the USB flash drive You may press Continue to save the scanned document to other destination or press Finish to complete the scanning procedure 51 ...

Страница 56: ...Scan Client software on the user s PC before users try the Save to PC function In the eScan Client interface you can modify the User Name select the desired file Location and determine the action after the file is downloading Please make sure the eScan Client software is executed before you try the Save to PC function For Windows For Mac 52 ...

Страница 57: ...Tap on PC button to save the scanned document to the desired PC on the list The following Save to PC dialog opens tap on Select a PC column to select the desired PC from the list 53 ...

Страница 58: ... of the connected PC If the desired PC is not on the list please tap on to refresh the list or use the Search PC column to search for the desired PC After selecting the desired PC press the button to save the scanned document to the selected PC 54 ...

Страница 59: ...og the scanned document is successfully saved to the selected PC You may press Continue to save the scanned document to other destination or press Finish to complete the scanning procedure S Sa av ve e t to o M Mo ob bi il le e 55 ...

Страница 60: ...The following Save to mobile dialog opens tap on Select a mobile device column to select the desired mobile device from the list In the Select a mobile device dialog you can find a list of the connected mobile device If the desired mobile device is not on the list please tap on to refresh 56 ...

Страница 61: ... list or use the Search mobile device column to search for the desired mobile device After selecting the desired mobile device press the button to save the scanned document to the selected mobile device 57 ...

Страница 62: ...aved to the selected mobile device You may press Continue to save the scanned document to other destination or press Finish to complete the scanning procedure S Sa av ve e t to o M Ma ai il l Tap on Mail button to send the scanned document to the desired e mail address 58 ...

Страница 63: ...e receiver e mail address in the To Enter an e mail address column If it is necessary you may enter desired e mail address in the CC Enter an e mail address column and modify the Subject name After setting the desired e mail address press the button to send the scanned document to the desired e mail address 59 ...

Страница 64: ...ther destination or press Finish to complete the scanning procedure S Sa av ve e t to o F FT TP P Tap on FTP button to save the scanned document to the FTP server If you has already setup the FTP server in the System Setting page you don t have to go through the following setting procedure The scanned document will be saved to the preset FTP server directly 60 ...

Страница 65: ...password If it is necessary you may change the Port on the left side Press the button to connect to the FTP server After successfully connecting to the FTP server press the button to save the scanned document to the desired FTP server 61 ...

Страница 66: ...the scanned document is successfully saved to the desired FTP server You may press Continue to save the scanned document to other destination or press Finish to complete the scanning procedure S Sa av ve e t to o C Cl lo ou ud ds s 62 ...

Страница 67: ... the cloud server If you has already setup the cloud server in the System Setting page you don t have to go through the following setting procedure The scanned document will be saved to the preset cloud server directly Tap on the desired cloud server 63 ...

Страница 68: ...sername and the password for the selected cloud server Press the button to connect to the cloud server After successfully connecting to the cloud server press the button to save the scanned document to the desired cloud server 64 ...

Страница 69: ... following dialog the scanned document is successfully saved to the desired cloud server You may press Continue to save the scanned document to other destination or press Finish to complete the scanning procedure 65 ...

Страница 70: ...rn off the scanner and disconnect the scanner s power cable and Ethernet cable and then wait a few minutes for the glass and or the inner ADF to cool to ambient temperature Wash your hands with soap and water after cleaning the scanner C Cl le ea an ni in ng g M Ma at te er ri ia al ls s Have the following cleaning materials ready to clean the scanner soft dry lint free cloth or a cotton swab non ...

Страница 71: ...ul NOT to scratch their surfaces Clean Feed Roller Wipe the Feed Roller from side to side and then rotate it Repeat this until its entire surface is cleaned Clean Pad Module Wipe the Pad Module from top to bottom in the direction of arrow shown in below picture Be careful not to damage the pick springs of the pad 67 ...

Страница 72: ...hing it back down until it snaps back into place REPLACING CONSUMABLES As a guideline it is recommended to replace the pad module every 50000 sheets of scans A4 70 g m2 or 18 lb and it is recommended to replace the feed roller every 300000 sheets of scans A4 70 g m2 or 18 lb R Re ep pl la ac ci in ng g t th he e P Pa ad d M Mo od du ul le e 1 Open the panel unit by pulling the panel unit open leve...

Страница 73: ...unit open lever Panel unit 2 Remove the pad module by pinching both sides of the pad module and pull it out 3 Install the new pad module by inserting the tabs on the module onto their slots on the scanner 69 ...

Страница 74: ...it by pushing it back down until it snaps back into place R Re ep pl la ac ci in ng g t th he e F Fe ee ed d R Ro ol ll le er r 1 Open the panel unit by pulling the panel unit open lever Panel unit open lever Panel unit 70 ...

Страница 75: ...2 Remove the paper chute by pinching both sides of the handles on the paper chute to remove it 3 Remove the feed roller by pinching both sides of the feed roller and pull it out 71 ...

Страница 76: ...4 Install the new feed roller by aligning and inserting the feed roller onto the roller pitman on the scanner 72 ...

Страница 77: ...brate the scanner if colors appear in areas that should be white or colors of the scanned image and the original vary a lot This allows you to adjust and compensate for variations that can occur in the optical component over time by its nature The following describes how to calibrate the scanner 1 The Calibration Sheet marked with an arrow on either edge at both sides is used specially for ADF Sca...

Страница 78: ...y plain white sheet of paper sized in Letter A4 instead however the calibration effect may be less good than the special calibration sheet 3 Tap on System Settings on the lower left of the screen Tap on General Calibration to enter calibration setting page 4 Click on the Start button to begin the calibration process 5 The scanner pulls the calibration sheet through the scanner which completes this...

Страница 79: ... CLEARING PAPER JAMS If a paper jam in the ADF happens please perform the following steps 1 Remove any unjammed documents still loaded into the ADF 2 Open the panel unit by pulling the panel unit open lever Panel unit open lever Panel unit 3 Gently but firmly pull the jammed documents out of the ADF Try to avoid creasing or wrinkling the documents 75 ...

Страница 80: ... try to pull jammed or half scanned documents out of the ADF without first opening the panel unit Doing so may permanently damage the ADF 4 Close the panel unit by pushing it back down until it snaps back into place 76 ...

Страница 81: ... Grayscale mode 200 dpi A4 Portrait 20 ppm 40 ipm B W mode 200 dpi A4 Portrait 5 ppm 10 ipm Color mode 200 dpi A4 Portrait Interface USB 2 0 x 2 RJ45 network connection x 1 WiFi 802 11 g n Display 7 1280x800 pixels with IPS wide view multi touch screen 3 Hardware specifications may change at any time without prior notice 77 ...

Страница 82: ... Information requested by relevant Implementing Measure Please ask local distributors and suppliers for the related information of Implementing Measure test report Do not dispose anything of products before you ask local distributors and suppliers to get correct information for decreases of environmental impact with right methods and procedures If you want to disposals the product and or an access...

Страница 83: ...is product If this product is an optional feature this Limited Warranty applies only when the feature is used in a machine for which it was designed If you have any questions about your Limited Warranty contact the approved retailer from whom you bought the product or the manufacturer THIS LIMITED WARRANTY REPLACES ALL OTHER WARRANTIES EXPRESS OR IMPLIED INCLUDING BUT NOT LIMITED TO THE IMPLIED WA...

Страница 84: ...s Reorient or relocate the receiving antenna Increase the separation between the equipment and receiver Connect the equipment to an outlet on a circuit different from that which the receiver is connected Shielded interconnect cables and shielded power cord which are supplied with this equipment must be employed with this equipment to ensure compliance with the pertinent RF emission limits governin...

Отзывы: