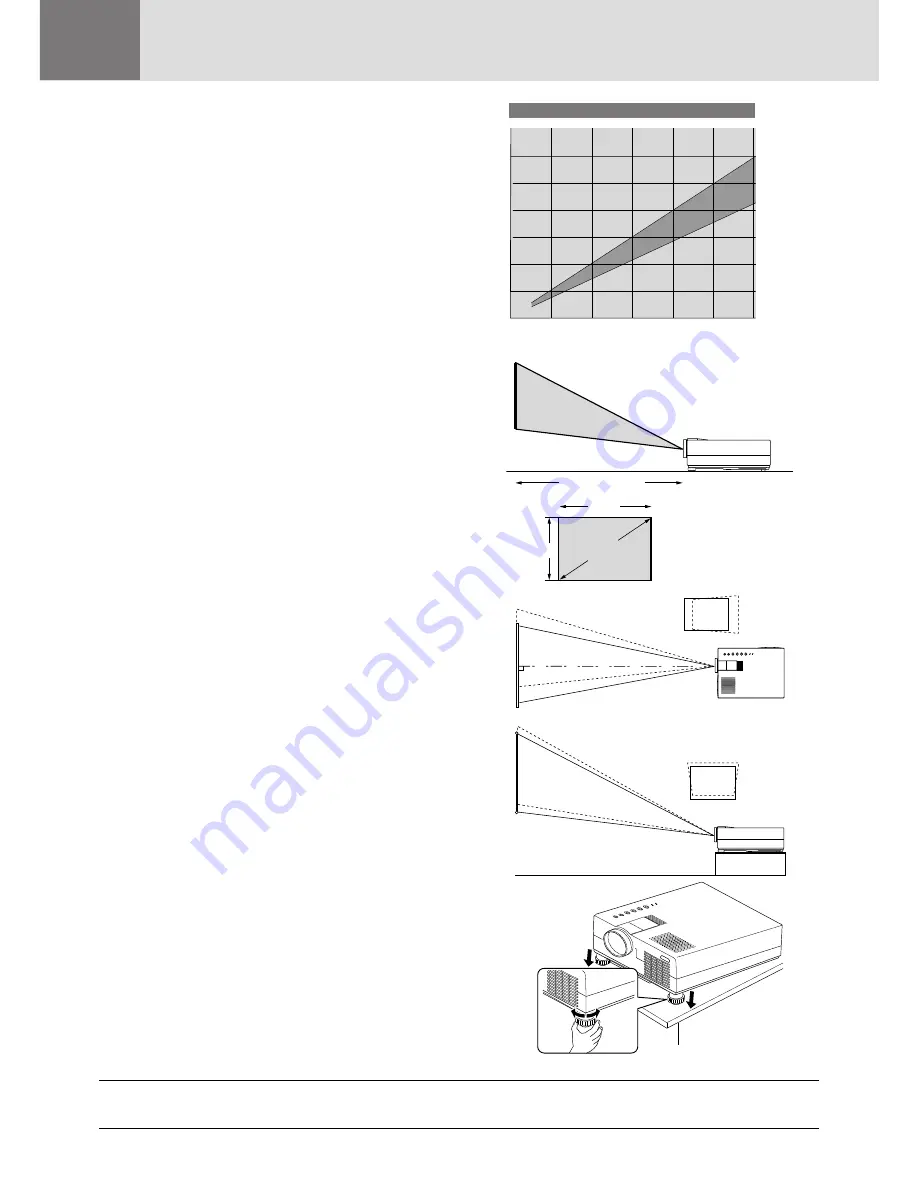
Plus UP-800 Скачать руководство пользователя страница 13

E – 13

2

350

300

250

200

150

100

50

0

0.0

6.56

13.12

19.69

26.25

32.81

39.37 ft.

(2.0)

(4.0)

(6.0)

(8.0)

(10.0)

(12.0) (m)

Projection Distance

Diagonal 

Image 

Size 

(inch)

Projection Distance and Image Size

300”

235”

WIDE

TELE

27”

Width

Height

Screen size

(diagonal)

Projection distance

Using A Tabletop Or Cart

1. Place your Data projector on a flat level surface at the

optimal distance from the screen or wall so you realize
the size image you want. (Avoid having bright room
lighting or sun light directly on the screen or wall where
you'll be projecting the image.)

2. Connect the power cable, remove the lens cap and turn

the projector on. (If no input signal is available, the
projector will display a background image.)

3. Make sure that the projector is square to the screen.

4. Move the pr ojector left or right to center the image hori-

zontally on the screen. (A)

5. To center the image vertically (B),

6. To fine tune the image's position vertically on the screen,

rotate each front foot.

7. Adjust the size of the screen with the zoom ring lever on

the projector main unit.

Adjustment method
1. Set the adjuster to the most tight state.
2. If the screen is at an angle, turn the two adjusters to tilt

the main unit and adjust until the main unit and screen are
parallel.

(A) Top view

(B) Side view

Screen

Screen

PL

US

UP

DOWN

This section describes how to set up your UP-800 Data
projector and how to connect video and audio sources.

Setting Up Your UP-800 Data  Projector

Your UP-800 Data Projector is simple to set up and use. But
before you get started, you must first:

1. Determine the image size

2. Set up a screen or select a non-glossy white wall onto

which you can project your image.

Carrying The Data Projector Always carry your Data projec-

tor by the carring case. Ensure that the power cord and any
other cables connecting to video sources are disconnected
before moving the projector. When moving the projector
or when it is not in use, cover the lens with the lens cap.

Selecting A Location  The further your Data projector is

from the screen or wall, the larger the image. The mini-
mum size the image can be is approximately 24" (0.61 m)
measured diagonally when the projector is roughly1.0 m
(3 feet) from the wall or screen. The largest the image can
be is 300" (7.6 m) when the projector is about 12.0 m
(39.37 feet) from the wall or screen.

Note:  Adjust with the adjustors so that the lens surface is parallel to the screen.  If you use the projector with the screen  tilted, the picture will
be distorted.

I N S T A L L A T I O N

Содержание UP-800

Страница 1: ...PLUS UP 800 USER S MANUAL English...

Страница 2: ...the unit EXCEPT those specified by PLUS Technologies in this manual Failure to comply with this government regulation could void your right to operate this equipment This equipment has been tested and...

Страница 3: ...strong mechanical shock These safety instructions are to ensure the long life of your Data projector and to prevent fire and shock Please read them carefully and heed all warnings Installation 1 For b...

Страница 4: ...Your PC Or Macintosh Computer E 17 Connecting Your Document Camera E 19 Connecting Your VCR Or Laser Disc Player E 19 Connecting An External Monitor E 19 Connecting Your Remote Mouse Receiver E 20 3...

Страница 5: ...oduction of small characters and figures Take a closer look and notice the difference in quality Outstanding beauty when reproducing DVDs and other high picture quality information sources Faithful re...

Страница 6: ...ler Please save the original box and packing materials if you ever need to ship your UP 800 Data Projector Remote control Batteries AA 2 Lens Cap Remote Mouse Receiver Serial mouse cable Mouse adapter...

Страница 7: ...ect the supplied power cable s three pin plug here Remote Sensor Slot for Kensington MicroSaver Security System Power Switch Rear Features ST AN DBY ST AN DBY MEN U SE LECT EN TE R AD JUST PLUS PC CON...

Страница 8: ...n the projector main unit operation section the green LED blinks for one minute then lights up and the projector goes on standby The projector will not accept operation instructions for the one minute...

Страница 9: ...eo sound S Video Input Here is where you connect S Video input from an exter nal source like a VCR 2 PC Control Port Port for settings at time of shipment from factory 3 RGB Input Connector D Sub 15 p...

Страница 10: ...terminal is output 5 Built in Security Slot This security slot supports the MicroSaver Security Sys tem MicroSaver is a registered trademark of Kensington Microware Inc The logo is trademarked and ow...

Страница 11: ...Transmitter Direct the remote control toward the remote sensor on the projector cabinet or the remote mouse receiver 3 LED Flashes when any button is pressed 4 Power On And Off If your main power swit...

Страница 12: ...to restore the image Position Button When the picture is magnified press this button to acti vate the mouse buttons that you can use to reposition the image in eight directions When you re finished t...

Страница 13: ...two adjusters to tilt the main unit and adjust until the main unit and screen are parallel A Top view B Side view Screen Screen PLU S UP DOWN This section describes how to set up your UP 800 Data pro...

Страница 14: ...quare box section 4 With the projector packed in the carrying case this way zip up the sides 5 Put the notebook PC into the carrying case too Completely close the zipper 6 Put the remote controller an...

Страница 15: ...r for more information Do not attempt to install the projector yourself If your projector is mounted on the ceiling and your image is upside down use the Menu and Select buttons on your projector cabi...

Страница 16: ...it may be the result of the computer s screen saver or power management software If you accidentally hit the OFF button on the remote control wait one full minute and then press the ON button to resum...

Страница 17: ...computer s video port use the smaller 15 pin connector on the cable to connect to the projector s RGB input You can also use your own video cable if you wish For a PC cable use the smaller 15 pin con...

Страница 18: ...asked to reboot for the changes to take affect or you ll get a message that Windows is about to resize your display You ll be asked if you want to keep your settings Select Yes Windows 3 1 1 Click on...

Страница 19: ...tor on the back of your VCR or laser disc player connect the other end to the Video input on your projector Use standard RCA audio patch cords to connect the audio from your VCR or laser disc player t...

Страница 20: ...rial cable from the remote mouse receiver to your PC s mouse port Use the 6 pin adapter for connecting to a PS 2 computer For Macintosh Remove your current mouse from your computer attach the Macintos...

Страница 21: ...ideo or RGB computer button on the remote control to display the image Or press the Menu button on the cabinet and use the icons to select your video source Video S Video or RGB 3 Adjust The Image Siz...

Страница 22: ...or the Left Click button on the remote control to select a submenu or item 4 Adjust the level or turn the selected item on or off by using the Adjust or buttons on the remote control or cabinet The on...

Страница 23: ...cts what is connected to your S Video input VCR or laser disk player RGB Selects what is connected to your RGB input a computer Use the Adjust or buttons to select a standard or one of six custom sett...

Страница 24: ...auto picture controls are available for RGB source Volume Use the Adjust or buttons to adjust the volume Brightness Use the Adjust or buttons to adjust the brightness Contrast Use the Adjust or button...

Страница 25: ...ge Mode controls will not work with an RGB source The Tint control will not work with a PAL or SECAM source Horizontal and Vertical position controls and Picture Fine Picture and Auto Picture adjustme...

Страница 26: ...ou do not want to change the STANDARD settings first select the Custom Memory icon then do the same as step5 Projection This reorients your image for your type of projection Press the Adjust or button...

Страница 27: ...ing screws 4 Slide the lamp cover in the direction of the arrow and remove it CAUTION Do not use a lamp other than the PLUS replacement lamp Order this from your PLUS dealer using your projector s mod...

Страница 28: ...rmly and slide the battery cover off 2 Remove all two old batteries and install new ones AA Ensure that you have the batteries polarity aligned correctly 3 Slip the cover back over the batteries until...

Страница 29: ...the projector is high check the cooling fan ventilation hole and the ventilation hole on the bottom of the projector If any of the holes are blocked remove whatever is blocking them The temperature pr...

Страница 30: ...s are connected properly Adjust the brightness and contrast Remove the lens cap Is the STNDBY indicator blinking Reposition the projector to improve its angle to the screen Adjust the focus See page E...

Страница 31: ...olor Reproduction Full color 16 7 million colors simultaneously Horizontal Resolution NTSC 550 PAL 350 SECAM 350 NTSC4 43 350 TV lines RGB 800 dots horizontal 600 dots vertical Power Requirement 100 1...

Страница 32: ...E 32 Dimensions PLUS STANDBY STANDBY MENU SELECT ENTER ADJUST PC CONTROL VIDEO IN S VIDEO VIDEO L MONO AUDIO R AUDIO IN AUDIO OUT RGB IN RGB OUT units mm 310 14 122 98 17 approx 85 5 235 Lens senter...

Страница 33: ...Signal to be connected 1 Red 2 Green 3 Blue 4 GND 5 GND 6 Red GND 7 Green GND 8 Blue GND 9 No Connection 10 Digital GND 11 GND 12 No Connection 13 Horizontal Sync 14 Vertical Sync 15 No Connection 1...

Страница 34: ...375 31 49 Y VESA 640 480 85 01 43 269 36 Y IBM 720 350 70 09 31 469 28 322 Y IBM 720 400 70 09 31 4469 28 322 Y VESA 720 400 85 04 37 927 40 Y IBM 720 350 87 85 39 44 35 5 Y IBM 720 400 87 7 39 375 35...

Страница 35: ...E 35 PLUS CORPORATION 3 B22 NAKASE 1 CHOME MIHAMA KU CHIBA 261 01 JAPAN PHONE 043 296 3056 FAX 043 296 3025 TELEX J22113 PLUSJIM CABLE PLUSJIMUK TOKYO...

Отзывы: