We’re Here To Help!
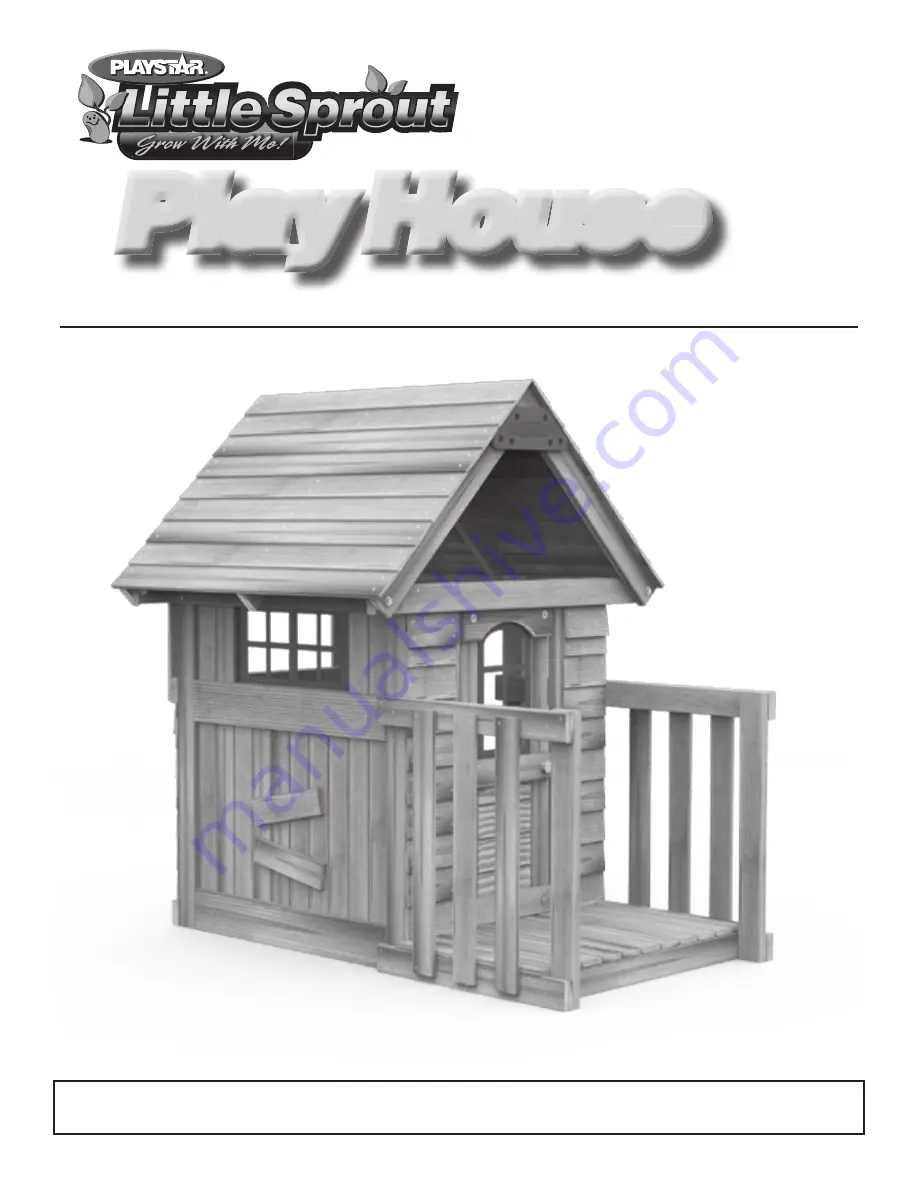
Play
House
Play House
TM
PS 7490
Safety Guide &Assembly Instructions
Call Toll Free
1-888-752-9782
Customer Service: Monday - Friday, 8:00 A.M. to 5:00 P.M. C.S.T.
Страница 1: ...We re HereTo Help Play House PlayHouseTM PS 7490 Safety Guide Assembly Instructions TM CallToll Free 1 888 752 9782 Customer Service Monday Friday 8 00 A M to 5 00 P M C S T...
Страница 2: ...unt of loose fill materials mark the correct level on play equipment support posts That way you can easily see when to replenish and or redistribute the surfacing Do not install loose fill surfacing o...
Страница 3: ...between the lowest point of component and top of shock absorbing surfacing material WARNING Lawn swings are designed for use by children two years of age and older Use by children under the age of two...
Страница 4: ...4 C lock nut 4 3 prong T nut 5 14 x 1Z v pan head screw 12 Z v x 1 machine screw 5 Assembly Tool Kit 1 Roof Cap 2 Hinge Strap 2 Door Knob 2 Level Square Pencil Hammer Adjustable Wrench Socket Wrench 9...
Страница 5: ...ocess hide the marked end of the board to the inside so it is not visible on your completed playset Thinner boards have a tendency to bow more than thicker boards However all minor bowing can be strai...
Страница 6: ...kit found on pages 7 and 8 BOARDS INCLUDED All boards are identified by nominal dimensions The actual width and thickness of boards will vary During assembly process hide the marked end of the board t...
Страница 7: ...o build your playset Position the template and mark only the holes that need to be drilled according to the patterns shown below Remove the template Warning Do not drill holes through the template as...
Страница 8: ...w side up and sliding it to the desired position Use the shaded holes for that pattern Patterns can be created anywhere along the board by turning the template over arrow side up and sliding it to the...
Страница 9: ...x 4 x 46C v board as shown Make sure the assembly remains square while securing with 8 x 2 deck screws 90 A A 2 x 4 x 46C v 2 x 4 x 34C v 2 x 4 x 44Z v 2 x 4 x 44Z v Items for STEP 2 4 2 x 4 x 40 boar...
Страница 10: ...40Z x board 1 1 x 4 x 34 board 16 8 x 2Z x deck screws 3 8 x 1Z x deck screws Attach one 1 x 4 x 34 board as shown Secure with 8 x 1Z x deck screws Attach one 2 x 4 x 40Z x board as shown Secure with...
Страница 11: ...tower over on its side so you don t fight gravity Two adults are required to tip the tower over Keep the tower tipped over on its side until you complete Step 7 Attach four pre drilled and counter sa...
Страница 12: ...ill and counter sink the boards may result in split lumber Items for STEP 8 1 1 x 4 x 29 boards 2 1 x 4 x 12 boards 8 8 x 1 v deck screws 4 8 x 1 x deck screws Attach one 1 x 4 x 29 board at dimension...
Страница 13: ...x 4 x 15Z x boards 1 1 x 4 x 34C v beveled board 20 8 x 1 deck screws Attach one 1 x 4 x 34C v beveled board tight against 2 x 4 x 34C v board overlapping board below as shown Secure with 8 x 1Z x de...
Страница 14: ...Z x 2 x 4 x 28 On a flat work surface lay out one 2 x 4 x 31Z x and two 2 x 4 x 28 boards as shown Make sure assembly remains square while securing with 8 x 2Z x deck screws Repeat one more time for s...
Страница 15: ...x 4 x 28 Flush Flush Attach Step 12 assembly to Play House End of 2 x 4 x 28 boards must be flush with side of 2 x 4 x 44Z v boards as shown Secure with 8 x 2Z x deck screws Pre drill the 2 x 4 x 28 b...
Страница 16: ...ust be less than Z v or a finger entrapment could exist Caution Failure to pre drill and counter sink the boards may result in split lumber See Pages 7 8 For Hole Patterns See Pages 7 8 For Hole Patte...
Страница 17: ...first board is tight against the decking as shown Secure with 8 x 1 deck screws Work your way up leaving no gap between boards Do not overlap Attach two 1 x 4 x 7M beveled boards tight against 2 x 4 x...
Страница 18: ...x 2 x deck screws On a flat surface position boards as shown Keep boards square while attaching roof cap to boards with 14 x 1 v pan head screws Repeat for second roof frame assembly On a flat surface...
Страница 19: ...crews Repeat for other side Position Step 20 Assembly as shown Keeping boards square and flush to 1 x 4 x 47Z x boards secure with 8 x 1 x deck screws Items for STEP 22 14 1 x 4 x 47Z x beveled boards...
Страница 20: ...h equal overhang on all four corners The short end of the center frame must be over the side entry Secure each corner from the inside with two 8 x 2 deck screws using previously drilled holes Drill a...
Страница 21: ...ecuring with 8 x 1 v deck screws Layout the 1 x 6 x 15Z x Arch Board 38C v apart from bottom 1 x 4 x 15Z x Set two 1 x 4 x 39 boards on top of 15Z x boards flush at the bottom and tight against the Do...
Страница 22: ...e Secure with Z v x 1 machine screws and Z v fender washers from front Items for STEP 27 1 door window 14 8 x B truss head screws Fold door window at scoring lines as shown Helpful Hint Using a straig...
Страница 23: ...deep Secure with 8 x 1 truss head screws 2C v 2C v 1M 1B Items for STEP 29 2 door knobs 1 Z v x 2Z x dowel screw Drill a Z v hole through the boards at the dimensions shown Insert Z v x 2Z x dowel scr...
Страница 24: ...imensions shown Using clamps to hold the door tight against 2 x 4 x 46C v at the locations shown will greatly help Use hinges as template and drill Z holes C v deep Secure door with 8 x 1 truss head s...
Страница 25: ...1 Sunlight Window 16 8 x B truss head screws Front View Inside View Use a straight edge and fold on the scoring lines at 90 angle as shown Fig 1 Fig 1 Fold here Fold here The Sunlight Window can be a...
Страница 26: ...t window 16 8 x B truss head screws Fold here using a straight edge or a table edge Use a straight edge and fold on the scoring lines at 90 angle as shown From the inside of Play House center sunlight...
Страница 27: ...ON INSTRUCTIONS AND MOUNTING HARDWARE WHICH ARE SUPPLIED WITH THE FOLLOWING COMPONENTS DECORATIVE KIT PS 7980 TODDLER TUNNEL PS 8814 Turn your Playhouse into a full sized playset with the PS 7492 Swin...
Страница 28: ...are instance a severe twist or bow may occur and cause the board to be un usable If this happens do not return the board to the store Please call our friendly Customer Service Department for immediate...