background image

MPS-X User Manual

11

SETUP MENU

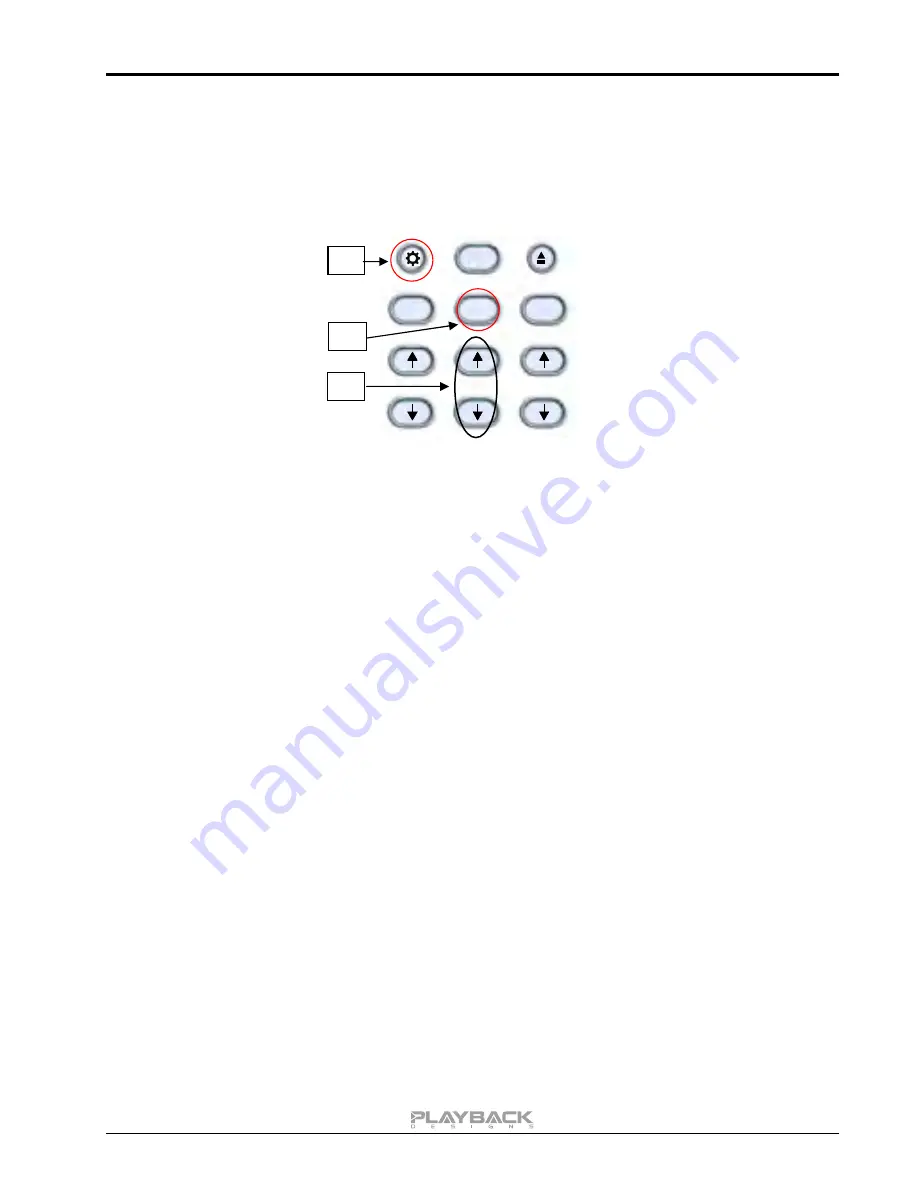
The MPS-X has several options that can be displayed and set via the remote control unit that came with

either your Dream or Edelweiss system. By pressing the DISC button on the remote first and then the

SETTINGS button within 5 seconds the top display starts to flash while displaying the first item in the setup

menu. Use the arrow buttons to go to the next setting.

DISC

MUTE

DAC

PRE

To change any settings in the menu the PLAY button can be pressed. Once you have programmed all

settings you can exit the menu by pressing the SETTINGS button again.

The following options are available in sequence:

1. List of 6 individual digital inputs: each input can be turned off so it no longer is available in the

selection during normal operation. For instance, if you only use two inputs you can turn off all others.

You can then switch between your two inputs with the front panel button or arrow buttons on the

remote.

2. Serial number of your MPS-X. This option is not user programmable.

3. Firmware version. This option is not user programmable.

4. REMOTE: If you are using the MPS-X in connection with any of the Dream or Edelweiss players you

may want to program the remote control such that you can use the PRE column instead of the DISC

column to select inputs or maneuver through the setup menu. This is to avoid a conflict with your

player which already uses the DISC column. Choose between DISC or PRE column by pressing the

PLAY button.

5. PLINK OUT: if you want to connect your MPS-X to a classic Playback Designs DAC (such as MPS-5)

you need to select the "Classic" format. All other products use the "Sonoma" format.

6. PLINK IN: if you want to connect a classic Playback Designs source (such as MPS-5) you need to

select the "Classic" format. All other products use the "Sonoma" format.

7. IR LOCK: with IR control there is always a chance for conflicts where 2 different machines use the

same codes. This feature allows you to disable the IR commands for the MPS-X.

8. HOURS: this indicates how many hours your MPS-X has been operating during its life.

1.

2.

3.

Содержание MPS-X

Страница 1: ...Version 1 0 MPS X Streaming and Digital Interface USER MANUAL ...

Страница 2: ......

Страница 3: ...irst 30 days of ownership you register your Playback Designs product by sending us a copy of your sales receipt your name address city state zip code phone number email address and your dealer s store name we will extend the warranty to 2 years Playback Designs will pay for return shipping charges domestically back to the owner when the product is sent to Playback Designs within the first 30 days ...

Страница 4: ...e connecting your MPS X to the AC mains make sure you select the correct voltage on the rear panel 100V 120V or 230 240V Operating this machine at the wrong AC voltage will cause serious damage Do not place the MPS X over an amplifier or any other equipment that generates heat As this product may become warm during operation always leave sufficient space around the player for ventilation Always al...

Страница 5: ...Designs during the development of the SACD and DSD formats PLINK does not use the same media as TosLink it is rather based on a much higher quality and lower jitter media that is used for very high bandwidth communication links where receivers require an extremely low jitter signal for reliable decoding Cable specs ST ST fiber optic multimode 62 5 125µm For PLINK we use a much lower bandwidth prot...

Страница 6: ...can be used in connection with the recording capability of the USB interface For instance you can connect the PLINK output of the MPT 8 MPS 8 or MPS 6 products to this input to record via USB anything played on these machines Cable specs ST ST fiber optic multimode 62 5 125µm NETWORK The internal Stream X2 module uses this connection to your network to stream from either the internet or your stora...

Страница 7: ...rder for your computer to communicate with the MPS X and to exchange audio data a custom driver software needs to be installed before you can connect it to the MPS X If your computer is a Mac running OSX 10 6 6 or later or you are using a Linux computer you don t need any driver software DSD file playback is supported on Mac via the DoP standard and on Linux computers natively up to DSD4x A driver...

Страница 8: ...ative OSX operating system and iTunes do not understand the needs of audiophile consumers and insist on sample rate conversion When connecting the MPS X OSX will automatically select the highest possible sample rate 384kHz and convert all your songs to this rate before playing them out through USB This will result in degraded performance You can manually select the sample rate in the Audio MIDI Se...

Страница 9: ...menu on front panel Press the DISC digital source button first to select the MPS X settings If you selected the PRE column to control the MPS X then you need to press the PRE button instead of DISC before pressing the settings button During normal operation these up and down arrows directly below the DISC or PRE button toggle through the active inputs of the MPS X During settings display these but...

Страница 10: ...up and down arrows right below the DISC button or the PRE button when this column is selected see setup menu With these buttons you can select any of the six digital inputs on the MPD X by toggling up and down through the list You can drastically shorten the list of selectable digital inputs by deactivating those that you don t use see setup menu for further details For instance if you only use th...

Страница 11: ...he remote 2 Serial number of your MPS X This option is not user programmable 3 Firmware version This option is not user programmable 4 REMOTE If you are using the MPS X in connection with any of the Dream or Edelweiss players you may want to program the remote control such that you can use the PRE column instead of the DISC column to select inputs or maneuver through the setup menu This is to avoi...

Страница 12: ... and flip sideways as shown below 4 Replace both fuses with 1 6A 250V slow blow types Length is 20mm CLEANING THE CHASSIS OF THE MPS X It is possible that the chassis can stain slightly from finger prints or you may discover subtle stains on the surface after some use You can easily clean the chassis with a window cleaning solution and a clean and soft cloth The best way is with a micro fiber clot...

Страница 13: ...d Roon but JRiver won t play this file 4 Play the file 5 The front panel will indicate WRITING FLASH It is important that at this point you no longer touch the system nor your PC nor the remote don t change the input don t turn the power off Go have a glass of wine because it will take about 2 minutes for this to finish 6 Once playback has finished the front panel will return to either normal disp...

Страница 14: ...ing on your NAS or DLNA server DSD files may not be played correctly Supported network protocols DLNA UPnP Roon Supported streaming services Tidal Qobuz Deezer vTuner CONNECTING MPS X TO YOUR NETWORK MODEL MPS X MADE IN U S A TOSLINK IN COAX IN COAX OUT AES AES OUT RESET USB AUDIO USB MEMORY NETWORK AUDIO DIGITAL I O AND CONTROL PLAYLINK OUT IN 50 60 Hz 100W max Network Audio Connect this to your ...

Страница 15: ...rate pages This app also incorporates features that are not supported in the standard DLNA protocol such as firmware update and complete set of features for all streaming services 3 mconnect Player there is also a Lite version These are general purpose DLNA apps and are therefore not free or come with advertising They do not support our additional features and only support limited streaming servic...

Страница 16: ...ans that there is a USB stick connected directly to the Stream X2 module USB MEMORY connector on back panel In this case the Stream X2 module acts as a server Tapping on any of these lines will allow you to select any song that this particular storage device contains In this list you can also see a list of computers and other DLNA or UPnP servers with storage that might contain playable audio file...

Страница 17: ...Playlist button on upper right corner You will be prompted to select an existing playlist or to create a new one 4 On the next page you will be able to select the songs in the queue that you want to transfer into the playlist When done with your selections press the DONE button in upper right corner 5 Select Favorites view and My Playlists under favorites There you will see your playlist you just ...

Страница 18: ...list from the list and the next page will show you the contents of your playlist 7 In this page you can edit your playlist by pressing the EDIT button or you can add more tracks by pressing the PLUS button Add to Playlist button Edit button ...

Отзывы: