background image

MPS-5 User Manual

14

5. For best performance and bit perfect reproduction make sure to set all volume controls in the

computer playback software, Windows / OSX control panel to exactly 0db (wide open), turn off all

operating systems sounds, effects or equalizer that might be running in your playback software or

Windows / OSX. Control the volume only with your analog pre-amp.

6. Your system is now ready for high resolution playback.

During playback with PC

When changing songs from within your computer player software the USB protocol automatically

communicates all necessary sample rate changes to the MPS-5. The front panel of the MPS-5 always

indicates the true sample rate during file playback. This system will never perform any sample rate conversion

or any signal processing that could adversely affect the sonic performance, but rather use the exact bits from

your file and convert them directly to analog.

During playback with Mac

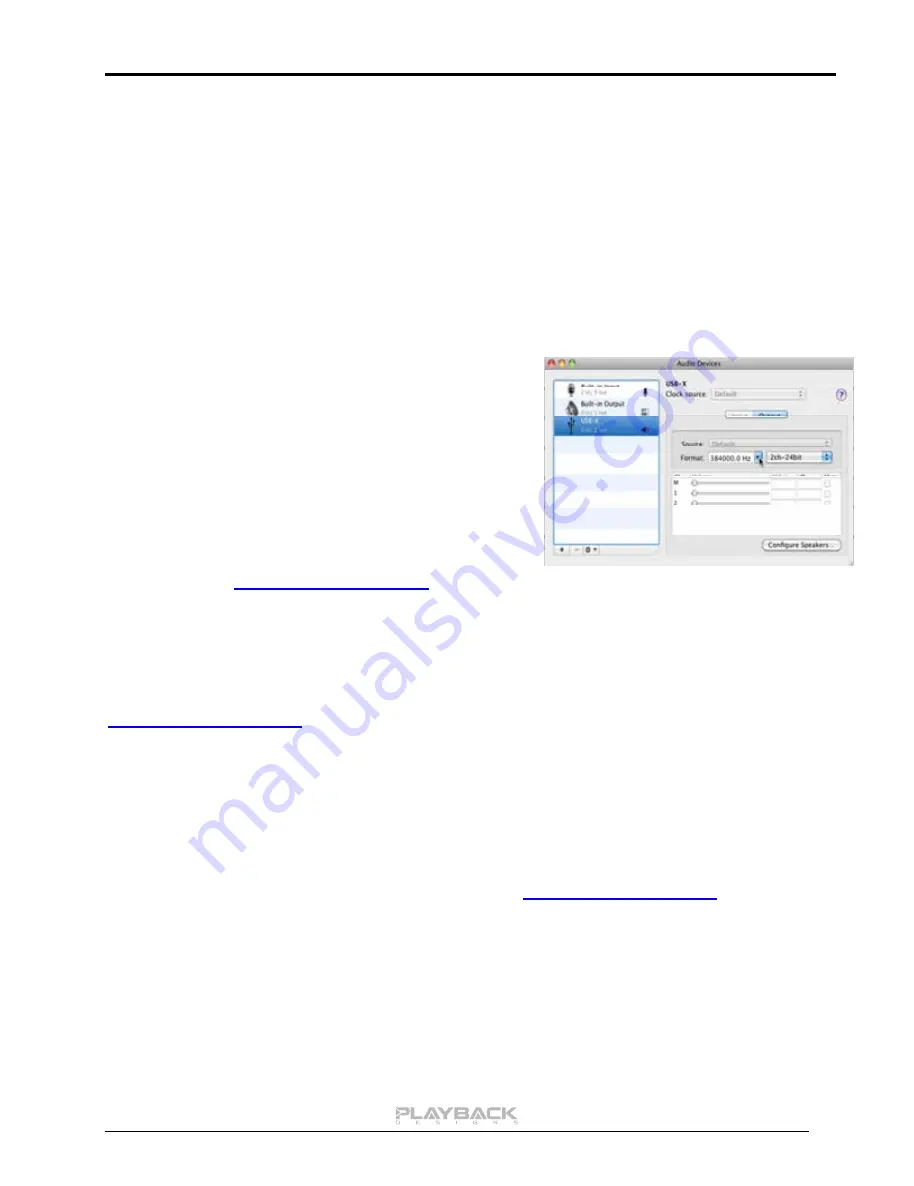
The native OSX operating system and iTunes do not

understand the needs of audiophile consumers and insist on

sample rate conversion. When connecting the MPS-5 OSX will

automatically select the highest possible sample rate (384kHz)

and convert all your songs to this rate before playing them out

through USB. This will result in degraded performance. You can

manually select the sample rate in the Audio/MIDI Setup utility

to correspond with the native sample rate of the song (as shown

in picture), but this can be a tedious process if your library

contains songs with more than 1 sample rate. Alternatively, 3

rd

party plug-ins for iTunes exist that automate this process and

always select the correct sample rate for bit perfect playback.

Check our website

www.playbackdesigns.com

 for an updated list of supported plug-ins.

Playback of DSD files

The driver software and MPS-5 hardware are designed to support playback of DSD files at 2 sample rates:

the standard 2.8224MHz as used on all SA-CDs and the double rate 5.6448MHz as supported by some

professional recording equipment. You will need a playback software running on your computer that can read

DSD files and play them to the USB driver. On the Mac platform you will have to use a playback software or

iTunes plug-in that supports the DoP standard for playing DSD files. Check our website

www.playbackdesigns.com

 for an updated list of playback software available.

Testing your system for bit perfect reproduction

Windows / OSX and your player software offer multiple places for volume control, effects processing,

dithering, equalization or sample rate conversion. Generally, these algorithms affect the sonic performance in

a negative way, especially in low volume listening levels. It is therefore recommended that all volume controls

on your computer are set to exactly 0db (wide open) and all operating system souns, effects, equalizers and

other algorithms are turned off. You should only control volume with your analog pre-amp. In order to test

your system to make sure that no hidden control or algorithm on your computer may impact your sonic

performance you can play a special test file:

1. Launch your favorite internet browser and navigate to

www.playbackdesigns.com

. Use

“USBAudio” as password to enter the software download section. Download the test file

“TestPat352.wav”.

2. The test file contains non audible audio, but it is still a good idea to mute your pre-amp.

3. Launch your playback software and play the test file while the MPS-5 is connected via USB and its

PLINK input is selected.

4. If all the controls on your computer are set correctly then the front panel on the MPS-5 will indicate

this by displaying ”BIT PERF” for 5 seconds at the end of the playback. If it doesn’t show this then at

least 1 control on your computer is impacting the performance of your system.

All manuals and user guides at all-guides.com

Содержание MPS-5

Страница 1: ...Version 2 5 MPS 5 Music Playback System USER MANUAL All manuals and user guides at all guides com a l l g u i d e s c o m ...

Страница 2: ...All manuals and user guides at all guides com ...

Страница 3: ...duct is completely confined in the protective housings Use of controls or adjustments or performance of procedures other than those specified herein may result in hazardous radiation exposure The use of optical instruments with this product will increase eye hazard CAUTION TO REDUCE THE RISK OF ELECTRIC SHOCK DO NOT REMOVE COVER NO USER SERVICEABLE PARTS INSIDE REFER SERVICING TO QUALIFIED SERVICE...

Страница 4: ...after purchase and the fault can be confirmed by Playback Designs Otherwise owner will be responsible for all shipping charges to and from Playback Designs International customers must deal with their local dealer or distributor For all warranty claims a copy of the original invoice must accompany the product Opening the product or modifying it in any way by the owner including but not limited to ...

Страница 5: ... moving the player make sure to remove the disc and close the disc tray Then turn off the power and disconnect the power cord Types of discs CDDA 12cm or 8cm discs 16bit 44 1kHz PCM digital audio SACD Single layer dual layer or Hybrid discs 12cm or 8cm discs DSD digital audio CD R RW discs recorded in Audio CD format and finalized correctly are playable But depending on the quality of the disc and...

Страница 6: ...as the MPD 5 D A converter or USB X interface This connection supports multiple audio formats and multi channel configurations PC Direct USB connection to Windows based computers for sample rates up to 48kHz Before connecting to PC make sure that PC input is selected on MPS 5 and the PC is turned on so that the PC can enumerate the link Subsequent changes of selected inputs on MPS 5 are then possi...

Страница 7: ...ck Stop playback from disc Hold this button and press NEXT TRACK to change the default layer on SACD discs multi channel stereo and to enable disable multi channel playback from SACD Factory default is set to stereo Previous track Next track Alphanumeric status display Time display during disc playback All manuals and user guides at all guides com ...

Страница 8: ... is pressed the alpha numeric display indicates the absolute phase for the analog outputs If it is pressed again within 5 seconds the absolute phase is toggled Dims display on front panel If these buttons are pressed for less than 1 second they allow you to jump tracks in sequential order If during normal playback they are held for more than 1 second the player enters Scan Mode in either forward o...

Страница 9: ...y selected state without changing it If during the next 5 seconds the button is pressed again it will toggle to the next state This toggles through 2 Repeat modes Repeat currently playing track Repeat entire disc Normal playback Numeric buttons Pressing any numeric button with a single digit will locate the transport to the beginning of the chosen track and start playback unless the transport is i...

Страница 10: ... 5 is equipped with an internal USB port that only supports PCM in 16bits and 44 1 48kHz In order to guarantee the best sonic performance of the MPS 5 when playing from other sources connected to other inputs or from its internal transport the USB port is disabled This makes it necessary that when a PC is booted the USB PC input is selected on the MPS 5 BEFORE connecting the USB cable from the PC ...

Страница 11: ... the manufacturer that cause such dropouts and others are user installed with additional software that do not allow flawless real time playback of audio Fortunately there is a free utility software that allows you to test your PC for real time capability 1 Go to http www resplendence com latencymon and download the utility program LatencyMon There is also a good description of the program and some...

Страница 12: ...screen This will install the driver necessary to communicate with the Playback Designs products via USB 4 Once your computer is properly configured power on the MPS 5 and connect the USB cable that was included with the MPS 5 between USB X and your computer Since the USB X interface is powered by your computer but receives the clock signal from the MPS 5 you must always power the MPS 5 first befor...

Страница 13: ...ed a plug in for ASIO compatible playback 8 For Mac users only launch iTunes 9 For best performance and bit perfect reproduction make sure to set all volume controls in the computer playback software Windows OSX control panel to exactly 0db wide open turn off all operating systems sounds effects or equalizer that might be running in your playback software or Windows OSX Control the volume only wit...

Страница 14: ...S 5 hardware are designed to support playback of DSD files at 2 sample rates the standard 2 8224MHz as used on all SA CDs and the double rate 5 6448MHz as supported by some professional recording equipment You will need a playback software running on your computer that can read DSD files and play them to the USB driver On the Mac platform you will have to use a playback software or iTunes plug in ...

Страница 15: ...the USB cable but the clock signal is coming from the MPS 5 So every time you turn off the MPS 5 you will have to unplug the USB cable from the computer and plug it back in once the MPS 5 is powered up again 2 Make sure that the driver is properly installed PC only See step 6 under driver installation above for instructions for how to check successful installation and connection 3 Make sure the US...

Страница 16: ...supports PLINK or SONOMA formats PLINK is a proprietary format used to link to other Playback Designs products for multi channel or multi room setups SONOMA is used to connect to professional recording equipment This function is only programmable for the MPS 5 5 Optical All Channels when using PLINK output format set this off for multi channel configuration or on for multi room configuration In mu...

Страница 17: ...and holding the STOP key and then pressing the NEXT key on the front panel Each time this key combination is pressed the modes are toggled between stereo and multi channel In stereo mode the player will automatically select the stereo program each time a SACD is put in Likewise in multi channel mode the player will automatically select the multi channel program each time a SACD is put in provided ...

Страница 18: ... smoothing out and clarity will increase but highs might continue to remain recessed At this point there probably will not be much change in the bass You will probably wonder how the Playback Designs converter will ever sound like others have described but we assure you that you will start to hear substantial changes within another week of play 4 350 500 Hours The magic will be starting Highs will...

Страница 19: ...nge the fuse 1 Locate fuse compartment on power connector on rear panel 2 Use a small screw driver to pry open the fuse holder Fuse Compartment Prying open with a small screw driver 3 The fuse holder contains 2 fuses The top one is a spare and can replace the blown one at the bottom 4 Replace fuse holder into power connector by making sure that good fuse is at bottom Replacement fuses should be ra...

Страница 20: ... track fsc Toggles through forward scan modes rsc Toggles through reverse scan modes lyr Toggles between CD SACD stereo and SACD multichannel layers of a SACD disc The player needs to be in stop mode before the layers can be switched rpt Toggles between no repeat repeat track repeat all tme Toggles through various time display modes phs Toggles phase inversion on and off mte Toggles mute on analog...

Страница 21: ...otal remaining disc time display Byte2 Track number in binary code Byte 3 Hours in binary code Byte 4 Minutes in binary code Byte 5 Seconds in binary code Byte 6 bit 2 0 0 transport selected for playback 1 AES input selected 2 RCA input selected 3 TosLink input selected 4 PlayLink input selected 5 USB PC input selected 6 Aux input selected bit 6 3 1 44 1kHz detected on digital input 2 48kHz detect...

Страница 22: ...the supplied application PDSetup exe on your PC and closely follow instructions on the screen Connect your MPS 5 to the PC only when told so But before then hitting the NEXT button wait until Windows confirms that the driver is fully installed and operational Only then hit NEXT 3 When you reach the following screen make sure to point the field File to Transfer to the file supplied by Playback Desi...

Страница 23: ...ctly 4 Proceed from here as for the first time installation IMPORTANT NOTE THE ENTIRE UPDATE PROCEDURE CAN TAKE SEVERAL MINUTES IT IS IMPORTANT THAT YOU DO NOT INTERRUPT POWER TO THE MPS 5 NOR DISCONNECT THE USB CABLE NOR TURN OFF THE PC DURING PROGRAMMING OR ELSE YOUR MPS 5 WILL NOT BE ABLE TO BOOT NORMALLY In case the programming has been interrupted accidentally please follow the steps below 1 ...

Отзывы: