Plas-Ties A401870 Series Скачать руководство пользователя страница 4


Page 3 of 17 


SAFETY INSTRUCTIONS 

CAUTION: 

DO NOT ATTEMPT TO OPERATE YOUR InkJet Printer 

BEFORE READING THE OPERATING INSTRUCTIONS  


The operating procedures outlined in this manual are prepared to facilitate the 

InkJet 

Printer

.  

1.


KEEP ALL SAFETY DEVICES IN PLACE 

and in working order.  

2.


KEEP WORK AREA CLEAN

. Cluttered areas invite accidents.  

3.


DO NOT USE IN DANGEROUS ENVIRONMENT

. Do not use machines in a damp or wet 

location, or where any flammable or noxious fumes may exist. Keep work area well lighted.  

4.


KEEP UNAUTHORIZED PEOPLE AWAY

. All unauthorized people should be kept out of 

work area and away from machine.  

5.


DO NOT FORCE MACHINE

. It will do the job better and safer at the rate for which it was 

designed.  

6.


USE THE RIGHT MACHINE. 

Do not force machine to do a job it is not designed to do.  

7.


DO NOT USE UNDER THE INFLUENCE OF DRUGS OR ALCOHOL.


8.


WEAR PROPER APPAREL. 

Do not wear loose clothing, gloves, neckties, rings, 

bracelets, or other jewelry, which may get caught in moving parts. Wear protective hair 
covering to contain long hair.  

9.


MAINTAIN MACHINE WITH CARE

. Keep machine clean for best and safest performance. 

Follow instructions for lubricating and keeping machine free of lint.  

10.


DISCONNECT MACHINE BEFORE SERVICING AND WHEN CHANGING SPOOL

.  

11.


CHECK DAMAGED PARTS

. Before further use of the machine, any part that is damaged 

should be carefully checked to determine that it would operate properly and perform its in-
tended function. Check for alignment of moving parts, binding of moving parts, breakage of 
parts, mounting, and any other conditions that may affect its operation. A part that is dam-
aged should be properly repaired or replaced.  

12.


NEVER LEAVE MACHINE RUNNING UNATTENDED

. Turn the power off, and do not 

leave machine until it comes to a complete stop.  

13.


NEVER ALLOW UNTRAINED USERS TO RUN THIS MACHINE

.  

14.


IF YOU ARE UNSURE OF THE INTENDED OPERATION, STOP USING THE 
MACHINE

Notes and Warnings:


                   NOTE

: Indicating important information for maximum use of printer 


WARNING

:  Indicating  either  potential  damage  to  hardware  or  loss  of  data  and 

telling you how to avoid the problem. 

Содержание A401870 Series

Страница 1: ...formation of Plas Ties Co Ink Jet Printer Manual for Tie Matic HD Series 14272 Chambers Road Tustin CA 92780 800 854 0137 714 542 4487 FAX 714 972 2978 E Mail info plasties com Website www plasties com ver 11 15 2016 ...

Страница 2: ... Copy Message 12 Rename Message 12 Ink Report 12 Production Counter 12 TROUBLESHOOTING 13 Print is Cut Off 13 Print is Scrunched 13 Print has Streaks 13 TROUBLESHOOTING 14 Incorrect conveyor speed setting 14 Incorrect Encoder DPI setting 14 Incorrect printing direction 14 Build up on the nozzle 14 TROUBLESHOOTING 15 Flowchart for missing lines when printing 15 Software Upgrade 16 Appendix A 17 TAB...

Страница 3: ...o the twist tie before the product is tied Supplies and Service Must use genuine Plas Ties ink cartridges for optimal performance If alternate cartridges are used the error WARNING INVALID CARTRIDGE 8 will appear on the screen PLAS TIES twist tie material and service should be ordered from PLAS TIES 14272 Chambers Road Tustin CA 92780 Telephone 714 542 4487 800 854 0137 Fax 714 972 2978 Email info...

Страница 4: ...lry which may get caught in moving parts Wear protective hair covering to contain long hair 9 MAINTAIN MACHINE WITH CARE Keep machine clean for best and safest performance Follow instructions for lubricating and keeping machine free of lint 10 DISCONNECT MACHINE BEFORE SERVICING AND WHEN CHANGING SPOOL 11 CHECK DAMAGED PARTS Before further use of the machine any part that is damaged should be care...

Страница 5: ...IES will arrange to repair or replace parts within the terms of the warranty Warranty coverage is limited to the Continental US Alaska Hawaii Puerto Rico and Canada The Product Warranty for INK JET printer provided by the manufacturer applies to the two major components One Year Warranty for INKJET printer One Year Warranty for INK JET printer bracket See below for details Please retain these warr...

Страница 6: ...ting Remote keypad for user friendly operation Built in SD card slot for custom print edits data backup 2 8 color LCD display 5 Indicators alarm low ink print run remote ON OFF High capacity ink cartridge 1 year warranty SPECIFICATIONS Maximum Characters 14 characters per tie 2 77mm tall Recommended Spools 312 313 Light Colors white yellow orange tan grey pink violet Power Supply AC 100V 240V 50 6...

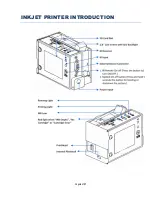
Страница 7: ...Page 6 of 17 INKJET PRINTER INTRODUCTION ...

Страница 8: ...Input the Shift Code F6 Input Logo F7 Input the Barcode F8 Input the String Basic operation and most frequent used keys FUNCTION Managing various settings TOOLS Managing various handy options ENTER To confirm modify or advance to next screen ESC Back to previous screen or quit action Navigation and selection Keys Tabl A Adjust the distance of printing or location on the tie ...

Страница 9: ...NK JET printer without losing previous saved messages or data insert the card into the INK JET printer ignore an INVALID SD CARD pop up message and reset to default See RESET TO DEFAULT The INK JET printer has ability to memorize the last previous working message However without the SD card you can edit only one message but you can save it After you re insert the SD card the working message 001 wi...

Страница 10: ...system Language 1 Press to choose a system language 2 Press to select different languages The system offers eight different languages English Chinese Japanese German Italian French Spanish and Korean Measurement 1 Press to choose the unit measurement 2 Press to select BRITISH INCH or METRIC MM System Clock Press to set system clock ...

Страница 11: ...esolution and it can be adjusted manually Be aware that adjustments affect printing quality Higher dpi slower printing speed and distortion of printing images when horizontal dpi is adjusted Pre purge Always keep Pre purge function in Disabled OFF Mode Enabling Pre purge function will force Printer to output ink dots periodically preventing the ink from solidifying on the nozzle in a dry environme...

Страница 12: ...rinting right after photocell is triggered 1 Under Message Browser and press 2 Input the value For example If you set the delay to be 1 Inch after the photocell is triggered the PrintHead will wait conveyor to roll 1 Inch before the next print Each message can be set with print delays individually P Pr ri in nt ti in ng g M Me es ss sa ag ge e Under Message Browser select a message and start or st...

Страница 13: ...ESSAGE and press 3 Input the Message No you want to copy to Rename Message Rename the message 1 Select a message then press 2 Highlight to RENAME MESSAGE and press 3 Input the new name desired Ink Report System automatically calculates ink consumption based on the content of selected message Under Message Tools highlight to INK REPORT press the system shows the residual ink content and automatical...

Страница 14: ... Encoder Conveyor 4 Input 65 Feet MIN HD38 or 60 Feet MIN HD58 5 Press 3x s on the remote 6 Press on the remote activate 4 x s Print has Streaks 1 Wipe Ink Cartridge a Release ink cartridge lever and remove cartridge b Place printhead upside down onto wipe and slowly slide from top to bottom direction c Replace cartridge into printer reset lever d Press 3x s on the remote e Press on the remote act...

Страница 15: ... installed a Conveyor Speed setting is too fast b Conveyor Speed setting is too slow Solution Press FUNCTION 5 to set up correct speed Incorrect Encoder DPI setting If the DPI setting is different with actual DPI there will be offset printing even if an encoder has been installed Solution Press FUNCTION 5 to set up correct Pulse Cycle and Diameter based on the Encoder Incorrect printing direction ...

Страница 16: ... Flowchart for missing lines when printing Missing Print 1 Use wet wipe cloth provided to clean the nozzle 2 Hold cartridge nozzle in warm water for 1 minute 3 If print is still missing insert a new cartridge The nozzle is blocked ...

Страница 17: ...rading Procedure 1 Insert the SD Card into the slot of U2 Controller 2 Keep pressing the Remote ON OFF button and power ON the U2 Controller 3 Press Enter to select the corresponding files for upgrading 4 Go to U2ALL to upgrade xxxxxxx TPU file 5 After finishing the upgrade please restart the U2 Controller to access the U2 Main Interface 2 Boot Version Upgrading 1 Power on the U2 Printer and acces...

Страница 18: ...ount Bracket 1 M001127 HD Printer Brake Beam Bracket 1 M001501 Switch Insulator 1 M001573 HD38 Printer Drum 1 M001574 HD58 Printer Drum 1 M001621 Arm Union Bracket 1 Micro Switch 1 M001622 Arm Union Bracket 2 Micro Switch 1 P001250 4 40 x 1 4 Phillips Pan Head Screw 1 P001725 10 32 X 1 Flat Socket Cap Screw 6 P002098 Plas Ties InkJet Printer with Software 1 P003002 Cleaning Wipes for Ink Cartridge...

Отзывы: