Note
– 1 –
– 2 –
– 3 –
– 4 –
1. Package Contents
2. Hardware Installation
– 7 –
– 8 –
5. Wireless Network Connection
4. Enter into the Web Management
– 5 –
– 6 –
Wireless Router
12V / 2A Power Adapter
You have already finished the configuration of the
WDRT-1200AC. Now you can use your iPhone, iPad, laptop,
and any other Wi-Fi device to connect with it wirelessly and
start surfing the Internet.
2011-E50330-000
Thank you for choosing PLANET WDRT-1200AC. Before installing
the router, please verify the following items in the package box.
If there is any item missing or damaged, please
contact the seller immediately.
Step 2:
Follow the figure below to connect the network
devices. It depends on your network environment
to connect the WAN port to a cable/xDSL modem,
or the Ethernet directly in your place.
Step 1:
Connect the Power Adapter provided in the package
to the WDRT-1200AC. The Power LED on the front
panel will turn on accordingly.
Step 3:
After you enter into the Web User Interface, please
follow the indications on the screen to quickly set
up for the Internet connection.
Default IP Address:
192.168.1.1
Default User Name:
admin
Default Password:
admin
Default SSID:
WDRT-1200AC_2.4G
WDRT-1200AC_5G
Default Wireless Encryption Type:
None
Step 2:
Highlight the wireless network (SSID) to connect
and click
[Connect]
button.
Step 1:
Right-click on the
network icon
displayed in the
system tray.
Quick Guide
WDRT-1200AC
Quick Installation Guide
1200Mbps 802.11ac Dual-Band Wireless
Gigabit Router
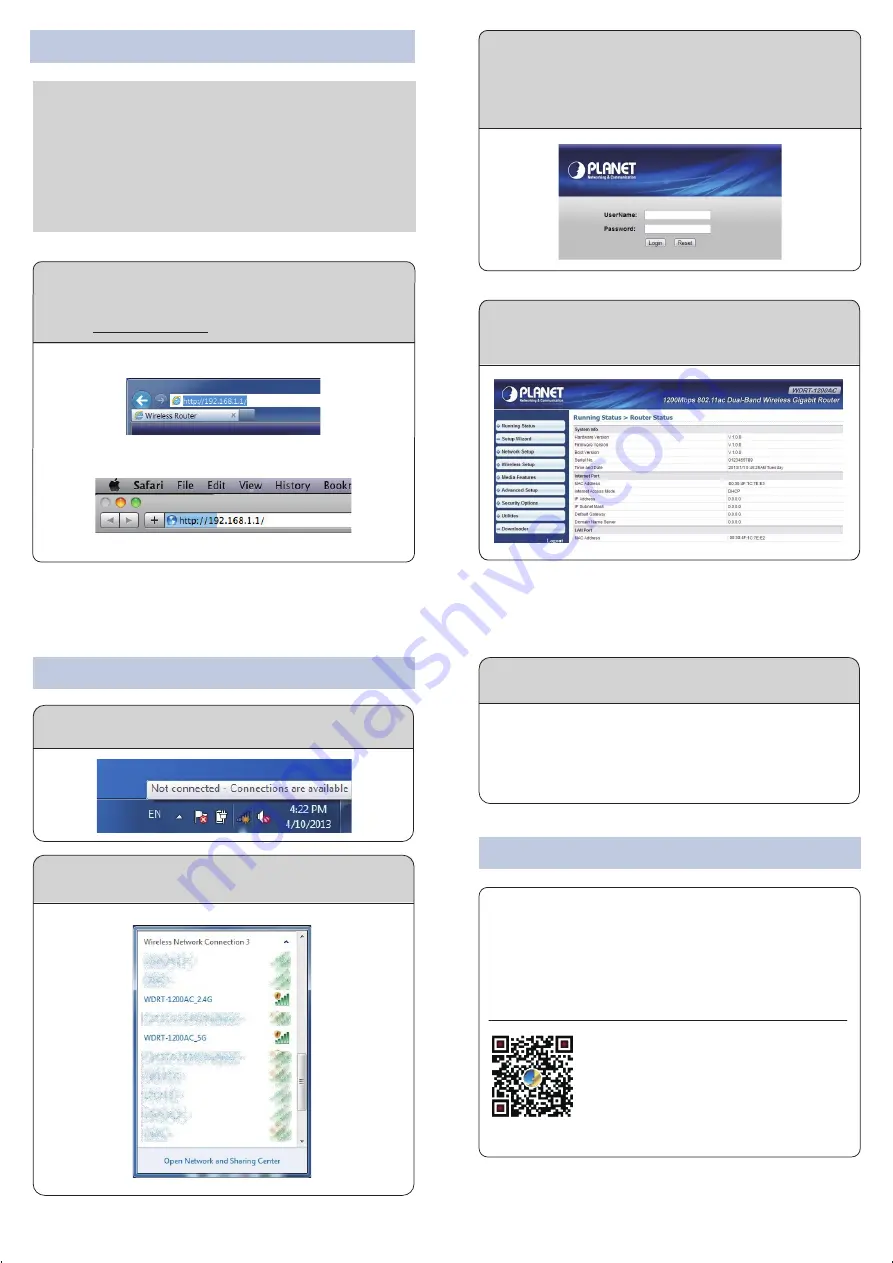
Step 1:
The Web management allows you to access and
manage the WDRT-1200AC easily. Launch the Web
browser and enter the default IP address
http://192.168.1.1
Step 2:
When you enter into the Web User Interface, please
enter the User Name and Password in the login
window. The default User Name and Password are
both
“admin”
. Then click
“Login”
button to
continue.
Step 3:
Enter the
encryption key
of the WDRT-1200AC if
necessary.
The above steps introduce simple installations and
configurations for the WDRT-1200AC. For further
configurations of Wireless Dual Band, WAN, LAN, Firewall,
Virtual Server, DMZ, and DDNS, please refer to the user
manual which you can download from the website.
http://www.planet.com.tw/en/support/download.php?type1=4&model=48557&type=3
If you have further questions, please
contact the local dealer or distributor where
you purchased this product.
3. Network Configuration (Windows 7)
1. Click
“Start”
button located in the lower-left corner of the
screen.
2. Click
“Control Panel”
.
3. Double-click
“Network and Sharing Center”
icon.
4. Click
“Change Adapter Settings”
.
5. Double-click
“Local Area Connection”
icon.
6. Select “
Internet Protocol Version 4 (TCP/IPv4)”
and
click
“Properties”
button.
7. Select
“Obtain an IP address automatically”
and
“Obtain DNS server address automatically”
, and
then click
“OK”
button twice to save the configuration.
A computer with a wired Ethernet connection is required for the
first-time configuration of the Wireless Router.
Steps :
Set your computer to get an IP address from the
Wireless Router:
Further Information
Ethernet Cable
Power
Power Adapter
Power
Power Adapter
Phone Jack
RJ-11
RJ-45
RJ-45
Cable/xDSL
Modem
001101010
WAN Port
LAN Ports


