Planet VIP-192 Скачать руководство пользователя страница 45


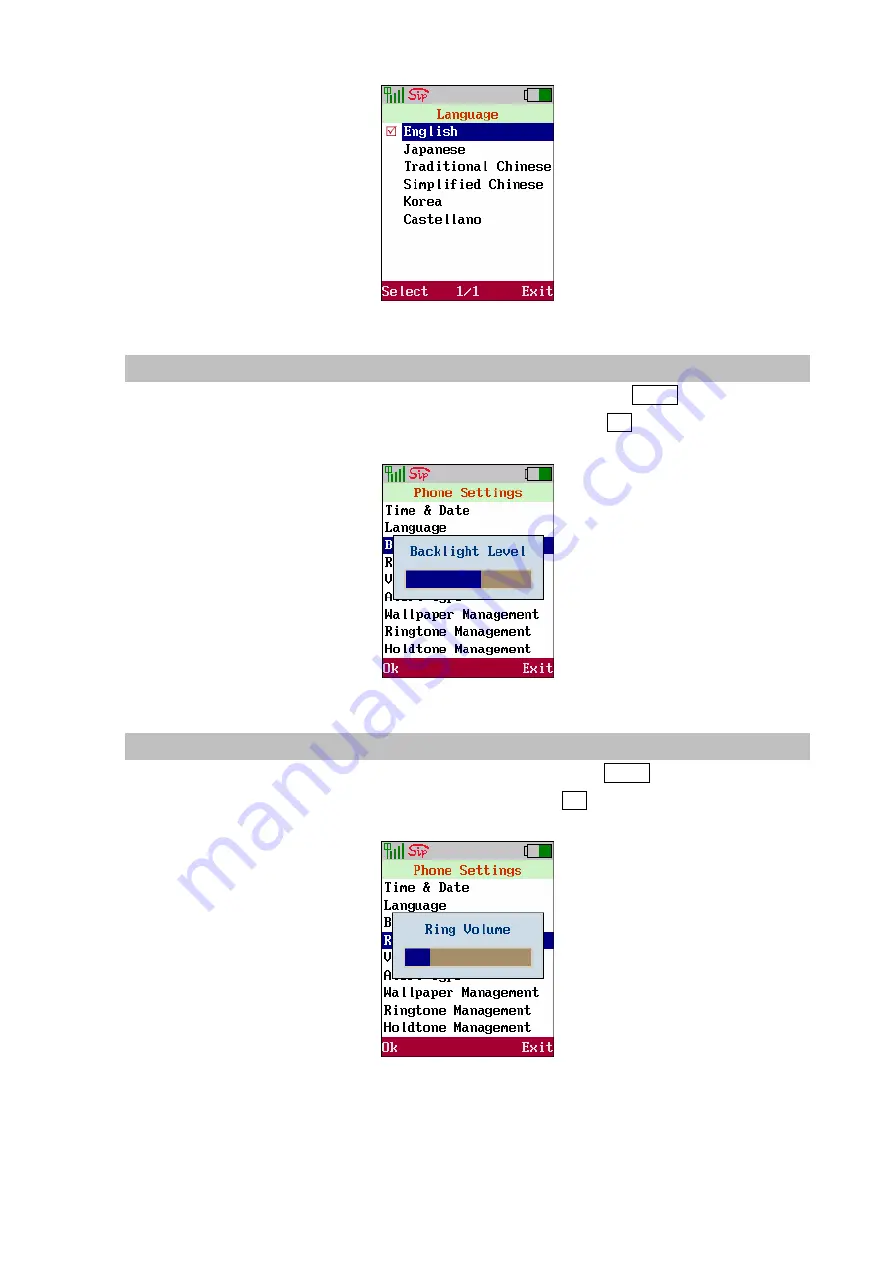
Figure 69. Language setting 


Backlight Level 

Move the highlight bar to 

Backlight Level

and press the <left soft key> 

Select

 to enter this menu. 

Use joystick 

 <Left>/ 

<Right> to adjust the backlight level and press 

OK

 to save the setting. 


Figure 70. Backlight Level setting 


Ring Volume 

Move the highlight bar to

Ring Volume

and press the <left soft key> 

Select

 to enter this menu. Use 

joystick 

 <Left>/ 

<Right> to adjust the sound level then press 

OK

 to save the setting. 


Figure 71. Ring volume setting 


45

Содержание VIP-192

Страница 1: ...802 11b g Wi Fi Phone VIP 192 User s manual Version 1 0 0 1...

Страница 2: ...nual is subject to change without notice and does not represent a commitment on the part of PLANET PLANET assumes no responsibility for any inaccuracies that may be contained in this User s Manual PLA...

Страница 3: ...3 Revision User s Manual for PLANET Wi Fi Phone Model VIP 192 Rev 1 0 2007 September Part No EM VIP192V1...

Страница 4: ...l Installation Requirement 12 Installing the Battery 12 Charging the Battery 12 Web Configuration access 13 Chapter 3 Menu Structure Network Settings 14 Menu Structure 14 Network Settings 15 Network C...

Страница 5: ...New 34 Inbox 35 Archive 35 Delete 36 Memory Status 36 E Mail 37 Account 37 POP3 Setting 38 SMTP Setting 38 Advance 39 Chapter 6 40 Call Log 40 Call Log 40 Chapter 7 41 Application 41 Application 41 Ca...

Страница 6: ...Disturb 51 Call Waiting 51 Anonymous Call 52 Anonymous Reject 52 Call Forward 53 Unconditional 53 Forward on Busy 53 Forward on No Answer 54 Chapter 11 55 Using the web configuration 55 Using the web...

Страница 7: ...Call Tracing Log 66 Phone Book 67 Speed Dial 68 Tools 68 Restart System 69 Voice Communications 70 Peer To Peer P2P mode 70 SIP Proxy mode 71 Appendix B 73 FAQ 73 Appendix C 74 VIP 192 Specifications...

Страница 8: ...caller ID numbers SMS and e mail functions for you doing the best work from where you choose Compatible with IEEE 802 11b g wireless standard and developed to support open standard Session Initiation...

Страница 9: ...e Active Detection VAD Comfort noise generation CNG Acoustic Echo Cancellation AEC G 168 Jitter buffer Package Content The contents of your product should contain the following items Wi Fi phone Power...

Страница 10: ...C Numeric 123 1 Space 1 7 P Q R S p q r s 7 2 A B C a b c 2 8 T U V t u v 8 3 D E F d e f 3 9 W X Y Z w x y z 9 4 G H I g h i 4 0 _ 0 5 J K L j k l 5 6 M N O m n o 6 Table 1 Keypad definition descript...

Страница 11: ...3 Side view of VIP 192 Normal Mode Main Screen SIP Status 11 Figure 4 Main screen WiFi Signal Strength Menu Battery Status Wallpaper of standby mode SSID of linking AP Registered SIP number Time Date...

Страница 12: ...ods for machine management and administration Installing the Battery To remove the battery cover and insert the battery then put the cover back to the Wi Fi phone Figure 5 Mounted the battery view Cha...

Страница 13: ...web browser and insert 192 168 0 1 in the address bar of your web browser to logon Wi Fi Phone web configuration page Wi Fi Phone will prompt for logon username password please enter root 1234 to con...

Страница 14: ...ng 1 Voicemail 2 SMS 3 E mail Call Log 1 Missed 2 Dialed 3 Received 4 Delete Entertainment 1 JAVA Download Network Settings 1 Network Config 2 Wireless 3 SIP 4 NAT Application 1 Calendar 2 Calculator...

Страница 15: ...ur items Network Config Wireless SIP and NAT Figure 9 Main menu Network Config The system supports DHCP that allow assign both IP addresses automatically and manually under static IP Please ensure the...

Страница 16: ...p IP manually by choosing Disable Press left soft key Ok to save the configuration Figure 11 DHCP settings 2 Static IP Get the information from the service provider before user enters data into the fi...

Страница 17: ...will be associated In the wireless setup user is able to modify the data of ESSID and Security by moving the highlight bar to Wireless Press the left soft key Select to enter Wireless Settings Figure...

Страница 18: ...16 Information 2 Set as Preferred AP Save the profile of the AP into Preferred APs user may have several preferred APs Repeat the steps of Scan APs to add more preferred APs 3 Connect now Associate wi...

Страница 19: ...digits for 64 bit or 26 digits for 128 bit ASCII It allows to input the characters in the ASCII system and the length must be 5 characters for 64 bit or 13 characters for 128 bit WPA PSK Pre Share Ke...

Страница 20: ...the name of linking AP and allows total 31 characters 2 Move the cursor to setup Security length and type of authentication that user wishes to link Use navigation keys to turn on off or set up this f...

Страница 21: ...the left soft key Select to setup ESSID Security of this preferred AP Press the left soft key Ok to store the settings Figure 20 AP Setting Move the highlight bar to Delete and press the left soft ke...

Страница 22: ...Please have an administrator setup these settings or obtain this information from the SIP service provider SIP setting define the SIP registrar address SIP account and related SIP parameter The SIP a...

Страница 23: ...the highlight bar to SIP Server and press the left soft key Select to enter this SIP Server menu Move cursor into the field of Registrar Server Registrar Port and Expire Time for inputting data Press...

Страница 24: ...ld of Phone Port for inputting data Press the left soft key Ok to store the settings Figure 26 Phone port NAT Setting Enable STUN or UPnP to activate the NAT traversal function if this device is behin...

Страница 25: ...left soft key Select to enter this STUN UPnP setting menu Move cursor to enable or disable STUN UPnP function Press the left soft key Ok to store the settings Figure 29 STUN UPnP STUN Server Move the...

Страница 26: ...anual Config and press the left soft key Select to enter this Manual Config menu This page provides three items User Define External IP add and External Port Figure 31 Manual config 1 User Define Move...

Страница 27: ...tore the settings Figure 33 External IP address 3 External Port Move the highlight bar to External Port and press the left soft key Select to enter this External Port Menu Move cursor to setup the fie...

Страница 28: ...Figure 35 NAT keep alive time 28...

Страница 29: ...he left soft key Select to enter Sub Menu Figure 36 Phonebook Create a New Contact Move the highlight bar to New and press the left soft key Select to enter this Phonebook menu Move cursor into the fi...

Страница 30: ...Browse Move the highlight bar to Browse and press the left soft key Select to enter the Browse menu Figure 38 Browse setting The highlight bar will locate the record that user would like to find Move...

Страница 31: ...ve setting User may delete the editing data select Delete to erase this contact Figure 41 Delete setting Delete All ghlight bar to Delete All and press the left soft key Select to all the records in P...

Страница 32: ...Memory Status r to Memory Status and press the left soft key Select to show the memory Move the highlight ba status It provides total 200 records in maximum Figure 43 Memory Status 32...

Страница 33: ...ollow the VMWI Virtual Message Waiting Indication standard to send the indication message When system receives a message it will show the mail icon on the upper status bar Voicemail feature enables th...

Страница 34: ...this menu New Inbox Archive Delete and Memory Status Figure 46 SMS setting 34 New In order to create new message user has to select Content to edit the content of message It allows 500 letters in max...

Страница 35: ...ID and phone number of the sender and the time at which the message is arrived Archive When a message is sent and user presses the right soft key Exit to exit it asks the user whether he she want to s...

Страница 36: ...ems Delete All Inbox and Archive to select what will be deleted Figure 51 Delete messages Memory Status Move the highlight bar to Memory Status and press the left soft key Select to show the status of...

Страница 37: ...l account Figure 53 E Mail setting Account This page shows or inputs display name and mail address which will show Sender Address by the receiver mail Field Description Display Name Display name which...

Страница 38: ...egister to the POP3 Server POP3 password Password for register to the POP3 Server POP3 Port Port no Use for POP3 protocol Table 5 POP3 setting description Figure 55 POP3 setting SMTP Setting SMTP Simp...

Страница 39: ...Using POP mail when user authenticates user s username and password in user e mail client user password is sent over the network in plain text Reserve Mail It will reserve the mail in the serve Reply...

Страница 40: ...er 6 Call Log Call Log From the Call Log menu user can view all the call history in this phone Figure 58 Call Log setting It is grouped into Missed Dialed Received and Delete Figure 59 Call Log select...

Страница 41: ...ck to locate Application icon Press the left soft key Select to enter this sub menu Figure 60 Application setting Calendar Move the highlight bar to Calendar and press the left soft key Select to ente...

Страница 42: ...show three functions New View and Delete Figure 62 Memo setting Select Date The date user wants to create memo Figure 63 Select date setting Delete All Memos In order to delete any date of memo that...

Страница 43: ...ce Figure 65 Memory status setting Calculator Move the highlight bar to Calculator and press the left soft key Select to enter this menu Please use the joystick as screen shows to calculate the number...

Страница 44: ...Date and press the left soft key Select to enter this menu Enter NTP Network Time Protocol server IP to have accurate time or enter by manually Figure 68 Time Date setting Language Move the highlight...

Страница 45: ...se joystick Left Right to adjust the backlight level and press OK to save the setting Figure 70 Backlight Level setting Ring Volume Move the highlight bar to Ring Volume and press the left soft key Se...

Страница 46: ...coming call indication types User is available to set as Vibrate or Ring Types Figure 73 Alert type setting Wallpaper Management The system supports selectable wallpaper while in the standby mode user...

Страница 47: ...download from the network as well Move the highlight bar to Ring tone Management and press the left soft key Select to enter this menu Wallpaper Size 176 x 220 16 bits Figure 75 Ring tone management...

Страница 48: ...to save the setting Normal is the default setting If user wants to save more power user can just select the Maximum item to achieve it Besides if the Maximum is selected the LCD display will be blacke...

Страница 49: ...ighlight bar to Speed Dial and press the left soft key Select to enter this menu There are two items Edit and Browse on screen Edit Select Edit and press the left soft key Select to edit the records E...

Страница 50: ...rstand the basic input data of the system such as IP Address Subnet Mask Default Gateway AP Max Rate Channel SIP ID MAC Address and Firmware Version Figure 81 Information setting The information shows...

Страница 51: ...nd press the left soft key Select to enter this menu Use joystick to select the Enable or Disable item then press left Soft key OK to save the setting Figure 84 Do not disturb setting Call Waiting Cal...

Страница 52: ...y Select to enter this menu This function provides user hiding caller ID also user can either enable to hide Full URI or Display Name Figure 86 Anonymous call setting Anonymous Reject Move the highlig...

Страница 53: ...to enter this menu this menu provide 3 items to setup such as Unconditional Busy and No Answer Figure 88 Call forward setting Unconditional Use joystick to enable or disable this function if enabled...

Страница 54: ...n busy setting Forward on No Answer Use joystick to enable or disable this function Enable Enter the phone number or IP address Press the left soft key Ok to store the settings Figure 91 Forward on no...

Страница 55: ...led on computer for management Microsoft Internet Explorer 6 0 or higher with Java support Default WLAN interface IP address of Wi Fi Phone is 192 168 0 1 You may now open your web browser and insert...

Страница 56: ...to have all user networked computers synchronized with one server Time Zone Select user time zone If there is daylight saving in user area click the check box TFTP Server Enable or Disable TFTP serve...

Страница 57: ...rchases the phone These are required to download and update the firmware Figure 95 Firmware updates setting Field Description FTP Server FTP Server address Login ID Login ID provided by user s supplie...

Страница 58: ...P Table 10 Network setting DHCP description Network Setting Static IP Choose Static IP network setting if all Wide Area Network IP is provided to user by ISP Figure 97 Network setting Static IP Field...

Страница 59: ...type of service for SIP signaling Table 12 QoS setting description SIP Setting Session Initiation Protocol SIP is the most popular Voice over IP standard It enables two or more people to make phone c...

Страница 60: ...xy Domain Name IP Address Outbound proxy domain name or IP address Outbound Proxy Port Number Outbound proxy port number Table 13 SIP setting description Figure 100 Message server setting Field Descri...

Страница 61: ...ecting the call Select Enable for a more reliable connection Session Refresher Select None to disable SIP session timer support Select UAC to initiate SIP request Select UAS to receive SIP request and...

Страница 62: ...e SIP user name Authentication User Name Username for authentication that is required by SIP Registrar Authentication Password Password For authentication that is required by SIP Registrar Register St...

Страница 63: ...User Defined External IP Port Enable or disable the settings for configuring the user defined external IP address and port number External IP Address Setup the external IP address manually Use Stun se...

Страница 64: ...to ensure NAT works properly Table 20 NAT keepalive time description Voice Setting Figure 107 Voice setting Field Description Codec Voice Compression Algorithm priority settings Select from the most u...

Страница 65: ...ing Anonymous Call 1 If DISABLE is selected full URI and name are sent to the receiver s phone when the user makes a phone call The URI and name of the caller are displayed on the receiver s phone 2 W...

Страница 66: ...gure 109 Time setting Field Description NTP Recycle NTP recycle time Originating Not Accept The time interval that the caller s phone waits to establish a call If the receiver fails to answer the phon...

Страница 67: ...name and number then click NEW to add To modify delete select the name from the list and click modify delete Figure 111 Phone book setting Field Description Name Name that you would like to add Numbe...

Страница 68: ...form speed dial Figure 112 Speed dial setting Field Description Number 00 19 Speed dials phone number 0x is the speed dial number Table 25 Speed dial description Tools On tools system user may use the...

Страница 69: ...Restart System Click Restart to update all the modifications and reboot the system Figure 114 Restart system screen 69...

Страница 70: ...ions Peer To Peer P2P mode Assuming there are two VIP 192 in the network and the IP address are 192 168 0 1 and 192 168 0 2 Figure 115 Topology of instruction example P2P mode Test the scenario 1 VIP...

Страница 71: ...nd set the static IP address as 192 168 0 1 2 Login the VIP 192_A via web browser and browse to SIP Settings page Set the Register Server as 192 168 0 100 and press the Submit button to affect the set...

Страница 72: ...IPX 1804 5 To verify the VoIP communication please dial the destination number to make call between SIP clients For example VIP 192_A with number 881 with the keypad number 882 and press the left soft...

Страница 73: ...yed use a web browser and access the configuration menu Make sure that the Registrar Server Domain Name IP Address is correct 3 Check the register status under SIP Account Settings in the configuratio...

Страница 74: ...cols IP TCP UDP DHCP RTP RTCP ICMP HTTP SNTP TFTP DNS Functions Call Features Call Hold Mute Retrieve Transfer Waiting Call Forward Busy No Answer Unconditional Caller ID Display Redial Anonymous Call...

Отзывы: