background image


32-Channel Network Video Recorder


NVR-3210/NVR-3250/NVR-3280 


65

8.4  Preset Point Setting 

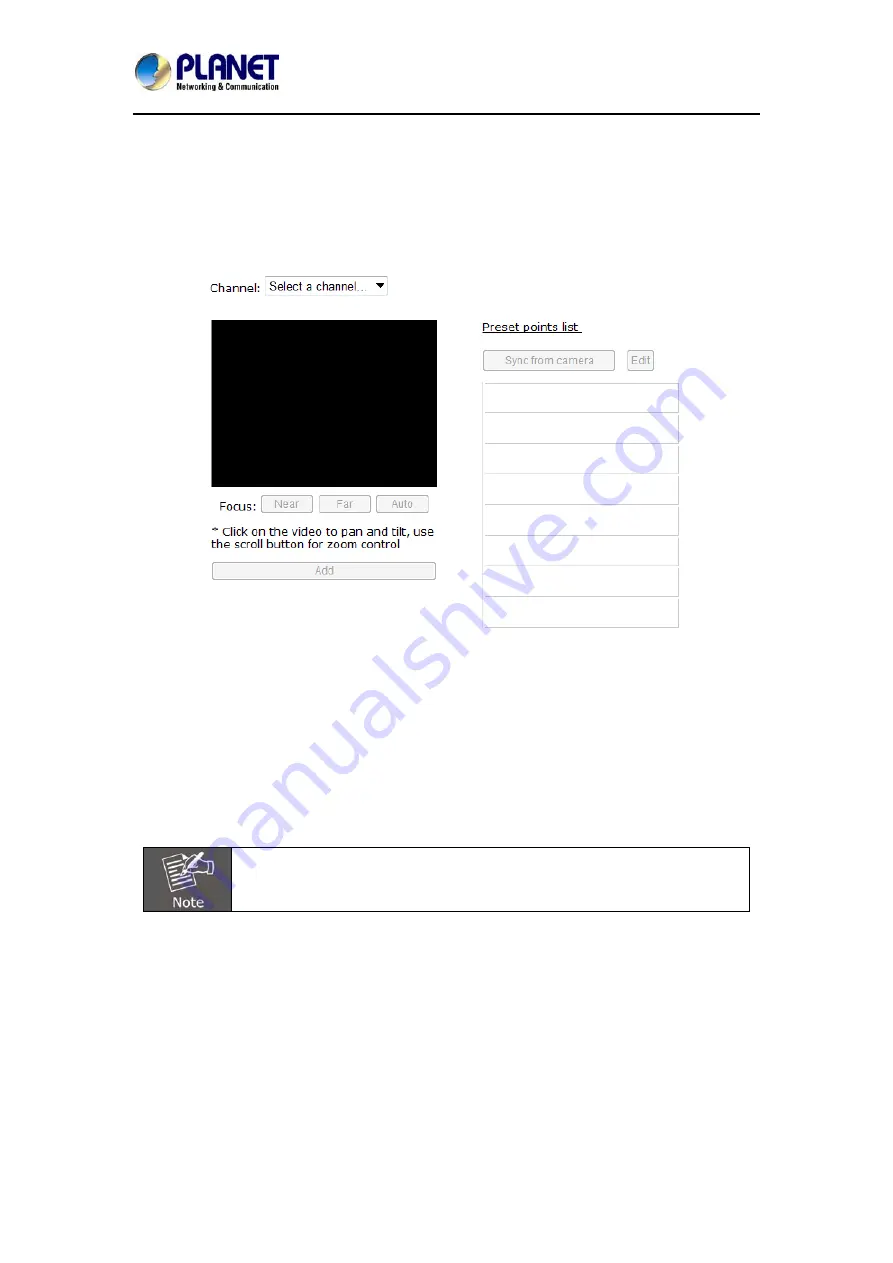
8.4.1 PTZ Preset Settings 

The recorder supports PTZ cameras and can set multiple preset points or retrieve and manage 
preset points that are set in the camera. This is helpful if you need to monitor multiple spots in 
one area from a particular camera. 


To set up PTZ preset points: 
1.  Select a camera from the “Channel” drop-down menu. 
2.  Use the PTZ control provided on the configuration page to set the preset point. 
3.  Press “Add” to add preset point. 
4.  Press “Edit” to enter edit mode to change preset point names or delete preset points. 
 
The function of “Sync from camera” is to retrieve preset points from camera. 
 
You can choose to make this preset point a “Home” point among all other preset points, as well 
as making the camera to move to this particular point when an event is triggered. 


“Move Here when Event Triggers”: In order for this function to work properly, 
please also complete configuration in “Event Configuration” >> “Event 
Trigger”.


Содержание NVR-3210

Страница 1: ...32 Channel Network Video Recorder Series NVR 3210 NVR 3250 NVR 3280...

Страница 2: ...erference in a residential installation This equipment generates uses and can radiate radio frequency energy and if not installed and used in accordance with the instructions may cause harmful interfe...

Страница 3: ...oduct In a domestic environment this product may cause radio interference in which case the user may be required to take adequate measures WEEE Regulation To avoid the potential effects on the environ...

Страница 4: ...31 4 1 1 Date and Time Display 32 4 1 2 User s Configuration 32 4 1 3 Hardware Event Notification 32 4 1 4 Channel Status 32 4 2 Video Frame 33 4 3 List Viewing 36 4 3 1 Pattern View 36 4 3 2 Sequence...

Страница 5: ...OSD Settings 67 Chapter 9 NVR Setup Event Configuration 69 9 1 Event Sources 69 9 2 Notification 71 9 3 E map 73 9 3 1 Local Map Setting 73 9 3 2 Google Map Setting 75 Chapter 10 NVR Setup Device Ope...

Страница 6: ...l CD x 1 z Quick Installation Guide x 1 z RJ45 Cable x 1 z Power Cord x 1 z HDD Screw x 16 z Angle Bar x 2 z Angle Screw x 4 z Handle Kit x 2 z Handle Screw x 4 z NVR Unit x 1 z User s Manual CD x 1 z...

Страница 7: ...annels simultaneously With the NVR users can view remote surveillance in real time and play back recorded videos via the bundled CMS software or the web browser The multi monitor and e map functions a...

Страница 8: ...cameras simultaneously Video recycling function with recording of videos 24 7 960fps at 1 3 megapixel H 264 Supports up to 8 SATA HDDs depending on model 1 x E SATA max 8TB Exports recorded video fil...

Страница 9: ...320fps 1 3MP 3Mbps H 264 Intel Core i7 Processor Video Display Frame Rate Web UI in Recording Mode 16Ch 320fps 1 3MP 3Mbps H 264 Intel Core i7 Processor Record 32Ch 960fps 1 3MP 4Mbps channel H 264 M...

Страница 10: ...ent Number of Groups 7 Administrator Guest User Define 5 Privileges Live View Playback System Configurations Camera Configurations Recording Configuration Event Configuration PTZ System Options User I...

Страница 11: ...Ds Color Description System Amber Firmware upgrade blinking System failure AP failed off System normal solid Event Amber Event recording solid No event off Power Blue Power on Restart Reset to default...

Страница 12: ...ect your USB flash disk for firmware upgrade and backup VGA VGA output E SATA External E SATA HDD Ethernet 10 100 1000Mbps network Audio Line in line out mic 2 1 2 NVR 3250 Front Panel Power Button Po...

Страница 13: ...No event Off Power Blue During power on restart reset to default OS failed solid Rear Panel DI x 8 DO x 4 e SATA USB x 2 System Fan Gigabit Ethernet Line in Line out Mic VGA Output System Fan AC Power...

Страница 14: ...tem failure AP failed off System normal solid Event Green Event recording solid No event off Power Green Power on Restart Reset to default OS failed solid Button Description Reset Restart Press and re...

Страница 15: ...0 NVR 3280 15 Rear Panel Connector Description VGA VGA output Ethernet Dual 10 100 1000Mbps network for redundancy USB Connect your USB flash disk for firmware upgrade and backup E SATA External E SAT...

Страница 16: ...der NVR 3210 NVR 3250 NVR 3280 16 2 2 Hardware Installation 2 2 1 Installing Hard Disk NVR 3210 1 Release the HDD tray by pulling the lock to the right 2 Pull the HDD tray out of the case 3 Place the...

Страница 17: ...32 Channel Network Video Recorder NVR 3210 NVR 3250 NVR 3280 17 4 Put the HDD tray back to the case 5 Push the tray door back to the case to secure it NVR 3250 1 Start by removing the front plate...

Страница 18: ...screws on both sides counter clockwise to loosen it from the unit Please note the screws will still be attached to the front plate even after the screws are completely loosened from the unit 3 Simply...

Страница 19: ...3250 NVR 3280 19 5 Pull out the HDD tray further to be removed 6 Once the tray is removed from the unit note there are four holes which are used to secure the HDD 7 Once the HDD is placed in the tray...

Страница 20: ...Recorder NVR 3210 NVR 3250 NVR 3280 20 8 Push the tray back into the unit and push it all the way in 9 Secure the tray by pushing in the latch which locks the tray with the unit NVR 3280 1 Start by r...

Страница 21: ...screws on both sides counter clockwise to loosen it from the unit Please note the screws will still be attached to the front plate even after the screws are completely loosened from the unit 3 Simply...

Страница 22: ...3250 NVR 3280 22 5 Pull out the HDD tray further to be removed 6 Once the tray is removed from the unit note there are four holes which are used to secure the HDD 7 Once the HDD is placed in the tray...

Страница 23: ...2 Channel Network Video Recorder NVR 3210 NVR 3250 NVR 3280 23 8 Push the tray back into the unit and push it all the way in 9 Secure the tray by pushing in the latch which locks the tray with the uni...

Страница 24: ...u can connect to the NVR and below are the suggested methods for different network setups The NVR is placed in a network with a DHCP server Connect to the NVR by using Device Search Utility The NVR is...

Страница 25: ...e Search Utility If the NVR is placed in a corporate network or a local area network where a DHCP server is already presented please install the Device Search utility from the bundled CD disk To begin...

Страница 26: ...32 Channel Network Video Recorder NVR 3210 NVR 3250 NVR 3280 26 Please click Next to continue Please click Install to start the installation...

Страница 27: ...inish Please go to Start Programs NVR Search NVR to run the search tool Then you will see the utility start searching the network The NVR should be located and its IP address should be displayed Doubl...

Страница 28: ...ideo Recorder NVR 3210 NVR 3250 NVR 3280 28 You may change NVR s IP address by clicking on the button highlighted below You will be prompted for the NVR s login information before proceeding to change...

Страница 29: ...l Network Video Recorder NVR 3210 NVR 3250 NVR 3280 29 You may click on the button highlighted below to perform search again Or double click on any of the search results to access NVR s web administra...

Страница 30: ...onnect the PC directly to the NVR using a crossover Cat5 Ethernet cable You can select utility or type the IP address to connect with NVR directly After login window appears you should be prompted for...

Страница 31: ...page provides the following functions z Retrieve camera s video stream z Retrieve camera s status z Perform Live Sequence Viewing z PTZ Control Click directly on the video z Perform PTZ Preset Sequenc...

Страница 32: ...Locking the screen Logout function 4 1 3 Hardware Event Notification In this section you will receive notifications if a warning sound is triggered or if the hard drive of the NVR fails in recording...

Страница 33: ...in function digital PTZ snapshot audio post lens control preset point control change channel stream selections fisheye mode and lens selection The camera menu offers the functions below Digital Zoom A...

Страница 34: ...ld control focus and iris the button of the selection could be active otherwise it will be highlighted There are three selections of focus and iris as shown below Preset Point Controls This page focus...

Страница 35: ...to pan function Changing Channel User can select to change the view to other channels or disconnect the current channel camera view Enhancing Contrast You are able to adjust brightness and contrast of...

Страница 36: ...e the channel number and its currents status The channel status is defined by 3 colors Red The channel is recording and the live view is available Blue The channel is connected and the live view is av...

Страница 37: ...matically switch between a single and group of cameras every a certain period of time You can define this period from 5 seconds to 60 seconds 4 3 3 Save Viewing Click on the save view button and you w...

Страница 38: ...splay the views that you have already saved You can choose the views from the list you have created You are also able to switch between saved views every certain period of time by clicking on the star...

Страница 39: ...or due to an event trigger The NVR offers synchronized playback from up to 4 channels and various types of search methods are provided to help you find the footage you need quickly You can turn on or...

Страница 40: ...nstalled e g C z Play Audio Turn on off audio of a playback video z Digital zoom After clicking the digital zoom button hold the mouse left button and draw a square on the video to specify the zoom in...

Страница 41: ...ll display snapshots and let you view them individually by using the Prev Next buttons as shown above z Adjust Brightness Contrast You are able to adjust brightness and contrast of the live video from...

Страница 42: ...ent playback time button will display while the NVR plays the recording It can help user to find current playback time easily Minimizing the Bar of the Playback If you click on the icon you can minimi...

Страница 43: ...okmark is used to set a time range for this specific time will be marked by a blue line Move the time bar to the end time and click the Bookmark button again You can find that this button will be chan...

Страница 44: ...xporting The file will be automatically named and saved under the C partition You will be notified once the process is completed successfully The exported AVI file will be saved under the C partition...

Страница 45: ...y the exported AVI files This can save you the trouble of installing third party media player or codecs when playing the exported AVI videos The NVR Media Player will be automatically installed after...

Страница 46: ...32 Channel Network Video Recorder NVR 3210 NVR 3250 NVR 3280 46 Locate the exported AVI file and click open Normally under C ExportFolder...

Страница 47: ...detected and displayed if you have configured it on the NVR s settings You can display the event of all the channels at once or by each channel You can click on one of the pictures on the bottom of t...

Страница 48: ...network video recorder that is ready to manage cameras on the network We will start by configuring its network settings to make sure it works correctly in your network Next we will help you adjust th...

Страница 49: ...twork the NVR should use the default IP 192 168 0 20 and turn on built in DHCP servers 2 Users should not be able to change IP settings when this mode is selected 3 Users cannot turn on off built in D...

Страница 50: ...re s a DHCP server in the same local network the NVR can obtain IP address from DHCP server and you can locate the NVR by using the NVR search utility If there s no DHCP server in the network and the...

Страница 51: ...a residential user s Internet gateway that has a variable often changing IP address with a well known host name resolvable through standard DNS queries This is useful if the NVR is placed on the Inter...

Страница 52: ...ing You can then type in http yourddnsdomain in the browser to access the NVR remotely for live viewing In order to properly configure the DDNS service function please register a free DDNS domain name...

Страница 53: ...n in the Domain Name field and the username password you created in the User ID and Password field and click Apply to finish You can click the Check DDNS Status button to check the PLANET DDNS service...

Страница 54: ...me of event logs and when they actually occur After selecting the time zone choose an option below to set the recorder time Sync with NTP server enter the host name or IP address of a valid NTP server...

Страница 55: ...hen click Apply This page will list the Internal disks and the USB disk only The HDD will be formatted in EXT4 file system y Disk ID Display disk ID y Model Display HDD model name y Capacity Display H...

Страница 56: ...this page to keep user information organized Each recorder comes with a built in admin account with password admin It s highly recommended to change the password upon your initial login 7 4 1 Adding...

Страница 57: ...uration pages or cameras Users that are created and assigned to this group will have limited access instead of full administration rights The recorder comes with seven built in groups and five built i...

Страница 58: ...mera Setup The NVR provides two options for adding a new camera Users have the option to let the recorder automatically find the cameras or it is possible to enter camera s information and add it manu...

Страница 59: ...search should begin and its status should be displayed Cameras found should be listed and simply select a camera from the list Its corresponding information should be displayed in the Camera Informati...

Страница 60: ...or bitrate etc if you wish and then click Apply to finish adding the camera You can click Next to set up recording stream if dual stream is supported on this camera Some cameras are capable of dual s...

Страница 61: ...the instruction described above but instead of using the Add manually function enter the camera s IP address and credential in the Camera Information manually If cameras are marked with in the search...

Страница 62: ...data by enabling the option below This is quite often used in application such as banking which certain countries requires to always keep a minimum previous number of days of recording data Recording...

Страница 63: ...down menu and select a camera first You can use the schedule table to set the time range Click the cell boxes and then move horizontally to let you set what hours to perform recording during a day Cli...

Страница 64: ...clicking cell boxes one by one on the timetable Simply check what days you would like to perform recording and specify the recording duration by either choosing All Day or enter a start and end time...

Страница 65: ...op down menu 2 Use the PTZ control provided on the configuration page to set the preset point 3 Press Add to add preset point 4 Press Edit to enter edit mode to change preset point names or delete pre...

Страница 66: ...switch between them for you To configure preset sequence for a camera 1 Select a channel from the Channel drop down menu The available preset points should be listed in the Camera Presets section 2 Pi...

Страница 67: ...7 8 5 OSD Settings The OSD On Screen Display allows users to add informational text message and embed it onto the video By default this function is turned off To add texts to one or more videos select...

Страница 68: ...system time or the frame rate for you Or simply choose to display a custom message of your own Next define where the text will be displayed by either entering an X Y value based on percentage or use...

Страница 69: ...be triggered Such setting can reduce the management overhead and notify the administrator only when it s necessary The 1st step is to define the condition to trigger event we can finish up the event t...

Страница 70: ...select the camera s input port from the drop down menu 3 Select the trigger condition from the Port condition drop down menu The recorder only acts as a medium for pairing up input output ports betwe...

Страница 71: ...nfiguration E mail notification 1 Enter the hostname or the IP address of the SMTP server 2 Enter the port of the SMTP server 3 Specify the sender s name in the Sender s name field 4 Enter the sender...

Страница 72: ...server if it s required 5 Check Use Passive Mode if it s required or leaves it unchecked to use active mode 6 Click Test to verify if all information is entered correctly and the connection to the FTP...

Страница 73: ...ent is happening This function works by incorporating the event detection function as well as the recording function which as a result helps users take all the necessary actions when an unusual event...

Страница 74: ...rk Video Recorder NVR 3210 NVR 3250 NVR 3280 74 Then click and drag the camera icon to move the camera to define its location Access the E map by enabling Event view You can click on the camera icon t...

Страница 75: ...ra to on the map You can do so by 1 Zoom in to a smaller area by using the zoom control bar on the map 2 Zoom in to a smaller area by using the mouse scroll button You can also go to a specific place...

Страница 76: ...rs a glance of the overall system status and allows users to perform maintenance tasks such as upgrading firmware restore backup device settings or reboot device etc The Device Info provides the gener...

Страница 77: ...32 Channel Network Video Recorder NVR 3210 NVR 3250 NVR 3280 77 10 2 Log Log keeps a record of what s been happening to the device and provides basic information for troubleshooting...

Страница 78: ...ctory default values Firmware Upgrade The firmware can be upgraded through web UI Before upgrading firmware please back up configuration in advance the firmware file comes with a tar gz file extension...

Страница 79: ...iously saved configuration file On Web UI the configuration can be backed up to or restore from a local computer Click Backup to store configuration file in local computer On local UI the configuratio...

Страница 80: ...hings to Pay Attention to the USB Backup Function Limitation y It does not support USB Hub that extends the number of HDDs connected to the NVR y Only one backup process can be performed at a time y M...

Страница 81: ...NVR Media Player to play the exported AVI files or media database file This can save you the trouble of installing third party media player or codecs when playing the exported AVI videos The NVR Media...

Страница 82: ...32 Channel Network Video Recorder NVR 3210 NVR 3250 NVR 3280 82 A new dialog should be prompted for you to select the file location When done click Check to validate the file...

Страница 83: ...el Network Video Recorder NVR 3210 NVR 3250 NVR 3280 83 Once the file has been successfully verified you should be prompted with the message shown below Select the time zone according to your current...

Страница 84: ...32 Channel Network Video Recorder NVR 3210 NVR 3250 NVR 3280 84 Finally click OK to begin playing The player should now play the backup file...

Страница 85: ...he IP address conflicts with any other device over the network If you want to make sure whether the IP address of Internet camera is right or not utilize the ping command as follows z Start a DOS wind...

Страница 86: ...DDNS Application Configuring PLANET DDNS Steps Step 1 Enable DDNS option through accessing web page of the 32 ch NVR Step 2 Select on DDNS server provided and register an account if you do not use ye...

Страница 87: ...ice with a fixed IP address for example 192 168 0 100 2 Accessing the Router with Your Web browser The following steps generally apply to any router that you have on your network PLANET WNRT 620 is us...

Страница 88: ...rough the router for remote access to your camera Follow these steps to configure your router s Virtual Server settings z Click Enabled z Enter a unique name for each entry z Select Both under Protoco...

Страница 89: ...er valid ports in the Virtual Server section of your router Please make sure to check the box on this line to enable settings Then the device can be accessed from WAN by the router s WAN IP address By...

Отзывы: