Planet IKVM-8010 Скачать руководство пользователя страница 7

7

2.3 Initial Configuration

By  default,  the  IKVM-8010  /  IKVM-16010  will  obtain  its  IP  address  from  a  DHCP 
server in the network. If a DHCP server is found, it may provide a valid IP address, 
gateway address and net mask.

Before  you  connect  IKVM-8010  /  IKVM-16010  to  your  local  network,  please 

make  sure  the  corresponding  configuration  of  your  DHCP  server  is  completed. 
It  is  recommended  to  reserve  a  fixed  IP  assignment  to  the  MAC  address  of  the 
IKVM-8010  /  IKVM-16010.  You  can  find  the  MAC  address  labeled  on  the  bottom 
side  of  the  metal  housing.  If  this  initial  configuration  does  not  meet  your  local 

requirements,  use  the  setup  tool  to  adjust  the  values  to  your  needs.  The  setup 
tool  can  be  found  on  the  CD-ROM  delivered  with  this  package.  You  can  follow  the 
procedure described below.

1. Connect  the  IKVM-8010  /  IKVM-16010  to  the  same  network  as  your  adminis-

trative  PC,  or  you  can  use  an  USB  cable  (type  A  to  type  B)  to  connect  admin-
istrative  PC  and  IKVM-8010  /  IKVM-16010  directly.  The  USB  connectivity  only 
supported  in  windows  2000,  XP,  Server  2003,  Win7  and  the  response  time  of 
USB connection would be longer than LAN connection.

2. Insert  the  bundled  CD-ROM  into  the  CD-ROM  drive  to  initiate  the  “auto  run” 

program.  Click  on  “Setup  Utility”  hyperlink  in  the  menu  screen  to  execute  the 
program.  If  the  menu  screen  is  not  shown,  you  can  click  “Start”  button  and 
choose  “Run…”  When  the  dialog  box  appears,  enter  “E:\utility\psetup.exe” 
(suppose “E” is your CD-ROM drive) and click “OK”.

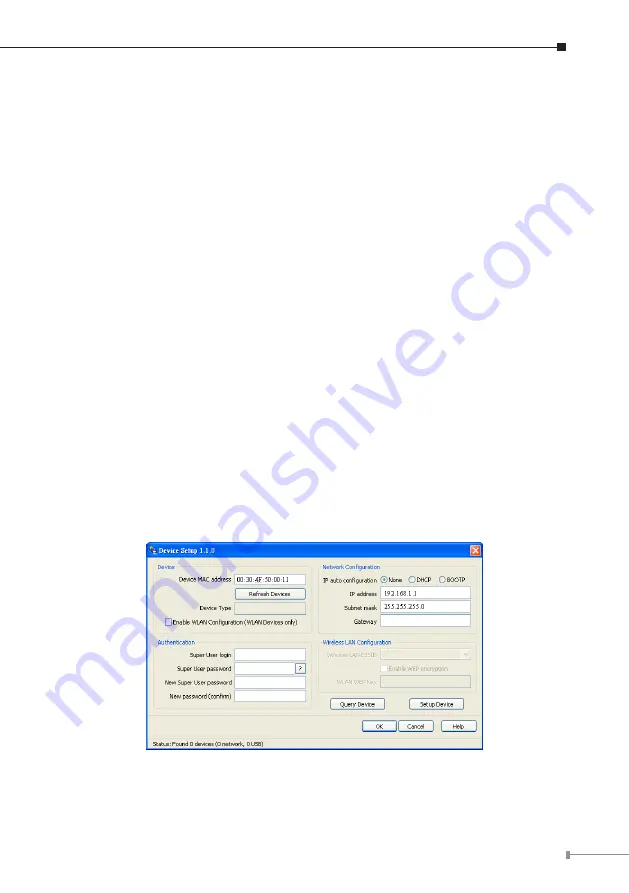
3. Once the utility is executed, it will search for available IKVM-8010 / IKVM-16010 

automatically.

4. On  the  upper  left  corner,  the  MAC  address  of  the  IKVM-8010  /  IKVM-16010  is 

displayed. To manually detect the MAC address again, press the button “Refresh 

Содержание IKVM-8010

Страница 1: ...8 16 Port IP KVM Switch IKVM 8010 IKVM 16010 Quick Installation Guide ...

Страница 2: ...1 Introduction 3 1 1 Features 3 1 2 Package Contents 4 1 3 Technical Specifications 4 Chapter 2 Installation 5 2 1 System Requirements 5 2 2 Hardware Installation Procedures 6 2 3 Initial Configuration 7 Further Configuration 8 ...

Страница 3: ... a frame rate of 60 Hz User can connect up to 8 16 PCs to the IKVM 8010 IKVM 16010 The IKVM 8010 IKVM 16010 can fully control the connected PCs of any platform through any at hand browser or just work as a normal 8 16 Port KVM Switch in local site By the support of daisy chain function users can cascade one IKVM 8010 IKVM 16010 to multiple KVM 800 or KVM 1600 and manage this KVM chain with one sin...

Страница 4: ...3 Technical Specifications Supported Protocol TCP IP ARP ICMP HTTP HTTPS Telnet DHCP BOOTP PPP SMTP DNS NTP Dynamic DNS Local Console Connectors all female type USB keyboard port USB mouse port HDDB 15 pin VGA port Daisy Chain Connectors all female type PS 2 keyboard port PS 2 mouse port HDDB 15 pin VGA port Remote Console RJ 45 port Host Connectors all female type HDDB 15 pin x 8 VGA Resolution L...

Страница 5: ...s In order to access the remote host system using a securely encrypted connection you need a browser that supports the HTTPS protocol Strong security is only assured by using a key length of 128 Bit Some of the old browsers do not have a strong 128 Bit encryption algorithm For using the Remote Console window of your managed host system the browser must come with a Java Runtime Environment version ...

Страница 6: ...KVM 8010 IKVM 16010 and PCs On one end it has just one HDDB 15 pin male connector Please plug it into the computer port on the rear of IKVM 8010 IKVM 16010 The other end has three connectors male type HDDB 15 pin for PC video male type Mini Din 6 pin for keyboard and male type Mini Din 6 pin for mouse Please plug these three connectors into the respective ports of computer If there are multiple PC...

Страница 7: ...he procedure described below 1 Connect the IKVM 8010 IKVM 16010 to the same network as your adminis trative PC or you can use an USB cable type A to type B to connect admin istrative PC and IKVM 8010 IKVM 16010 directly The USB connectivity only supported in windows 2000 XP Server 2003 Win7 and the response time of USB connection would be longer than LAN connection 2 Insert the bundled CD ROM into...

Страница 8: ...ust the network settings according to your requirement To save the changes enter super in the Super user login field and pass in the Super user password field Then press the Setup Device button 6 On the lower left Authentication field you can change the super user password here However the super user name is fixed to super and can t be modified The default super user password is pass It is recomme...

Отзывы: